
Popular categories
Looking for a yarn?


Comments / Questions (30)
![]() CRISTINA CARDOZO wrote:
CRISTINA CARDOZO wrote:
Estoy realizando el sombrero, pregunto que puedo hacer para que me quede mas rigido cuando lo termine? Gracias y saludos cordiales
22.06.2021 - 22:14DROPS Design answered:
Hola Cristina, puedes colocar un alambre de acero delgado a lo largo de la orilla del ala. Trabajar 1 punto bajo en cada punto alto en toda la vuelta, trabajando, AL MISMO TIEMPO, alrededor del alambre de acero. Esto se hace para que el sombrero quede más rígido a lo largo de la orilla. Ajustar la longitud del alambre de acuerdo a las medidas deseadas del ala. Retorcer los extremos del alambre de acero juntamente y esconderlos en los puntos. Cortar y asegurar el hilo. Buen trabajo!
23.06.2021 - 12:56
![]() VINCENZA wrote:
VINCENZA wrote:
Buonasera, vorrei sapere se è possibile realizzare questo modello in raffia. Grazie
15.06.2021 - 20:10DROPS Design answered:
Buonasera Vincenza, può realizzarlo con il filato che desidera, tenendo conto della corrispondenza del campione. Buon lavoro!
15.06.2021 - 21:41
![]() Ildikó wrote:
Ildikó wrote:
Kedves Drops Design! Ha ki akarom váltani az A.4 jelű mintát és csak színnel horgolom, akkor elég 50 g C fonal vagy többre lesz szükségem? Köszönöm a segítséget.
30.03.2021 - 15:47DROPS Design answered:
Kedves Ildikó! nagy valószínűséggel elég lesz 50 grammal több fonal, de a felhasznált fonalmennyiség is több tényezőtől függ, pl. attól, mennyire horgol szorosan. Ha biztosra akar menni, 2 plusz gombolyagot szerezzen be, a maradékból mindig lehet valami apróságot készíteni :-). Sikeres kézimunkázást kívánok!
30.03.2021 - 19:50
![]() Cayherine wrote:
Cayherine wrote:
Please explain how to work A2. I do not understand the chains on top of the double crochet around the ring are the adding stitches for every round. Thank you very much
03.12.2020 - 23:08DROPS Design answered:
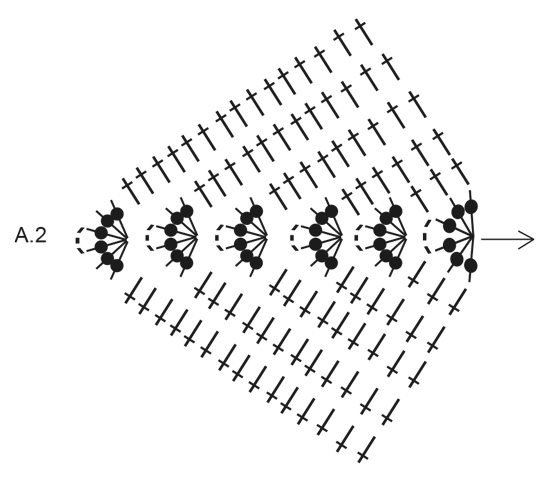
Dear Cayherine, A.2 will be worked around loop at one end of the foundation row. on row 1 in A.2 work: 3 dc, 3 ch, 3 dc (US-crochet terms / tr Uk-crochet terms) around the ring. on row 2 work 1 dc in each of the first 3 dc, around the 2-ch-space work: 3 dc, 2 ch, 3 dc, and 1 dc in each of the last 3 dc. And continue like this, there should be 1 dc in each of the dc from previous round and 3 dc,2ch, 3 dc around the 2-ch-sp from previous round. Happy crocheting!
04.12.2020 - 07:53
![]() Anna Paola Majer wrote:
Anna Paola Majer wrote:
Buonasera, ho ultimato lo schema A1,2,3, facendo un bordo, che ha piegato il lavoro in dentro; ora però cosa significa "Lavorare 1 altro giro di maglie alte ma lavorare ora tutte le maglie alte puntando l’uncinetto nelle maglie del giro precedente (quindi attraverso il filo davanti e quello dietro delle maglie) e anche attraverso il filo visibile sul rovescio del lavoro"? Devo fare un altro bordo? Grazie!
15.07.2020 - 22:33DROPS Design answered:
Buongiorno Anna Paola. Al giro precedente, ha lavorato puntando l'uncinetto attraverso 1 solo filo della maglia; questo dovrebbe averle lasciato un filo visibile. Al giro che sta lavorando, deve puntare l'uncinetto attraverso i due fili della maglia ma anche attraverso questo filo visibile. Si forma così quel bordo più marcato che delimita la parte sopra del cappello. Buon lavoro!
16.07.2020 - 15:56
![]() Sabine Motti wrote:
Sabine Motti wrote:
Liebes Drops-Team, das Häkeln des Hutes hat viel Freude bereitet. Er ist tatsächlich relativ fest und die Krempe wölbt sich wie selbstverständlich nach oben. Dankeschön für diese Anleitung. :-)
18.06.2020 - 20:44
![]() Sabine Motti wrote:
Sabine Motti wrote:
Liebes Drops-Team! Für die Fertigung der KREMPE heißt es: "1. RUNDE: * je 1 Stäbchen in die 7-7 ersten Stäbchen, 2 Stäbchen in das nächste Stäbchen " - doch zuvor wurden gar keine Stäbchen gehäkelt, sondern feste Maschen. Oder habe ich etwas übersehen? Dank vorab!
17.06.2020 - 17:28DROPS Design answered:
Liebe Frau Motti, Sie sind ja recht, Anleitug wird korrigiert, danke für den Hinweis. Viel Spaß bei häkeln!
18.06.2020 - 09:24
![]() Martine De Jager wrote:
Martine De Jager wrote:
Ik heb een vraag over dit patroon van Sweet Fedora 190/35. Ik heb nu al meerdere malen de rand geprobeerd te haken, maar het lukt me niet. Ik snap het niet helemaal. Een stokje door de voorste lus van de vorige toer snap ik, maar dan? Nog een stokje door beide lussen én de lus van de vorige toer? Van alles geprobeerd. Kunt u het mij laten zien? Met vriendelijke groeten, Martine de Jager
17.04.2020 - 15:56DROPS Design answered:
Dag Martine,
De eerste toer haak je de stokjes alleen door de voorste lus van de steek en op de tweede toer haakje ieder stokje door beide lussen van de vorige toer (er stond beide stokjes, maar dat is fout; er moet staan beide lussen, dat is nu gecorrigeerd.)
18.11.2020 - 23:42
![]() Giusta wrote:
Giusta wrote:
Ho fatto 3 cappelli per mia figlia e i miei nipotini poi irrigiditi con la colla vinilica bellissimi
03.09.2019 - 17:26
![]() Bénédicte wrote:
Bénédicte wrote:
Bonjour, faut-il utiliser un double fil pour ce chapeau? J'ai commencé avec un seul fil mais je trouve que le résultat est beaucoup trop mou... Merci pour votre réponse
17.06.2019 - 15:42DROPS Design answered:
Bonjour Bénédicte, on ne crochète qu'avec un seul fil Paris, mais vous devez avoir le bon échantillon soit 20 brides x 11 rangs = 10 x 10 cm - ajustez la taille du crochet si besoin, et pensez surtout à bien conserver la même tension lors de la réalisation du chapeau. Bon crochet!
17.06.2019 - 15:46
|
||||||||||||||||||||||||||||||||||
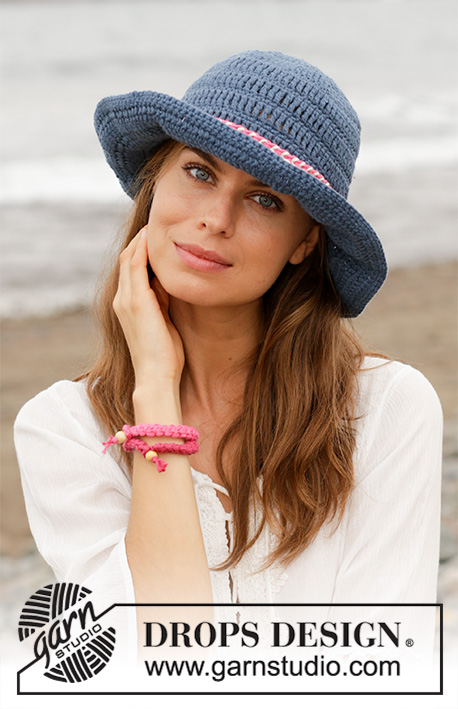
Sweet Fedora#sweetfedorahat |
||||||||||||||||||||||||||||||||||
 |
 |
|||||||||||||||||||||||||||||||||
Crocheted hat with edge in multi-coloured pattern. Piece is crocheted in DROPS Paris.
DROPS 190-35 |
||||||||||||||||||||||||||||||||||
|
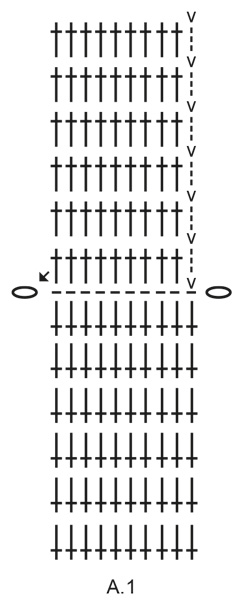
INFORMATION FOR PATTERN: CROCHET INFO: Replace first treble crochet on round with 3 chain stitches, finish round with 1 slip stitch in third chain stitch at beginning of round. Replace first double crochet on round with 1 chain stitch, finish round with 1 slip stitch in first chain stitch at beginning of round. COLOUR PATTERN: See diagram A.4. Diagram shows colours in pattern. 1 square = 1 double crochet. COLOUR CHANGE TIP: When changing colour work as follows: Work last double crochet with first colour but wait with last pull through, switch to next colour and work last pull through with the new colour, then work next double crochet. This way there will be a nice transition when changing colour. When working with two colours place strand for the colour not worked over stitches from previous round, work around the strand so that it is hidden and follows when working. ---------------------------------------------------------- HAT: Work in the round top down. Begin with a flat, oval top, then work down the hat (crown) before working an edge in multi-coloured pattern and then the brim. TOP OF HAT: Read CROCHET INFO! Begin at the arrow in the middle of A.1 and work on hook size 3 mm with white as follows: 4 chain stitches, form a ring with 1 slip stitch in the first chain stitch worked, work 14 chain stitches, work 1 slip stitch in 4th chain stitch from hook. You now have a chain stitch row with a loop in each end. Work next round as follows: 1 slip stitch in the first of the 10 chain stitch on row, 3 chain stitch (= 1 treble crochet), 1 treble crochet in each of the next 9 chain stitches, work A.2 around loop (begin with 1st row in diagram), work 1 treble crochet in each of the 10 chain stitch (i.e. on opposite side of where 10 treble crochets were worked first), work A.3 around loop in the other side and finish with 1 slip stitch in 3rd chain stitch at beginning for round. Continue the pattern like this until 6 rounds have been worked in total. A.1 to A.3 are now done and there are 104 treble crochets on round in both sizes. Then work an edge at the top around the hat as explained below. EGDE AT THE TOP AROUND HAT: Work 1 round treble crochets with 1 treble crochet in every treble crochet and 4 treble crochet in the chain space in the middle of A.2 (work 1 treble crochet in both the first and the last chain stitch and 2 treble crochets in the middle chain stitch), but on this round work only in front loop of stitch (stitch loop closest to you) = 108 treble crochets on round. Insert 1 marker thread between 2 treble crochets in the middle of A.2 (= mid front of hat) and move the marker thread upwards when working. Work 1 more round with treble crochets but now work every treble crochet through both the treble crochet from previous round (through both front and back loop) and in addition through stitch loop visible on the wrong side of piece. This gives a more distinct edge around the top part of hat. Then work the crown as explained below: CROWN: Work treble crochets in the round with 1 treble crochet in every treble crochet (work through both stitch loops). AT THE SAME TIME on 1st round increase 1 treble crochet mid front by working 2 treble crochets in last treble crochet before marker thread. Increase like this 4-8 times in total in S/M: On every other round, and in L/XL: On every round = 112-116 treble crochets. NOTE: When increasing work 2 treble crochets alternately in first treble crochet after marker thread and last treble crochet before marker thread. When piece measures 6-7 cm from edge at the top, work COLOUR PATTERN – see explanation above (= 28-29 repetitions of 4 stitches) and read COLOUR CHANGE TIP. NOTE: On 2nd and 7th round work in back loop of stitch from previous round. AT THE SAME TIME on last round in A.4 increase 0-4 double crochets evenly (increase 1 double crochet by working 2 double crochets in 1 stitch) = 112-120 double crochets. When A.4 is done, work the brim with white as explained below. BRIM: Remember CROCHET INFO! ROUND 1: * Work 1 treble crochet in the first 7-7 double crochets, 2 treble crochets in next double crochet *, repeat from *-* the entire round = 126-135 treble crochets. ROUND 2: Work 1 treble crochet in every treble crochet. ROUND 3: * Work 1 treble crochet in the first 8-8 treble crochets, 2 treble crochets in next treble crochet *, repeat from *-* the entire round = 140-150 treble crochets. ROUND 4: * Work 1 treble crochet in the first 9-9 treble crochets, 2 treble crochets in next treble crochet *, repeat from *-* the entire round = 154-165 treble crochets. ROUND 5: Work 1 treble crochet in every treble crochet. ROUND 6: Work 1 double crochet in every treble crochet = 154-165 double crochets. Fasten off. Brim measures approx. 5 cm. |
||||||||||||||||||||||||||||||||||
Diagram explanations |
||||||||||||||||||||||||||||||||||
|
||||||||||||||||||||||||||||||||||
 |
||||||||||||||||||||||||||||||||||
 |
||||||||||||||||||||||||||||||||||
 |
||||||||||||||||||||||||||||||||||
Have you finished this pattern?Tag your pictures with #dropspattern #sweetfedorahat or submit them to the #dropsfan gallery. Do you need help with this pattern?You'll find 13 tutorial videos, a Comments/Questions area and more by visiting the pattern on garnstudio.com. © 1982-2026 DROPS Design A/S. We reserve all rights. This document, including all its sub-sections, has copyrights. Read more about what you can do with our patterns at the bottom of each pattern on our site. |
||||||||||||||||||||||||||||||||||


With over 40 years in knitting and crochet design, DROPS Design offers one of the most extensive collections of free patterns on the internet - translated to 17 languages. As of today we count 324 catalogues and 12290 patterns translated into English (UK/cm). 12290
We work hard to bring you the best knitting and crochet have to offer, inspiration and advice as well as great quality yarns at incredible prices! Would you like to use our patterns for other than personal use? You can read what you are allowed to do in the Copyright text at the bottom of all our patterns. Happy crafting!
Post a comment to pattern DROPS 190-35
We would love to hear what you have to say about this pattern!
If you want to leave a question, please make sure you select the correct category in the form below, to speed up the answering process. Required fields are marked *.