
Popular categories
Looking for a yarn?


Comments / Questions (42)
![]() LINDA MOSS wrote:
LINDA MOSS wrote:
Sized as S-XXXL is not helpful. Measurements please!
07.06.2017 - 15:39DROPS Design answered:
Dear Mrs Moss, you will find at the bottom of the pattern a measurement chart with all measurements for each size, taken flat, in cm. Compare these to a similar garment you have and like the shape to find out the matching size. Read more about sizing here. Happy crocheting!
07.06.2017 - 15:55
![]() Uyan wrote:
Uyan wrote:
Cher drops, Malgré un échantillon parfait,la laine cloud,je n'arrive pas à 36 x 36 cm à la fin du diagramme A1 et cela en suivant et faisant juste le diagramme A1, ma question et la suivante : pourquoi? En attente de votre réponse,recevez mes salutations amicales
04.05.2017 - 16:41DROPS Design answered:
Chere Uyan! Selon les dimensions obtenues je vous recommande d'utiliser un autre numero de crochet (6 ou 8). Au debut realisez un échantillon de 10 B x 6 rangs et verrez si les dimensions sont correctes (10 x 10 cm). Bon tricot!
04.05.2017 - 17:36
![]() Anja Stahl wrote:
Anja Stahl wrote:
Haekelt man die Arme einzeln oder in Runden das sieht man nicht auf den Fotos.
29.03.2017 - 20:10DROPS Design answered:
Liebe Frau Stahl, die Ärmel werden in Hin- und Rück-R gehäkelt, mit einer Naht mitte unter die Ärmel. Viel Spaß beim häkeln!
28.06.2017 - 08:37
![]() Margarida wrote:
Margarida wrote:
Fiz a amostra com o tamanho correcto, mas ao terminar o diagrama A1 só tenho 29cm, e isso esticando já o quadrado. Devo bloquear até alcançar os 36cm? Nao sei bem como prosseguir, devo juntar mais uma fila para alcançar o tamanho correcto ou confiar que a peça vai alargar?
29.10.2016 - 01:53DROPS Design answered:
Preferencialmente, deve esticar o quadrado até alcançar os 36 cm para que a forma do casaco se mantenha como no modelo original. Opcionalmente, pode juntar mais uma fila. Se não está a usar o fio DROPS, não podemos garantir qual o resultado final. Bons crochés!
31.10.2016 - 16:14
![]() Margarida wrote:
Margarida wrote:
Fiz a amostra com o tamanho correcto, mas ao terminar o diagrama A1 só tenho 29cm, e isso esticando já o quadrado. Devo bloquear até alcançar os 36cm? Nao sei bem como prosseguir, devo juntar mais uma fila para alcançar o tamanho correcto ou confiar que a peça vai alargar?
29.10.2016 - 01:13DROPS Design answered:
Preferencialmente, deve esticar o quadrado até alcançar os 36 cm para que a forma do casaco se mantenha como no modelo original. Opcionalmente, pode juntar mais uma fila. Se não está a usar o fio DROPS, não podemos garantir qual o resultado final. Bons crochés!
31.10.2016 - 16:14
![]() Christiane Moten wrote:
Christiane Moten wrote:
Vielen Dank für die schnelle Antwort. Doppelstäbchen sind doch nur in der zweiten Runde von A.1 vorhanden, oder habe ich etwas übersehen ?
28.10.2016 - 18:21DROPS Design answered:
Liebe Frau Morten, stimmt. Passen Sie mal auf, die Maschenprobe bei dem Quadrat auch zu beachten. A.1 müsste ca 36x36cm sein.
31.10.2016 - 08:41
![]() Christiane Moten wrote:
Christiane Moten wrote:
Hallo, auch mir geht es wie Hanne. Die Maschenprobe war perfekt und auch bei mir ist nach Fertigstellung von A.1 die Größe nur 25x25 cm. Wie kommen Sie auf 36 cm ?
28.10.2016 - 14:30DROPS Design answered:
Liebe Frau Moten, beachten Sie die Maschenprobe so daß sie dieselbe bleibt, und beachten Sie auch, die richtige Maschen zu häkeln, dh Stäbchen/Doppel-Stb wie under Diagram Text beschrieben.
28.10.2016 - 14:47
![]() Hanne Jakobsen wrote:
Hanne Jakobsen wrote:
Min hækleprøve passede perfekt. 10 masker og 6 rækker på pind 7 var 10 gange 10 cm. Når jeg har lavet diagram A1 er mit arbejde kun 25 cm på hver led - i opskriften står der, at det skal være 36 cm på hver led??? Jeg strikker med Cloud fra Drops - som blev anbefalet i butikken. Jeg ved ikke hvordan jeg skal komme videre???!
27.10.2016 - 15:10DROPS Design answered:
Hej Hanne, Da er du nødt til at bruge en tykkere hæklenål for at få det rigtige mål. God fornøjelse!
22.12.2016 - 09:50
![]() Ruth wrote:
Ruth wrote:
Ja, das kann ich sehen, aber mir geht es nicht um die Größe des Armausschnittes, sondern um den Abstand zwischen linkem und rechtem Armausschnitt und der ist 43 cm lt. den Angaben in der Zeichnung.
15.09.2016 - 18:36
![]() Ruth wrote:
Ruth wrote:
Ja, vielen Dank, das sehe ich. Es geht mir aber nicht um die Größe des Armausschnittes, sondern um den Abstand zwischen rechtem und linkem Armausschnitt ... und da sind oben 43 cm eingetragen
15.09.2016 - 18:30
|
|||||||||||||||||||||||||||||||||||||||||||||||||
Stony Ridge#stonyridgecardigan |
|||||||||||||||||||||||||||||||||||||||||||||||||
 |
 |
||||||||||||||||||||||||||||||||||||||||||||||||
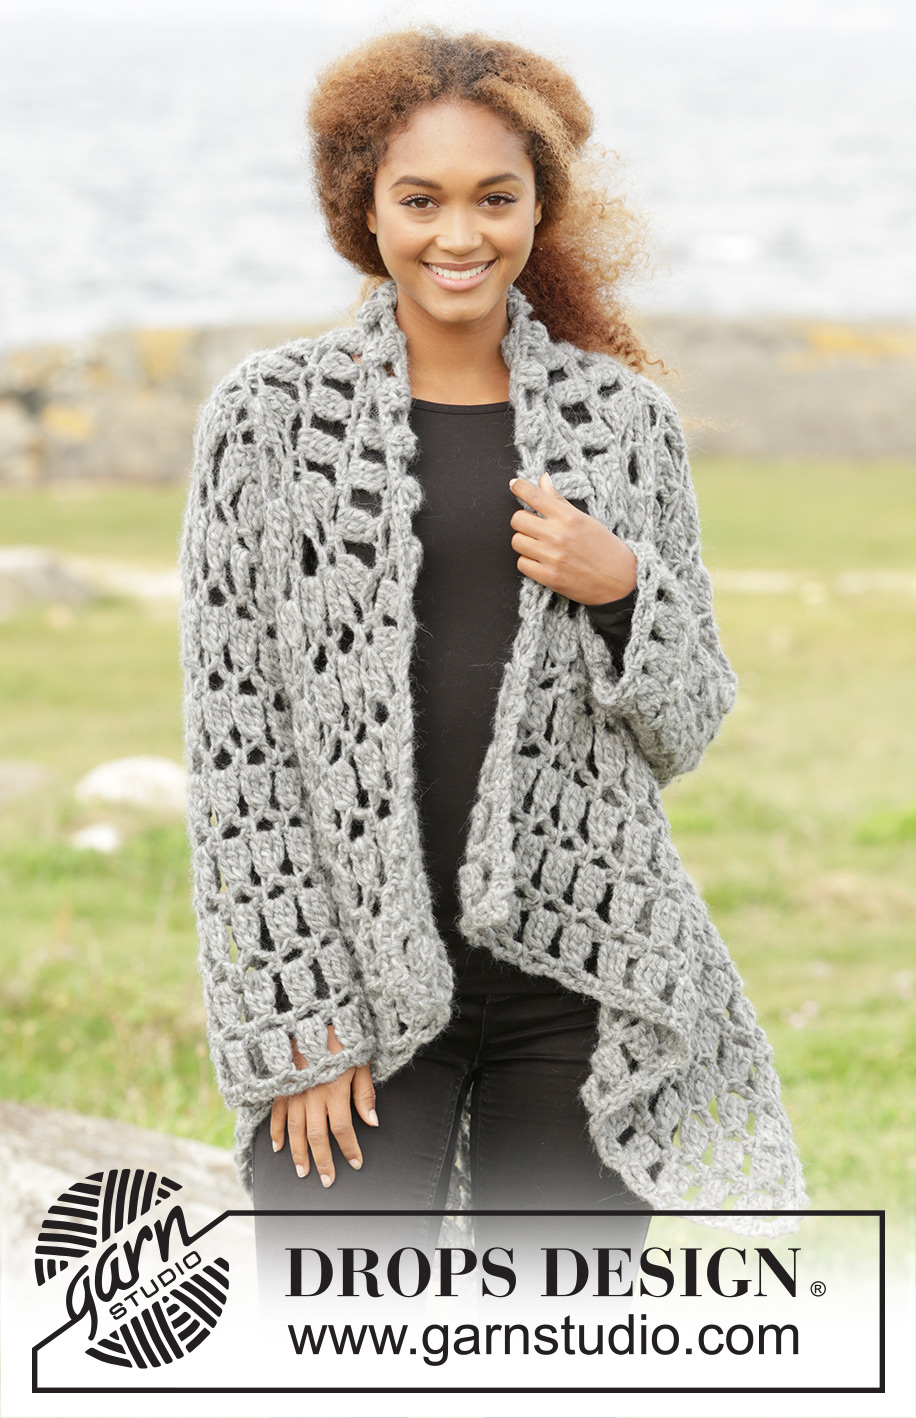
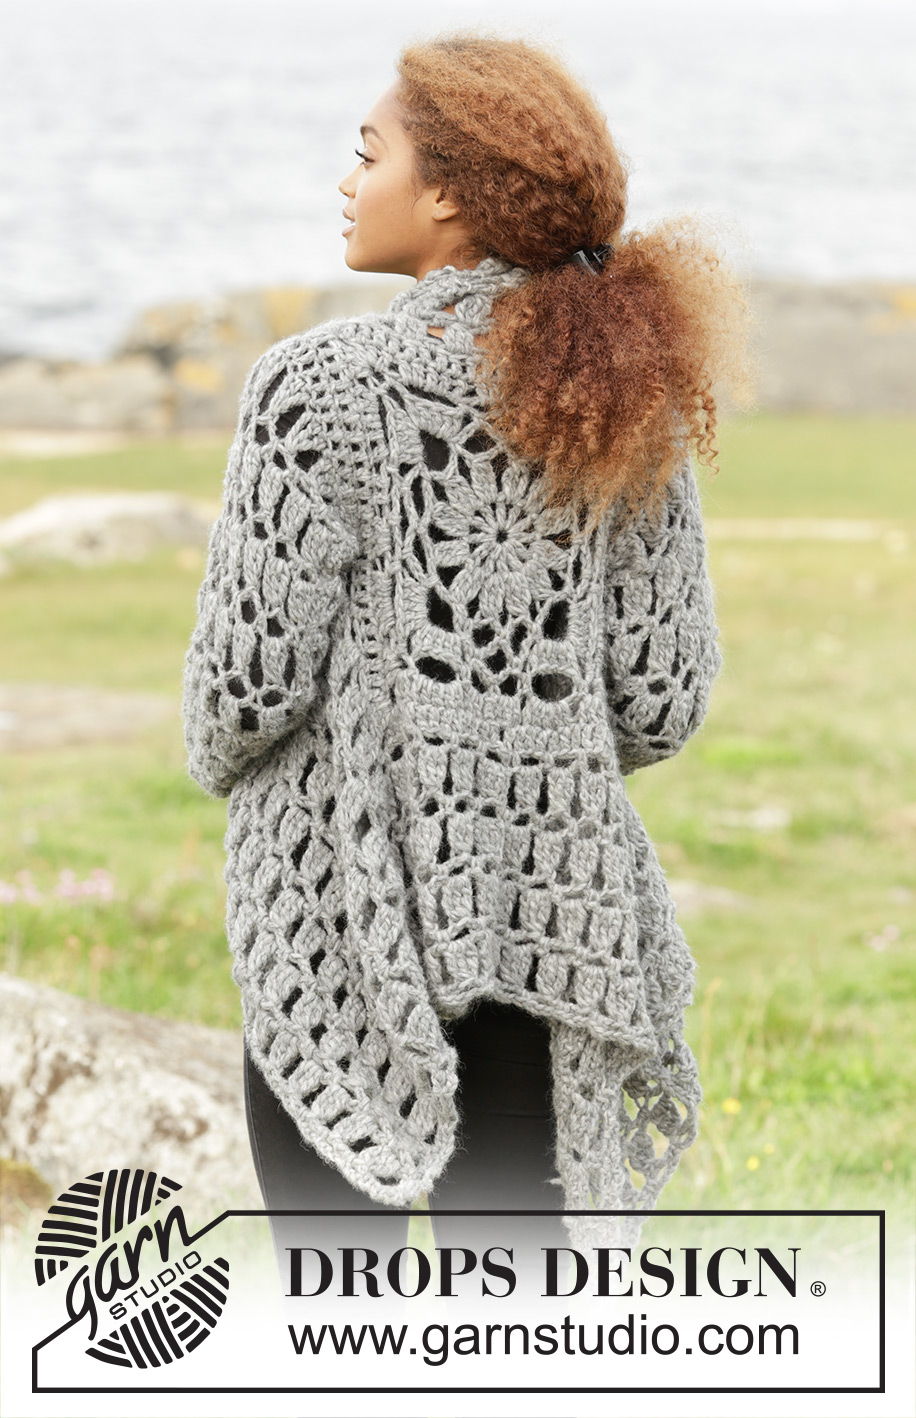
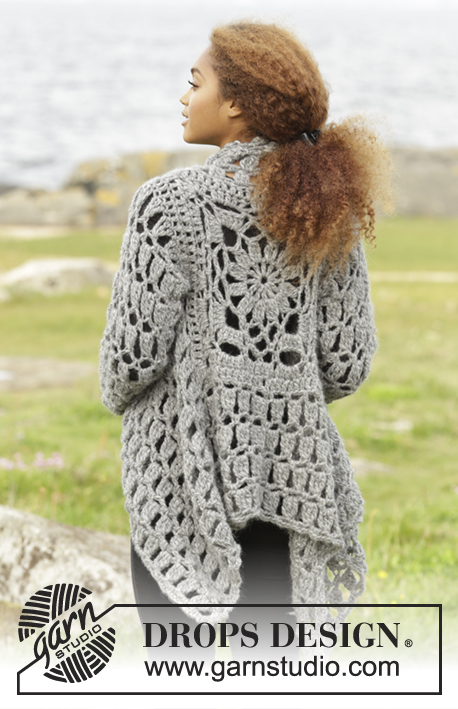
Crochet DROPS jacket worked in a square in 1 thread Cloud or 2 threads Air. Size S-XXXL.
DROPS 173-31 |
|||||||||||||||||||||||||||||||||||||||||||||||||
|
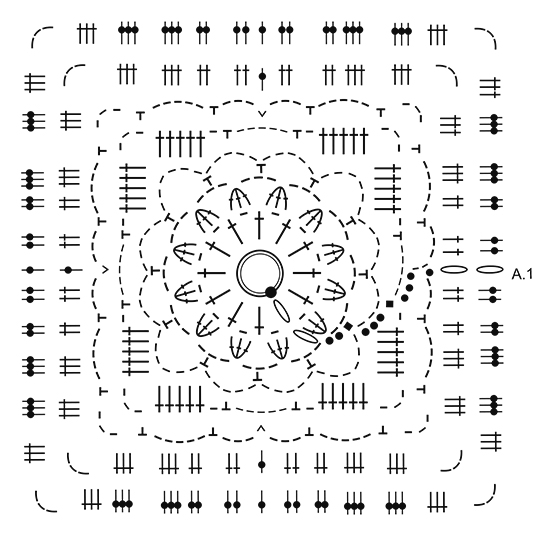
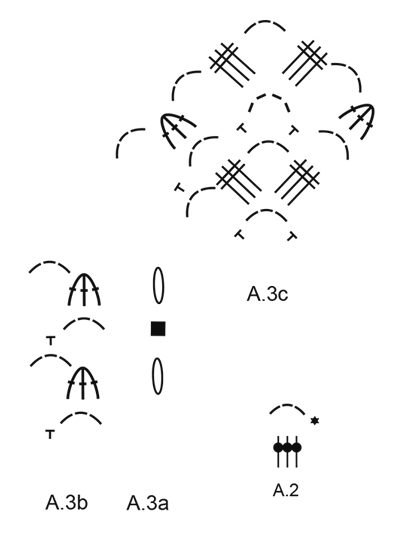
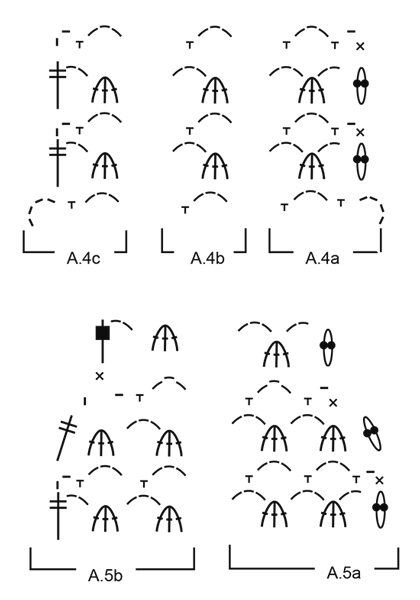
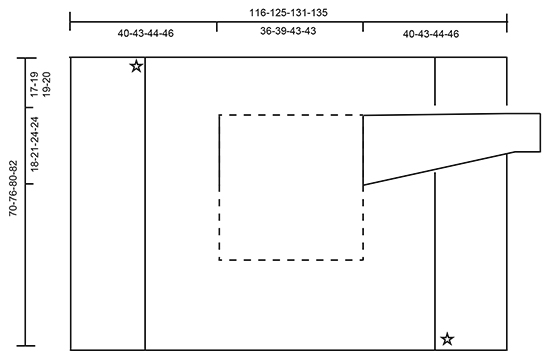
INC TR-GROUP: Work (3 tr, 3 ch, 3 tr) around ch-space in the corner. PATTERN: See diagrams A.1 to A.5. ---------------------------------------------------------- JACKET: Work piece from mid back and outwards as a square. Beg with 1 thread Cloud or 2 threads Air on hook size 7 mm and work pattern according to diagram A.1. REMEMBER THE CROCHET TENSION! When entire diagram A.1 has been worked, piece measures 36 x 36 cm. Size S/M is now finished. Continue the remaining sizes in the round as follows: Size L/XL, XXL and XXXL: Continue with 1-2-2 rounds in total with 1 tr in every tr and work 1 INC TR-GROUP – see explanation above, in each corner. NOTE: Beg round with 3 ch, and finish round with 1 sl st in 3rd ch at beg of round Now continue in all sizes as follows (work 2nd round in diagram A.2): Work 1 ch and 1 sl st in first tr on round, work A.2 over the next 12-15-18-18 tr (= 4-5-6-6 repetitions), work (1 dc, 3 ch, 1 dc) around ch-space in the corner, work 3 ch, skip 3 tr, A.2 over the next 6-9-12-12 tr (= 2-3-4-4 repetitions), 1 dc in space between the next 2 tr, insert a marker in piece and work 18-21-24-24 loose ch for armhole, skip 18-21-24-24 tr, work (1 dc, 3 ch, 1 dc) around ch-space in next corner, work 3 ch, skip 3 tr, work A.2 over the next 27-33-39-39 tr (= 9-11-13-13 repetitions), work (1 dc, 3 ch, 1 dc) around ch-space in the corner, work 18-21-24-24 loose ch for armhole, skip 18-21-24-24 tr, insert a new marker in piece and work A.2 over the next 9-12-15-15 tr (= 3-4-5-5 repetitions), work (1 dc, 3 ch 1 dc) around ch-space in the corner, work 3 ch, skip 3 tr, work A.2 over the next 12-15-18-18 tr (= 4-5-6-6 repetitions), and finish with 1 sl st in first dc on round. Now work pattern in the round as follows (work from 2nd round in diagram A.3a-A.3c): Work A.3a (show how round beg and end), work A.3b around every ch-space until first corner, work A.3c (= 3 dtr, 3 ch, 3 dtr) around ch-space in the corner, continue with A.3b around every ch-space until ch for armhole, work A.3b 6-7-8-8 times around the 18-21-24-24 ch, work A.3c around ch-space in the corner, work A.3b around every ch-space until next corner, work A.3c around ch-space in the corner, work A.3b 6-7-8-8 times around the 18-21-24-24 ch for armhole, work A.3b around every ch-space until next corner, work A.3c around ch-space in the corner, work A.3b around the remaining ch-spaces on round. When A.3a-A.3c have been worked vertically, repeat the last 2 round in diagram until piece measures approx. 70-76-80-82 cm in total (= 35-38-40-41 cm from the middle of A.1 and out in one side) - adjust so that last round worked is a round with ch-spaces and dc. Cut the yarn. FRONT PIECE: Work front pieces back and forth without inc. Insert a marker on last round worked. NOW MEASURE THE PIECE FROM HERE. Beg at star in one corner – see chart, and work from 2nd row in diagram as follows: A.4a, then work A.4b until 1 ch-space remain before the ch-space in the corner, work A.4c. Continue like this back and forth. When A.4a, A.4b and A.4c have been worked vertically, repeat the last 2 rows until front piece measures approx. 23-25-26-27 cm from marker – adjust so that last row is worked as next to last row in A.4a-A.4c. Fasten off. Repeat in opposite side of piece – see star on chart. SLEEVES: Work sleeve back and forth. Beg at marker mid under sleeve and work from WS 18-21-24-24 tr evenly up to shoulder, then work 18-21-24-24 tr around ch-row = 36-42-48-48 tr. Insert a marker here. NOW MEASURE THE PIECE FROM HERE. Then work pattern back and forth from 2nd row (= RS) in diagram A.4 as follows: NOTE: On first row work every dtr in dtr-groups into one tr on previous row. Work A.4a, then work A.4b over the next 30-36-42-42 tr, work A.4c = 12-14-16-16 dtr-groups. When entire diagram A.4a-A.4c has been worked vertically, repeat the last 2 rows in pattern, AT THE SAME TIME dec 1 dtr-group in each side of sleeve by working as shown on the last 4 rows in diagram A.5a at beg of row and A.5b at the end of row = 10-12-14-14 dtr-group. Repeat this dec in each side 0-1-1-1 more time = 10-10-12-12 dtr-groups. When piece measures approx. 50 cm in all sizes, the sleeve is done - adjust to finish after a row that is last row in A.4a-A.4c. Fasten off. Work the other sleeve the same way. ASSEMBLY: Sew underarm seams in outer loops of edge sts. Work an edge around the entire jacket as follows: Beg in one corner on one of the front pieces and work * (1 dc, 3 ch, 1 dc, 3 ch, 1 dc, 3 ch) around ch-space in the corner, work (3 ch, skip approx. 1 cm, 1 dc) until next corner, work 3 ch, *, repeat from *-* around the entire jacket. Finish with 1 sl st in first dc on round. Fasten off. |
|||||||||||||||||||||||||||||||||||||||||||||||||
Diagram explanations |
|||||||||||||||||||||||||||||||||||||||||||||||||
|
|||||||||||||||||||||||||||||||||||||||||||||||||
 |
|||||||||||||||||||||||||||||||||||||||||||||||||
 |
|||||||||||||||||||||||||||||||||||||||||||||||||
 |
|||||||||||||||||||||||||||||||||||||||||||||||||
 |
|||||||||||||||||||||||||||||||||||||||||||||||||
Have you finished this pattern?Tag your pictures with #dropspattern #stonyridgecardigan or submit them to the #dropsfan gallery. Do you need help with this pattern?You'll find 11 tutorial videos, a Comments/Questions area and more by visiting the pattern on garnstudio.com. © 1982-2026 DROPS Design A/S. We reserve all rights. This document, including all its sub-sections, has copyrights. Read more about what you can do with our patterns at the bottom of each pattern on our site. |
|||||||||||||||||||||||||||||||||||||||||||||||||


With over 40 years in knitting and crochet design, DROPS Design offers one of the most extensive collections of free patterns on the internet - translated to 17 languages. As of today we count 324 catalogues and 12290 patterns translated into English (UK/cm). 12290
We work hard to bring you the best knitting and crochet have to offer, inspiration and advice as well as great quality yarns at incredible prices! Would you like to use our patterns for other than personal use? You can read what you are allowed to do in the Copyright text at the bottom of all our patterns. Happy crafting!
Post a comment to pattern DROPS 173-31
We would love to hear what you have to say about this pattern!
If you want to leave a question, please make sure you select the correct category in the form below, to speed up the answering process. Required fields are marked *.