Comments / Questions (10)
![]() Lissey, Christa wrote:
Lissey, Christa wrote:
Zum Beispiel, das Beispiel A 1 von Ihrer Zeichnung - wie häkelt oder bringt man mehrere Teile davon zusammen? Ich suche mich schon seit Tagen krumm und dumm, finde keine Anleitungen Viele Grüße, Chrily
18.02.2021 - 19:23DROPS Design answered:
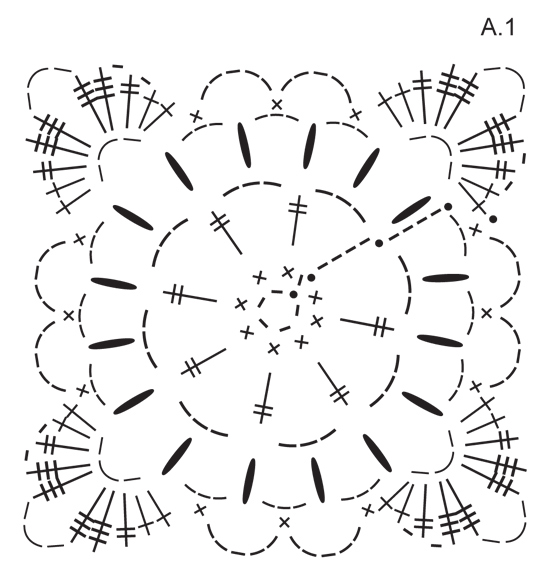
Liebe Chrily, jedes Quadrat wird gehäkelt, wie das Diagram A.1 zeigt - dieses Video Zeigt wie man 1 Quadart häkelt. Dann ab der 2. Quadrat häkeln Sie die Quadrate zusammen wie in der schriflichen Anleitung erklärt - und wie in diesem Video gezeigt. Viel Spaß beim häkeln!
19.02.2021 - 07:47
![]() Lolettie wrote:
Lolettie wrote:
Bonjour pour faire ce model en 220 cm par 200 cm combien de pelote drop Lima me faut il? Svp merci d avance
24.05.2018 - 10:35DROPS Design answered:
Bonjour Lolettie, nous ne sommes malheureusement pas en mesure de pouvoir adapter chacun de nos modèles à chaque demande, toutefois votre magasin DROPS saura vous aider et vous conseiller, même par mail ou téléphone. Bon crochet!
24.05.2018 - 13:30
![]() Renee wrote:
Renee wrote:
Het patroon van de rand in de Nederlandse vertaling klopt niet. Daar staat dat je na de drie losse een vaste moet haken in dezelfde losse lus. In het Engelse patroon is dat de volgende losse lus. En dan komt het ook beter uit
02.11.2016 - 11:41DROPS Design answered:
Hoi Renee. Je hebt gelijk, dat is een foutje in de vertaling. Het is aangepast. Bedankt!
03.11.2016 - 16:02
![]() Ria Halsema wrote:
Ria Halsema wrote:
In de teltekening van het vierkant in de laatste toer: aan de ene kant van de 'hoek' haak je een losse tussen de stokjes en dubbelstokje, na de drie lossen en driedubbel stokje staan er geen lossen getekend tussen dubbelstokje en stokje
28.12.2014 - 21:31
![]() Janneke wrote:
Janneke wrote:
Hallo, Ik wil graag deze deken haken, maar ik weet niet hoeveel garen ik ervoor nodig heb. Hoeveel garen zit er in 1 zo'n vierkantje? Groetjes, Janneke
30.07.2014 - 19:28DROPS Design answered:
U hebt voor deze deken 850 gram Drops Lima nodig, dus dat is 17 bollen van 50 gram. We geven geen aanwijzing per blokje, omdat de deken uit een stuk gehaakt wordt en er ook een rand gehaakt wordt aan het eind, maar u hebt genoeg aan 17 bollen Lima.
31.07.2014 - 10:43Sybelle Mermoud wrote:
Es muy lindo, mi pregunta es si puede subir los esquemas sobretodo de grannies, gracias
18.02.2014 - 23:14
![]() Cdel wrote:
Cdel wrote:
Het telpatroon lijkt niet te kloppen... 3 lossen tussen de drie dstk groepen is te weinig, je krijgt een kommetje ipv een vierkant. Of doe ik iets verkeerd?
03.02.2014 - 19:23DROPS Design answered:
Hoi Cdel. De tekening zou correct moeten zijn, maar misschien haak je te strak of probeer wat verder te haken en zien of de vierkant wat platter wordt als je verder bent / na het wassen kan ook een verschil maken.
06.02.2014 - 14:30
![]() Conni wrote:
Conni wrote:
Wunderaschön!
26.01.2014 - 16:41
![]() Monica wrote:
Monica wrote:
Vakkert og romantisk! men samtidig veldig enkelt.
27.12.2013 - 08:22
![]() Britt wrote:
Britt wrote:
Nydelig
11.12.2013 - 11:35
Do As You Dream#doasyoudreamblanket |
||||||||||||||||||||||
|
|
||||||||||||||||||||||
Crochet DROPS blanket in "Lima".
DROPS 153-41 |
||||||||||||||||||||||
|
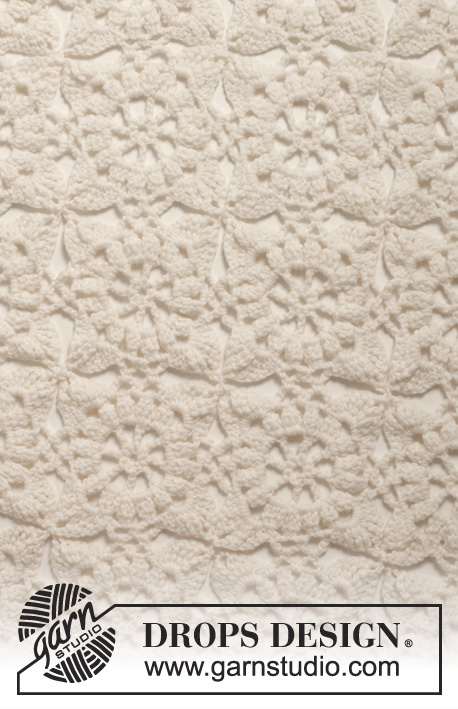
PATTERN: See diagram A.1. CROCHET TIPS: When squares are crochet tog replace mid ch in ch-spaces and in corners on last round with a dc. ---------------------------------------------------------- BLANKET: Blanket consist of 7 squares in height and 11 squares in length. Work a square according to diagram A.1. When working next square, work according to diagram A.1, but on last round after last dc on the 2nd side on round work as follows - READ CROCHET TIPS: 2 tr + 1 ch + 1 dtr + 1 ch + 2 triple tr in next ch-space, 1 ch, 1 dc in ch-space in the corner on first square, 1 ch + 2 triple tr + 1 dtr + 2 tr in ch-space below (i.e. in the same space on square no 2) * 1 dc in next ch-space, 2 ch, 1 dc in ch-space on first square, 2 ch *, repeat from *-* 1 more time, 1 dc in next ch-space, 2 tr + 1 ch + 1 dtr + 1 ch + 2 triple tr in next ch-space, 1 ch, 1 dc in ch-space in the corner on first square. Continue according to A.1 the entire round. Finish with 1 sl st in first st on round. You now have two equal squares linked tog in one side. Continue to work squares and fasten them in the one side until you have a strip with 11 squares in total. Work 3 more strips the same way = 4 strips in total (with 11 squares each). Continue to work as follows: Work a square, AT THE SAME TIME on last round work this square tog between 2 strips (i.e. between 2 strips with 11 square) so that each corner and the 2 ch-spaces between the corner on square hang tog with a corner and ch-spaces on a square in the two strips. You now have 2 strips with 11 squares that hang tog with 1 square in between in one side. Continue to work squares but now work this square tog between the 2 strips with 11 squares and first square on this row by working the 2nd, 3rd and 4th side on last round tog with squares around. Continue like this until there are 3 rows with 11 squares. There are now 33 squares that hang tog. Continue the same way by working new squares that are worked tog between strips with 11 squares. When 7 squares in height and 11 squares in length have been worked, the blanket is finished. Fasten the strands. EDGE: Then work an edge around the blanket as follows: Round 1: Work like this over the edge on a square on long side of blanket. Beg with a sl st in first ch-space in the corner on a square (in the middle of long side on blanket). Work as follows: * 7 ch, 1 dc in next ch-space below, 3 ch, 1 dc in next ch-space, 7 ch, 1 dc in ch-space in the corner on square, 3 ch, 1 dc in next ch-space (in first corner on next square) *, repeat from *-* around the entire edge on blanket but in the corner on blanket work as follows after the 7 ch: * 1 dc in next ch-loop, 3 ch, 1 dc in same ch-space *. Work around the entire edge on blanket and finish with an sl st in 1st st on round. Round 2: Work as follows: 3 ch, * 7 dtr in first ch-space (= large ch-space), 1 ch, 3 dtr in next ch-space, 1 ch, 7 dtr in next ch-space, 1 ch, 3 dtr in next ch-space (= ch-space over corner between to squares) 1 ch *, repeat from *-* the entire round, but in ch-space in the corners on blanket work as follows after the 7 dtr: 1 ch, 3 dtr in ch-space below, 3 ch, 3 dtr in the same ch-space, 1 ch. Then continue with 7 dtr in next ch-space and as explained above. Continue like this the entire round, and finish with 1 sl st in 3rd ch on round. Fasten off. |
||||||||||||||||||||||
Diagram explanations |
||||||||||||||||||||||
|
||||||||||||||||||||||
 |
||||||||||||||||||||||
Have you finished this pattern?Tag your pictures with #dropspattern #doasyoudreamblanket or submit them to the #dropsfan gallery. Do you need help with this pattern?You'll find 9 tutorial videos, a Comments/Questions area and more by visiting the pattern on garnstudio.com. © 1982-2026 DROPS Design A/S. We reserve all rights. This document, including all its sub-sections, has copyrights. Read more about what you can do with our patterns at the bottom of each pattern on our site. |
||||||||||||||||||||||


Post a comment to pattern DROPS 153-41
We would love to hear what you have to say about this pattern!
If you want to leave a question, please make sure you select the correct category in the form below, to speed up the answering process. Required fields are marked *.