
Popular categories
Looking for a yarn?


Comments / Questions (195)
![]() Charlene wrote:
Charlene wrote:
I'm interested in watching this video but I cannot get the sound to work. Is there separate plug in for internet browsers in the USA? Or is there some other way I can watch the tutorials on the garnstudio website? I love the beautiful patterns that you have. They are so much nicer than what I can find in the USA.
10.12.2015 - 22:26DROPS Design answered:
Dear Charlene, Our videos do not have sound. We are a worldwide company and our videos are watched by people around the world, speaking different languages, many of whom do not understand English. We have therefore written instructions to accompany this video, and there is no sound to disturb while watching. Enjoy!
11.12.2015 - 09:56
![]() Birgit wrote:
Birgit wrote:
Hallo, ich habe leider vor der Wollbestellung nicht ordentlich gelesen und nun stehen 2 Farben in der Anleitung. Wird das gute Stück 2-fädig gestrickt? Ich hab mir eine Wolle für Nadelstärke 6-8 bestellt (500 g, keine Ahnung, wie ich glauben konnte, dass das reicht ;)) LG Birgit
27.10.2015 - 09:25DROPS Design answered:
Nein, es wird einfädig gestrickt, entweder mit Bomull-Lin oder mit Paris. Bei Bomull-Lin sind 500g daher in der Tat für Größe S ausreichend, wenn Sie die Maschenprobe einhalten, das ist natürlich Voraussetzung. Bei der Garnmenge müssen Sie immer die Lauflänge des Originalgarns beachten und dementsprechend umrechnen, wenn Sie ein anderes Alternativgarn verwenden wollen.
27.10.2015 - 21:18
![]() Fionn wrote:
Fionn wrote:
Hello, this is a fantastic pattern and so fun to knit! I'm on the left front piece, and I'm confused by what "band st" means. I can't find it in the tutorial videos and I don't understand the search engine results. Could you please clarify "band st"?
17.09.2015 - 18:09DROPS Design answered:
Dear Mrs Fionn, the 19-21 front band sts on left front piece are the sts worked with A.1 to armhole (= 9-10 times A.1 = 19-21 sts). You continue over these sts with A.1 as you worked before. Happy knitting!
17.09.2015 - 18:28André De Castro wrote:
Hi! I would like to know if it is possible to tell me the finished measurents for the begining and the end of the sleeve. I want to make some alterations beacause the sleeve don't fit for the person I want to knit the jacket... Thanks in advance!
27.05.2015 - 15:52DROPS Design answered:
Dear Mrs De Castro, you can calculate the measurements of your own sleeves with a simple ration (rule of three), on the basis of the tension (17 cm = 10 cm) and your desired measurements. Happy knitting!
27.05.2015 - 17:17
![]() Caroline wrote:
Caroline wrote:
Comment recuperer lesdiagrammes de ce modele 146.1 merci pour la reponse
23.02.2015 - 21:30DROPS Design answered:
Bonjour Caroline, vous trouverez les diagrammes A.1 et A.2 en bas de page, à côté du schéma des mesures, A.1 se tricote sur 2 m et 4 rangs, A.2 sur 3 m et 4 rangs. Bon tricot!
24.02.2015 - 09:07
![]() Rita wrote:
Rita wrote:
Een telpatroon wordt van rechts naar links gelezen
05.08.2014 - 09:29
![]() Aline wrote:
Aline wrote:
Het telpatroon,word dat van links naar rechts gelezen of van rechts naar links?
05.08.2014 - 08:22DROPS Design answered:
Hoi Eline. Je kan hier lezen hoe je onze telpatronen moet lezen.
06.08.2014 - 16:57
![]() Angela wrote:
Angela wrote:
Ich habe eine Frage zur Anleitung des Vorderteils. Dort steht das man glatt re' 1 Randmasche seit und 19 Blendenm zur vorderen Mitte weiter stricken soll. Sollen die Blendenm in Muster A1 gestrickt werden? Fuer Hilfe wäre ich sehr dankbar.
24.07.2014 - 19:22DROPS Design answered:
Liebe Angela, ja genau, Sie haben ja mit den Blenden-M im Muster angefangen (beim Rumpfteil) und stricken die nun einfach im Muster A.1 wie zuvor weiter.
25.07.2014 - 11:26
![]() Claire wrote:
Claire wrote:
I bought the correct amount of wool for this pattern and when only one sleeve left to knit i have ran out of wool so have had to order a further 2 balls and pay postage again. i used the paris wool
05.06.2014 - 21:21
![]() Gunvor Waller wrote:
Gunvor Waller wrote:
Tyvärr stämmer mönstet inte. En bit in på första ärmen insåg jag att garnet inte skulle räcka. Jag fick köpa mer och då fanns inte samma färgbad så en ärm är med annat färgbad. När det var dags att montera såg jag genast att ärmhålet skulle bli alldeles för litet. Jag är van stickare och löste det med att sticka till 12 cm över resp axel och förlänga mönsterkanten så att det passade. Men då hade jag använt upp precis allt garn jag hade så nu syr jag ihop koftan med annat garn!
09.04.2014 - 10:36
|
||||||||||||||||
Nathalie#nathaliecardigan |
||||||||||||||||
 |
 |
|||||||||||||||
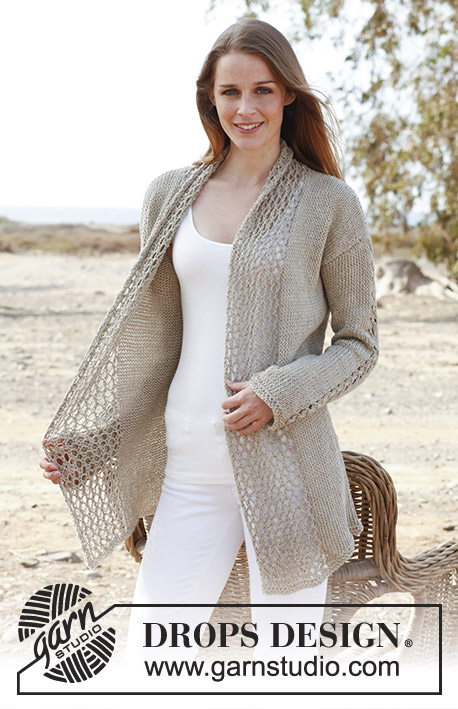
Knitted DROPS jacket in "Bomull Lin" or "Paris". Size: S - XXXL.
DROPS 146-1 |
||||||||||||||||
|
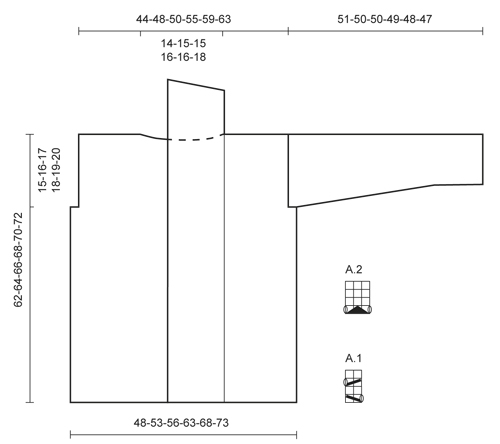
GARTER ST: K back and forth on all rows. 1 ridge = 2 rows K. PATTERN: See diagrams A.1 and A.2. Diagrams show all rows in 1 pattern repetition seen from RS. INCREASE TIP: Inc 1 st by making 1 YO, on next row work YO twisted (i.e. work in the back loop of st instead front) to avoid holes. -------------------------------------------------------- BODY: Worked back and forth on circular needle from mid front. Loosely cast on 170-184-196-218-234-248 sts on circular needle size 6 mm with Bomull-Lin. Work 4 rows in garter st - read explanation above. Work next row (= RS) as follows: 1 edge st in garter st, work A.1 9-9-9-10-10-10 times in total (= 19-19-19-21-21-21 sts on right band), work in stocking st until 19-19-19-21-21-21 sts remain, work A.1 9-9-9-10-10-10 times in total, finish with 1 edge st in garter st (= 19-19-19-21-21-21 sts on left band). Continue with A.1 on band in each side and in stocking st over the middle sts. REMEMBER THE KNITTING TENSION! When piece measures 47-48-49-50-51-52 cm, insert 2 markers; 47-50-53-59-63-66 sts in from each side (= 76-84-90-100-108-116 sts between markers on back piece). On next row cast off 3-4-5-6-7-8 sts for armholes on each side of both markers (= 6-8-10-12-14-16 cast off sts in each side). Now divide the piece and finish each part separately. BACK PIECE: = 70-76-80-88-94-100 sts. Continue in stocking st with 1 edge st in garter st in each side until piece measures 60-62-64-66-68-70 cm. Then cast off the middle 20-22-22-24-24-26 sts for neck and finish each shoulder separately. Continue to cast off 1 st on next row from neck = 24-26-28-31-34-36 sts remain on the shoulder. Cast off when piece measures 62-64-66-68-70-72 cm. LEFT FRONT PIECE: = 44-46-48-53-56-58 sts. Continue in stocking st with 1 edge st in garter st in the side and 19-19-19-21-21-21 band sts mid front until piece measures 62-64-66-68-70-72 cm. On beg of next row from RS cast off the first 24-26-28-31-34-36 sts for shoulder = 20-20-20-22-22-22 sts remain on band. Continue with A.1 with 1 edge st in garter st in each side until band measures 9-10-10-10-10-11 cm from shoulder. At the beg of the next 3 rows from RS cast off the first 5 sts = 5-5-5-7-7-7 sts remain. Loosely cast off these sts on next row from RS. RIGHT FRONT PIECE: Work as left front piece but reversed. SLEEVE: Worked back and forth on needle. Loosely cast on 35-37-39-39-41-43 sts and work 4 rows in garter st. Work next row (= RS) as follows: 1 edge st in garter st, K 15-16-17-17-18-19, work A.2 over the next 3 sts, K 15-16-17-17-18-19, finish with 1 edge st in garter st. Continue in stocking st with A.2 over the middle 3 sts until finished measurements. When piece measures 8 cm, inc 1 st inside 1 edge st in each side - Read INCREASE TIP above. Repeat inc every 6½-5½-4½-4-3½-3½ cm 6-7-8-9-10-10 more times (7-8-9-10-11-11 times in total) = 49-53-57-59-63-65 sts. When piece measures 49-48-47-45-44-42 cm, insert a marker in each side of sleeve (for assembly). When piece measures 51-50-50-49-48-47 cm (shorter measurements in the larger sizes because of broader shoulder width), loosely cast off all sts. ASSEMBLY: Sew shoulder seams inside cast off edges. Sew cast off edge on bands tog, WS against WS. Sew bands along neckline in the back of neck. Sew in sleeves, sew sleeve seams inside 1 edge st - NOTE: The section worked after the marker at the top of sleeve, should fit the cast off for armhole. |
||||||||||||||||
Diagram explanations |
||||||||||||||||
|
||||||||||||||||
 |
||||||||||||||||
Have you finished this pattern?Tag your pictures with #dropspattern #nathaliecardigan or submit them to the #dropsfan gallery. Do you need help with this pattern?You'll find 24 tutorial videos, a Comments/Questions area and more by visiting the pattern on garnstudio.com. © 1982-2026 DROPS Design A/S. We reserve all rights. This document, including all its sub-sections, has copyrights. Read more about what you can do with our patterns at the bottom of each pattern on our site. |
||||||||||||||||


With over 40 years in knitting and crochet design, DROPS Design offers one of the most extensive collections of free patterns on the internet - translated to 17 languages. As of today we count 324 catalogues and 12290 patterns translated into English (UK/cm). 12290
We work hard to bring you the best knitting and crochet have to offer, inspiration and advice as well as great quality yarns at incredible prices! Would you like to use our patterns for other than personal use? You can read what you are allowed to do in the Copyright text at the bottom of all our patterns. Happy crafting!
Post a comment to pattern DROPS 146-1
We would love to hear what you have to say about this pattern!
If you want to leave a question, please make sure you select the correct category in the form below, to speed up the answering process. Required fields are marked *.