
Popular categories
Looking for a yarn?


Comments / Questions (66)
![]() Kirsten wrote:
Kirsten wrote:
Ich habe eine Frage zum Ärmel. Ab einer Länge von 52 cm (Gr.M) soll in Hin-u.Rückrunden gearbeitet werden. Ich habe den Ärmel auf einem Nadelspiel und so lange nicht abgekettet wird, stricke ich immer in Hinrunden. Beim Fertigstellen steht dann, dass der in Hin-u.Rückrunden gestrickte Abschnitt in den für den Armausschnitt abgeketteten Teil passen soll. Mir ist nicht klar, welcher Teil das sein soll.
08.12.2015 - 13:50DROPS Design answered:
Wenn Sie ab 52 cm in Hin- und Rück-R stricken, entsteht ja an der unteren Ärmelmitte eine Öffnung, denn Sie wenden ja nach jeder R, d.h. Sie haben nun einen "Spalt" an der unteren Ärmelmitte. Sie stricken nun 1 cm in Hin- und Rück-R und dieser cm soll dann hinterher in den Armausschnitt passen.
12.12.2015 - 21:14Oksana wrote:
The model is described in quite complicated way. Could you please specify about collar in here: there are 61-61-61-70-70-70 sts in total on stitch holder in each side - so IN TOTAL or IN EACH SIDE? (Why not to describe the quantity of short rows instead? It is equal for all the sizes, isnt it)
27.08.2015 - 17:02DROPS Design answered:
Dear Oksana, you work short rows over collar sts slipping the first 16 sts (then the first 15-18 sts) sts at beg of every row (in each side) on a thread/ st holder until you have a total of 61-70 sts on each st holder (= on each side), you will repeat this a total of 4 times (1 time 16 sts + 3 times 15-18 sts) on each side. Happy knitting!
28.08.2015 - 09:49
![]() Eefje wrote:
Eefje wrote:
Wanneer je in het patroon met rondbreinaald 6 moet beginnen staat er een aantal keer aangegeven dat bepaalde stukken recht gebreid moeten worden. Ik heb nu het volgende gebreid: 3 knt.stk. - 14 r. - 26 p. (patroon) - 14 - 26 p. - 17 r. - 26 p. - 14 - 26 p. - 14 - 3 knt stk. Ik heb nu 183 steken, dat klopt, maar de stukken recht komen me nogal willekeurig voor. Klopt dat?
16.02.2015 - 15:20DROPS Design answered:
Hoi Eefje. Het patroon zou correct moeten zijn. Maar twijfel je nog, dan geef aan waar in het patroon je precies bent, dan kan ik nakijken en bevestigen. bvd.
17.02.2015 - 15:40
![]() Frieda wrote:
Frieda wrote:
Bedankt voor het patroon. Hij is mooi geworden en ik ben er erg blij mee
15.02.2015 - 11:39
![]() Karin WITTEVEEN wrote:
Karin WITTEVEEN wrote:
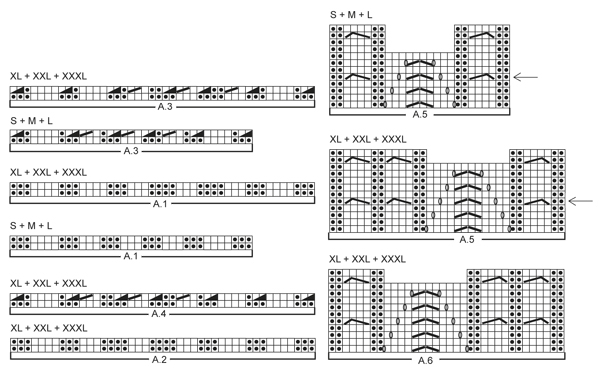
Bij de tekening A5 staat bij de regels 11 en 12 in het midden niets. Wat moet je hier breien. Ik heb nog een vraag, Er wordt bij het begin van het patroon gezegd om 0 1 3 0 2 4 in averechts tricotsteek te breien. Maar wat wordt hiermee bedoeld.
04.02.2015 - 16:34DROPS Design answered:
Hoi Karin. Je begint dat weer opnieuw met de teltekening in het midden (het ajourpatroon). 1 herhaling van het kabelpatroon is gewoon meer naalden dan 1 herhaling van het ajourpatroon in het midden. De getallen 0-1-3-0-2-4 verwijzen naar welke maat je breit, dus brei je bijv maat S, dan moet je 0 st breien, en maat M 1 st averechte tricotst enzovoort.
05.02.2015 - 13:42
![]() Karin Witteveen wrote:
Karin Witteveen wrote:
In het patroon 141-19 staan bij de laatste regels niets ingevuld wat moet ik hier breien.
04.02.2015 - 08:57DROPS Design answered:
Hoi Karin. Wat bedoel je precies? Dan zal ik proberen je verder te helpen :-)
04.02.2015 - 13:18
![]() Iliane wrote:
Iliane wrote:
Hallo, ich habe diese Jacke (etwas kürzer) gestrickt und finde das Muster wunderschön! Im Nachhinein würde ich die Maschen an der Seite, die hier in der Anleitung gl re gestrickt dind, links stricken. So fügen sie sich zwischen den Zöpfen besser ein und die Abnahmen fallen nicht gleich so auf. Das gl re sieht zu aufgesetzt aus, als würde es dort nicht hingehören. Liebe Grüße, iliane
09.10.2014 - 22:59
![]() Anika wrote:
Anika wrote:
Hallo, ist es möglich, die Antworten auf die Fragen von Birgit (30.08.12) und Wera (10.09.12)in die Anleitung mit aufzunehmen? Diese Informationen sind m.E. unerlässlich, um korrekt stricken zu können. Danke und viele Grüße
30.04.2014 - 19:19DROPS Design answered:
Liebe Anika, die Antwort auf die Frage vom 30.08.12 findet sich bereits in der Anleitung, unter "Muster": "Die Diagramme zeigen alle R der Muster, wie sie auf der Vorderseite erscheinen." Ob die Diagramme A.5 und A.6 noch deutlicher erklärt werden müssen, werde ich anfragen. Viel Spaß beim Stricken!
30.04.2014 - 23:58
![]() Claudia wrote:
Claudia wrote:
Die Abnahmen neben den Markierern befinden sich jedoch in den Mustern. Oder habe ich da etwas missverstanden?
21.10.2013 - 22:07DROPS Design answered:
Liebe Claudia, die Markierer sitzen in den glatt re Streifen zwischen A.5 bzw. A.6 (je nach Grösse). Siehe: "Nach den ersten 47-50-54-59-66-71 M und vor den letzten 47-50-54-59-66-71 M je 1 Markierer anbringen".
22.10.2013 - 09:14
![]() Claudia wrote:
Claudia wrote:
Leider komme ich nach dem Abnahmetipp nicht mehr mit dem Muster A5 klar. Ich habe nur noch 8 Maschen in der Mitte anstatt den 10?
20.10.2013 - 20:58DROPS Design answered:
Liebe Claudia, die Abnahmen werden in den glatt re gestrickten Streifen gemacht und nicht innerhalb des Musters A5.
21.10.2013 - 12:15
|
|||||||||||||||||||||||||
Birch Leaves#birchleavesjacket |
|||||||||||||||||||||||||
 |
 |
||||||||||||||||||||||||
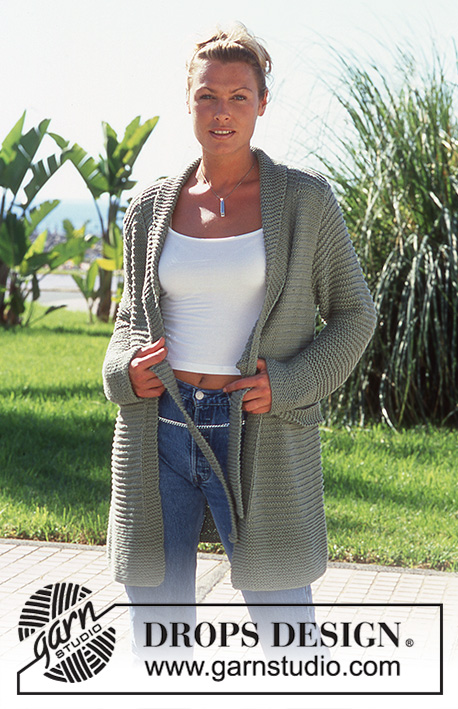
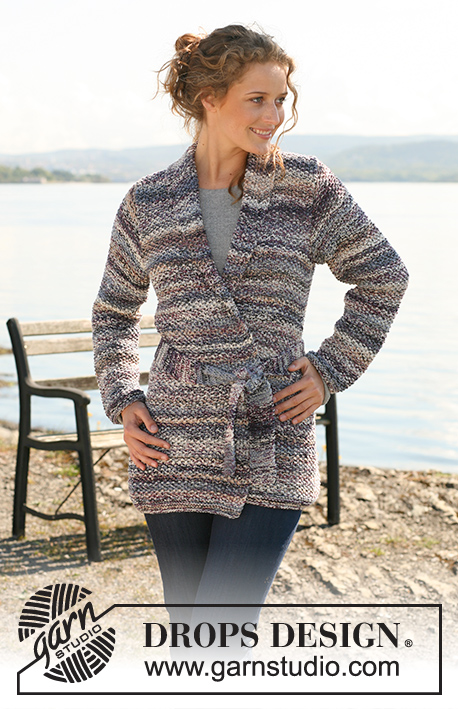
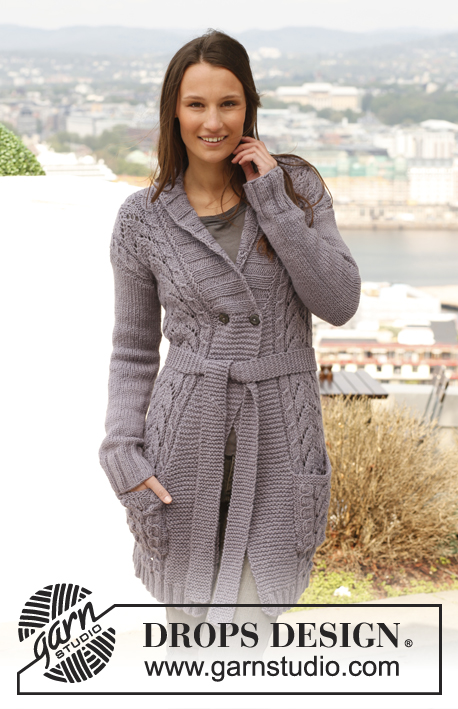
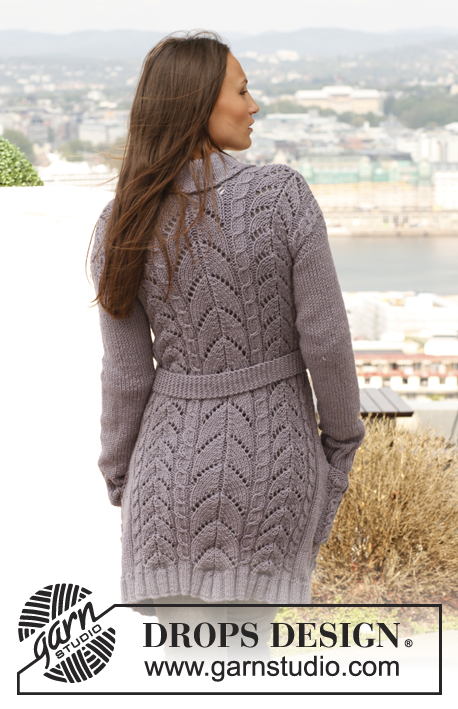
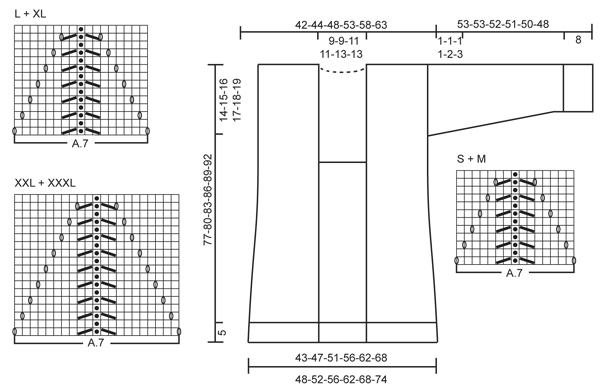
Knitted DROPS jacket with cables, lace pattern and band collar in ”Nepal”. Size: S - XXXL.
DROPS 141-19 |
|||||||||||||||||||||||||
|
GARTER ST (back and forth on needle): K all rows. 1 ridge = 2 rows K. PATTERN: See diagrams A.1 to A.7. Diagrams show all rows in pattern seen from RS. Choose diagram for your size. DECREASE TIP (applies to sides of body): All dec are done from RS! Dec as follows before marker: K 2 tog. Dec as follows after marker: Slip 1 st as if to K, K 1, psso. KNITTING TIP (applies to band): To avoid the bands contracting at the front, work short rows over bands on every row marked with arrow in diagram A.5/A.6 as follows: * Beg from RS on right front piece (= mid front) on row marked with arrow in diagram and K 1 row over the outermost 16-16-18-18-22-22 sts (= band – the other sts on row are not worked), turn piece, tighten thread and K the rest of row, turn piece and work 1 row as before (in garter st and with pattern) over all sts, turn piece, K 1 row over the outermost 16-16-18-18-22-22 sts (= band on left front piece – the other sts on row are not worked), turn piece, tighten thread and K the rest of row *, repeat from *-* on every row marked with arrow in diagram. BUTTONHOLES: Cast off for 2 buttonholes on right band as follows: K tog third and fourth st from edge and make 1 YO, work until 5 sts remain on band, K the next 2 tog and make 1 YO. ---------------------------------------------------------- JACKET: Worked back and forth on circular needle from mid front. Cast on 239-251-269-305-335-347 sts (incl 16-16-18-18-22-22 band sts in each side towards mid front) on circular needle size 5 mm with Nepal. P 1 row from WS. Work next row as follows from RS: 3 edge sts in GARTER ST – see explanation above , * K 3, P 3 *, repeat from *-* a total of 3-3-4-4-5-5 times, K 3, work diagram A.1 (choose diagram for your size = 35-35-35-44-44-44 sts), * K 3, P 3 *, repeat from *-* a total of 2-3-3-3-4-5 times, K 3, work diagram A.1 in sizes S + M + L (= 35 sts) and diagram A.2 in sizes XL + XXL + XXXL (= 44 sts), * K 3, P 3 *, repeat from *-* a total of 3-3-4-4-5-5 times, K 3, work diagram A.1 (choose diagram for your size = 35-35-35-44-44-44 sts), * K 3, P 3 *, repeat from *-* a total of 2-3-3-3-4-5 times, K 3, work diagram A.1 in sizes S + M + L (= 35 sts) and diagram A.2 in sizes XL + XXL + XXXL (= 44 sts), * K 3, P 3 *, repeat from *-* a total of 3-3-4-4-5-5 times, K 3 and 3 edge sts in GARTER ST. Continue rib like this until piece measures 5 cm. Switch to circular needle size 6 mm and work next row from RS as follows: 3 edge sts in garter st, K while AT THE SAME TIME dec 8-7-9-12-12-10 sts evenly over the next 21-21-27-27-33-33 sts, work last row in A.3 over sts from A.1 (choose diagram for your size = 9-9-9-10-10-10 sts dec), K while AT THE SAME TIME dec 5-7-7-7-11-11 sts evenly over the next 15-21-21-21-27-33 sts, work last row in A.3 in sizes S + M + L over sts from A.1 (= 9 sts dec) and work last row in A.4 in sizes XL + XXL + XXXL over sts from A.2 (= 10 sts dec), K while AT THE SAME TIME dec 6-4-4-10-8-4 sts evenly over the next 21-21-27-27-33-33 sts, work last row in A.3 over sts from A.1 (choose diagram for your size = 9-9-9-10-10-10 sts dec), K while AT THE SAME TIME dec 5-7-7-7-11-11 sts evenly over the next 15-21-21-21-27-33 sts, work last row in A.3 in sizes S + M + L over sts from A.1 (= 9 sts dec) and work last row in A.4 in sizes XL + XXL + XXXL over sts from A.2 (= 10 sts dec), K while AT THE SAME TIME dec 8-7-9-12-12-10 sts evenly over the next 21-21-27-27-33-33 sts and finish with 3 edge sts in garter st = 171-183-197-217-241-261 sts. Work 1 row from WS with K over K and P over P but K the outermost 16-16-18-18-22-22 sts in each side (= bands). Then work pattern as follows, beg from RS - READ KNITTING TIP: 16-16-18-18-22-22 band sts in garter st, 0-1-3-0-2-4 sts in reverse stocking st, work pattern according to diagram A.5 (choose diagram for your size = 26-26-26-34-34-34 sts), work in stocking st over the next 10-14-14-14-16-22 sts, work A.5 in sizes S + M + L (= 26 sts) and A.6 in sizes XL + XXL + XXXL (= 34 sts), 0-1-3-0-2-4 sts in reverse stocking st, work diagram A.7 (choose diagram for your size = 15-15-17-17-21-21 sts), 0-1-3-0-2-4 sts in reverse stocking st, work A.5 (choose diagram for your size = 26-26-26-34-34-34 sts), work in stocking st over the next 10-14-14-14-16-22 sts, work A.5 in sizes S + M + L (= 26 sts) and A.6 in sizes XL + XXL + XXXL (= 34 sts) and 0-1-3-0-2-4 sts in reverse stocking st and 16-16-18-18-22-22 band sts in garter st. Insert 2 markers in the piece; 47-50-54-59-66-71 sts in from each side = 77-83-89-99-109-119 sts between markers on back piece. Continue pattern. REMEMBER THE KNITTING TENSION! When piece measures 10 cm, dec 1 st on each side of both markers – READ DECREASE TIP (= 4 sts dec). Repeat dec every 10-10-10-8-9-9 cm, 3-3-3-4-4-4 more times = 155-167-181-197-221-241 sts. When piece measures 50-52-54-56-58-60 cm, cast off for 2 buttonholes on right band - see explanation above! When piece measures 51-53-55-57-59-61 cm, cast off the first 15-15-17-17-21-21 sts on row, insert 1 marker (shows where to beg knit up for collar), work the rest of row. Turn piece, cast off the first 15-15-17-17-21-21 sts on row, insert 1 marker (this marks where to end the knit up for collar), work the rest of row = 125-137-147-163-179-199 sts. Continue pattern as before with 1 edge st in garter st in each side. When piece measures 63-65-67-69-71-73 cm, cast off 2-4-4-4-6-8 sts in each side for armholes (i.e. 1-2-2-2-3-4 sts on each side of both markers) = 67-71-77-85-93-101 sts on back piece and 27-29-31-35-37-41 sts on front piece. Finish each part separately. BACK PIECE: Continue pattern as before with 1 edge st in garter st in each side. When piece measures 75-78-81-84-87-90 cm, cast off the middle 11-11-13-13-17-17 sts for neck and finish each shoulder separately. Then cast off 1 st on next row from neck = 27-29-31-35-37-41 sts remain on needle. Continue until piece measures 77-80-83-86-89-92 cm and cast off. RIGHT FRONT PIECE: Continue pattern as before with 1 edge st in garter st in each side. When piece measures 77-80-83-86-89-92 cm – adjust so that same no of rows has been worked as on back piece, cast off. LEFT FRONT PIECE: Work as right front piece. SLEEVE: Worked in the round. Cast on 42-42-42-48-48-48 sts on double pointed needles size 5 mm with Nepal. K 1 round, then work rib (= K 3/P 3). When rib measures 8 cm, switch to double pointed needles size 6 mm. K 1 round while AT THE SAME TIME dec 8-7-6-11-10-9 sts evenly = 34-35-36-37-38-39 sts. Then work in stocking st. Insert 1 marker at the beg of round. When piece measures 10 cm, inc 1 st on each side of marker mid under sleeve. Repeat inc every 13-10-7½-6-5-4 cm 3-4-5-6-7-8 more times = 42-45-48-51-54-57 sts. When piece measures 52-52-51-50-48-45 cm (shorter measurements in the larger sizes because of longer sleeve cap and broader shoulder width), finish the piece back and forth on needle from mid under sleeve as follows: Sizes S + M + L + XL: Cast on 1 new st in each side (= edge st for assembly) and work until piece measures 53-53-52-51 cm, loosely cast off. Size XXL + XXXL: Cast on 1 new st in each side (= edge st for assembly) and work until 2 rows remain before piece measures 50-48 cm. Now cast off 5 sts at beg of the next 2 rows before casting off all sts. ASSEMBLY: Sew the shoulder seams. Sew in sleeves inside 1 edge st (section worked back and forth at the top of sleeve should fit the cast off for armhole). Sew on buttons. COLLAR: Knit up sts from RS (inside 1 edge st) on circular needle size 5 mm - start mid front at marker on right front piece: Knit up approx. 38 to 46 sts up to shoulder, then 16 to 22 sts along the neck, and 38 to 46 sts down along left front piece until marker = 92 to 114 sts. K 1 row from WS. Then K 1 row from RS while AT THE SAME TIME inc no of sts evenly to 137-143-149-155-161-167. Then work rib as follows (from WS): 1 edge st in garter st, * P 3, K 3 *, repeat from *-* until 4 sts remain and finish with P 3 and 1 edge st in garter st (from RS there are 3 K sts in each side inside edge st). Continue rib like this until collar measures approx. 5 cm. Now inc 1 st in each of the middle 12 P-sections, seen from RS (= back of neck) = 149-155-161-167-173-179 sts. Continue with K over K and P over P until collar measures approx. 9-9-11-11-13-13 cm. Now work as follows: Work 1 row as before and slip the first 16 sts worked on a stitch holder, turn piece, work the rest of row and slip the first 16 sts worked at the beg of row on another stitch holder. Turn piece, work the rest of row and slip the first 15-15-15-18-18-18 sts worked at the beg of row on the first stitch holder, turn piece, work the rest of row and slip the first 15-15-15-18-18-18 sts worked at the beg of row on the other stitch holder. Continue like this by slipping the first 15-15-15-18-18-18 sts worked on stitch holder in each side until there are 61-61-61-70-70-70 sts in total on stitch holder in each side. Then slip sts from stitch holders back on needle and work 1 row as before over all the 149-155-161-167-173-179 sts – NOTE: To avoid holes in every transition where piece was turned, slip loop before next st twisted on needle and work tog with first st on needle. On next row cast off with K over K and P over P. Neatly fasten collar with stitches in each side towards band – sew edge to edge to avoid a chunky seam. POCKET: Worked back and forth on circular needle. Cast on 28-28-28-36-36-36 sts on circular needle size 6 mm with Nepal. Work pattern according to diagram A.5 (choose diagram for your size) with 1 edge st in garter st in each side. When pocket measures approx. 17-17-17-20-20-20 cm – adjust after one whole repetition of lace pattern in the middle – dec from RS 2 sts over each cable and 3 sts over lace pattern in the middle = 21-21-21-27-27-27 sts. Switch to circular needle size 5 mm and K 4 rows and cast off with K from WS. Knit another pocket but in sizes XL + XXL + XXXL work diagram A.6 instead of A.5. Sew 1 pocket on to each front piece with stitches inside 1 edge st - approx. 13-13-13-17-17-17 cm from bottom edge (try the jacket on for placement) – pattern on pocket should fit pattern repetition on front piece. BELT: Cast on 9 sts on needle size 5 mm and work in garter st back and forth until belt measures approx. 150-190 cm, cast off. |
|||||||||||||||||||||||||
Diagram explanations |
|||||||||||||||||||||||||
|
|||||||||||||||||||||||||
 |
|||||||||||||||||||||||||
 |
|||||||||||||||||||||||||
Have you finished this pattern?Tag your pictures with #dropspattern #birchleavesjacket or submit them to the #dropsfan gallery. Do you need help with this pattern?You'll find 19 tutorial videos, a Comments/Questions area and more by visiting the pattern on garnstudio.com. © 1982-2026 DROPS Design A/S. We reserve all rights. This document, including all its sub-sections, has copyrights. Read more about what you can do with our patterns at the bottom of each pattern on our site. |
|||||||||||||||||||||||||


With over 40 years in knitting and crochet design, DROPS Design offers one of the most extensive collections of free patterns on the internet - translated to 17 languages. As of today we count 324 catalogues and 12272 patterns translated into English (UK/cm). 12272
We work hard to bring you the best knitting and crochet have to offer, inspiration and advice as well as great quality yarns at incredible prices! Would you like to use our patterns for other than personal use? You can read what you are allowed to do in the Copyright text at the bottom of all our patterns. Happy crafting!
Post a comment to pattern DROPS 141-19
We would love to hear what you have to say about this pattern!
If you want to leave a question, please make sure you select the correct category in the form below, to speed up the answering process. Required fields are marked *.