
Popular categories
Looking for a yarn?


Comments / Questions (59)
![]() Gilardi Claudette wrote:
Gilardi Claudette wrote:
Je ne comprends pas l'explication des manches.que veut dire "avec les rangs raccourcis comme avant,aux mêmes endroits" Merci
31.01.2022 - 09:02DROPS Design answered:
Bonjour Mme Gilardi, vous avez auparavant tricoté des rangs raccourcis sur toute la longueur, lorsque vous tricotez les manches, vous allez tourner aux mêmes endroit qu'avant (moins de fois car moins de marqueurs), et continuer ainsi les rangs raccourcis comme avant. Bon tricot!
31.01.2022 - 10:23
![]() Martens wrote:
Martens wrote:
Ik ben deze Eden vest aan het breien. Ik ben nu de libkermouw aan het breien. Deze moeten in verkorte toeren gebreid worden. De eerste en de tweede toer van de verkorte toeren moeten gewoon volledig heen en terug gebreid worden. Blijft dit ook gelden in de mouw? Want er zijn maar 2 verkorte toeren in de mouw ipv 3. Ik begrijp tevens niet hoe je 35 cm meet (aan de onderkant op het breedste deel) in de uitleg van de linkermouw. Kan u mij daarmee helpen, please?
09.01.2021 - 20:24DROPS Design answered:
Dag Martens,
De lengte van de mouw meet je aan de onderkant van de mouw op het breedste deel. Als je verkorte toeren maakt op de mouw, keer je het werk op het zelfde punt als bij de panden, dus het aantal steken vanaf de hals tot het keerpunt voor de verkorte toeren moet hetzelfde zijn. Hoe de verkorte toeren herhaald worden is verder precies hetzelfde als op de panden.
10.01.2021 - 12:15
![]() Bobby Garland wrote:
Bobby Garland wrote:
OK, I think I get it. I need to do 1 more row on the LF (row 1 for me) in order to end at the top. Then, I need to attach a new yarn to stitch #64 on the WS and knit the side piece. Then I will end up with the last row on the RS. Then I will cut that yarn. Then I will go back to the top edge on the LF and pick up yarn and turn to the WS to start the sleeve on those 51 sts. It would have been nice if the instructions had been more specific, instead of saying "work approximately..."
08.01.2021 - 19:57
![]() Bobby Garland wrote:
Bobby Garland wrote:
I get what you are saying, but I am not asking about the sleeve, as I am not there yet. I need to know if I am to cut the yarn at the lower edge of the left front piece and reattach it to the WS at stitch #64 to start the first row of the side piece so as to end on the RS of the side piece as instructed. There is no other way to end up on the RS unless you start the side piece on the WS in the middle of the work.
08.01.2021 - 17:21DROPS Design answered:
Dear Mrs Garland, after left front piece measures 23 cm, adjust so that next row will be worked from RS and now work this 1 cm starting from RS = from the bottom edge over the first 64 cm - adjust this 1 cm so that last row is worked from RS, then cut the yarn and join it to work sleeve (starting from RS) over the 51 sts left unworked on needle (starting from RS). Happy knitting!
11.01.2021 - 06:57
![]() Bobby Garland wrote:
Bobby Garland wrote:
OK, so you also cut the yarn at the end of the left front, which for me is at the lower edge, and reattach to stitch # 64 (for small size) in order to start the side piece on the WS, so as to finish last row of side piece on the RS?
08.01.2021 - 15:15DROPS Design answered:
Dear Mrs Garland, the last row on left front piece is worked from RS, but when you turn and work sleeve, first row on sleve is worked from WS = this means you don't need to cut the yarn between left front piece and sleeve, then after sleeve, just work the 64 sts on side at the end of a WS row. - no need to cut the yarn neither between sleeve and back piece. Happy knitting!
08.01.2021 - 16:19
![]() Bobby Garland wrote:
Bobby Garland wrote:
Thank you for your response. Another question....I finished the left front and ended on row 8 of short row sequence, which means the next row would be a right side row. In order to finish the side piece on the RS as instructed and have the side pieces be the same number of rows and have a marker in the middle, I would have to start the side piece on the WS. Do I cut the yarn and start at stitch number 64 at the other end from the WS?
08.01.2021 - 14:08DROPS Design answered:
Dear Mrs Garland, last row worked for side on front piece is worked from the right side, then cut the yarn and work sleeve. Last row worked on sleeve is from WS, after you have worked this last row on sleeve, work the stitches of the side at the end of this row = from WS, all stitches are now back on needle, turn and start short rows at the beg of next row from RS. Happy knitting!
08.01.2021 - 15:02
![]() Bobby Garland wrote:
Bobby Garland wrote:
For short rows, when moving from left front to sleeve to back to sleeve to right front, do you continue in the same numerical sequence from the previous section, or do you start again at row 1 or do you reverse the short row sequence, work rows 8-1? You start with row 1 at the left front border and end up with row 8 at the right front....the pieces would not be "mirrored." Even if you have the same number of rows, the short rows would not be in the same place. Does it matter?
04.01.2021 - 14:50DROPS Design answered:
Dear Mrs Garland, after you have worked the sleeve, work the short rows on back piece starting from row 1 of short rows. Happy knitting!
05.01.2021 - 10:43
![]() LISA RENBARGER wrote:
LISA RENBARGER wrote:
A friend and I are about to cast on Eden to knit at the same time. My bust measurement is between size M & L. Is there positive ease built in to the pattern?
13.01.2020 - 16:49DROPS Design answered:
Dear Mrs Renbarger, measure a similar garment you have and like the shape and compare these measurements to the one in the measurement chart (taken flat from side to side, in cm) to find out the matching size. You can then either decide if you want it rather tight or rather loose (with negative or positive ease). Read more here. Happy knitting!
14.01.2020 - 07:17
![]() Kironieke wrote:
Kironieke wrote:
If i cast on 120 stitches for size M with 23st/cm (tension) how do i get to the total height of 75cm? It only adds up to the 52cm of the body, not the yoke/sleeve part.
21.05.2019 - 20:53DROPS Design answered:
Dear Kironieke, the 120 stitches will measure 52 cm = whole length of jacket as shown in measurement chart (= 23 cm yoke + 29 cm body). Happy knitting!
22.05.2019 - 09:14
![]() Rosie FRANCIS wrote:
Rosie FRANCIS wrote:
When knitting the left sleeve, you will have between 51 and 62 stitches, how many do you work before turning on the short rows? The short row instructions work for the whole garment (between 115 and 138 stitches)
06.08.2018 - 22:35DROPS Design answered:
Dear Mrs Francis, you should work the short rows on the left sleeve on the same places you worked the short rows on the top of front piece before, ithe "turns" should continue and be aligned from the beg of piece. Happy knitting!
07.08.2018 - 09:38
|
||||
Eden#edencardigan |
||||
|
|
||||
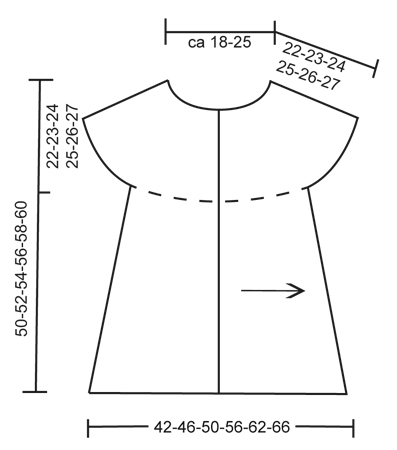
Knitted DROPS vest in garter st worked sideways with short rows in ”Fabel”. Size: S - XXXL.
DROPS 134-4 |
||||
|
KNITTING TIP: Every time piece is turned in the middle of piece, slip first st as if to K, tighten thread and return. This is done to avoid holes when working short rows. SHORT ROWS: Work short rows in the middle of the piece to give the garment a slight A shape. Beg from bottom edge and work up to neck. * Work all sts, turn and work back. Work 103-108-112-115-119-122 sts, turn and work back. READ KNITTING TIP! Work 89-94-97-99-103-105 sts, turn and work back. Work 71-75-77-79-81-83 sts, turn and work back *. Repeat from *-*, i.e. 1 repetition = 2 rows at the top and 8 rows at the bottom. MEASURING TIP: Measure when piece is flat, it is important not to stretch the piece when measuring. -------------------------------------------------------- VEST: Worked across back and forth on needle. Beg mid front on left front piece and finish mid front on right front piece. NOTE: The picture of the vest has been reversed. LEFT FRONT PIECE: The whole piece is worked in garter st, i.e. K all rows. Loosely cast on 115-120-125-129-134-138 sts on needle size 3.5 mm with ocean view Fabel. 1st row is worked from RS (= from bottom edge and up to neck). Work 3 cm over all sts (= band), finish after 1 row from WS. REMEMBER THE KNITTING TENSION! Continue with SHORT ROWS - see explanation above! Continue like this until piece measures approx. 23-25-27-30-33-35 cm from cast on edge (measured at the bottom on the widest) – READ MEASURING TIP! Then work side piece as follows: Work 1 cm back and forth over only the 64-67-70-72-74-76 sts from bottom edge. Insert 1 marker (= middle of the side). Work 1 cm back and forth over the same sts, and slip them on 1 stitch holder (finish after 1 row from RS, sts are to be used on back piece later). Then work sleeve. LEFT SLEEVE: = 51-53-55-57-60-62 sts on needle. Work back and forth with short rows on the same places as before until piece measures approx. 30-31-32-33-34-35 cm (at the bottom on the widest), finish after 1 row from WS. BACK PIECE: Work the 64-67-70-72-74-76 sts from stitch holder back on needle (from WS) = 115-120-125-129-134-138 sts. Continue with short rows as before. When piece measures approx. 21-23-25-28-31-33 cm from marker in the side (measured at the bottom on the widest), insert another marker (= mid back). Continue with short rows until piece measures approx. 20-22-24-27-30-32 cm from marker mid back (measured at the bottom on the widest). Now work side piece as follows: Work 1 cm back and forth over only the 64-67-70-72-74-76 sts from bottom edge. Insert another new marker (= middle of the side). Work 1 cm back and forth over the same sts (finish after 1 row from RS), then slip them on 1 stitch holder. Work right sleeve. RIGHT SLEEVE: Work as left sleeve. RIGHT FRONT PIECE: Work the 64-67-70-72-74-76 sts from stitch holder back on needle (from WS) = 115-120-125-129-134-138 sts. Continue with short rows as on back piece. When same no of rows have been worked on right front piece as on left front piece (minus band = 3 cm), work band as follows: Work 1½ cm back and forth over all sts. On next row from RS, cast off for button holes as follows (= from bottom edge): Work 12 sts for all sizes, cast off the next 2 sts, * work 12-13-14-14-15-15 sts, cast off the next 2 sts *, repeat from *-* a total of 4 times, work the rest of row. On next row cast on 2 new sts over the cast off sts. Work over all sts until band measures a total of 3 cm. Loosely cast off. ASSEMBLY: Crochet with 2 threads brown on hook size 4 mm as follows: Beg at the bottom of right front piece with 1 dc, * 2 ch, skip approx. 1 cm and fasten with 1 dc *, repeat from *-* up along right front piece, along the collar, back of neck and down along left front piece, cut the threads and fasten. Sew on buttons. |
||||
Diagram explanations |
||||
|
||||
 |
||||
Have you finished this pattern?Tag your pictures with #dropspattern #edencardigan or submit them to the #dropsfan gallery. Do you need help with this pattern?You'll find 6 tutorial videos, a Comments/Questions area and more by visiting the pattern on garnstudio.com. © 1982-2026 DROPS Design A/S. We reserve all rights. This document, including all its sub-sections, has copyrights. Read more about what you can do with our patterns at the bottom of each pattern on our site. |
||||


With over 40 years in knitting and crochet design, DROPS Design offers one of the most extensive collections of free patterns on the internet - translated to 17 languages. As of today we count 324 catalogues and 12290 patterns translated into English (UK/cm). 12290
We work hard to bring you the best knitting and crochet have to offer, inspiration and advice as well as great quality yarns at incredible prices! Would you like to use our patterns for other than personal use? You can read what you are allowed to do in the Copyright text at the bottom of all our patterns. Happy crafting!
Post a comment to pattern DROPS 134-4
We would love to hear what you have to say about this pattern!
If you want to leave a question, please make sure you select the correct category in the form below, to speed up the answering process. Required fields are marked *.