
Popular categories
Looking for a yarn?


Comments / Questions (74)
![]() Marieke Lopers wrote:
Marieke Lopers wrote:
Ik heb deze trui voor mij zelf gebreid, hij zit heerlijk! Nu zou ik voor mijn dochter dezelfde willen maken. Met bijvoorbeeld big Merino uitgevaren categorie C naald dikte 5 mm. Als ik een grote damesmaat XL aanhoud zou dat met naald vijf en big Merino een passende maat kunnen zijn voor een meisje van 10? Ik weet niet hoe ik de verhoudingen kan omrekenen. Alvast bedankt, groetjes Marieke
07.01.2023 - 15:42DROPS Design answered:
Dag Marieke,
Helaas is het voor ons niet mogelijk om een patroon aan te passen naar persoonlijke wensen. Op basis van de stekenverhouding met je eigen naalden en garens zou je de afmetingen kunnen berekenen als je deze vergelijkt met de stekenverhouding in het patroon. Maar je moet dan ook nog uitkomen met het patroon.
08.01.2023 - 10:18
![]() BOURGEOIS wrote:
BOURGEOIS wrote:
Je fais ce pull en taille L, pour l'empiècement, la moitié du premier motif du renne se commence donc au milieu du dos ?
04.11.2022 - 18:01DROPS Design answered:
Bonjour Mme Bourgeois, pour l'empiècement, on commence les tours au milieu dos; lorsque vous tricotez le diagramme, vous commencez par la 1ère maille du diagramme au milieu dos, si vous voulez centrer un renne au milieu devant, calculez où vous devrez commencer le tour par rapport au milieu dos (cette leçon peut vous y aider). Bon tricot!
07.11.2022 - 08:01
![]() Maureen wrote:
Maureen wrote:
Should the neck from the start of the instructions elevation to end be in Rib with no stocking stitch
28.10.2022 - 18:42DROPS Design answered:
Dear Maureen, the short rows for the elevation are worked in stocking stitch, ie knit from the right side and purl from the wrong side, then knit all stitches in the round decreasing evenly and then start working ribbing. Happy knitting!
31.10.2022 - 08:07
![]() Maureen wrote:
Maureen wrote:
Neck Elevation mid back and onwards to the end, looking at the finished jumper it appears the rib should be the complete neck is that correct even the elevation Thank you
28.10.2022 - 18:38DROPS Design answered:
Dear Maureen, you work a total of 6 short rows in stocking stitch for the elevation on back piece, then work back in the round decreasing on first round and then work ribbing for the neck edge. Can this help?
31.10.2022 - 08:06
![]() Anna wrote:
Anna wrote:
Bonjour Je suis en train de faire les manches et comment augmente-t’on dans le diagramme M2? Merci
20.09.2021 - 17:34DROPS Design answered:
Bonjour Anna, incorporez les augmentations dans le jacquard: à la fin du tour, tricotez la nouvelle maille comme la maille suivante du motif (= lisez de droite à gauche) et au début du tour, tricotez la nouvelle maille comme la maille indiquée dans le diagramme avant la suivante (= lisez de gauche à droite). Bon tricot!
21.09.2021 - 08:36
![]() Gaby wrote:
Gaby wrote:
Bonjour, Je suis en train de terminer ce (magnifique!) modèle mais je ne comprends pas ce que signifie dans le diagramme "le creux" qui apparaît sur les 6 derniers rangs de M3. Dois-je, 6 rangs avant la fin du diagramme, rabattre une maille toutes les 6 mailles ? Je vous remercie par avance de votre réponse.
14.12.2019 - 23:03DROPS Design answered:
Bonjour Gaby et merci. le "trou" au milieu de A.3 (dans les 2 diagrammes) correspond à la maille diminué au milieu de chaque M.3 (2 m ens à l'end) = on a donc 1 m en moins au tour suivant, soit 12 m (= 6+6) dans chaque M.3. Bon tricot!
16.12.2019 - 08:18
![]() Pamela Cornish wrote:
Pamela Cornish wrote:
Hi. Ive just finished the increases on the body but don't quite understand about adjusting the pattern to the middle. Do I move the two markers - first and last to the middle markers and start from that point where the arrow is marked on m3. Thanks.
12.11.2019 - 08:00DROPS Design answered:
Dear Mrs Cornish, you can read how to center a diagram here. Happy knitting!
12.11.2019 - 08:34
![]() Julia wrote:
Julia wrote:
Hallo nochmal :) Vielen Dank für die letzte Antwort bzgl. der Messhöhe :) Ich habe jetzt noch eine Frage: Ich stricke Größe L und bin mit 174 M ins M2 gegangen. Damit bin ich jetzt fertig und habe insgesamt 16 Maschen für die Armlöcher abgekettet ... Wie viele Maschen sollte ich jetzt noch haben? In der Anleitung steht 79... aber da komme ich ja längst nicht hin ... :( Hab ich etwas falsch gemacht?? LG und vielen Dank!! Julia
04.02.2019 - 19:16DROPS Design answered:
Liebe Julia, in der Größe L sollen Sie 79 M für je Vorder und Rückenteil haben: es sind 174 M, 4 M werden nach der 1. Markierer am Anfang der Runde abgekettet, bis 4 M vor dem 1. Markierer stricken (= 79 M), die nächste 8 M abketten, bis 4 M vor dem 1. Markierer stricken (= 79 M) und die letzten 4 M abketten = 8 M x 2 + 79 M x 2 = 174 M. Viel Spaß beim stricken!
05.02.2019 - 08:30
![]() Katrin wrote:
Katrin wrote:
Wird das Vorder- und Rückenteil in Reihen oder Runden gestrickt?
03.02.2019 - 21:39DROPS Design answered:
Liebe Katrin, sie sind in der Runde gestrickt. Viel Spaß beim stricken!
04.02.2019 - 13:27
![]() Julia wrote:
Julia wrote:
Hallo :) Es heißt in der Anleitung beim Vorder- und Rückenteil: "GLEICHZEITIG nach 14 cm auf beiden Seiten der 1. und 4. Markierung je 1 M. abn. (Seiten). Alle 6-9-9-9-9-6 cm total 4-3-3-3-3-4 Mal. Nach allen Abnahmen die Maschenzahl auf 126-142-158-178-202-222 M. anpassen"... ist hier auch 14 Gesamthöhe gemeint, oder 14 cm nach Beginn der ersten Runde davor? Vielen Dank für die Hilfe!
29.01.2019 - 20:40DROPS Design answered:
Liebe Julia, es sind hier 14 cm Gesamthöhe (= ab der Anschlagskante) gemeint. Viel Spaß beim stricken!
30.01.2019 - 07:28
|
|||||||||||||
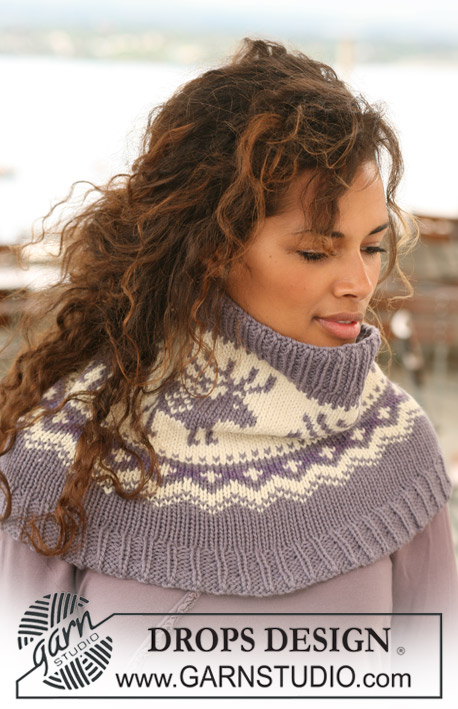
Reindeer Swing#reindeerswingsweater |
|||||||||||||
|
|
|||||||||||||
Knitted DROPS Christmas jumper with raglan sleeves and reindeer pattern on yoke in ”Nepal”. Size S - XXXL.
DROPS 122-43 |
|||||||||||||
|
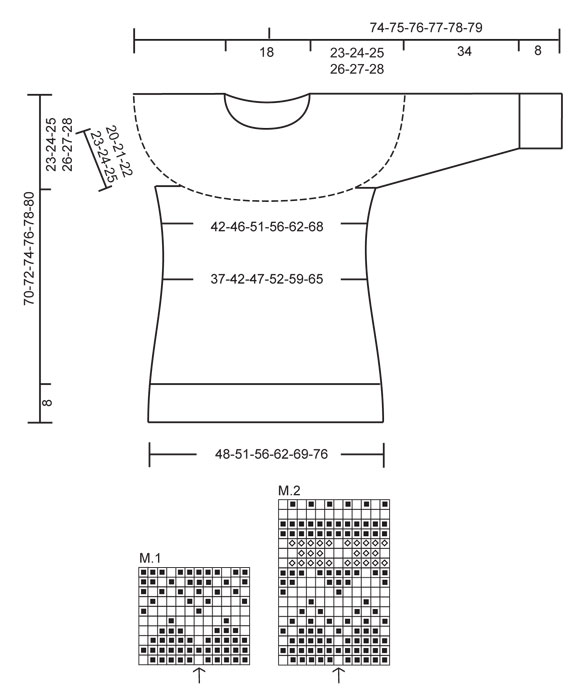
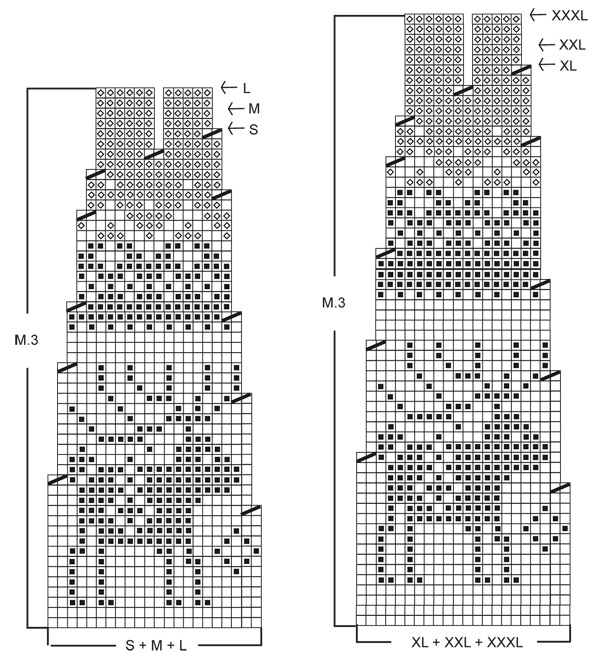
PATTERN: See diagram M.1 to M.3. The entire pattern is worked in stocking st in the round. MEASUREMENT TIP: Because of the weight of the yarn make all measurements while the garment is hanging otherwise it will be too long when worn. INCREASING TIP (applies to darts + inc at the side): Inc 1 st by picking up st from previous row and K this. DECREASING TIP (applies to darts + dec at the side): Dec as follows after marker: slip 1 st as if to K, K1, psso. Dec as follows 2 sts before marker: K2 tog. -------------------------------------------------------- BODY PIECE: See MEASUREMENT TIP! Cast on 240-255-282-312-348-384 sts on circular needle size 4 mm with grey/purple. Work rib, K1/P2. When piece measures 8 cm change to circular needle size 5 mm. K 1 round AT THE SAME TIME dec 78-81-90-102-114-126 sts evenly = 162-174-192-210-234-258 sts. Now work M.1 AT THE SAME TIME on last round dec 2 sts evenly in SIZE L (no dec in the other sizes) = 162-174-190-210-234-258 sts. After M.1 continue with grey/purple and stocking st. REMEMBER THE KNITTING TENSION! AT THE SAME TIME after M.1 insert 6 markers in piece as follows: Marker-1at beg of round (= the side). Marker-2 after 25-27-30-34-38-42 sts. Marker-3 after a further 31-33-35-37-41-45 sts. Marker-4 after a further 25-27-30-34-38-42 sts (= the side). Marker-5 after a further 25-27-30-34-38-42 sts. Marker-6 after a further 31-33-35-37-41-45 sts (= 25-27-30-34-38-42 sts left on round after last marker) – let the markers follow the piece as you go along. READ ALL OF THE FOLLOWING SECTION BEFORE CONTINUING! When piece measures 14 cm dec 1 st after marker-2 and -5 and before marker-3 and -6 – See DECREASING TIP (= darts on front and back piece). Repeat the dec on every 4.5 cm a total of 5 times. AT THE SAME TIME when piece measures 14 cm dec 1 st each side of marker-1 and -4 (= at the sides) and repeat the dec on every 6-9-9-9-9-6 cm a total of 4-3-3-3-3-4 times. After all dec there are 126-142-158-178-202-222 sts on needle. When piece measures 35-35-35-36-36-37 cm inc after marker-2 and -5 and before marker-3 and -6 – See INCREASING TIP. Repeat the inc on every 1.-1.-1,5.-1,5.-3,5.-3,5 cm a total of 4-4-4-3-2-2 times = 142-158-174-190-210-230 sts on needle. When piece measures 39-40-41-42-43-44 cm work M.2 - NOTE: adjust pattern to the middle, arrow in diagram marks the middle st front and back – pattern will not fit at the sides. When 1 round remain of M.2 (piece measures approx 47-48-49-50-51-52 cm) cast off 8 sts each side for armhole (i.e. 4 sts each side marker-1 and -4) = 63-71-79-87-97-107 sts left on front and back piece. Put piece aside and knit the sleeves. SLEEVE: READ ALL OF THIS SECTION BEFORE CONTINUING! Cast on 54-54-54-57-57-57 sts on double pointed needles size 4 mm with grey/purple. Work rib, K1/P2. When piece measures 8 cm change to double pointed needles size 5 mm , K 1 round AT THE SAME TIME dec 12-12-12-9-9-9 sts evenly = 42-42-42-48-48-48 sts. Now work M.1. After M.1 continue in grey/purple and stocking st AT THE SAME TIME dec 1 st for all sizes on round 1 = 41-41-41-47-47-47 sts. When piece measures 14-13-13-13-14-13 cm (M.1 is finished) inc 2 sts mid under sleeve. Repeat the inc on every 3-2.5-2.5-2.5-2-2 cm a total of 9-11-12-11-13-15 times = 59-63-65-69-73-77 sts. AT THE SAME TIME when piece measures 34 cm work M.2 – NOTE: adjust pattern to the middle, arrow in diagram marks the middle st on upper arm. When 1 round remain of M.2 (piece measures approx 42 cm for all sizes) cast off 8 sts mid under sleeve = 51-55-57-61-65-69 sts left on needle. Put piece aside and knit the other sleeve. YOKE: Slip sleeves on the same circular needle as body pieces where cast off for armholes = 228-252-272-296-324-352 sts. Round now beg mid back. K 1 round with eco off-white AT THE SAME TIME dec 8-10-8-10-16-0 sts evenly = 220-242-264-286-308-352 sts. Continue in M.3 – see chart for your size. After M.3 (finish pattern by arrow in diagram for your size) there are 110-121-132-143-154-176 sts on needle. K 1 round with purple/violet mix AT THE SAME TIME dec 34-41-48-55-62-80 sts evenly = 76-80-84-88-92-96 sts. NECK: Now work elevation mid back, back and forth on needle with purple/violet mix. Work row to mid front, insert a marker. K 47-50-52-55-57-60 sts, turn piece and P 18-20-20-22-22-24 sts. Turn piece, K 27-30-30-33-33-36 sts, turn piece and P 36-40-40-44-44-48 sts. Turn piece, K 45-50-50-55-55-60 sts, turn piece and P 54-60-60-66-66-72 sts. Turn piece, K all sts to marker. Change to double pointed needles size 4 mm and continue in the round. K 1 round AT THE SAME TIME inc 26-22-24-20-22-18 sts evenly = 102-102-108-108-114-114 sts. Work rib = K1/ P2 on all sts. Cast off with K over K and P over P when rib measures 14-14-15-15-16-16 cm, measured mid front. ASSEMBLY: Sew openings under sleeves. |
|||||||||||||
Diagram explanations |
|||||||||||||
|
|||||||||||||
 |
|||||||||||||
 |
|||||||||||||
Have you finished this pattern?Tag your pictures with #dropspattern #reindeerswingsweater or submit them to the #dropsfan gallery. Do you need help with this pattern?You'll find 19 tutorial videos, a Comments/Questions area and more by visiting the pattern on garnstudio.com. © 1982-2026 DROPS Design A/S. We reserve all rights. This document, including all its sub-sections, has copyrights. Read more about what you can do with our patterns at the bottom of each pattern on our site. |
|||||||||||||


With over 40 years in knitting and crochet design, DROPS Design offers one of the most extensive collections of free patterns on the internet - translated to 17 languages. As of today we count 324 catalogues and 12290 patterns translated into English (UK/cm). 12290
We work hard to bring you the best knitting and crochet have to offer, inspiration and advice as well as great quality yarns at incredible prices! Would you like to use our patterns for other than personal use? You can read what you are allowed to do in the Copyright text at the bottom of all our patterns. Happy crafting!
Post a comment to pattern DROPS 122-43
We would love to hear what you have to say about this pattern!
If you want to leave a question, please make sure you select the correct category in the form below, to speed up the answering process. Required fields are marked *.