
Popular categories
Looking for a yarn?


Comments / Questions (66)
![]() Christine wrote:
Christine wrote:
Bonjour, Pourriez-Vous me préciser à quel moment on utilise les augmentations milieu-dos qui sont expliquées dans votre rubrique « Augmentation s »? Je ne retrouve pas ces augmentations dans l’explication du « Châle ». Faut-il augmenter de chaque côté de la section centrale et aussi au milieu du dos?…… Merci d’avance pour votre réponse. Bonne journée Christine
07.04.2026 - 15:44DROPS Design answered:
Bonjour Christine, on utilise cette technique après avoir tricoté 5 rangs au point mousse, les explications font mention de ces augmentations, je cite: Augmenter ensuite tous les 2 rangs (= sur l'endroit) de chaque côté et de chaque côté de la section centrale jusqu'à la fin – VOIR AUGMENTATIONS. Ces augmentations sont à faire tout du long comme indiqué tous les 2 rangs: 1 m après les 4 m point mousse, 1 m de part et d'autre des 39 m centrales (que l'on tricote ensuite: 2 m point mousse, M.1 et 2 m point mousse), et 1 m avant les 4 m point mousse. Bon tricot!
08.04.2026 - 13:58
![]() Christina wrote:
Christina wrote:
Efter att ha stickat M1 2 ( eller 3) gånger ska det stickas 8 räta varv med ökningar. Det är efter det som jag undrar. Det står att man ska sticka en hålrad och sedan 7 räta varv ( med extravarv). Det är väldigt oklart i beskrivningen om man ska fortsätta med ökningarna på denna hålrad och de efterföljande 7 varven.
31.01.2026 - 10:13DROPS Design answered:
Hei Christina. Både under ÖKNINGSTIPS og under SJAL (når man har 369-533 m) står det at det at man skal økes / fortsettes med økninger. Under ÖKNINGSTIPS står det: ... Det ökas 4 m på ALLA v från rätsidan tills sjalen är färdig, og under SJAL : Det är nu 369-533 m på st. Sticka 8 v räta över alla m, fortsätt med ökningarna. (= 385-549 masker. Sedan stickas det hålrad så här: 4 rm, * 2 rm tills, 1 dbl-omslag *, upprepa *-*, tills det återstår 5 m, avsluta med 5 rm. Sticka 7 v räta över alla m = 8 v = 16 økninger = 401-565 m). Når det økes, stemmer maskeantallet. mvh DROPS Design
09.02.2026 - 10:07
![]() Christina wrote:
Christina wrote:
Ska det inte göras några ökningar på hålraden och de efterföljande 7 varven?
22.01.2026 - 20:33DROPS Design answered:
Hei Christina. Fint om du kan opplyse hvilken hullrad du mener. Nesten hele diagram M.1 består av hullrader. mvh DROPS Design
30.01.2026 - 10:14
![]() Monique wrote:
Monique wrote:
Bonjour, je comprends pas quand on doit faire les motifs de côté. Merci pour l’explication.
03.08.2025 - 14:34DROPS Design answered:
Bonjour Monique, ce châle se tricote de haut en bas, on le tricote au point mousse avec d'abord une seule fois le point ajouré au milieu, puis, quand le châle a atteint la longueur/le nombre de mailles souhaité, on va le terminer par une rangée du point ajouré pour le bas du châle. Bon tricot!
04.08.2025 - 09:07
![]() Stephanie wrote:
Stephanie wrote:
Fikk ikke begynt en gang, fordi jeg skjønner absolutt ikke hvordan jeg skal begynne... Trodde jeg trengte ekstra pinnene med en gang 🤔
14.03.2025 - 14:09DROPS Design answered:
Hei Stephanie. Ekstra pinne i oppskriften er ikke en ekstra strikkepinne, men henviser til når man strikker 1 rad (= 1 rekke = 1 pinne) på strikketøyet. Når man har strikket frem og tilbake, har man strikket 1 pinne frem og 1 pinne tilbake (eller 2 rader / 2 rekker). Slik starter du: Legg opp 49 masker på rundpinne. Strikk 5 pinner rett, deretter settes 2 merketråder 5 masker inn fra hver side = 39 m mellom trådene (midtparti). Følg resten av oppskriften. Lykke til. mvh DROPS Design
17.03.2025 - 12:03
![]() Stephanie wrote:
Stephanie wrote:
Hva trenger man extra pinnene til?
12.03.2025 - 16:47DROPS Design answered:
Hej Stephanie, hvilken extra pinne? Hvor langt er du kommet i opskriften?
14.03.2025 - 13:51
![]() Julianna Agoritsas wrote:
Julianna Agoritsas wrote:
That helps very much thank you!!!
10.02.2023 - 03:18
![]() Julianna Agoritsas wrote:
Julianna Agoritsas wrote:
I am very sorry but how do you go from 39 stitches to 35 for the center panel?
08.02.2023 - 14:37DROPS Design answered:
Dear Mrs Agoritsas, you should insert a marker on either side of the middle 39 stitches which are worked as follows: 2 sts in garter stitch, 35 sts in diagram M.1 and 2 sts in garter stitch. Hope this can help. Happy knitting!
08.02.2023 - 16:44
![]() Julianna Agoritsas wrote:
Julianna Agoritsas wrote:
Thank you but after the 12 rows in garter stitch then you start on M1 of the diagram. Do you count to the middle? I am an experienced knitter but this is a confusing pattern in English It just isn't clear .....I wish I knew Norwegian !!!
07.02.2023 - 14:30DROPS Design answered:
Dear Mrs Agoritsas, M.1 will be then worked over the middle 35 stitches, ie Marker, 2 sts, M.1 (= 35 sts), 2 sts, Marker - and you will increase as before, before the first marker and after the 2nd marker. Happy knitting!
07.02.2023 - 17:08
![]() Julianna Agoritsas wrote:
Julianna Agoritsas wrote:
I believe I get that you need two increases to make the edges longer and and keep the 39 stitches for the back !!!so that the double yarn over is an increase done on the edge before marker!!!
06.02.2023 - 15:39DROPS Design answered:
Dear Mrs Agoritsas, no you should increase 1 st at the beg of row + 2 sts on mid back + 1 st at the end of row, just as explained under INCREASING TIP: - see also previous answer. Happy knitting!
06.02.2023 - 16:07
|
||||||||||||||||
Lady Splendour#ladysplendourshawl |
||||||||||||||||
|
|
||||||||||||||||
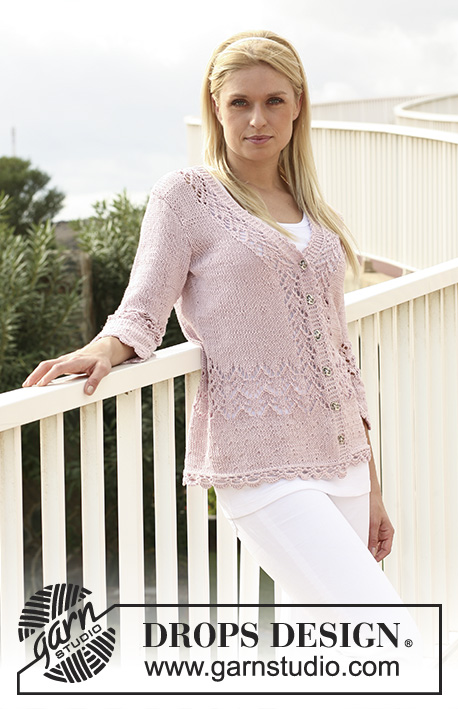
DROPS shawl in garter st with lace pattern in ”Alpaca”.
DROPS 111-6 |
||||||||||||||||
|
PATTERN: See diagram M.1. The diagram shows the pattern from the RS. GARTER ST (back and forth on needle): K all rows. INCREASING TIP: Make all inc from RS. Inc 4 sts on every other row (= the RS) throughout as follows: Inc 1 st at beg of row: work 4 garter sts, 1 double YO. On return row K all sts (K the first YO and slip the other off needle – to make the hole larger). Inc 2 sts mid back: beg 1 st before marker, K1, 1 double YO, marker, 2 garter sts, M.1 (= 35 sts), 2 garter sts, marker, 1 double YO, K1. On return row K all sts (K the first YO and slip the other off needle). Inc 1 st at the end of row: beg 4 sts before end of row, 1 double YO, 4 garter sts. On return row K all sts (K the first YO and slip the other off needle). EXTRA ROWS: Work row to marker, work sts on the middle section (= 39 sts), turn piece and work return row on the 39 sts, turn piece again and work all sts on row. MEASUREMENT TIP: Because of the weight of the yarn all measurements should be made while the garment is hanging. -------------------------------------------------------- SHAWL: Worked back and forth on circular needle in order to fit in all sts, from mid back on neckline and down, in garter st. NOTE! Make sure to start a new ball of yarn at the side and not mid piece. Cast on 49 sts on circular needle size 3.5 mm with Alpaca. Work 5 rows garter st and now insert 2 markers in piece 5 sts in from each side = 39 sts between markers (= middle section). Now inc on every other row (= the RS) at both sides and mid back until finished measurements – SEE INCREASING TIP! Work 12 rows garter st on all sts and now work M.1 on the middle 35 sts with remaining sts in garter st as before. Work 2-3 vertical repeats of M.1, BUT in the last repeat finish when 16 rows remain (after the lace pattern). There are now 369-533 sts on row. Work 8 rows garter st on all sts – continue to inc. Now work next row as follows: K4, * K2 tog, 1 double YO *, repeat from *-*, until 5 sts remain and finish with K5. Work 7 rows garter st on all sts, AT THE SAME TIME on row 2 and 6 (= row from RS) work 2 extra rows on the middle section – see above. There are now 401-565 sts on row. Continue to inc. Work next row as follows from RS: 5-17 garter sts, M.1 (= 35 sts) a total of 5-7 times, 1 garter st, marker, 2 garter sts, M.1, 2 garter sts, marker, 1 garter st, M.1 a total of 5-7 times, 5-17 garter sts. Work 1 vertical repeat of M.1, BUT finish the repeat when 16 rows of diagram remain (after lace pattern), AT THE SAME TIME on row 33 in M.1 (see arrow) work 2 extra rows on the middle section. Work 8 rows garter st on all sts, AT THE SAME TIME on row 3 and 7 work 2 extra rows on the middle section. Now work next row as follows: K4, * K2 tog, 1 double YO *, repeat from *-*, until 4 sts remain, K4. Continue in garter st on all sts until piece measures approx 75-85 cm in the centre – SEE MEASUREMENT TIP! Cast off loosely. |
||||||||||||||||
Diagram explanations |
||||||||||||||||
|
||||||||||||||||
 |
||||||||||||||||
Have you finished this pattern?Tag your pictures with #dropspattern #ladysplendourshawl or submit them to the #dropsfan gallery. Do you need help with this pattern?You'll find 14 tutorial videos, a Comments/Questions area and more by visiting the pattern on garnstudio.com. © 1982-2026 DROPS Design A/S. We reserve all rights. This document, including all its sub-sections, has copyrights. Read more about what you can do with our patterns at the bottom of each pattern on our site. |
||||||||||||||||


With over 40 years in knitting and crochet design, DROPS Design offers one of the most extensive collections of free patterns on the internet - translated to 17 languages. As of today we count 324 catalogues and 12290 patterns translated into English (UK/cm). 12290
We work hard to bring you the best knitting and crochet have to offer, inspiration and advice as well as great quality yarns at incredible prices! Would you like to use our patterns for other than personal use? You can read what you are allowed to do in the Copyright text at the bottom of all our patterns. Happy crafting!
Post a comment to pattern DROPS 111-6
We would love to hear what you have to say about this pattern!
If you want to leave a question, please make sure you select the correct category in the form below, to speed up the answering process. Required fields are marked *.