Comments / Questions (17)
![]() Nancy wrote:
Nancy wrote:
Hallo, I'm stuck on exactly which section to decrease for the neckband (Neckband: When the piece measures 45 cm dec 1 st for the neck inside of the 14 sts in garter st every other row). Specifically where the instruction says to dec "inside of the 14 sts": should I dec in the middle of the 10 collar + 4 buttonband stitches? Or should I begin the dec in the straight stitches next to the buttonband? Thank you in advance !
08.02.2019 - 23:42DROPS Design answered:
Hi Nancy, You decrease in the stocking stitch section, just inside the band/collar stitches. Happy knitting!
09.02.2019 - 08:36Janice Thiele wrote:
How can I download this garment in English. Thanks
24.05.2018 - 01:04DROPS Design answered:
Hi Janice, Under the photograph of the model you can click on the arrow beside the word "norsk" which means Norwegian and change the language. Happy knitting!
24.05.2018 - 08:08
![]() Monique Van Elsen wrote:
Monique Van Elsen wrote:
Is de bovenwijdte die staat aangegeven, de breedte van het vest of is dat je eigen bovenwijdte. Mijn maat is bij het ene artikel XL en bij het andere XXL. Bij dit patroon scheelt het 10cm. Welke maat kan ik het beste maken? Mijn eigen bovenwijdte is 115cm.
09.12.2016 - 10:08DROPS Design answered:
Hoi Monique. Lees hier hoe je onze maatschema's moet lezen en begrijpen. Dan kan je goed je maat kiezen.
12.12.2016 - 15:24
![]() Mireille wrote:
Mireille wrote:
Bij de kraag is het me niet helemaal duidelijk. Je moet 10 steken extra opnemen dan 2 naalden recht breien en vervolgens 2 naalden 7 steken recht breien. Wat gebeurt er met de rest van de steken? En na die 2 naalden, hoe brei je het dan? Ik ben nog niet zo'n ervaren breier, dus het verhaal van de kraag vind ik best ingewikkeld. Voor de rest een prachtvest.
19.07.2015 - 10:24DROPS Design answered:
Hoi Mireille. Tegelijkertijd met het breien van de st voor de kraag, ga je door met het breien van de hals (minderen) en het afkanten van het armsgat. Als alle minderingen voor het armsgat en de hals voltooid zijn, resteren er 18-18-18-19-19 st (= 8-8-8-9-9 schouder st + 10 kraag st). Kant bij een hoogte van 76-78-80-82-84 cm de 8-8-8-9-9 st voor de schouder af. Daarna brei je verkorte toeren over de 10 kraagsteken zoals beschreven. Hoe je de kraag moet monteren staat in Afwerking.
29.07.2015 - 13:59Zuzana Guldanova wrote:
Hallo, mir ist nicht klar, ob der Kragen extra gestrickt wird, da ja die rundung fuer den halsausschnitt gearbeitet werden soll. Wo soll der kragen wieder aufgenommen werden? Vielen dank, mfg Zuzana
20.10.2014 - 21:32DROPS Design answered:
Sie schlagen ja bei einer Länge von 43 cm 10 neue M an der vorderen Mitte für den Kragen an. Die Abnahmen für den Halsausschnitt machen Sie in jeder 2. R nach den 14 kraus-re-M am vorderen Rand, also innerhalb des Kragens, nicht direkt am Rand. Der Kragen wird dann wie beschrieben weitergestrickt. Die Anleitung wird noch sprachlich überarbeitet, dann ist das vielleicht etwas deutlicher.
20.10.2014 - 22:15
![]() Elena wrote:
Elena wrote:
Buongiorno, complimenti per il modello! Sto provando ad eseguirlo, ma leggendo la spiegazione del lavoro, non capisco cosa si intende per divisione, cosa devo fare quando scrivete "non continuare con la divisione"? grazie per l'aiuto
26.11.2013 - 08:55DROPS Design answered:
Buongiorno Elena, abbiamo leggermente modificato il testo: ai lati c'è uno spacco, con un bordo a m legaccio; ad una certa altezza lo spacco finisce e si continua a m rasata su tutte le m. Provi a vedere se il testo è più chiaro. Buon lavoro!!
26.11.2013 - 14:21
![]() Renoust wrote:
Renoust wrote:
Bonjour, Je crois qu'il y a un souci pour le nombre de pelotes indiqués. il faut compter plutôt 8 pelotes. car si j'ai bien compris il faut tricoter avec deux fil .... donc ca prend plus de laine. Sinon, si je n'ai pas bien saisi, il faudrait m expliquer. Merci
08.11.2013 - 23:31DROPS Design answered:
Bonjour Mme Renoust, la quantité DROPS Vienna est exacte, la veste est tricotée sur la base d'un échantillon de 6 m x 7 rangs en jersey = 10 x 10 cm. On ne tricote qu'avec 1 seul fil, seul le montage de chaque pièce et la ceinture se font avec le fil en double. Bon tricot!
09.11.2013 - 09:05
Gray Clouds |
|
|
|
|
DROPS Cardigan in Vienna
DROPS 82-25 |
|
|
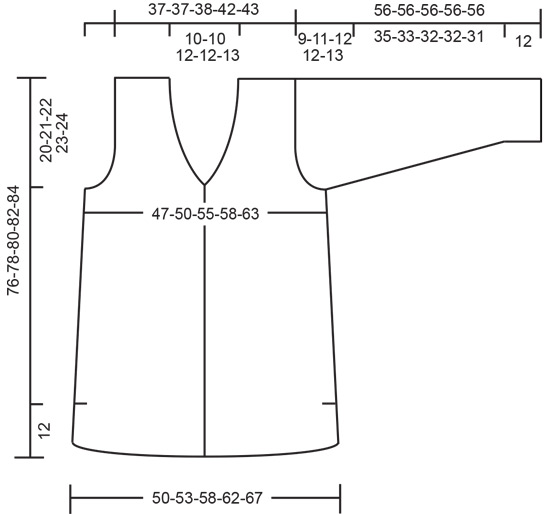
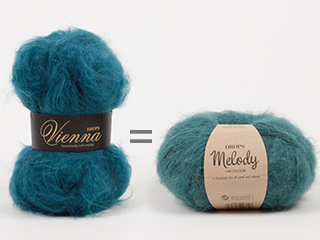
Knitting Tension: 6 stitches x 7 rows using 15mm needle in stocking stitch = 10x10cm Decreasing: All decreases are done from the right side of the cardigan within garter sts. For neckline decrease as follows: after garter st: slip st as if to knit it, knit 1, psso, before garter st: knit 2 together. Back: Cast on 30-32-35-37-40 sts using 2 threads of Vienna and 15mm needle, remove one thread and knit 2 rows garter stitch. Continue in stocking, but knit the first and last 2 sts garter (for split). When back measures 12 cm, discontinue the split and cast on 1 new st each side (edge st) = 32-34-37-39-42 sts. Continue in stocking stitch and 3 garter sts each side until there are 4 rows garter over the split. Hereafter, continue in stocking stitch over all sts and decrease 1 st each side when back measures 20 cm = 30-32-35-37-40 sts. When back measures 56-57-58-59-60 cm, decrease for armhole each side on every other row as follows: 3 sts 1 time, 2 sts 0-0-1-1-2 times and 1 st 1-2-1-1-2 times = 22-22-23-25-26 sts. When back measures 74-76-78-80-82 cm cast off middle 4-4-5-5-6 sts and knit each shoulder separately. Shape the neckline by decreasing 1 st on both neck edges = 8-8-8-9-9 sts left on each shoulder. Cast off when back measures 76-78-80-82-84 cm. Left Front: Cast on 19-20-21-22-24 sts (incl 4 front band sts) using 2 threads of Vienna and 15mm needle, remove 1 thread and knit 2 rows garter stitch. Tip: lift 1st st mid front off at beg of row and knit it in garter at the end to make the edge even. Continue in stocking stitch, but knit 4 front band sts and 2 sts at the side (for split) garter. When front measures 12 cm, discontinue the split and cast on 1 new st at the side (edge st) = 20-21-22-23-25 sts. Continue in stocking stitch and 3 garter sts at the side until there are 4 rows garter over the split. Continue in stocking stitch over all sts and decrease 1 st at side when front measures 35 cm = 19-20-21-22-24 sts. Read all of the rest before knitting it! Collar: When front measures 43 cm, cast on 10 new sts mid front. Continue lifting 1st st off, knit the following 13 sts garter and the rest in stocking stitch. Neckline: At the same time, when front measures 45 cm decrease for neckline within the 14 garter sts (see Decreasing), 1 st every other row 7-7-7-7-8 times. Armhole: At the same time as decreases are made for the neckline, decrease for armhole as on the back. When all decreases for neckline and armhole are made, there are 18-18-18-19-19 sts left. When front measures 76-78-80-82-84 cm, cast off 8-8-8-9-9 sts for shoulder = 10 collar sts left on needle. Collar: Continue knitting the 10 collar sts in garter as follows: *1st row: garter over all sts, 2nd row: garter over all sts, 3rd row: garter over only the 7 front sts, 4th row: garter over only the 7 front sts*, repeat from *to* until the collar measures 5-5-6-6-6.5 cm on the inner side (to be stitched to back neckline) – it will measure 10-10-12-12-13 on the outer side. Right Front: Cast on and knit as left front, but mirrored. Sleeves: Cast on 16-17-18-19-20 sts (incl 1edge st each side) using 2 threads of Vienna and 15mm needle. Remove 1 thread, knit 6 rows garter stitch and continue in stocking stitch. When sleeve measures 12 cm., increase 1 st each side every 11-10-9.5-7.5-7 cm a total of 4-4-4-5-5 times = 24-25-26-29-30 sts. When the sleeve measures 47-45-44-44-43 cm, decrease (loosely) for armhole each side on every other row as follows: 3 sts 1 time, and then 1 st until sleeve measures 54 cm. Cast off 3 sts each side, knit one row and cast off remaining sts. Sleeve measures approx 56 cm. To make up: Join shoulders. Stitch together collar centre back and attach collar to back neckline. Set in sleeves and join side and arm seems. Belt: Cast on 7 sts using 2 threads of Vienna and 15mm needle and knit 120-140 cm garter stitch. Cast off. The whole belt is knitted with 2 threads! |
|
 |
|
Have you finished this pattern?Tag your pictures with #dropspattern or submit them to the #dropsfan gallery. Do you need help with this pattern?You'll find 15 tutorial videos, a Comments/Questions area and more by visiting the pattern on garnstudio.com. © 1982-2026 DROPS Design A/S. We reserve all rights. This document, including all its sub-sections, has copyrights. Read more about what you can do with our patterns at the bottom of each pattern on our site. |


Post a comment to pattern DROPS 82-25
We would love to hear what you have to say about this pattern!
If you want to leave a question, please make sure you select the correct category in the form below, to speed up the answering process. Required fields are marked *.