
Popular categories
Looking for a yarn?


Comments / Questions (16)
![]() Claire wrote:
Claire wrote:
Pattern 51-22 There is a mistake in the English version of this pattern. It says make a buttonhole at 1 cm then 13.5 cm etc. In the Dutch version it says to make buttonholes at 1 cm, then 7 cm etc. This needs to be corrected.
17.02.2026 - 12:28
![]() Cajsa wrote:
Cajsa wrote:
Rolig att sticka och så nöjd med resultatet !
26.09.2025 - 17:38
![]() Jeanette Holm wrote:
Jeanette Holm wrote:
Hej Jeg har brug for hjælp til mønstret. På bærestykket ser det ud til, at være glatstrik , men på mønstret skal der strikkes ret på alle pind eller er det mig som misforstår beskrivelsen? vh. Jeanette Holm
01.04.2025 - 15:28DROPS Design answered:
Hei Jeanette. Det strikkes glattstrikk (men med 1 vrang maske hver 6. maske, se M.1). Diagrammet ses fra retten. For lettere å forstå, kunne det i diagramteksten stått ved den blanke ruten rett fra retten, vrang fra vrangen. mvh DROPS Design
07.04.2025 - 09:53
![]() Gesine Temme wrote:
Gesine Temme wrote:
Guten Tag! In der Anleitung für die Ärmel steht: " Wenn M.3 zu Ende ....und gleichzeitig mit den Zunahmen beginnen, dafür abwechselnd in jeder und in jeder (??) 2. Rd 2 M .... an unteren Ärmelmitte zunehmen. " Ich habe das so verstanden, dass ich am Anfang und am Ende jeder glatt rechts gestrickten Reihe je 1 M zunehmen soll. Ist das richtig?
11.03.2023 - 10:58DROPS Design answered:
Liebe Frau Temme, die Ärmel werden in Runden mit Nadelspiel gestrickt, nach M.3 gestrickt wird, stricken Sie M.2 und gleichzeitig, nehmen Sie 2 Maschen (1 M am Ende + 1 M am Anfang der Runde) in jeder 2. Runde zu. Viel Spaß beim stricken!
13.03.2023 - 09:18
![]() Susanne Glans wrote:
Susanne Glans wrote:
Guten Tag Mit der angegebenen Maschenprobe wird die Jacke 125 cm breit für die Grösse L. Viel zu weit....?????
12.05.2022 - 21:41DROPS Design answered:
Liebe Frau Glans, die 288 angeschlagenen Maschen gelten für beide Vorderteile + Rückenteil, davon sind die mittleren 138 Maschen für den Rückenteil, mit 23 M = 10 cm sind diese 138 M 60 cm. Viel Spaß beim stricken!
16.05.2022 - 10:49
![]() Lea Jensen wrote:
Lea Jensen wrote:
Mange tak for svar - men jeg mente ikke at der er problemer med montering af halskant. Det der er mit problem er lukning af masker til halsudskæring, når der samtidig er den retstrikkede stolpe til knapper og knaphul foran på jakken. Hvordan lukkes der af til halsudskæring på forstykkerne?
27.08.2021 - 16:06DROPS Design answered:
Hei Lea. Når du starter fellingene til hals da er stolpen ferdig. Siste knapphull strikkes når arbeidet måler 37 (39 eller 39) cm og når arbeidet måler 38 (40 eller 40) cm felles til hals på hver 2.pinne. Første gang du feller til hals, 8 (9 eller 9) masker felles det da også over stolpemaskene. Mvh DROPS design
30.08.2021 - 11:47
![]() Lea Jensen wrote:
Lea Jensen wrote:
Jeg forstår ikke hvordan der skal afsluttes /lukkes masker af til halsudskæring på forstykkerne - samtidig med, at den retstrikkede kant føres op.
27.08.2021 - 08:55DROPS Design answered:
Hei Lea. Halskanten strikkes til slutt. Her mangler det noen ord under montering. Vi har tilføyd "rundt halskanten" under MONTERING slik: Plukk opp ca 110 m på p 3,5 med naturhvit cotton viscose rundt halskanten og strikk 2 riller, fell av....... Takk for at du gjorde oss oppmerksom på dette. mvh DROPS design
27.08.2021 - 14:14
![]() BCH wrote:
BCH wrote:
Bonjour j aimerai faire ce tricot avec des manches longues, pourriez vous me donner quelques explications diminution + longueur et combien de pelote en plus ? Merci de votre aide Bonne journée Béatrice
17.04.2021 - 09:25DROPS Design answered:
Bonjour Mme BCH, nous ne sommes malheureusement pas en mesure de pouvoir adapter chacun de nos modèles à chaque demande; toutefois, vous pourrez faire les ajustements souhaités en vous basant sur un modèle similaire de même tension, avec les manches souhaitées. Merci pour votre compréhension. Votre magasin pourra volontiers vous aider si besoin, même par mail ou téléphone. Bon tricot!
19.04.2021 - 07:55
![]() Claire Rothrock wrote:
Claire Rothrock wrote:
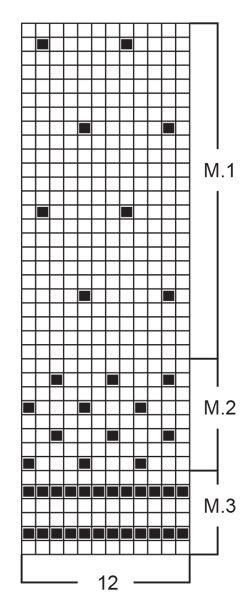
Thanks, but still have question. What are the symbols with black circles? Is the 2nd and fifth rows rows purl or plain? And the symbols with black circles further up in pattern?
13.09.2018 - 12:31DROPS Design answered:
Dear Mrs Rothrock, this is the 2nd symbol in diagram key, ie you will knit these sts from RS and purl them from WS. You start working M.3 from RS, ie on 2nd row you will knit all sts from WS and on row 5 you will purl all sts from RS. Happy knitting!
13.09.2018 - 13:17
![]() Claire Rothrock wrote:
Claire Rothrock wrote:
I don't understand the chart. Are all wrong side rows purl? I don't understand the answer above.. that all WS side rows (pattern shows no character therefore it should be all knit stitches). does the chart show all rows? Above you say it's a purl stitch. I'm lost! Would appreciate clarification.
13.09.2018 - 03:48DROPS Design answered:
Hi Claire, the diagram shows all the rows seen from the right side. So you have to follow the symbol indicated: for example, first row is Knit and the return row is pur. And so on. Remember to start reading the diagram from the bottom right corner. Happy knitting!
13.09.2018 - 06:42
|
|||||||
Kentucky Moon#kentuckymooncardi |
|||||||
|
|
|||||||
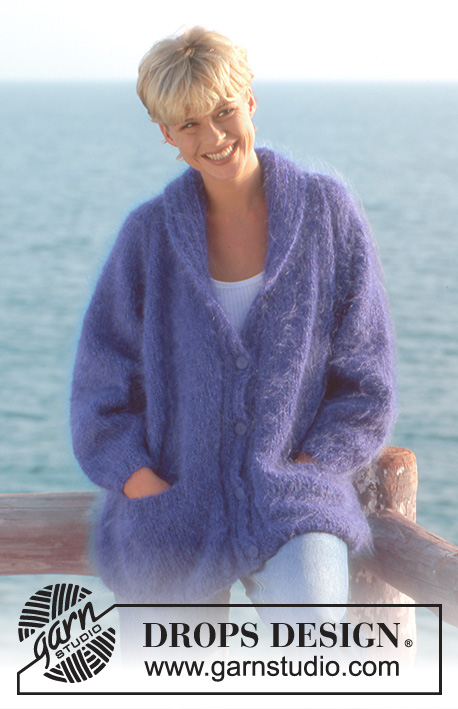
Short sleeved DROPS Cardigan in Safran and Cotton Viscose
DROPS 51-22 |
|||||||
|
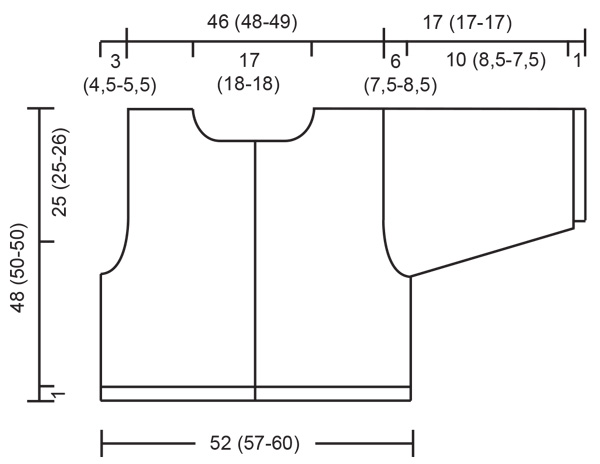
Gauge: 23 sts x 30 rows in stockinette st = 10 x 10 cm Pattern: See chart (1 chart = 1 repeat). The pattern is seen from the right side. Garter st, when knitting flat: Knit all sts, all rows. Garter st, when knitting in the round: *Rnd 1, knit. Rnd 2, purl.* Repeat from * - *. Buttonholes: When the work measures 1 cm, 13 (13.5-13.5) cm, 19 (20-20) cm, 25 (26.5-26.5) cm, 31 (33-33) cm and 37 (39-39) cm make buttonholes on the right front as follows: Bind off 3rd and 4th sts and cast on 2 new sts over the bound-off sts on the next row. Body: Cast on 252 (276-288) sts on circular needles with Cotton Viscose and knit 4 rows garter st. Keep the 6 sts on each edge in garter st for the button band and make buttonholes on the right side as instructed above; work the remaining sts in pattern. Begin with Pattern 3, then knit Pattern 2. When the work measures 13 cm, knit Pattern 3, then change to Safran and work Pattern 1. When the work measures 23 (25-24) cm knit the next row as follows: 64 (70-73) for the front, bind off 4 sts for the armhole, 116 (128-134) sts for the back, bind off 4 sts for the armhole, 64 (70-73) for the front. Knit the rest of each part separately. Front: = 64 (70-73) sts. Bind off at armhole edge every other row 3 sts 0 (1-1) time, 2 sts 2 (2-3) times, dec 1 st 1 (2-2) times = 59 (61-62) sts. When the work measures 38 (40-40) cm, shape neck: bind off at neck edge every other row 8 (9-9) sts 1 time, 3 sts 2 times, 2 sts 3 times, dec 1 st 6 times. Bind off when the work measures 48 (50-50) cm. Back: = 116 (128-134) sts. Shape armholes as on the front = 106 (110-112) sts. When the work measures 46 (48-48) cm bind off the center 36 (38-38) sts for the neck. Bind off 2 sts at each neck edge on the next row. Bind off all sts when the work measures 48 (50-50) cm. Sleeves: Cast on 90 (94-94) sts on double pointed needles with Cotton Viscose; join and place a marker at the join. Knit 4 rows garter st, then work Pattern 3. Change to Pattern 2 and inc 1 st each side of marker 13 (11-13) times, alternately every and every other row, working new sts in pattern = 116 (116-120) sts. When the work measures 7 cm work Pattern 3 and then change to Safran and Pattern 1. When the work measures 11 (9.5-8.5) cm bind off 2 sts each side of marker and knit the rest of the sleeve back and forth on the needle. Shape sleeve caps: bind off at each edge every other row 4 (3-3) sts 8 (10-12) times, bind off all sts. The work measures 17 cm. Assembly: Sew shoulder seams. Pick up 110 sts with Cotton Viscose around neck edge and knit 4 rows garter st, bind off all sts. Sew on sleeves and buttons. |
|||||||
Diagram explanations |
|||||||
|
|||||||
 |
|||||||
 |
|||||||
Have you finished this pattern?Tag your pictures with #dropspattern #kentuckymooncardi or submit them to the #dropsfan gallery. Do you need help with this pattern?You'll find 19 tutorial videos, a Comments/Questions area and more by visiting the pattern on garnstudio.com. © 1982-2026 DROPS Design A/S. We reserve all rights. This document, including all its sub-sections, has copyrights. Read more about what you can do with our patterns at the bottom of each pattern on our site. |
|||||||


With over 40 years in knitting and crochet design, DROPS Design offers one of the most extensive collections of free patterns on the internet - translated to 17 languages. As of today we count 324 catalogues and 12290 patterns translated into English (UK/cm). 12290
We work hard to bring you the best knitting and crochet have to offer, inspiration and advice as well as great quality yarns at incredible prices! Would you like to use our patterns for other than personal use? You can read what you are allowed to do in the Copyright text at the bottom of all our patterns. Happy crafting!
Post a comment to pattern DROPS 51-22
We would love to hear what you have to say about this pattern!
If you want to leave a question, please make sure you select the correct category in the form below, to speed up the answering process. Required fields are marked *.