
Popular categories
Looking for a yarn?


Comments / Questions (41)
![]() Marjo wrote:
Marjo wrote:
Ich finde es schade, dass es kein Foto von der Rückseite gibt.
28.05.2022 - 11:26
![]() Tina wrote:
Tina wrote:
Kan I venligst rette garn forbrug, det passer ikke og kan se andre har samme problem, jeres beregning er forkert hvis I har regnet med 8 masker i rapporterne, de fleste pinde er med 9 masker. Der skal bruges 100 gram mere, meget irriterende hvis man ikke kan få fat i samme indfarvning, ellers en super fin top.
14.04.2022 - 11:28DROPS Design answered:
Hej Tina, Tak for information - design kigger på det og der kommer en rettelse!
21.04.2022 - 14:57
![]() Winnie Akselsen wrote:
Winnie Akselsen wrote:
Hej, jeg har simpelthen problemer med A1, jeg har prøvet at lave bare to rapporter men allerede ved 3 pind har jeg 4 masker for lidt. Hvad mon jeg gør forkert? Mvh Winnie Akselsen
24.03.2022 - 15:23DROPS Design answered:
Hei Winnie. Når du strikket etter diagram A.1 skal det på 1.-4. omgang ha det samme maske antallet. Kun rett og vrangmasker. Når du begynner på 5. omgang strikkes det 2 masker vrang sammen 2 steder, MEN det lages også 2 kast, slik at her blir også maskeantallet det samme. Men når du skal strikke omgang 15 minsker maskeantallet med 2 masker pr gang A.1 strikkes. Om du har veldig mange maskemarkører kan du sette en maskemarkør mellom hver rapport av diagrammet, så har du bedre oversikt over hvor du evnt "mister" masker. mvh DROPS Design
28.03.2022 - 12:00
![]() Gitte wrote:
Gitte wrote:
Meget fin model, men jeg må bruge 100g mere garn end angivet i opskriften, drops Safran. 😊
06.08.2021 - 10:12
![]() MajBritt wrote:
MajBritt wrote:
Stickade storlek smal, men behövde använda mer garn än angivet. 250 gr istället för 150 gr
04.08.2021 - 11:56
![]() Mariell wrote:
Mariell wrote:
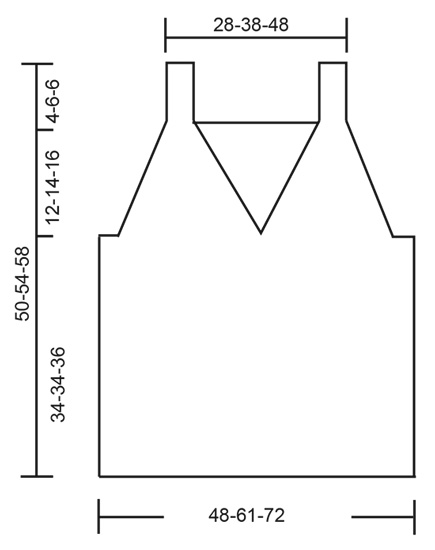
Hei, Om brystvidden er 96 cm på den man skal strikke til, hvilken størrelse bør man strikke? Det står at "Målene på målskissen viser plagget i strukket tilstand, toppen blir smalere pga mønsteret", så jeg skjønner ikke hvordan jeg skal ta hensyn til det i forhold til valg av størrelse. Er personen da en S/M eller en L/XL?
03.08.2021 - 19:05DROPS Design answered:
Hei Mariell, Du strikker den størrelsen på målskissen som gir dine mål. Dette betyr at plaget sitter fint, men når det ikke brukes er det smalere enn vanlig pga mønsteret. God fornøyelse!
04.08.2021 - 09:03
![]() CHIARA CELLAMARE wrote:
CHIARA CELLAMARE wrote:
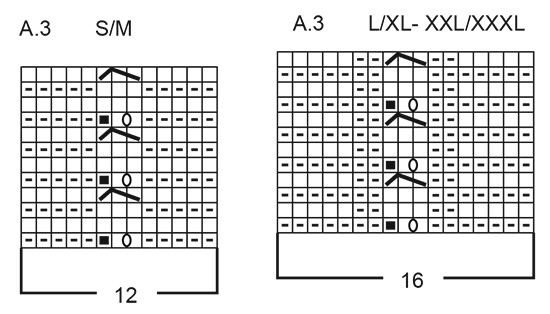
Buongiorno una volta avviate le maglie non si unisce in tondo? Si unisce in tondo solo in un secondo momento? grazie mille! Chiara Avviare 512-640-768 maglie con i ferri circolari n° 3 mm con Safran. Lavorare A.1 su tutte le maglie (= 64-80-96 ripetizioni di 8 maglie). Alla fine di A.1, ci sono 256-320-384 maglie sul giro. Lavorare A.2 su tutte le maglie (= 32-40-48 ripetizioni di 8 maglie).
04.07.2021 - 22:29DROPS Design answered:
Buonasera Chiara, il lavoro parte subito in tondo. Buon lavoro!
05.07.2021 - 19:35
![]() Chris wrote:
Chris wrote:
Top 221-13 Oh pardon !!! C'est pour les bretelles. Désolée. Meilleures salutations
27.06.2021 - 17:02
![]() Chris wrote:
Chris wrote:
Bonjour. Où est le diagramme A 3 ? Je ne vois aucune indication dans les explications. Merci d'avance de la réponse. Pour le top 221-13 !
27.06.2021 - 16:59DROPS Design answered:
Bonjour Chris, les diagrammes A.3 des tailles S/M et L/XL-XXL-XXXL se trouvent juste entre les diagrammes A.1 et A.2 et le schéma des mesures. Bon tricot!
28.06.2021 - 07:54
![]() Chris wrote:
Chris wrote:
Bonjour. Où est le diagramme A 3 ? Je ne vois aucune indication dans les explications. Merci d'avance de la réponse.
27.06.2021 - 16:58
|
|||||||||||||||||||
Blue Cove#bluecovetop |
|||||||||||||||||||
 |
 |
||||||||||||||||||
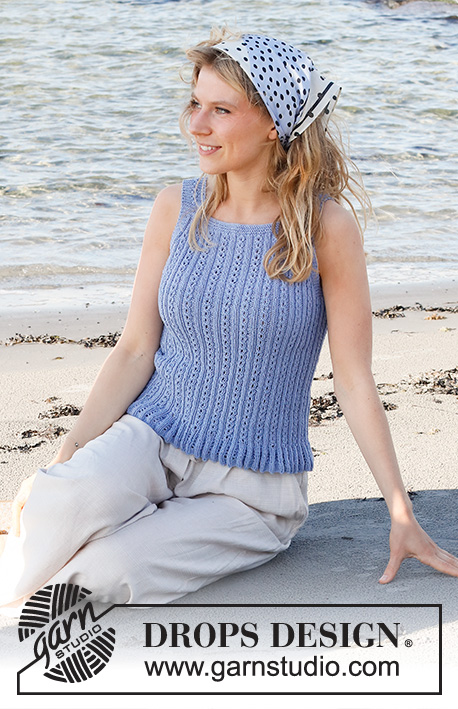
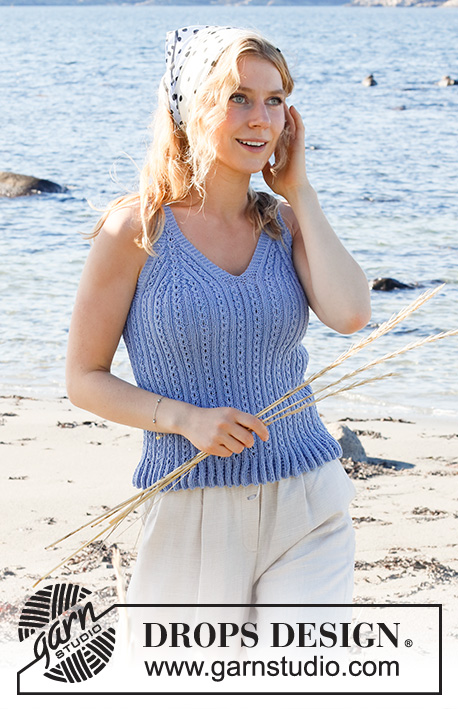
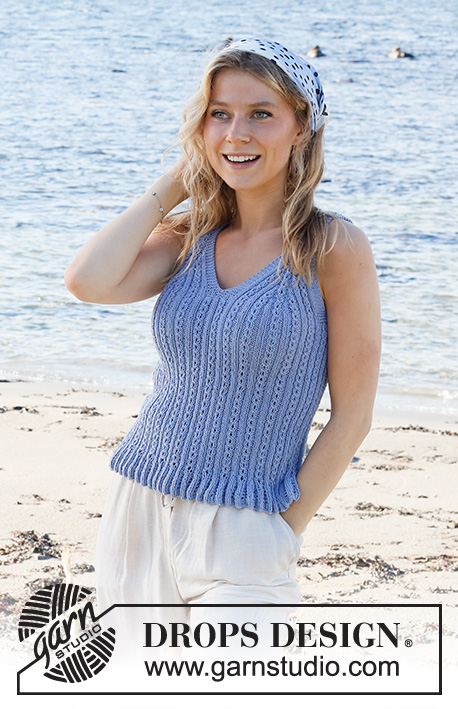
Knitted top in DROPS Safran. Piece is worked bottom up with pattern. Size: S - XXXL
DROPS 221-13 |
|||||||||||||||||||
|
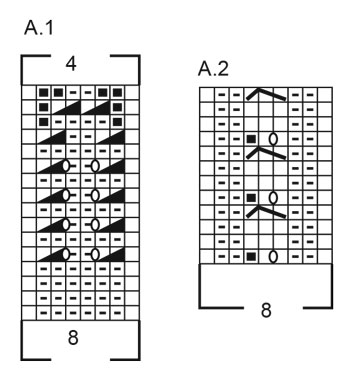
------------------------------------------------------- EXPLANATION FOR THE PATTERN: ------------------------------------------------------- GARTER STITCH (worked in the round): 1 ridge vertically = 2 rounds, i.e. knit 1 round and purl 1 round. GARTER STITCH (back and forth): Knit all rows. 1 ridge vertically = knit 2 rows. PATTERN: See diagrams A.1 to A.3. Diagrams show all rows in pattern seen from the right side. NOTE! Stitches in A.2 are always counted as 8 stitches even though stitches in cable alternates between 2 and 3 stitches. Stitches in A.3 are always counted as 12 stitches in S/M and 16 stitches in L/XL and XXL/XXXL. See diagram for your size in A.3. DECREASE TIP-1 (applies to back piece): Decrease inside 7 stitches in each side. Decrease by purling 2 together. DECREASE TIP-2 (applies to front pieces): Decrease on each side of a cable + 1 purl stitch in each side. All decreases are done from the right side. DECREASE 1 STITCH ON EACH SIDE OF CABLE AS FOLLOWS: Work until 3 stitches remain before cable, purl 2 together, purl 1, work cable, purl 1, purl 2 together = 2 stitches decreased. DECREASE 2 STITCHES ON EACH SIDE OF CABLES AS FOLLOWS: Work until 5 stitches remain before cable, purl 2 together, purl 2 together, purl 1, work cable, purl 1, purl 2 together, purl 2 together = 4 stitches decreased. ------------------------------------------------------- START THE PIECE HERE: ------------------------------------------------------- TOP - SHORT OVERVIEW OF THE PIECE: Work body in the round on circular needle, from the bottom and up to armholes. Then work back piece and the 2 front pieces separately, back and forth on circular needle until finished measurements. Straps on front piece are fastened to back piece. BODY: Cast on 512-640-768 stitches on circular needle size 3 mm with Safran. Work A.1 over all stitches (= 64-80-96 repetitions of 8 stitches). When A.1 has been worked 1 time vertically, there are 256-320-384 stitches on round. Work A.2 over all stitches (= 32-40-48 repetitions of 8 stitches). NOTE! Stitches in A.2 are always counted as 8 stitches even though stitches in cable alternates between 2 and 3 stitches. Work A.2 in the round – insert at the same time 1 marker thread at the beginning of round (= left side when garments is worn), and 1 marker thread after 128-160-192 stitches (= right side when garment is worn). Both marker threads are between 2 knit stitches. Move the marker thread upwards when working. REMEMBER THE KNITTING TENSION! When piece measures 33-33-35 cm, work next round as follows (approx. 1 cm remains until piece is divided mid front and decrease for armholes): NOTE! Adjust so that next round worked, is a even round in pattern, this is important so that the cable row is from right side when piece is worked back and forth. Work in GARTER STITCH over the first 15-15-15 stitches – read explanation above, work pattern as before over the next 42-58-74 stitches, work in garter stitch over the next 14 stitches, AT THE SAME TIME decrease 4 stitches evenly over these stitches (= 10 stitches mid front), work pattern as before over the next 42-58-74 stitches, work in garter stitch over the next 30-30-30 stitches, work pattern as before over the next 98-130-162 stitches (= back piece), and work in garter stitch over the last 15-15-15 stitches. There are 128-160-192 stitches on back piece and 124-156-188 stitches on front piece. Continue pattern like this until 3 ridges have been worked over stitches in the side. On next round cast off for armholes, i.e. work next round as follows: Cast off 10-10-10 stitches for armhole, work 5 stitches in garter stitch, continue pattern as before over the next 42-58-74 stitches, work 10 stitches in garter stitch (= mid front), continue pattern as before over the next 42-58-74 stitches, work 5 stitches in garter stitch, cast off 20-20-20 stitches for armhole, work 5 stitches in garter stitch, continue pattern as before over the next 98-130-162 stitches, work 5 stitches in garter stitch, and cast off the remaining 10-10-10 stitches for armhole. Cut the yarn. Finish back piece and front pieces separately. BACK PIECE: = 108-140-172 stitches. Begin from wrong side and work 1 row in PATTERN as before with 5 edge stitches in GARTER STITCH - read explanation above, in each side. Continue with A.2 and in garter stitch, at the same time decrease for armhole in each side on every row from right side - read DECREASE TIP-1! Decrease 17-19-23 times in total = 74-102-126 stitches remain. Work 3 ridges back and forth over all stitches. Cast off - make sure that the cast-off edge is not too tight. Back piece measures approx. 12-14-16 cm from where piece was divided for front piece and back piece. FRONT PIECE: = 104-136-168 stitches. Divide the piece mid front and slip half the stitches on 1 stitch holder or extra needle. Then work first part as explained below. PART-1: = 52-68-84 stitches. Begin from wrong side and work 1 row in pattern as before with 5 edge stitches in garter stitch in each side. Insert 1 marker between the 2 middle stitches on row (= in the middle of the middle cable). Marker indicates the middle. Continue to work pattern as before with 5 edge stitches in garter stitch in each side while at the same time decreasing on each side of the middle on every other row (i.e. every row from the right side) - read DECREASE TIP-2. Decrease 1 stitch on each side of the middle cable 20-18-18 times in total, then decrease 2 stitches on each side of the middle cable 0-4-8 times in total = 12-16-16 stitches remain on needle for strap, and front piece measures approx. 12-14-16 cm from where piece was divided into front piece and back piece. Work strap as explained below. STRAP: = 12-16-16 stitches. Work A.3 (= 12-16-16 stitches) - see diagram for your size. Work first row from wrong side: Work pattern back and forth until the strap measures approx. 9-13-13 cm – try the top on and work to desired length, strap should continue over the shoulder and down to back piece. Cast off. PART-2: Slip the 52-68-84 stitches from stitch holder or extra needle back on circular needle size 3 mm, and work part-2 the same way as part-1. Then work strap the same way as on part-1. Cast off. ASSEMBLY: Fasten straps to back piece - begin at the edge in each side and fasten with 1 grafting/kitchener stitch in every stitch. Fasten off. |
|||||||||||||||||||
Diagram explanations |
|||||||||||||||||||
|
|||||||||||||||||||
 |
|||||||||||||||||||
 |
|||||||||||||||||||
 |
|||||||||||||||||||
Have you finished this pattern?Tag your pictures with #dropspattern #bluecovetop or submit them to the #dropsfan gallery. Do you need help with this pattern?You'll find 23 tutorial videos, a Comments/Questions area and more by visiting the pattern on garnstudio.com. © 1982-2026 DROPS Design A/S. We reserve all rights. This document, including all its sub-sections, has copyrights. Read more about what you can do with our patterns at the bottom of each pattern on our site. |
|||||||||||||||||||


With over 40 years in knitting and crochet design, DROPS Design offers one of the most extensive collections of free patterns on the internet - translated to 17 languages. As of today we count 324 catalogues and 12290 patterns translated into English (UK/cm). 12290
We work hard to bring you the best knitting and crochet have to offer, inspiration and advice as well as great quality yarns at incredible prices! Would you like to use our patterns for other than personal use? You can read what you are allowed to do in the Copyright text at the bottom of all our patterns. Happy crafting!
Post a comment to pattern DROPS 221-13
We would love to hear what you have to say about this pattern!
If you want to leave a question, please make sure you select the correct category in the form below, to speed up the answering process. Required fields are marked *.