
Oblíbené kategorie
Hledáte přízi?


Komentáře / Otázky (168)
![]() Christiane napsala:
Christiane napsala:
Ich verstehe die Erklärung zum Diagramm "1 M auf eine Hilfsnadel hinter die Arbeit legen, 2 M re., 1 M li/re von der Hilfsnadel. Was bedeutet 1 M li/re, also wann rechts und wann links?
17.11.2025 - 21:23Odpověď DROPS Design :
Liebe Christiane, es kommt darauf an, an welcher Stelle Sie gerade im Perlmuster sind. Sie müssen die Masche so stricken, dass sie ins Perlmuster passt - oder zum Linksgestrick am rechten und linken Rand des Diagramms. Viel Spaß beim Stricken!
17.11.2025 - 21:58
![]() Sacha napsala:
Sacha napsala:
Ik zag nu dat in het Engels mijn vraag ook al door iemand gesteld is en heb ik het antwoord gevonden. De eerste/laatste steek van de kabel brei je in gerstekorrel en is dus afhankelijk van de steek in de onderliggende toer. Ik kan weer verder.
19.09.2025 - 19:12
![]() Sacha napsala:
Sacha napsala:
Deze leuke sloffen ben ik aan het maken. Ik weet ook hoe ik kabels moet maken, maar één ding in het patroon begrijp ik niet. Bij de kabel over 3 steken staat: op kabelnaald, 2r, 1av/r. Hoe is de 1 av/r bedoeld? Ik begrijp niet wat ik daar moet doen.
18.09.2025 - 14:47
![]() Prodache napsala:
Prodache napsala:
Prodache
27.05.2025 - 16:53
![]() Gaetane napsala:
Gaetane napsala:
Bonjour ! Avez vous pris la laine en double ? Merci !
05.12.2024 - 17:06Odpověď DROPS Design :
Bonjour Mme Gaetane, c'est un seul fil a tricoter ces chaussons. Bon tricot!
05.12.2024 - 17:45
![]() Kristen Hanson napsala:
Kristen Hanson napsala:
I am wondering what way is the best to sew up the slipper heel.
20.11.2024 - 01:19Odpověď DROPS Design :
Hi Kristen, The seam needs to be flat, so sew together edge to edge using grafting stitch will give the best result. Here is a link to a video if you need it: https://www.garnstudio.com/video.php?id=60&lang=en Happy crafting!
20.11.2024 - 06:47
![]() Nicolle napsala:
Nicolle napsala:
Hi, I am wondering how to switch to knitting in the round after i have knitted the piece (11,5cm size M) and cast on 4 new stitches. At this point i have all the stitches (41) on one double pointed needle. So, do I now split the knitting in 3 parts (e.g. 14+14+13stitches) onto 3 double pointed needles and work the piece in the round this way, startin from the beginning of A2? I would appreciate some advice on this (how to switch from knitting straight to knitting in the round). thank you!
06.09.2024 - 09:29Odpověď DROPS Design :
Hi Nicolle, yes, it's exactly as you write - divide the stitches on several DPN needles and join them in the round. Happy knitting! Milá Nicolle, ano, je to přesně tak, jak píšete - oka rozdělte na několik ponožkových jehlic a spojte do kruhu. Hodně zdaru!
06.09.2024 - 16:31
![]() Teresa Matheson napsala:
Teresa Matheson napsala:
Ok, I followed your instructions but I still end up knitting the whole circular part from the Wrong side. Probably because you stipulate the last row on straight needles is to be. RS row. "from RS: P 4, A.3, 13-13-15 sts moss st, A.1, P 4, cast on 4 new sts, work the first 4 sts, round beg here = 41-41-43 sts" so I still end up having to substitute in front for behind on the cables and pearling the knits/knitting the pearls. It gets the desired result though. 😃
29.04.2024 - 09:57
![]() Teresa Matheson napsala:
Teresa Matheson napsala:
I was just checking back through the comments as I'm confused. After 22 cm for the last 3 cm to 25cm do you work Aa as stocking stitch? One answer said yes, as you are decreasing and it's too hard to work the pattern while decreasing, but an earlier answer said continue to work the pattern (as in the photo) while decreasing. I did stocking stitch but it looks odd with hardly any of the second pattern.
21.04.2024 - 22:00Odpověď DROPS Design :
Dear Teresa, you need to continue working the pattern as you decrease. This means that the stitches in A.a are worked in stocking stitch from 22 cm onwards, while you continue working the pattern for A.1 and A.3. Then you decrease for the foot at one side of each marker which should correspond to A.a stitches or the sides of the A.1/A.3 charts, so the decreases shouldn't interrupt the rest of the pattern. Happy knitting!
22.04.2024 - 00:44
![]() Teresa Matheson napsala:
Teresa Matheson napsala:
Do you cast the 4 new stitches on the end of the row you have just finished and then knit them off onto a new needle having a split row? Or do you need to cast them onto a new needle and knit them back onto the full needle thus having the whole row on one needle. I did the latter as the first meant you started the row on stitch 5 of A2. But it meant that I knitted the rest of the slipper inside out.
21.04.2024 - 21:49Odpověď DROPS Design :
Dear Teresa, you work: P 4, A.3, 13-13-15 sts moss st, A.1, P 4, cast on 4 new sts, work the next 4 sts. Here you will start working the round; you have displaced the beginning of the round. The cast on stitches are worked as normal stitches and don't split the row. Happy knitting!
22.04.2024 - 00:47
|
|||||||||||||||||||
Celtic Dancer#celticdancerslippers |
|||||||||||||||||||
 |
 |
||||||||||||||||||
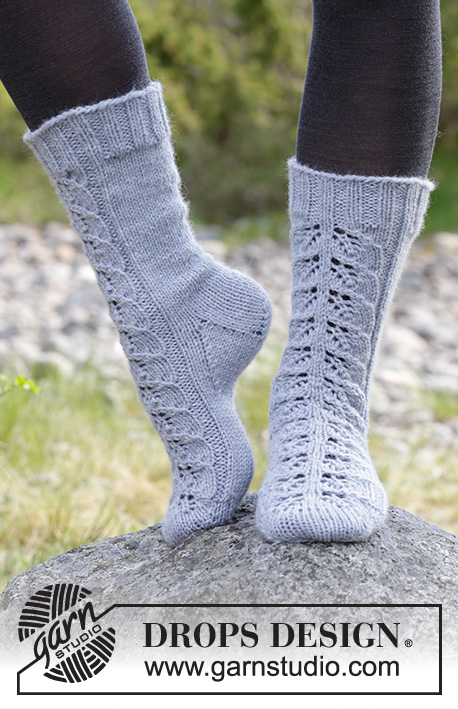
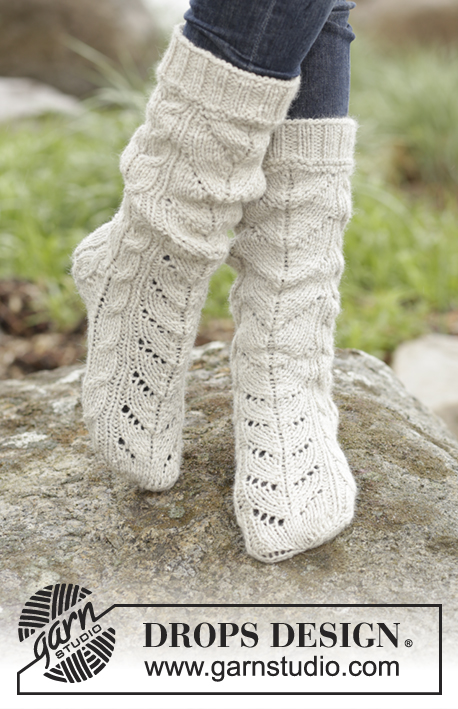
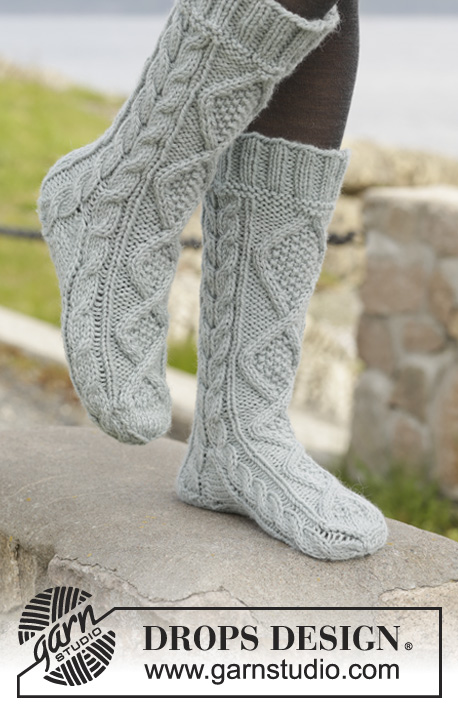
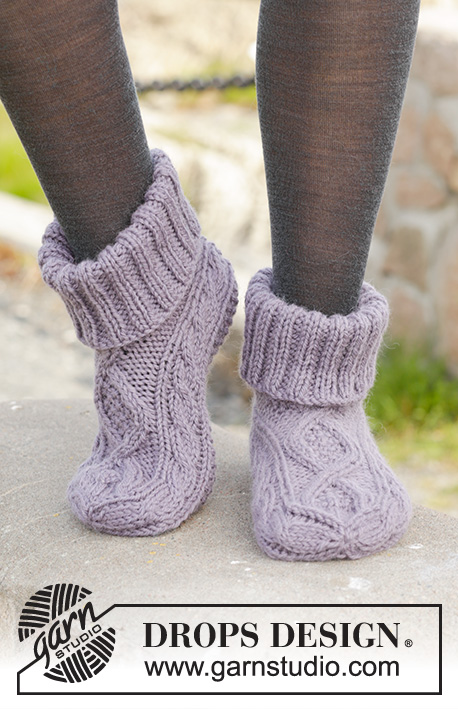
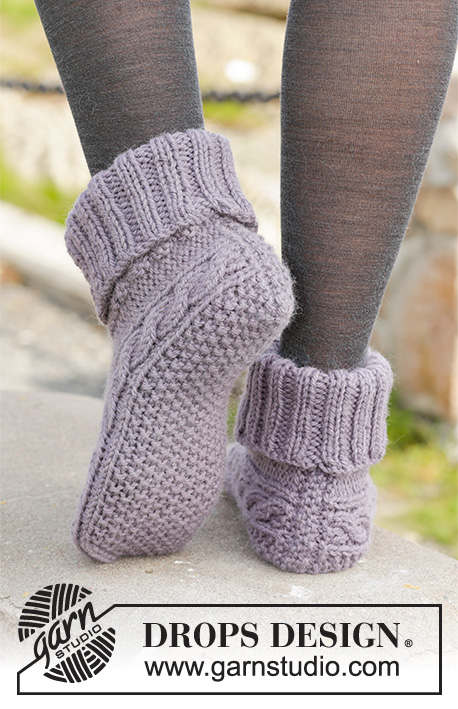
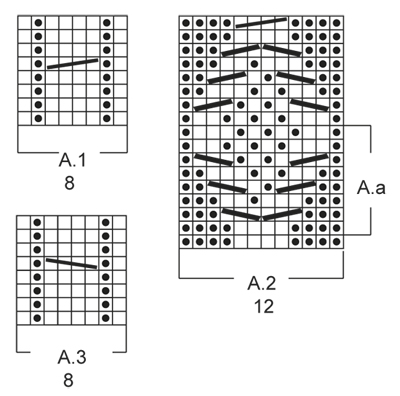
DROPS papučky - ponožky s copánkovým vzorem pletené z příze "Nepal". Velikost: 35-43.
DROPS 156-55 |
|||||||||||||||||||
|
VZOR: Viz schémata A.1-A.3; vzor je nahlížen z lícové strany. TIP - UJÍMÁNÍ: PŘED značkou splétáme 2 oka hladce. ZA značkou splétáme 2 oka hladce za zadní nit. VROUBKOVÝ VZOR: Pleteme stále hladce, lícové i rubové řady. 1 vroubek = 2 řady hladce. PERLIČKOVÝ (HRÁŠKOVÝ) VZOR: 1. ŘADA/KRUHOVÁ ŘADA: *1 oko hladce, 1 oko obrace*, *-* opakujeme. 2. ŘADA/KRUHOVÁ ŘADA: oka pleteme opačně, než se jeví - nad okem hladce tedy pleteme obrace, nad okem obrace pleteme hladce; tuto řadu stále opakujeme. TIP - MĚŘENÍ: Měříme podél středu copánku ve vzoru A.1/A.3. ---------------------------------------------------------- PAPUČKA – PONOŽKA: Pleteme v řadách od středu zadní strany. Na jehlice č.5 nahodíme přízí Nepal 33-33-35 ok (konec příze ponecháme dlouhý asi 20 cm; využijeme jej později při dokončování). Pleteme 1 vroubek vroubkovým vzorem – viz výše – a SOUČASNĚ v poslední řadě přidáme rovnoměrně 4 oka = 37-37-39 ok. Pokračujeme lícovou řadou takto: 4 oka obrace, vzor A.3 (= 8 ok), 13-13-15 ok perličkovým vzorem – viz výše, vzor A.1 (= 8 ok), končíme 4 oky obrace. V tomto rozvržení vzorů pokračujeme, oka obrace pleteme v rubových řadách hladce. Vzor A.1 a A.3 opakujeme až do ukončení práce. Ve výši 10,5-11,5-13 cm – viz TIP – MĚŘENÍ – pleteme lícovou řadu takto: 4 oka obrace, vzor A.3, 13-13-15 ok perličkovým vzorem, vzor A.1, 4 oka obrace, nahodíme 4 nová oka, upleteme první 4 oka, kruhová řada nyní začíná zde = 41-41-43 ok. Nyní pleteme v kruhových řadách na ponožkových jehlicích. Pleteme vzorem jako dosud, ale teď pleteme nad 4 oky obrace na každé straně dílu a 4 novými oky vzor A.2 (= 12 ok). Po dokončení celé 1 sekvence vzoru A.2 (na výšku) pleteme vzor A.a, a to až do výše 17-19-22 cm. Nyní pleteme nad oky vzoru A.a lícovým žerzejem, ppř. začneme plést lícový žerzej o něco dříve. Pleteme vzorem A.1 a A.3 až do ukončení práce. Teď umístíme do pleteniny 4 značky, takto: pleteme vzor A.3 a SOUČASNĚ vložíme 1. značku mezi 1. a 2. oko a 2. značku mezi 7. a 8. oko vzoru A.3, pleteme perličkovým vzorem jako dosud, pak pleteme vzor A.1 a SOUČASNĚ vložíme 3. značku mezi 1. a 2. oko a 4. značku mezi 7. a 8. oko vzoru A.1, zbylá oka upleteme hladce (= 14 ok nártu, 15-15-17 ok chodidla a 6 ok na každém boku). V následující kruhové řadě začneme tvarovat špičku, takto: ujmeme 1 oko ZA 2. značkou a 1 oko PŘED 3. značkou na chodidle, a to celkem 0-0-1x – viz TIP - UJÍMÁNÍ, upleteme zbylá oka = 14 o nártu a 15 ok chodidla (= 41 ok celkem). V následující kruhové řadě ujímáme takto: ujmeme 1 oko PŘED 1. a 3. značkou a 1 oko ZA 2. a 4. značkou (= ujmeme celkem 4 oka). Toto ujímání opakujeme v každé kruhové řadě, celkem 6x a SOUČASNĚ u posledního ujímání pleteme oka copánku ve vzoru A.1 a A.3 takto: 2 oka spleteme hladce za zadní nit, 2 oka spleteme hladce. Po dokončení veškerého ujímání máme na jehlicích 13 ok. Díl měří asi 20-22-25 cm. Pak přízi odstřihneme, protáhneme zbylými oky, stáhneme a zapošijeme. DOKONČENÍ: Počáteční, nahozenou řadu přeložíme napolovic (= střed zadní strany, paty) a koncem příze, který jsme si nechali při počátečním nahazování, patu sešijeme. LEM: Pleteme v kruhových řadách na ponožkových jehlicích po celém obvodu otvoru. Na ponožkové jehlice č.4 nabereme přízí Nepal 50-50-54 ok a upleteme 1 kruhovou řadu obrace. Pak pleteme 1 kruhovou řadu hladce a SOUČASNĚ přidáme rovnoměrně 10 ok = 60-60-64 ok. Nyní pleteme pružným vzorem 2/2 (tj. pleteme střídavě 2 oka hladce, 2 obrace) až do výše asi 12-13-14 cm. Pak všechna oka dle vzoru uzavřeme. Lem ohrneme. Stejným způsobem upleteme i druhou papučku. |
|||||||||||||||||||
Vysvětlivky ke schématu |
|||||||||||||||||||
|
|||||||||||||||||||
 |
|||||||||||||||||||
Dokončili jste tento model?Pak označte své fotky tagem #dropspattern #celticdancerslippers nebo je pošlete do galerie #dropsfan. Potřebujete s tímto návodem poradit?Otevřete-li si návod na stránce garnstudio.com, najdete tam 21 výukových video-ukázek, Komentáře/Dotazy a další užitečné informace. © 1982-2026 DROPS Design A/S. Vyhrazujeme si veškerá práva. Tento dokument, včetně všech jeho dílčích částí, podléhá autorským právům. Podrobnější komentář k možnostem užití našich návodů najdete dole pod každým návodem na našich stránkách. |
|||||||||||||||||||


V oblasti pletené a háčkované módy působí DROPS Design více než 40 let. Díky tomu vám můžeme nabídnout jednu z nejrozsáhlejších kolekcí modelů s bezplatnými návody dostupnými na internetu - navíc v 17 jazycích. K dnešnímu dni máme na 324 katalogů a 12290 návodů celkem - z nich je už 7602 dostupných v [češtině].
We work hard to bring you the best knitting and crochet have to offer, inspiration and advice as well as great quality yarns at incredible prices! Would you like to use our patterns for other than personal use? You can read what you are allowed to do in the Copyright text at the bottom of all our patterns. Happy crafting!
Přidejte komentář k návodu DROPS 156-55
Rádi bychom věděli, co si o tomto modelu myslíte!
Pokud se chcete na něco zeptat, dbejte prosím na to, abyste ve formuláři níže vybrali správnou kategorii - díky tomu se dříve dozvíte, co potřebujete vědět. Povinná pole jsou označena *.