
Categorias populares
Procura um fio?


Comentários / Perguntas (168)
Debbie escreveu:
I understand where the markers are placed but what I don't understand is how you can knit 2 tog. when there is only one stitch before the marker because this is the beginning of the round
21.10.2014 - 16:07DROPS Design respondeu:
Dear Debbie, to decrease 1 st before marker, work until 2 sts remain before marker and work K2 tog, so that you will work last st on round tog with 1st st next round at the beg of round. Happy knitting!
21.10.2014 - 17:07Debbie escreveu:
My problem is with the decrease round. You say to decrease 1 stitch before the first marker by knitting 2 together but the 1st stitch before the marker is the beginning of the round (beginning ofA3 pattern). I am not sure how I should be decreasing.
20.10.2014 - 22:17DROPS Design respondeu:
Dear Debbie, markers are place here to work the dec for toe, 1st marker will be between 1st and 2nd st in A.3, and you will dec 1st before 1st marker (see next paragraph where decreases are explained). Happy knitting!
21.10.2014 - 09:58
![]() Bev escreveu:
Bev escreveu:
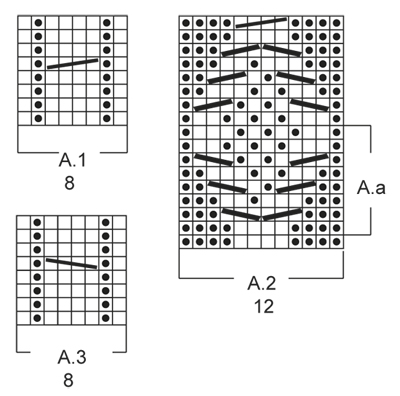
What is meant by A.a in the pattern. It is mentioned after working in the round after A.2 has ben worked 1 time vertically. " work A.a until piece measures 61/2/ 71/2, 81/2 inches. I have read over this pattern multiple times and I cannot find what this refers to. Please respond as I am at that point in the construction
20.10.2014 - 02:56DROPS Design respondeu:
Dear Bev, when you have worked diagram A.2 1 time vertically (all rows in diagram), start again on 2nd row in A.2 working the A.a part (framed on the side). Happy knitting!
20.10.2014 - 10:37
![]() Barb escreveu:
Barb escreveu:
I am having trouble going from straight to in the round. Could you tell me exactly where in the pattern Is the first stitch in the beginning of the round and are the 12 stitches in chart A2 all worked together? Sorry if this is obvious but I just can't get my head around this.
14.10.2014 - 18:04DROPS Design respondeu:
Dear Barb, when working straight, row from RS starts and ends with P4, join in the round on a RS row casting on 4 sts between the first and last P4 = you get P12 for the upper foot. Rounds will then start there (after cast on), continue then in the round in pattern as before and work A.2 over the P12 (end of round). Happy knitting!
15.10.2014 - 08:33
![]() Debbie escreveu:
Debbie escreveu:
Do you have a video for this slipper?
14.10.2014 - 16:31DROPS Design respondeu:
Dear Debbie, you will find all relevant videos to these slippers under the tab "videos" at the right side of the picture. Remember you can ask any question here or contact your DROPS store for any individual assistance. Happy knitting!
14.10.2014 - 16:57
![]() Debbie escreveu:
Debbie escreveu:
What do you mean by work one row vertically?
12.10.2014 - 19:58DROPS Design respondeu:
Dear Debbie, when it says "When A.2 has been worked 1 time vertically" it means you have to work 1 time in height all rows of diagram A.2. Happy knitting!
13.10.2014 - 10:12
![]() Debbie Clarke escreveu:
Debbie Clarke escreveu:
When you say to cast on 4 stitches and then work them, are the purled or knitted? Also I am not sure where you should join for in the round. Is the start of the round before or after the 4 stitches?
12.10.2014 - 17:27DROPS Design respondeu:
Dear Mrs Clarke, the 4 sts are cast on at the end of a row from RS and then continue in the round - beg of round will be then after the new 4 sts. Happy knitting!
13.10.2014 - 10:03
![]() Sue escreveu:
Sue escreveu:
I love the pictures but your patterns are so hard to follow! They are not clearly written. Maybe if you write it out by rows instead of a paragraph?
06.09.2014 - 14:33
![]() Corinna escreveu:
Corinna escreveu:
Hallo liebes Drops Team, wenn im Muster A2 steht: "1 M auf eine Hilfsnadel hinter die Arbeit legen, 2 M re, 1 M li/re von der Hilfsnadel" bzw. "2 M auf eine Hilfsnadel vor die Arbeit legen, 1 M li/re, 2 M re von der Hilfsnadel" was ist dann mit li/re gemeint. Woher weiß ich, ob ich links oder rechts stricken soll? Vielen Dank vorab :)
20.08.2014 - 22:22DROPS Design respondeu:
Liebe Corinna, das ergibt sich aus dem Muster. Sie stricken die M so, wie sie erscheinen. Also je nachdem, ob Sie eine linke oder rechte M auf die Hilfsnadel gelegt haben, stricken Sie diese links oder rechts.
21.08.2014 - 09:30
![]() Johanna escreveu:
Johanna escreveu:
I finished my pair a few weeks ago and I love them! My husband wants me to make a pair for him and two friends have asked for the pattern, so that they can make their own =) It seems like Drops have created another winner!
07.08.2014 - 14:48
|
|||||||||||||||||||
Celtic Dancer#celticdancerslippers |
|||||||||||||||||||
 |
 |
||||||||||||||||||
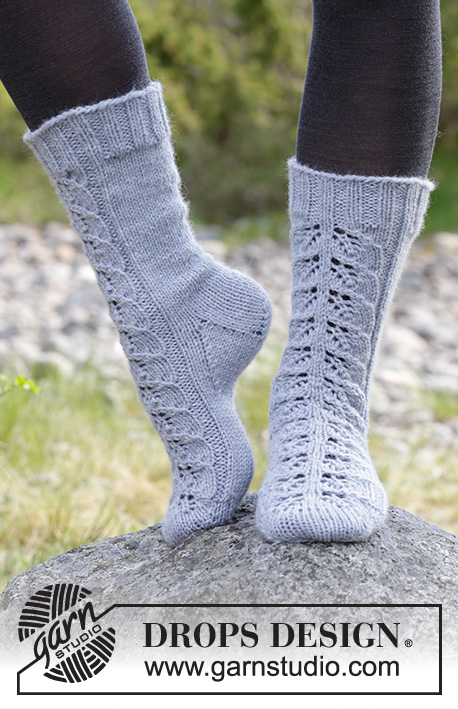
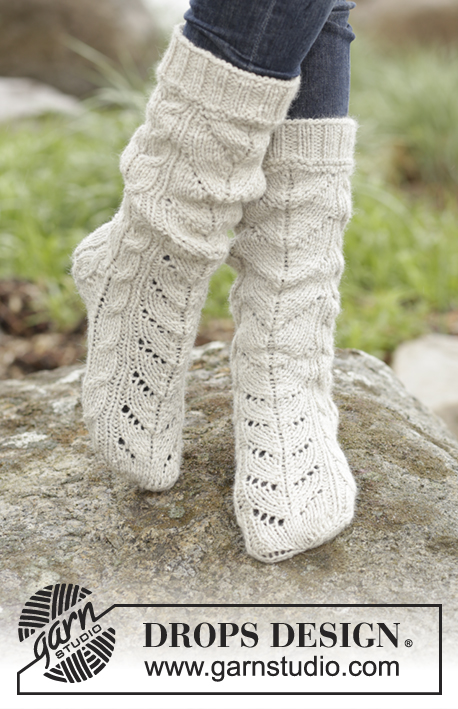
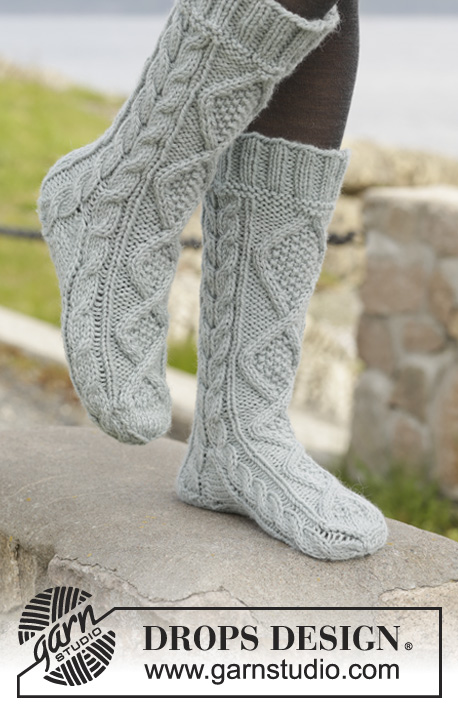
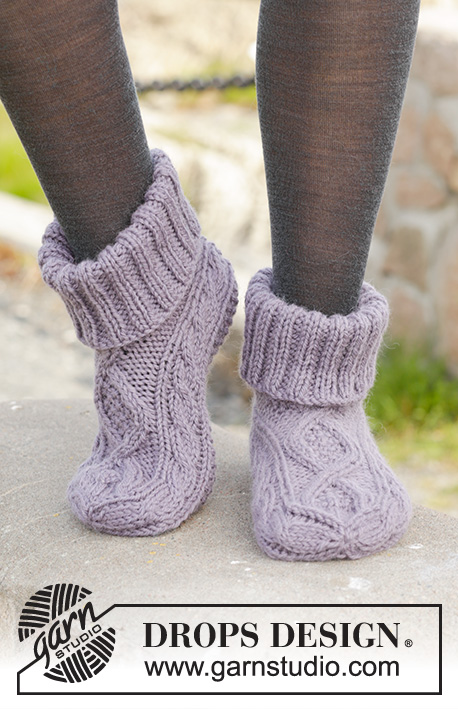
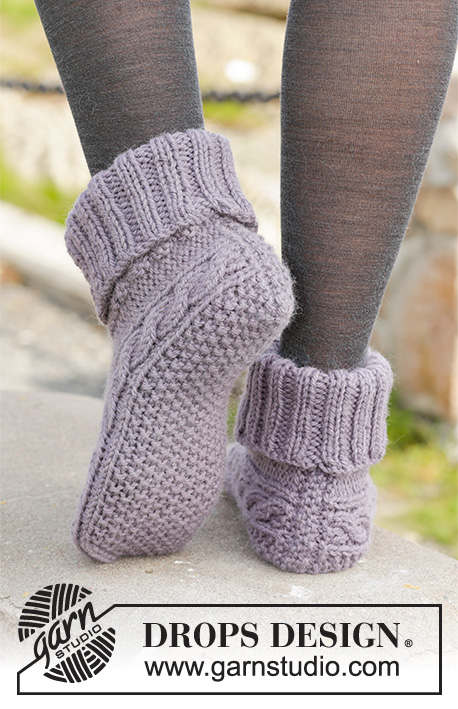
Pantufas DROPS com tranças, em "Nepal". Do 35 ao 43.
DROPS 156-55 |
|||||||||||||||||||
|
---------------------------------------------------------- NOTA: Existem termos diferentes de tricô e croché em português de Portugal e do Brasil. TRICÔ : Malha = Ponto Canelado = Barra Ponto Jarreteira = Cordões de Tricô Ponto Liga = Ponto Tricô CROCHÉ : mpa – meio ponto alto pa – ponto alto pad – ponto alto duplo pat – ponto alto triplo pb – ponto baixo pbx – ponto baixíssimo pc – ponto corrente ---------------------------------------------------------- PONTO FANTASIA : Ver os diagramas A.1-A.3. Os diagramas mostram o ponto fantasia, visto pelo direito. DIMINUIÇÕES : Diminuir 1 m/p antes do marcador da seguinte maneira: 2 ms/pts tricotadas juntamente em meia. Diminuir 1 m/p depois do marcador da seguinte maneira: 2 ms/pts tricotadas juntamente em meia torcida. PONTO JARRETEIRA (em idas e voltas): Tricotar todas as carreiras em meia. 1 barra jarreteira = 2 carreiras meia. PONTO DE ARROZ : Carreira 1: * 1 m/p meia, 1 m/p liga/tricô *, repetir de * a *. Carreira 2: Tricotar as ms/pts liga/tricô em meia e as ms/pts meia em iga/tricô. Repetir a carreira 2. DICA MEDIÇÃO : Medir a meio da trança em A.1/A.3. ---------------------------------------------------------- PANTUFA : Tricota-se em idas e voltas a partir do meio das costas. Montar 33-33-35 ms/pts com as agulhas 5 mm em Nepal (deixar uma ponta com cerca de 20 cm de fio que irá, usar, mais tarde, para a montagem). Tricotar 1 barra em PONTO JARRETEIRA - ver acima - e, AO MESMO TEMPO, na última carreira, distribuir 4 aumentos = 37-37-39 ms/pts. Tricotar, então, da seguinte maneira pelo direito: 4 ms/pts liga/tricô, A.3 (= 8 ms/pts), 13-13-15 ms/pts em PONTO DE ARROZ – ver acima, A.1 (= 8 ms/pts), terminar com 4 ms/pts liga/tricô. Continuar desta maneira; tricotar as ms/pts liga/tricô em meia pelo avesso. Repetir A.1 e A.3 até ao fim. NÃO ESQUECER DE MANTER A MESMA TENSÃO DA INDICADA PARA A AMOSTRA! Quando a peça medir 10½-11½-13 cm – ver DICA MEDIÇÃO acima -, tricotar da seguinte maneira pelo direito: 4 ms/pts liga/tricô, A.3, 13-13-15 ms/pts em ponto de arroz, A.1, 4 ms/pts liga/tricô, montar 4 ms/pts, tricotar as 4 primeiras ms/pts – a carreira começa aqui = 41-41-43 ms/pts. Tricotar então em redondo nas agulhas de pontas duplas. Continuar em ponto fantasia como antes mas tricotar então A.2 (= 12 ms/pts) acima das 4 ms/pts liga/tricô de cada lado da peça e das 4 novas ms/pts. Quando A.2 tiver sido tricotado 1 vez em altura, tricotar A.a até a peça medir 17-19-22 cm. Tricotar então em ponto meia acima das ms/pts de A.a, ou começar a tricotar em ponto meia um pouco antes. Continuar A.1 e A.3 até ao fim. Então, colocar 4 marcadores da seguinte maneira: Tricotar A.3 mas colocar o 1.º marcador entre a 1.ª e a 2.ª m/p e o 2.º marcador entre a 7.ª e a 8.ª m/p em A.3, tricotar em ponto de arroz como antes, tricotar A.1 mas colocar o 3.º marcador entre a 1.ª e a 2.ª m/p e colocar o 4.º marcador entre a 7.ª e a 8.ªm/p em A.1, tricotar as restantes ms/pts em meia (= 14 ms/pts para o peito do pé, 15-15-17 ms/pts para a planta do pé e 6 ms/pts de cada lado da peça). Diminuir, então, para a ponta na carreira seguinte da seguinte maneira: Diminuir 0-0-1 vez 1 m/p depois do 2.º marcador e 1 m/p antes do 3.º marcador da planta do pé – VER DIMINUIÇÕES acima -, tricotar as restantes ms/pts = 14 ms/pts para o peito do pé e 15 ms/pts para a planta do pé (= 41 ms/pts ao todo). Na carreira seguinte, diminuir da seguinte maneira: Diminuir 1 m/p antes do 1.º e do 3.º marcador e 1 m/p depois do 2.º e do 4.º marcador (= 4 diminuições ao todo). Repetir estas diminuições 6 vezes ao todo em todas as carreiras e, AO MESMO TEMPO, na última diminuição, tricotar as ms/pts as tranças em A.1 e A.3 da seguinte maneira: 2 ms/pts tricotadas juntamente em meia torcida, 2 ms/pts tricotadas juntamente em meia. Quando todas as diminuições estão feitas, restam 13 ms/pts. A peça mede cerca de 20-22-25 cm. Cortar o fio e passá-lo pelas restantes ms/pts, franzir e arrematar. MONTAGEM : Dobrar a orla de montagem ao meio (= meio da parte de trás), usar o fio do princípio para costurar cuidadosamente a pantufa a meio da parte de trás. ORLA : Tricota-se em redondo nas agulhas de pontas duplas à volta da abertura da pantufa. Levantar 50-50-54 ms/pts com as agulhas de pontas duplas 4 mm em Nepal e tricotar 1 carreira liga/tricô, depois, 1 carreira meia e, AO MESMO TEMPO, distribuir 10 aumentos = 60-60-64 ms/pts. Tricotar em canelado/barra 2 ms/pts meia/2 ms/pts liga/tricô até a peça medir cerca de 12-13-14 cm. Arrematar as ms/pts como elas se apresentam. Dobrar a orla ao meio. Tricotar a outra pantufa. |
|||||||||||||||||||
Explicações do diagrama |
|||||||||||||||||||
|
|||||||||||||||||||
 |
|||||||||||||||||||
Terminou este projecto?Então, identifique as suas fotos com as tags #dropspattern #celticdancerslippers ou mostre-as na galeria #dropsfan. Precisa de ajuda para este modelo?Encontrará 22 turotiais em vídeo, uma rubrica Comentários/Perguntas e muito mais ao visitar a página do modelo em www.garnstudio.com © 1982-2026 DROPS Design A/S. Todos os direitos reservados. Este documento, incluuindo as suas su-secções, tem copyrights. Saia mais o que pode fazer com os nossos modelos no fim de cada uma das páginas do nosso site. |
|||||||||||||||||||


Com mais de 40 anos no design de modelos de tricô e de croché, a DROPS Design oferece uma das mais vastas colecções demodelos gratuitos na Internet - traduzidos em 17 línguas. Neste dia de hoje, temos 324 catálogos e 12290 modelos - dos quais 12271 estão traduzidos em português.
Trabalhamos com muito empenho para lhe proporcionar o melhor que o tricô e o croché têm para oferecer, para lhe fornecer inspiração e conselhos bem como fios da mais elevada qualidade a preços incríveis! Gostaria de usar os nossos modelos para outros fins que não uso pessoal? Pode ler o que lhe é permitido fazer no Copyright texto que se encontra na parte de baixo de todos os nossos modelos. Bom tricô! Bom croché!
Deixe um comentário acerca do modelo DROPS 156-55
Gostaríamos muito de saber o que tem a dizer-nos acerca deste modelo!
Se deixar uma pergunta acerca do modelo, certifique-se de que escolhe a categoria adequada no formulário abaixo para acelerar o processo relativo à resposta. Os campos obrigatórios estão assinalados com um *.