
Popular categories
Looking for a yarn?


Comments / Questions (36)
![]() Jill wrote:
Jill wrote:
Ich bin ziemlich verwirrt was die Armkugel angeht. Erst bis Marker 1 stricken, dann bis 4 (2 und 3 entfernen). Dann ist doch die Runde beendet und plötzlich geht es um die linke Armkugel? Ist das noch die gleiche Reihe oder erfolgen diese Zunahmen später? Muss man da nicht wie bei einem Raglan Pullover an jeder "Naht" je links und rechts davon zunehmen? Wäre hilfreich wenn nach dieser Zunahme eine Maschenzahl angegeben wäre.
20.01.2020 - 20:12DROPS Design answered:
Liebe Jill, bei der Zunahmen für den Armkugel nehmen Sie 2 Maschen an jedem Ärmel wie beschrieben, dh es sind keine Raglanzunahmen sondern nur für die Ärmel. Stricken Sie genau wie beschrieben, so nehmen Sie 4 Maschen bei jeder Ärmel zu = 8 Maschen pro Zunahmenrunde und insgesamt 8 bis 13 x (siehe Größe). Viel Spaß beim stricken!
21.01.2020 - 09:36
![]() Karine wrote:
Karine wrote:
Incompréhensible... Après le tour 1 et ses jetés, on se retrouve avec 81m. En ajoutant 7 séries de 8 augmentations, on aurait donc au total 137m. et non 110 pour la taille M. A cause de ce mauvais nombre de mailles, le motif n'arrête pas de se décaler et impossible de comprendre ce que je fais de travers : je suis scrupuleusement les indications... Dommage, j'aurais vraiment aimé tricoter ce modèle.
19.01.2020 - 03:36DROPS Design answered:
Bonjour Karine, les jetés des côtes anglaises ne comptent pas dans le nombre de mailles, ils comptent uniquement avec leur maille glissée. En M vous avez 54 mailles après la bordure endroit, vous tricotez ensuite en côtes anglaises, en plaçant bien vos marqueurs comme indiqué (on augmente dans les mailles envers); le nombre de mailles entre les marqueurs des épaules ne change pas, c'est le nombre de mailles du devant et du dos qui augmente au début. On augmente 7 x 8 mailles = 56 augmentations + les 54 m du début = 110 m. Bon tricot!
20.01.2020 - 10:29
![]() Silke wrote:
Silke wrote:
Ein tolles Modell! Leider passt die Anleitung nicht zur Maßskizze. Es gibt falsche Angaben: Die Schulter über 13 Maschen entspricht 10,8 cm und nicht 6 cm. Der Ärmel hat 40 Maschen = 33,4 cm Ärmelumfang und nicht 56 cm!!! Die Grundform entspricht auch keimen T! Sehr schade!
16.01.2020 - 23:28DROPS Design answered:
Liebe Silke, die 3 cm oben sind für die Schulter, die sind aber nicht die 13 Maschen von der Anleitung. Wenn der Pullover flach liegt, dann sind die Schulter 3 cm höher als bis zum Halsausschnitt (1 cm = Halskante). Die 25 cm sind die Höhe der Passe, der Ärmelumfang ist aber nicht in der Maßskizze. Die Ärmel wird 33 cm messen, Sie sind ja recht. Maßskizze ist etwas standard, aber hier haben Sie genauso die Schulter, und Ärmel wie in der Maßskizze gezeichnet, keine Abnahme bei den Ärmeln und die Seite vom Rumpfteil sind gerade. Viel Spaß beim stricken!
22.01.2020 - 09:41
![]() Marianne wrote:
Marianne wrote:
Hei =) Jeg skulle ønske dere hadde flere bilder av genseren, for det er litt vanskelig å se hvor lang den er, samt hvordan den ser ut i armene =) Den ser vanvittig digg ut, så denne vil jeg strikke 😍 Er det noe mulighet for å få tilsendt noen bilder av genseren, eller kan dere legge ut flere bilder av den her?
16.01.2020 - 18:53DROPS Design answered:
Hei Marianne. Vi har lagt ut 5 bilder av denne modellen som vi håper gir et godt inntrykk av hvordan denne herlige genseren blir. God Fornøyelse!
27.01.2020 - 12:50
![]() Jero wrote:
Jero wrote:
Casual y desenfadado. Fácil de ejecutar. Lo tiene todo para realizarlo enseguida publiquen los patrones.
15.01.2020 - 10:23
![]() Eva wrote:
Eva wrote:
Ich habe für diesen Pullover gestimmt, weil es mir immer gefällt, wenn Ärmel mal nicht auf die typische Art und Weise eingesetzt sind. Aber bitte nicht Sky! Das Garn verfilzt extrem schnell und ist nach meiner Erfahrung für Pullover nicht geeignet.
11.12.2019 - 16:32
|
||||
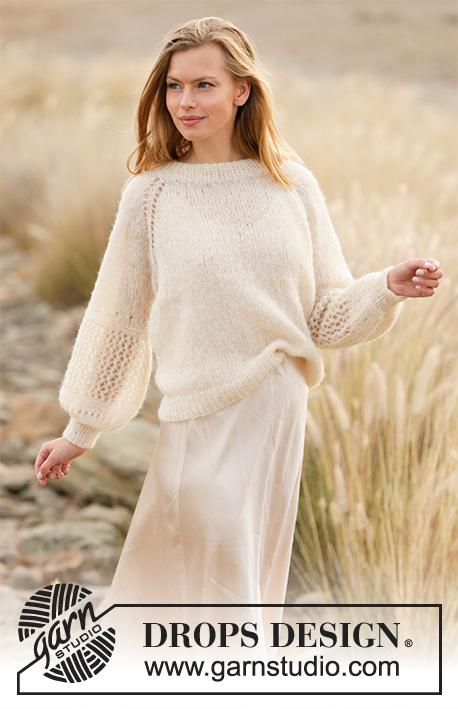
Cloud Fluff#cloudfluffsweater |
||||
 |
 |
|||
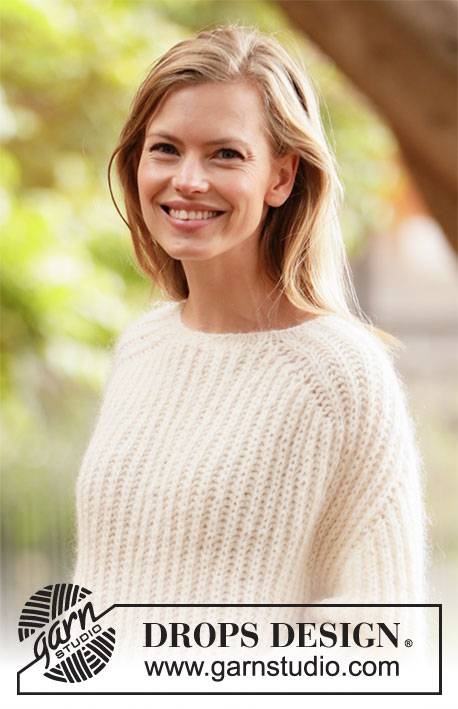
Knitted jumper with set-in sleeves without seams in DROPS Sky and DROPS Kid-Silk. The piece is worked top down in English rib. Sizes S - XXXL.
DROPS 212-14 |
||||
|
------------------------------------------------------- EXPLANATIONS FOR THE PATTERN: ------------------------------------------------------- DECREASE TIP-1 (evenly spaced): To work out how to decrease evenly, count the total number of stitches on needle (e.g. 66 stitches) and divide by number of decreases to be made (e.g. 8) = 8.25. In this example decrease by knitting approx. each 7th and 8th stitch together. ENGLISH RIB WITH YARN OVERS – in the round: ROUND 1: * Knit 1, make 1 yarn over, slip 1 stitch as if to purl *, work from *-* to end of round. ROUND 2: * Make 1 yarn over, slip 1 stitch as if to purl, purl the yarn over and slipped stitch together *, work from *-* to end of round. ROUND 3: * Knit the yarn over and slipped stitch together, make 1 yarn over, slip 1 stitch as if to purl *, work from *-* to end of round. Repeat rounds 2 and 3 onwards. INCREASE TIP-1: All increases are worked on a round where yarn overs and stitches are purled together. Work 3 stitches in the stitch and yarn-over with the markers as follows: Purl together the yarn over and stitch but do not slip the stitch and yarn-over off the left needle, make 1 yarn over the right needle and purl together the stitch and yarn-over 1 more time = 3 stitches (= 2 stitches increased = a total of 8 stitches increased). On the next round work the 3 stitches as follows: Make 1 yarn over, slip 1 stitch as if to purl, knit the yarn over, make 1 yarn over, slip 1 stitch as if to purl. Then continue these stitches in English rib. NOTE! These markers should not be moved, increase continues in the same stitch. i.e. the number of stitches between 1st and 2nd increase on each shoulder remains the same. INCREASE TIP-2: All increases are worked on a round where yarn overs and stitches are purled together. INCREASE 1 ON SLEEVE CAP IS WORKED AS FOLLOWS: Work 3 stitches in the stitch and yarn-over and move the marker as follows: Purl together the yarn-over and stitch, insert 1 marker in this stitch (i.e. stitch on right needle), but do not slip the stitch and yarn over off the left needle, make 1 yarn over the right needle and purl together the stitch and yarn-over 1 more time = 3 stitches (= 2 stitches increased). The marker sits in the first increased stitch (= purled stitch). The next increase is worked in the stitch with the marker. INCREASE 2 ON SLEEVE CAP WORKED AS FOLLOWS: Work 3 stitches in the stitch and yarn over and move the marker as follows: Purl together the yarn over and stitch, but wait with slipping the stitch and yarn over off the left needle, make 1 yarn over the right needle, purl together the stitch and yarn-over 1 more time and insert the marker in this stitch = 3 stitches (= 2 stitches increased). The marker sits in the last increased stitch (= purled stitch). The next increase is worked in the stitch with the marker. On the next round work the 3 stitches as follows: Make 1 yarn over, slip 1 stitch as if to purl, knit the yarn over, make 1 yarn over, slip 1 stitch as if to purl. Then continue these stitches in English rib. CASTING-OFF TIP: To avoid the cast-off edge being tight you can cast off with a larger size needle. If the edge is still tight, make 1 yarn over after approx. each 4th stitch at the same time as casting off; the yarn overs are cast off as normal stitches. ------------------------------------------------------- START THE PIECE HERE: ------------------------------------------------------- JUMPER – SHORT OVERVIEW OF THE PIECE: The jumper is worked in one piece from the top down. You increase for the shoulders and sleeve caps. The yoke is divided for body and sleeves and the body continued in the round with circular needle. The sleeves are worked in the round with double pointed needles/ short circular needle. NECK: Cast on 62-62-66-72-72-76 stitches with circular needle size 6 mm and 1 strand Sky and 1 strand Kid-Silk. Knit 1 round. Knit 1 round and decrease 8-8-8-10-10-10 stitches evenly spaced – read DECREASE TIP = 54-54-58-62-62-66 stitches. On the next round insert 4 markers as follows (the markers are inserted in the stitches; round begins approx. mid-back): Knit 7-7-9-9-9-11, insert marker 1 in the next stitch and knit this stitch, knit 13, insert marker 2 in the next stitch and knit this stitch, knit 11-11-13-15-15-17, insert marker 3 in the next stitch and knit this stitch, knit 13, insert marker 4 in the next stitch and knit this stitch, knit the remaining 6-6-6-8-8-8 stitches. The stitches between markers 1 and 2 are the right shoulder, between markers 3 and 4 the left shoulder. You will increase in the stitches with markers later. Insert 1 marker at the beginning of the round; the yoke is measured from this marker! YOKE: Work ENGLISH RIB WITH YARN OVERS in the round – read description above, over all stitches and increase for the shoulders as follows: SHOULDER: The first increase is worked on round 2 in the English rib (the stitches with markers are purled stitches). Increase 2 stitches in each of the stitches with markers – read INCREASE TIP-1. Increase like this every 4th round a total of 6-7-8-8-9-9 times = 102-110-122-126-134-138 stitches. Increase in the same stitch, i.e. the number of stitches between markers 1 and 2, and between markers 3 and 4 remain the same; the increased stitches are worked before marker 1, between markers 2 and 3 and after marker 4. REMEMBER THE KNITTING TENSION! The piece measures approx. 9-10-11-11-12-12 cm from the marker in the neck. Now increase for the sleeve caps as follows: SLEEVE CAP: Work 3 rounds after the final increase on the shoulder. On the next round with purl (i.e. yarn over and stitch are purled together) increase for the sleeve cap and the markers are moved as follows: HALF BACK PIECE: Work as before as far as the stitch with marker 1. RIGHT SLEEVE CAP: Increase-1 on the right sleeve cap is worked in the next stitch (= stitch with marker 1 = purled stitch) – read INCREASE TIP-2, knit 1, increase-2 on the right sleeve cap is worked in the next stitch (= purled stitch) (= 4 stitches increased). FRONT PIECE: Work as before until there are 2 stitches left before the stitch with marker 4, remove markers 2 and 3. LEFT SLEEVE CAP: Increase-1 on the left sleeve cap is worked in the next stitch (= purled stitch), knit 1, increase-2 on the right sleeve cap is worked in the next stitch (= stitch with marker 4 = purled stitch) (= 4 stitches increased). HALF BACK PIECE: Work as before to end of round. You have now inserted 4 new markers in the piece. Increase 2 stitches in each stitch with a marker and move the markers every 4th round a total of 8-9-10-10-12-13 times = 166-182-202-206-230-242 stitches. The markers are moved to the outermost stitch on each side of each sleeve cap each time you increase, i.e. there are 4 more new stitches between the markers on the sleeve caps each time you increase. The piece measures approx. 20-22-24-24-28-29 cm, measured from the marker mid-back. Continue in the round with English rib until the piece measures 24-24-25-26-29-30 cm, measured from the marker mid-back. Now increase 2 stitches in each stitch with a marker (= 8 stitches increased) = 174-190-210-214-238-250 stitches. Work 1 round then divide for the body and sleeves as follows, working English rib as before: Work 27-29-31-33-37-39 stitches (= half back piece), place the next 34-38-42-42-46-48 stitches on a thread for sleeve and cast on 6-6-6-8-8-8 new stitches under the sleeve, work 53-57-63-65-73-77 stitches (= front piece), place the next 34-38-42-42-46-48 stitches on a thread for sleeve and cast on 6-6-6-8-8-8 new stitches under the sleeve and work the remaining 26-28-32-32-36-38 stitches (= half back piece). BODY: = 118-126-138-146-162-170 stitches. Continue in the round with English rib. On the first round work the 6-6-6-8-8-8 new stitches under each sleeve without working the stitches and yarn-overs together. When the piece measures 25-27-28-29-28-29 cm from where body and sleeves were divided, knit 3 rounds. Cast off with knit – read CASTING-OFF TIP. SLEEVES: Place the 34-38-42-42-46-48 stitches from the thread on the one side of the piece on double pointed needles/ short circular needle size 6 mm and knit up 1 stitch in each of the 6-6-6-8-8-8 stitches cast on under the sleeve = 40-44-48-50-54-56 stitches. Continue in the round with English rib. On the first round work the 6-6-6-8-8-8 new stitches under the sleeve without working the stitches and yarn-overs together. When the piece measures 30-31-31-30-28-27 cm from where the sleeve was divided from the body, knit 3 rounds. Then cast off – remember CASTING-OFF TIP. Work the other sleeve in the same way. |
||||
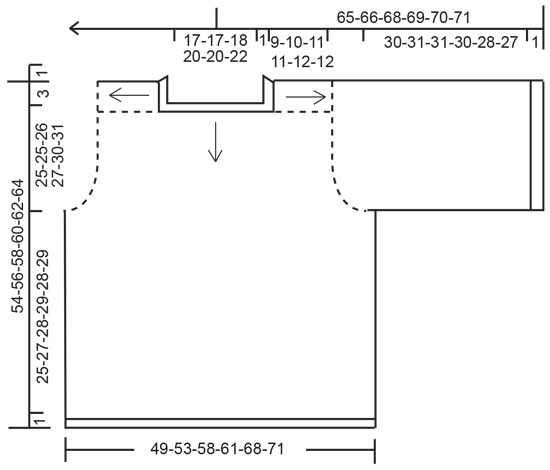
Diagram explanations |
||||
|
||||
 |
||||
Have you finished this pattern?Tag your pictures with #dropspattern #cloudfluffsweater or submit them to the #dropsfan gallery. Do you need help with this pattern?You'll find 15 tutorial videos, a Comments/Questions area and more by visiting the pattern on garnstudio.com. © 1982-2026 DROPS Design A/S. We reserve all rights. This document, including all its sub-sections, has copyrights. Read more about what you can do with our patterns at the bottom of each pattern on our site. |
||||


With over 40 years in knitting and crochet design, DROPS Design offers one of the most extensive collections of free patterns on the internet - translated to 17 languages. As of today we count 324 catalogues and 12290 patterns translated into English (UK/cm). 12290
We work hard to bring you the best knitting and crochet have to offer, inspiration and advice as well as great quality yarns at incredible prices! Would you like to use our patterns for other than personal use? You can read what you are allowed to do in the Copyright text at the bottom of all our patterns. Happy crafting!
Post a comment to pattern DROPS 212-14
We would love to hear what you have to say about this pattern!
If you want to leave a question, please make sure you select the correct category in the form below, to speed up the answering process. Required fields are marked *.