Comments / Questions (8)
![]() Dominique wrote:
Dominique wrote:
Bonjour! Je suis à nouveau auprès de vous pour vous demander de l’aide. Je ne comprends pas, après plusieurs essais, comment terminer les rangs. C’est soit c’est trop soit pas assez. Je ne comprends pas si je dois tricoter A2, A3 et A5 ou seulement A3… et je réussis pas à insérer le A1, ça ne marche jamais. J’en suis déjà à ma dixième tentative et ça ne marche vraiment pas. Y a-t-il peut-être une erreur dans les explications?’ Merci mille fois de m’aider!
18.09.2023 - 22:52DROPS Design answered:
Bonjour Dominique, commencez les diagrammes par A.1a; puis crochetez les diagrammes dans l'ordre indiqué et terminez par A.1a, autrement dit, en début de rang, vous crochetez soit 3 mailles en l'air (si la 1ère maille est une bride) soit 1 maille en l'air (si la première maille est une maille serrée); et vous terminez soit par 1 bride soit par 1 maille serrée. Entre temps, crochetez simplement les diagrammes dans l'ordre indiqué pour votre taille. Bon crochet!
19.09.2023 - 09:23
![]() Dominique wrote:
Dominique wrote:
Bonjour! Je ne comprends pas du tout le début du modèle… la chaînette que l’on doit faire au début à quoi correspond-elle? Et les 18 mailles en l’air? Je n’arrive pas du tout à me mettre dedans… pouvez-vous éclairer ma lanterne, s’il vous plaît? Merci!
29.08.2023 - 15:45DROPS Design answered:
Bonjour Dominique, vous crochetez d'abord la chaînette de l'épaule droite, puis la chaînette de l'épaule gauche (séparément), crochetez ensuite des brides sur la chaînette de l'épaule gauche, 18 mailles en l'air pour l'encolure dos, et crochetez ensuite dans la chaînette de l'épaule droite = les 2 épaules sont maintenant réunies et vous avez 1 rang de brides sur les 2 épaules + une chaînette entre les deux. Bon crochet!
30.08.2023 - 07:51
![]() Joanne wrote:
Joanne wrote:
Is it possible to obtain this pattern in writing and not a chart? I struggle to read charts. Thank you.
09.09.2020 - 16:13DROPS Design answered:
Dear Joanne, there are only diagrams to this pattern, but you will find how to read crochet diagrams here. Happy crocheting!
09.09.2020 - 16:27Carolina wrote:
Hola, soy Carolina Fresno de Chile, me gustaría saber si venden sus lanas acá en mi país? Y perdonen pero si alguien me puede ayudar para aprender a leer sus patrones, la verdad es q estoy empezando y lo único q quiero es aprender. Muchas gracias
28.02.2018 - 19:39DROPS Design answered:
Hola Carolina. En Chile no hay tiendas de Drops, bajo esté línk puedes encontrar las tiendas que tienen envíos internacionales.: https://www.garnstudio.com/findastore.php?s=w&cid=23
01.03.2018 - 20:27
![]() Britt wrote:
Britt wrote:
Hej vil lige høre om i har fundet ud af mit spørgsmål? Vh Britt
14.07.2017 - 14:30DROPS Design answered:
Hej Britt, jo men det skal passe, du hækler 18 lm imellem stykkerne og mønsteret går over 9 masker, så du skal hækle de to stykker som tidligere, plus 2 gange over de nye masker. God fornøjelse!
08.08.2017 - 08:21
![]() Britt wrote:
Britt wrote:
Hej Jeg er kommet til forstyk hvor jeg hækler venstre og højreskulder sammen med 18 lm jeg laver str. xxl, der kan jeg ikke få det til at passe sammen med mønsteret.
14.06.2017 - 09:42
![]() Britt wrote:
Britt wrote:
Jeg kan ikke få mønsteret til at passe på forstykket. Jeg har lavet ryggen. Kan der være en fejl i maske antallet? Vh Britt
12.06.2017 - 14:12DROPS Design answered:
Hej Britt, Kan du beskrive hvor du er i opskriften. Hvilken størrelse du hækler og hvor mange masker du har, så skal vi se på det.
13.06.2017 - 13:55Britt wrote:
Jeg har lavet ryggen på denne, og er nu gået til skulder på forstykket. Jeg kan ikke få mønsteret til at passe. Er der muligvis en fejl i mønsteret? britt
12.06.2017 - 09:56
Winter Skies Tunic |
|||||||||||||||||||||||||
|
|
|||||||||||||||||||||||||
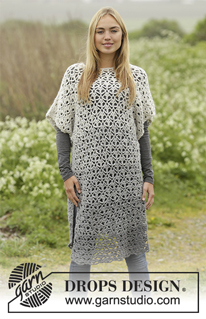
Crochet tunic in 2 strands DROPS Alpaca with lace pattern and stripes, worked top down. Size S-XXXL.
DROPS Extra 0-1326 |
|||||||||||||||||||||||||
|
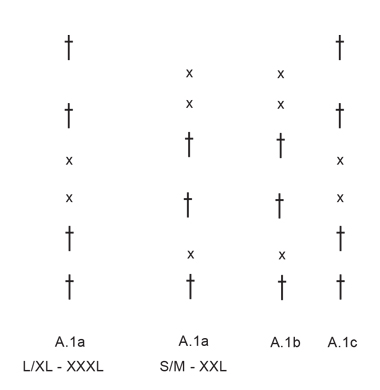
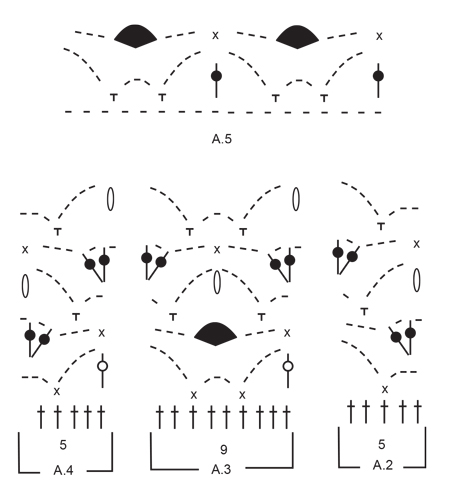
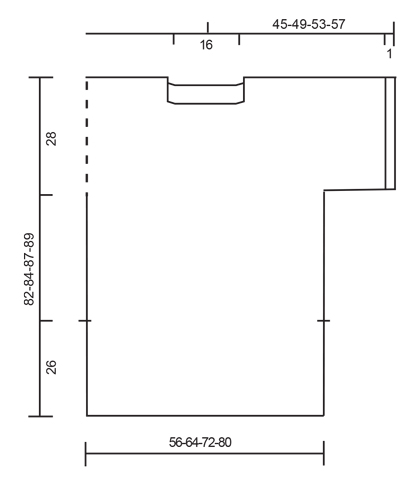
CROCHET INFO: Replace first tr at beg of every tr row with 3 ch. Replace first dc at beg of every dc row with 1 ch. PATTERN: See diagrams A.1 to A.5 – see diagram for correct size. STRIPES: Work all stripes with 2 strands. 1st repetition vertically = the last 4 rows in diagram. 1st-5th stripe are 3 repetitions, work 6th stripe until finished measurements. Stripe 1: 1 strand off white + 1 strand light pearl grey. Stripe 2: 2 strands light pearl grey. Stripe 3: 1 strand light pearl grey + 1 strand light grey. Stripe 4: 2 strands light grey. Stripe 5: 1 strand light grey + 1 strand medium grey. Stripe 6: 2 strands medium grey. ---------------------------------------------------------- TUNIC: Work back and forth, top down in 2 parts, sew tog when finished. BACK PIECE: Right shoulder: Work 48-53-59-63 ch with 1 strand off white and 1 strand light pearl grey (= 2 strands) on hook size 6 mm. Cut the yarn and work left shoulder. Left shoulder: Work 50-55-61-65 ch with 1 strand off white and 1 strand light pearl grey (= 2 strands) on hook size 6 mm. Turn and work 1 tr in 4th ch from hook (= 2 tr) - READ CROCHET INFO, 1 tr in each of the next 4-2-1-5 ch, * skip 1 ch, work 1 tr in each of the next 6 ch *, repeat from *-* 6-7-8-8 times in total = 42-46-51-55 tr. Work 18 ch (= first row in A.5), work 1 tr in st 1st ch on the loose ch-row (= right shoulder), work 1 tr in each of the next 5-3-2-6 ch, * skip 1 ch, work 1 tr in each of the next 6 ch *, repeat from *-* 6-7-8-8 times in total = 42-46-51-55 tr for each shoulder. Turn and work STRIPES - see explanation above, and PATTERN from RS as follows - beg on 2nd row in diagram: Work A.1a – see diagram for correct size (= 1 st), A.2 (= 5 tr) 1-0-1-0 times in width, repeat A.3 (= 9 tr) over the next 36-45-45-54 tr, A.5 over the 18 ch for neck, repeat A.3 over the next 36-45-45-54 tr, A.4 1-0-1-0 times, A.1a. Work 1 row in pattern (= 3rd row). Continue pattern like this but now work from 4th row in diagram A.3 over A.5 (neck), i.e. work 10-12-12-14 repetitions of A.3 in total in width. REMEMBER THE CROCHET TENSION! When diagram A.1 to A.4 have been worked, repeat the last 4 rows in diagram vertically. When 2nd stripe has been worked vertically, piece measures approx. 28 cm. Last row worked must be last row in diagram. Cut the yarn. Now continue from 3rd stripe and leave out repetitions in each side to dec after sleeves in the different sizes as explained below - beg from WS: S/M - XXL: NOTE: Beg working from 3rd row in diagram. Skip A.1a, A.4, 1 repetition A.3 and first ch-space in next repetition of A.3 for dec after sleeve. Beg in next ch-space (= 3 ch) and work A.1a, work A.4, A.3 6-8 times in total in width, A.2, A.1a. NOTE: The same pattern now remain at the end of row that were skipped at beg of row. L/XL - XXXL: NOTE: Beg working from 3rd row in diagram. Skip A.1a, 1 repetition of A.3 and skip the next 2 ch-spaces in next repetition of A.3 for dec after sleeve. Beg in next ch-space (= last ch-space in A.3) and work A.1a, work A.3 8-10 times in total in width, work A.1a in next ch-space. NOTE: The same pattern now remain at the end of row that were skipped at beg of row. Continue to repeat the last 4 rows in diagram until 5th stripe has been worked vertically. Work 6th stripe until piece measures 82-84-87-89 cm from shoulder. FRONT PIECE: Left shoulder: Work 51-56-62-66 ch with 1 strand off white and 1 strand light pearl grey (= 2 strands) on hook size 6 mm. Turn and work 1 tr in 4th ch from hook (= 2 tr), 1 tr in each of the next 5-3-2-6 ch, * skip 1 ch, work 1 tr in each of the next 6 ch *, repeat from *-* 6-7-8-8 times in total = 43-47-52-56 tr. Turn and work stripes and pattern from RS as follows - beg on 2nd row in diagram: Work A.1c (= 1 st), repeat A.3 over the next 36-45-45-54 tr, A.2 (= 5 tr) 1-0-1-0 times in width, work A.1a - see diagram for correct size. Continue like this back and forth until 4th row in diagram has been worked vertically. Cut the yarn and work right shoulder. Right shoulder: Work 51-56-62-66 ch with 1 strand off white and 1 strand light pearl grey (= 2 strands) on hook size 6 mm. Turn and work 1 tr in 4th ch from hook (= 2 tr), 1 tr in each of the next 5-3-2-6 ch, * skip 1 ch, work 1 tr in each of the next 6 ch *, repeat from *-* 6-7-8-8 times in total = 43-47-52-56 tr. Turn and work stripes and pattern from RS as follows - beg on 2nd row in diagram: Work A.1a – see diagram for correct size (= 1 st), A.2 (= 5 tr) 1-0-1-0 times in width, A.3 (= 9 tr) over the next 36-45-45-54 tr, work A.1c (= 1 st). Continue like this back and forth until 5th row in diagram has been worked vertically – but on 5th row skip A.1c, work first row in A.5 (i.e. 18 loose ch for neck), then continue with left shoulder as follows: skip A.1c, work 5th row in diagram over the remaining sts on row. Work last row in diagram. Then repeat the last 4 rows in diagram vertically - over A.5 work A.3 2 times in width, i.e. there are 10-12-12-14 repetitions A.3 in width. Continue with stripes and pattern, dec after sleeves as on back piece. ASSEMBLY: Place shoulders on back piece and front piece towards each other and sew shoulder seams with 1 strand off white by sewing one and one st tog. Sew underarm seams and side seams in one with 1 strand light grey, sew outer loops of edge sts in one and one st until 26 cm remain for vents at the bottom in each side. Crochet an edge around the sleeves as follows: Beg mid under sleeve and work with 1 strand off white and 1 strand light pearl grey (= 2 strands) on hook size 6 mm as follows: * Work 1 dc, 3 ch, skip 1 cm *, repeat from *-* around the entire sleeve and finish with 1 sl st in first dc on round. Work the same way around the other sleeve. Crochet an edge around the neck as follows: Beg mid on top of one shoulder and work tog the same way as around sleeves. |
|||||||||||||||||||||||||
Diagram explanations |
|||||||||||||||||||||||||
|
|||||||||||||||||||||||||
 |
|||||||||||||||||||||||||
 |
|||||||||||||||||||||||||
 |
|||||||||||||||||||||||||
Have you finished this pattern?Tag your pictures with #dropspattern or submit them to the #dropsfan gallery. Do you need help with this pattern?You'll find 5 tutorial videos, a Comments/Questions area and more by visiting the pattern on garnstudio.com. © 1982-2026 DROPS Design A/S. We reserve all rights. This document, including all its sub-sections, has copyrights. Read more about what you can do with our patterns at the bottom of each pattern on our site. |
|||||||||||||||||||||||||


Post a comment to pattern DROPS Extra 0-1326
We would love to hear what you have to say about this pattern!
If you want to leave a question, please make sure you select the correct category in the form below, to speed up the answering process. Required fields are marked *.