
Popular categories
Looking for a yarn?


Comments / Questions (114)
![]() Lyse Goyette wrote:
Lyse Goyette wrote:
Bonsoir , y a t'il un erreur dans le patron homme Finnley's Hat , en francais ` mERCI
10.02.2026 - 01:53DROPS Design answered:
Bonjour Mme Goyette, à priori non (je l'ai moi-même réalisé), mais n'hésitez pas à nous préciser votre pensée, nous pourrons volontiers vérifier à nouveau et/ou vous expliquer si besoin. Bon tricot!
10.02.2026 - 17:41
![]() Maryam wrote:
Maryam wrote:
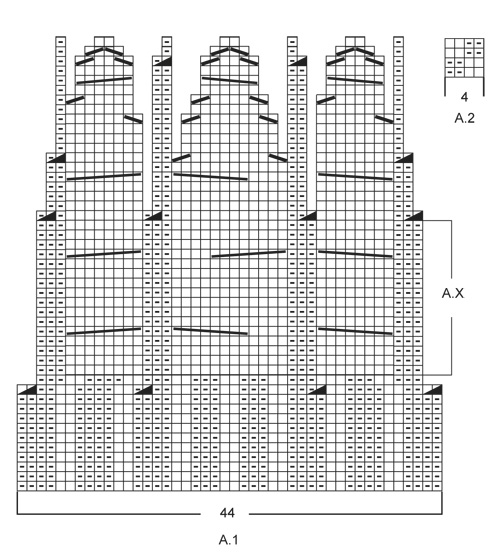
How to decrease in diagram A.2?
09.02.2025 - 09:55DROPS Design answered:
Dear Maryam, in round 2 of A.2 you will have: knit 2, purl 2. You will need to decrease in A.2 by purling together these purl 2 of the rib (so the new rib will look like: knit 2, purl1) in each repeat of A.2 in the round. Then work as indicated in ROUNDS 2 to 6 (not exactly as in the chart). In ROUND 7 of decreases you will have the opposite type of rib: purl 2, knit 1. So you will purl together the 2 purl stitches of the rib (new rib = purl 1, knit 1) in each repeat of A.2 in the round. Happy knitting!
10.02.2025 - 01:00
![]() Lotte Ø wrote:
Lotte Ø wrote:
Hej jeg forstår ikke helt følgende sætning: Nu strikkes de 2 sidste m i A.2, A.2 over de næste 76 m?
26.08.2024 - 22:07
![]() Leonie wrote:
Leonie wrote:
Ich bin etwas verwirrt, wie die 131 M am Anfang zustandekommen. 2+(3+2)*16 sind ja 82 und auch wenn man A.1 mit 44 M wiederholt, kommt ja immer eine gerade M-Anzahl raus. Wo kommt diese extra M her? Wie stricke ich die?
28.11.2023 - 11:16DROPS Design answered:
Liebe Leonie, man muss 16 Mal mehr (3 links, 2 rechts) dh insgesamt 17 Mal stricken, so hat man: 2 + ((3+2)x17) + 44 = 131 Maschen. Viel Spaß beim stricken!
28.11.2023 - 16:28
![]() Monica wrote:
Monica wrote:
Buongiorno, Le correzioni sono già presenti nel diagramma o solo nella spiegazione? Grazie
21.11.2023 - 13:26DROPS Design answered:
Buonasera Monica, il modello online è già corretto. Buon lavoro!
22.11.2023 - 17:59
![]() Goanne wrote:
Goanne wrote:
Brei nu de laatste 2 st in A.2, A.2 over de volgende 76 st, ga verder met A.1. Ga zo verder en herhaal A.X 3 keer in de hoogte. Hoe moet ik dit lezen? Moet ik 4 pennen A2 breien of alleen 1 toer A2? Als ik vervolgens verder ga met AX 3 keer in de hoogte heb ik niet genoeg steken. Ik heb namelijk 118 steken op de naald en AX 3 keer in de breedte is 120 steken. Wat lees ik verkeerd?
31.10.2023 - 13:47DROPS Design answered:
Dag Goanne,
Je breit A.X 3 keer in de hoogte, niet 3 keer in de breedte. Daartussen brei je A.2
01.11.2023 - 19:36
![]() NICOLA WARNANTS wrote:
NICOLA WARNANTS wrote:
Like others, i have found this hat comes out rather loose and long, and would certainly fit a large head. It would be useful to have a final length, but according to the row count on the pattern, with the given row guage that makes 28cm which is a long hat. Perhaps it is intended to fit with slouch, although that is not obvious from the photos . Just saying...
06.10.2023 - 10:10
![]() Valeria wrote:
Valeria wrote:
Ospravedlnujem sa,ale nerozumiem pokracovaniu po A1=118.Prevedieme pletenie na ihlicu c.4 a pletieme posledné dve ocká A2.Je to 12 riadok,alebo ako sa dostanem na posledné ocká?Preco zacína nová zmena poslednými ockami?Dakujem za odpoved.
15.08.2023 - 22:40DROPS Design answered:
Dobrý den, Valerie, při této změně vzoru začínáme 2 oky obrace (= poslední 2 oka vzoru A.2), abychom zajistili návaznost vzoru po ujímání, které jsme provedli v závěru vzoru A.1. Postupujte tedy přesně podle rozpisu, vzor by se vám měl po této "vyrovnávací" řadě hezky složit a pokračovat plynule. Hodně zdaru! Hana
20.08.2023 - 13:24
![]() Carole wrote:
Carole wrote:
Bonjour Existe t'il un modèle d'echarpe qui va avec ce bonnet svp ? Merci
01.01.2023 - 19:06DROPS Design answered:
Bonjour Carole, pas précisément, mais vous pourrez trouver ici d'autres modèles d'écharpes que vous pourrez assortir. Bon tricot!
02.01.2023 - 14:30
![]() Patricia wrote:
Patricia wrote:
"Brei nu de laatste 2 st in A.2, A.2 over de volgende 76 st, ga verder met A.1. Ga zo verder en herhaal A.X 3 keer in de hoogte. " Wat wordt met deze zin bedoeld? Ik heb namelijk niet nog 2 steken te breien...of wordt hiermee bedoeld dat ik nu volgens A2 moet beginnen te breien? Ik hoor het graag :-)
06.01.2022 - 09:55DROPS Design answered:
Dag Patricia,
Op de 11e naald in A.1 brei je de laatste 2 steken in A.2, dus eigenlijk brei je de laatste 2 steken recht in plaats van dat je ze samenbreit. Vervolgens ga je verder in A.2 over de volgende toer over de eerste 76 steken, dan brei je A.1 over de rest van de naald. Op deze manier brei je A.1 en A.2 in de hooge.
13.02.2022 - 09:30
|
||||||||||||||||||||||||||||
Finnley's Hat |
||||||||||||||||||||||||||||
|
|
||||||||||||||||||||||||||||
Knitted DROPS hat for men with cables and texture in ”Lima”.
DROPS Extra 0-1133 |
||||||||||||||||||||||||||||
|
PATTERN: See diagrams A.1 and A.2. DECREASE TIP: Dec 1 st by P 2 tog. ---------------------------------------------------------- HAT: Worked in the round on circular needle/double pointed needles. Cast on 131 sts on circular needle size 3.5 mm with Lima. Work rib as follows: K 2, * P 3, K 2 *, repeat from *-* 16 more times, A.1 (= 44 sts). Continue like this until 10 rounds have been worked. On next round dec over the first 87 sts 1 P in every other section with P - READ DECREASE TIP, (= 9 sts dec), then continue with 11th round in A.1 = 118 sts. Switch to circular needle size 4 mm. Now work the last 2 sts in A.2, A.2 over the next 76 sts, continue with A.1. Continue like this and repeat A.X 3 times vertically. REMEMBER THE KNITTING TENSION Piece measures approx. 21 cm. Now continue with the remaining rounds in A.1 until finished measurements, AT THE SAME TIME dec and work as follows over the 78 sts with A.2 as follows: NOTE: Next round is round 2 in diagram A.2! ROUND 1: Dec by P 2 tog over all P 2 (= 20 sts dec) = 94 sts in total (58 sts + sts in A.1) ROUND 2: P over K and K over P. ROUND 3: P over P and K over K. ROUND 4: P over K and K over P. ROUND 5: P over P and K over K. ROUND 6: P over K and K over P. ROUND 7: Now dec by P 2 tog over ell P 2 (= 19 sts dec) = 71 sts in total (39 sts + sts in A.1). ROUND 8-13: Continue in stocking st over the 39 sts (work A.1 as before). ROUND 14: Work in stocking sts and dec 15 sts evenly by K 2 tog = 48 sts in total (= 24 sts + sts in A.1) ROUND 15-17: Continue in stocking sts over the 24 sts (work A.1 as before). ROUND 18: K tog all sts 2 by 2 = 22 sts in total ( = 12 sts + sts in A.1). When A.1 has been worked in total cut the yarn, pull the yarnend through the remaining sts, tighten tog and fasten. |
||||||||||||||||||||||||||||
Diagram explanations |
||||||||||||||||||||||||||||
|
||||||||||||||||||||||||||||
 |
||||||||||||||||||||||||||||
Have you finished this pattern?Tag your pictures with #dropspattern or submit them to the #dropsfan gallery. Do you need help with this pattern?You'll find 12 tutorial videos, a Comments/Questions area and more by visiting the pattern on garnstudio.com. © 1982-2026 DROPS Design A/S. We reserve all rights. This document, including all its sub-sections, has copyrights. Read more about what you can do with our patterns at the bottom of each pattern on our site. |
||||||||||||||||||||||||||||


With over 40 years in knitting and crochet design, DROPS Design offers one of the most extensive collections of free patterns on the internet - translated to 17 languages. As of today we count 324 catalogues and 12290 patterns translated into English (UK/cm). 12290
We work hard to bring you the best knitting and crochet have to offer, inspiration and advice as well as great quality yarns at incredible prices! Would you like to use our patterns for other than personal use? You can read what you are allowed to do in the Copyright text at the bottom of all our patterns. Happy crafting!
Post a comment to pattern DROPS Extra 0-1133
We would love to hear what you have to say about this pattern!
If you want to leave a question, please make sure you select the correct category in the form below, to speed up the answering process. Required fields are marked *.