
Popular categories
Looking for a yarn?


Comments / Questions (19)
![]() Anne Kocarová wrote:
Anne Kocarová wrote:
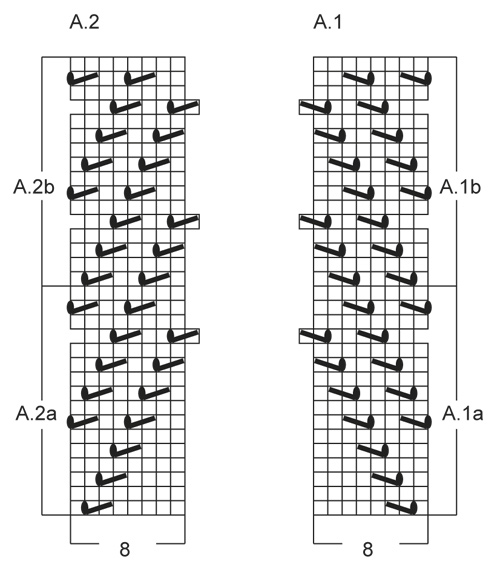
Miten takakappale neulotaan? Siis ohjeessa sanotaan " neuloa piirrosten A1/A2 mukaisesti.... mutta montako silmukkaa neulotaan ennen reikä neuletta aluksi ja monta silmukkaa ennen reikä neuletta toisessa reunassa? Ja onko se A.2b vai A.2a?
07.04.2023 - 12:32DROPS Design answered:
Hei, mallineuletta jatketaan kuten aiemmin (A.1b ja A.2b). Kummassakin reunassa neulotaan 4 silmukkaa sileää neuletta (eli luoduilla 3 silmukalla neulotaan myös sileää neuletta).
12.04.2023 - 16:37
![]() Anne Kocarová wrote:
Anne Kocarová wrote:
En edelleenkään näe mallipiirroksessa palloa joka kuvaa langankiertoa ym. Voitteko lähettää minulle mallipiirroksen, jossa kaikki merkit näkyy. Kiitos.
31.10.2021 - 19:18
![]() Anne Kocarová wrote:
Anne Kocarová wrote:
Piirroksessa ei ole ohjeen mukaisia merkkejä
17.09.2021 - 11:56DROPS Design answered:
Tarkistin ohjeen, ja kaikki tarvittavat merkit (4 kpl) löytyvät piirroksesta.
20.09.2021 - 17:04
![]() Anna wrote:
Anna wrote:
OHJE: "I= 2 langankiertoa 2 silmukan väliin, seuraavalla krs:lla 1. langankierto neulotaan nurin ja 2. langankierto pudotetaan puikolta".. Tarkoittaako tämä että seuraavalla, eli nurjalla kerroksella tiputetaan toinen langankierto. Vai tarkoittaako se seuraavalla oikealla kerroksella?
10.03.2021 - 22:16DROPS Design answered:
Tässä tarkoitetaan seuraavaa , eli nurjan puolen, kerrosta.
15.03.2021 - 18:51
![]() Monika wrote:
Monika wrote:
Ska det ökas motsvarande antal maskor på de aviga varven som det minskas på de räta varven? I mönstret A1/A2. Står inget i mönstret o diagrammet är inte tydligt.
26.01.2021 - 23:21DROPS Design answered:
Hej Monika. På de räta varven gör du både ökning och minskning (omslag + sticka 2 maskor tillsammans) så maskantalet är oförändrat på de räta varven. På de aviga varven gör du varken ökning eller minskning. Mvh DROPS Design
29.01.2021 - 07:48
![]() Caterina wrote:
Caterina wrote:
Ho realizzato questo modello col filato sostitutivo Paris ma è venuto troppo "lasso" con i ferri n. 8;cosa succede se lavoro col ferro n. 5 che è adatto a paris?Oppure:quali ferri più piccoli dell'8 potrei usare per rispettare la proporzione?
17.08.2014 - 10:39DROPS Design answered:
Buongiorno Caterina, prima di lavorare il modello con il Paris ha fatto il campione? Deve utilizzare il n° di ferri che le permette di ottenere un campione di 12 m x 17 ferri a m rasata = 10 x 10 cm. Buon lavoro!!
18.08.2014 - 10:23
![]() Kim Chapman wrote:
Kim Chapman wrote:
Thank you so much. Yes I see now-I'll get started now. Ps. Brilliant site, fab patterns and quick reply to queries-what could be better?
05.08.2014 - 14:53
![]() Kim Chapman wrote:
Kim Chapman wrote:
Just read the instructions for this pattern AFTER buying the wool (silly me!!!) I can't see the instructions for the neckband. Help please!!!
02.08.2014 - 17:22DROPS Design answered:
Dear Mrs Chapman, neckband is worked at the same time as front piece (first work 3 ridges over the first 12 sts ,then cast off the first 9 sts and continue with 3 sts garter st towards neckline until the end). Happy knitting!
04.08.2014 - 09:21Ellen wrote:
Nar jeg strikker A1 og A2, skal det da pa vrangsiden av arbeidet legges opp en maske der hvor jeg har tatt 2 sammen pa rettsiden? Skal det lages kast pa pinnen? Dette er ikke tydelig i oppskrifen.
11.07.2014 - 13:40DROPS Design answered:
Hej Ellen. Du har jo lavet et dobbelt kast (slå om) ved hver 2 sammen iflg diagrammerne. Så når du strikker vrangen, slipper du det ene kast og strikker det andet vrang (+ 1m).
21.07.2014 - 17:07
![]() Janneke wrote:
Janneke wrote:
Het is een vestje, dus ik brei een linker en rechter voorpand, en een achterpand. Waarom moet ik dan ook een 'lijf'breien??Wat wordt daarmee bedoeld? Ik brei 3 panden van onder naar boven, en niet alles als één lap, toch? (achterboord beginnen, voorpand eindigen??)
29.06.2014 - 15:05DROPS Design answered:
Hoi Janneke. Je breit de panden in één keer tot aan de armsgaten (= lijf). Je breit van middenvoor naar middenvoor, dus over linker voorpand, achterpand en voorpand. Op deze manier heb je geen zijnaden.
01.07.2014 - 14:36
|
|||||||||||||
Sofie Cardigan#sofiecardiganbolero |
|||||||||||||
|
|
|||||||||||||
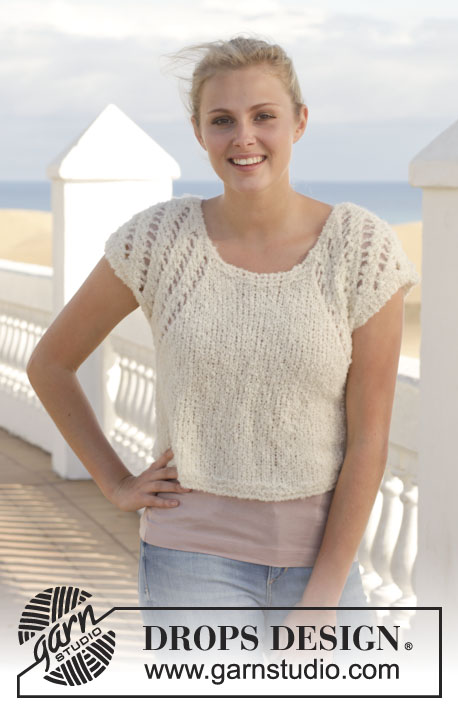
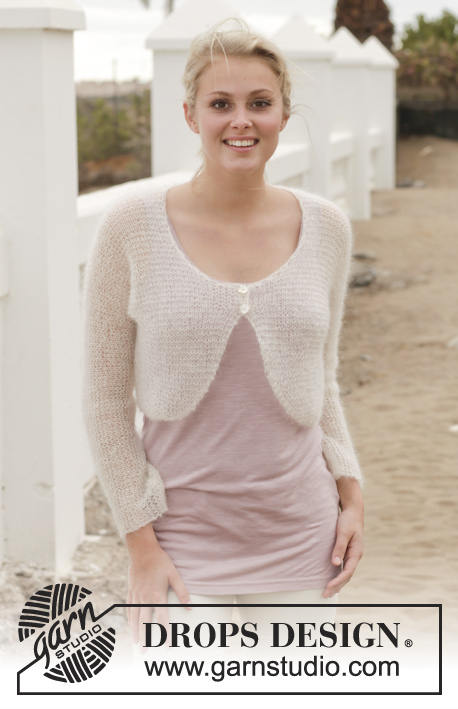
Knitted DROPS bolero with lace pattern in ”Alpaca Bouclé”. Size: S - XXXL.
DROPS 155-24 |
|||||||||||||
|
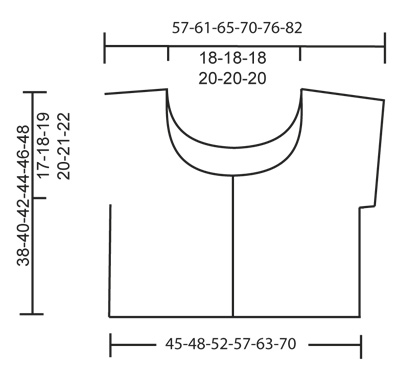
GARTER ST (back and forth on needle): K all rows. 1 ridge = 2 rows K. PATTERN: See diagrams A.1-A.2. The diagrams show all rows in pattern seen from RS. DECREASE TIP: Dec 1 st after 3 band sts as follows: Slip 1 st as if to K, K 1, psso. Dec 1 st before 3 band sts as follows: K 2 tog. BUTTONHOLES: Cast off for buttonholes on right band. 1 buttonhole = cast off 3rd st from mid front. On next row cast on 1 new st over the cast off st. Cast off for buttonholes when piece measures: SIZE S: 2, 9, 16 and 22 cm SIZE M: 2, 9, 16 and 24 cm SIZE L: 2, 10, 18 and 25 cm SIZE XL: 2, 10, 18 and 27 cm SIZE XXL: 2, 11, 20 and 28 cm SIZE XXXL: 2, 12, 21 and 30 cm ---------------------------------------------------------- BODY: Worked back and forth on needle. Cast on 114-122-130-142-158-174 sts (incl 3 band sts in each side) on circular needle size 8 mm with Alpaca Bouclé. Work 2 ridges in GARTER ST - see explanation above. Then work in stocking st with 3 sts in garter st (= band sts) in each side of piece. Work bands in garter st until finished measurements. Remember BUTTONHOLES - see explanation above. When piece measures 14-15-16-17-18-19 cm (adjust so that next row is from RS), insert two markers in the piece AT THE SAME TIME work from RS as follows: Work 3 sts in garter st (= band), 18-20-22-25-29-33 sts in stocking st, A.2a (= 8 sts), 1 st in stocking st (= right front piece), insert 1 marker, 1 st in stocking st, A.1a (= 8 sts), 36-40-44-50-58-66 sts in stocking st, A.2a (= 8 sts), 1 st in stocking st (= back piece), insert 1 marker, 1 st in stocking st, A.1a (= 8 sts), 18-20-22-25-29-33 sts in stocking st, finish with 3 sts in garter st (= band). NOTE: Diagrams A.1a/A.2a are displaced 1 st towards mid front and mid back on every row from RS. Continue pattern like this. When A.1a and A.2a have been worked 1 time vertically, work A.1b instead of A.1a and A.2b instead of A.2a. Diagrams A.1b and A.2b are repeated until finished measurements, AT THE SAME TIME continue eyelet rows already begun. REMEMBER BUTTONHOLES! When piece measures 21-22-23-24-25-26 cm (adjust so that next row is from RS), work each part separately. Now divide the piece between each marker. RIGHT FRONT PIECE: = 30-32-34-37-41-45 sts. REMEMBER BUTTONHOLES! Cast on 3 sts for sleeve at the end of next row from RS = 33-35-37-40-44-48 sts on needle. Work the 3 new sts in garter st until finished measurements. Continue to work garter st, stocking st and A.2 as before AT THE SAME TIME when piece measures 23-25-26-28-29-31 cm (adjust so that next row is from RS), work 3 ridges over the first 12 sts, stocking st and A.2 as before. On next row from RS cast off for neck as follows: Cast off the first 9 sts, continue in garter st over the next 3 sts (= band sts), stocking st and A.2 as before = 24-26-28-31-35-39 sts remain on needle. Then on next row from RS, dec 1 st after the 3 sts in garter st - SEE DECREASE TIP! Repeat dec on every row from RS 4-4-4-5-5-5 more times = 19-21-23-25-29-33 sts remain on needle. Work as before until piece measures 38-40-42-44-46-48 cm. Cast off. LEFT FRONT PIECE: Work as right but reversed. Work A.1 instead of A.2. Cast off for neck from WS. BACK PIECE: = 54-58-62-68-76-84 sts. Work A.1/A.2 and in stocking st as before AT THE SAME TIME cast on 3 sts in each side of piece at the end of the next 2 rows = 60-64-68-74-82-90 sts on needle. When piece measures 27-29-30-32-33-35 cm (adjust so that next row is from RS), work 3 ridges over the middle 24-24-24-26-26-26 sts (= 18-20-22-24-28-32 sts in each side in stocking st and A.1/A.2 as before). On next row from RS cast off the middle 18-18-18-20-20-20 sts for neck (= 21-23-25-27-31-35 sts remain on each shoulder). Now finish each shoulder separately. Continue in garter st over the 3 sts towards the neck, stocking st and A.1/A.2 as before AT THE SAME TIME on next row from RS dec 1 st after/before the 3 sts in garter st in the neck – see DECREASE TIP. Repeat dec 1 more time (= 2 times in total) = 19-21-23-25-29-33 sts remain on needle. Work as before until piece measures 38-40-42-44-46-48 cm. Cast off. ASSEMBLY: Sew the shoulder seams. Sew sleeve edges. Sew the buttons on to left front piece. |
|||||||||||||
Diagram explanations |
|||||||||||||
|
|||||||||||||
 |
|||||||||||||
 |
|||||||||||||
Have you finished this pattern?Tag your pictures with #dropspattern #sofiecardiganbolero or submit them to the #dropsfan gallery. Do you need help with this pattern?You'll find 20 tutorial videos, a Comments/Questions area and more by visiting the pattern on garnstudio.com. © 1982-2026 DROPS Design A/S. We reserve all rights. This document, including all its sub-sections, has copyrights. Read more about what you can do with our patterns at the bottom of each pattern on our site. |
|||||||||||||


With over 40 years in knitting and crochet design, DROPS Design offers one of the most extensive collections of free patterns on the internet - translated to 17 languages. As of today we count 324 catalogues and 12290 patterns translated into English (UK/cm). 12290
We work hard to bring you the best knitting and crochet have to offer, inspiration and advice as well as great quality yarns at incredible prices! Would you like to use our patterns for other than personal use? You can read what you are allowed to do in the Copyright text at the bottom of all our patterns. Happy crafting!
Post a comment to pattern DROPS 155-24
We would love to hear what you have to say about this pattern!
If you want to leave a question, please make sure you select the correct category in the form below, to speed up the answering process. Required fields are marked *.