
Popular categories
Looking for a yarn?


Comments / Questions (111)
![]() Leny wrote:
Leny wrote:
Hoe vaak moet je af hechten en de 5 lossen aanhaken? 2 x?? En met de 13 lossen, waar begin je weer het patroontje, in de 10 e losse?
14.05.2018 - 22:51DROPS Design answered:
Dag Leny, Op het eind van de 1e alinea van het achterpand staat 'hecht af' Daarna begin je met de volgende alinea met de 5 lossen. Aan het eind van die toer haak je 5 lossen, keer je het werk en begin je met TOER 1, dus opnieuw 5 lossen, dan vervolg je de toer zoals beschreven in het patroon, en aan het eind van TOER 1 haak je het laatste dubbele stokje in de eerste lus van de vorige toer. Dan knip je de draad weer af en keer je het werk. Voor maat L/XL herhaal je wat tussn de *-* staat in het patroon. Dat betekent dat je nog een keer de draad af moet knippen en opnieuw moet beginnen met 5 lossen.
16.05.2018 - 16:57
![]() Leny wrote:
Leny wrote:
Ik heb op het Franse instructie filmpje gezien. Daar lijkt het erop dat er 10 lossen worden gemaakt. Is dat dan de meerdering in 1 x? Zoals jij verteld zijn het 5 lossen, moet dit dan 2 x? Komen er in totaal 2 patroontjes bij aan elke kant?
12.05.2018 - 21:20DROPS Design answered:
Hallo Leny, Dat klopt; je haakt 5 lossen, dan keer je het werk en dan weer 5 lossen. Hoeveel patroontjes er in elke maat bij komen heb ik niet uitgerekend, maar als je het zo doet (met die 2 keer 5 lossen) moet het goed komen
14.05.2018 - 18:53
![]() Leny wrote:
Leny wrote:
Hoeveel patroontjes krijg je voor maat L/XL na het meerderen van de mouwen? Ik snap niet gied hoe je moet meerderen, misschien als ik weet hoeveel patroontjes je moet krijgen wordt het wat duidelijker
10.05.2018 - 22:27DROPS Design answered:
Hallo Leny, Uit mijn hoofd weet ik zo niet hoeveel patroonherhalingen je hebt. Maar als het werk 28 cm meet, hecht je af en dan begin je met een nieuwe draad en haak je eerst 5 lossen. Dan begin je met haken op de verkeerde (de lossen laatje gewoon hangen, daar haak je op de volgende toer nieuwe herhalingen op) en haak je gewoon zoals eerst A.3, een aantal herhalingen van A.2 en dan A.1, maar je eindigt nu weer met 5 lossen en dan keer je het werk. Laat even weten of deze uitleg helpt, of dat er iets anders is wat onduidelijk is.
12.05.2018 - 16:57
![]() Piette Nancy wrote:
Piette Nancy wrote:
J'ai essayé 2 fois la 1ère ligne en taille L/XL donc 95 ml pour la chaînette puis les 4ms en passant 1ml comme expliqué mais ça me fait 19 fois les 4ms et pas 18 fois comme expliqué ???
05.05.2018 - 20:58DROPS Design answered:
Bonjour Mme Nancy, tout à fait, on a bien un total de 19 fois 4 ms car on commence par 4 ms (= 1 ms dans la 2ème ml à partir du crochet, 1 ms dans les 3 ms suivantes) puis 18 fois (on saute 1 ml et on crochète 1 ms dans les 4 ms suivantes). Bon crochet!
07.05.2018 - 09:02
![]() Beatrice wrote:
Beatrice wrote:
Buonasera, sto realizzando questo modello, sono arrivata ai 49 cm del dietro e non riesco a capire come devo proseguirne per le spalle, devo continuare il lavoro o tagliare?e i diagrammi A.4 e A.5 come se devono lavorare? Grazie
13.04.2018 - 22:18DROPS Design answered:
Buongiorno Beatrice. Prosegue con la spalla destra senza tagliare il filo, lavora A1 e A2 sul numero di maglie indicate , gira il lavoro e segue adesso A4 iniziando dalla seconda riga. Buon lavoro!
14.04.2018 - 13:34
![]() Monique wrote:
Monique wrote:
Hoi, Worden het achterpand en de voorpanden met de goede kanten op elkaar gelegd, als je de delen aan elkaar gaat haken? Alvast bedankt, Monique.
14.01.2018 - 13:33DROPS Design answered:
Hoi Monique, De panden leg je met de verkeerde kanten op elkaar als je het werk in elkaar haakt.
15.01.2018 - 19:51
![]() Monique wrote:
Monique wrote:
Achterpand: waarom moet je op 28 cm afhechten, als jevervolgens weer verder moet haken?
09.01.2018 - 23:08DROPS Design answered:
Hoi Monique, Op 28 cm begin je met het opzetten van een aantal lossen voor de aangehaakte mouw, daarna haak je verder over het achterpand. Vandaar dat je af moet hechten. Dus: hecht af, haak het aantal lossen en haak verder over het achterpand.
10.01.2018 - 11:49
![]() Sonja Breuer wrote:
Sonja Breuer wrote:
People who complain about IKEA instructions, should pick up crochet for a challenge :-) :-) I can't make head and tail of the instructions regarding the increase for the arms. I must add chains to the ends to increase and add 5 to the chain for the next row up. Normally, there are 4 chains between each fan. But I attach the chain and start on row one, how many chains do I leave between the fans at the point of attachment, more than 4 so that it goes round as opposed to square?
07.08.2017 - 15:17DROPS Design answered:
Dear Mrs Breuer, the number of increase will depend on your size, follow your size working the number of chains to cast on, work next row as before over the sts on previous row and finish with the number of chains to cast on at the end of row. Then work pattern on next row in chains and previous row. Happy crocheting!
07.08.2017 - 17:38
![]() Sonja wrote:
Sonja wrote:
Why do I need to lose 3 in first row? Why and how? I don't understand the instruction: 1sc in each of the next 1-3 1-3 ch.
24.04.2017 - 21:28DROPS Design answered:
Dear Sonja, according to the instruction you mention, you should crochet 1 sc in each of the 1-3-1-3 stitch. These numbers for the sizes, in other words 1 stitch for the size S/M; 3 stitch for the size L /XL, 1 stitch for the size XXL, and 3 stitch for the size XXL. Also, you leave out 1 chain stitches, in order to have the edge not as tight, a bit more elastic. I hope, this helped. Happy crocheting!
24.04.2017 - 23:05
![]() Robyn Greaves wrote:
Robyn Greaves wrote:
I have read the responses for the back and I am still confused about what to do after the back measures 11". If I fasten off, where do I reattach the yarn to do the chain 5? I'm assuming the ch 5 at each end is the sleeves.
11.04.2017 - 00:58DROPS Design answered:
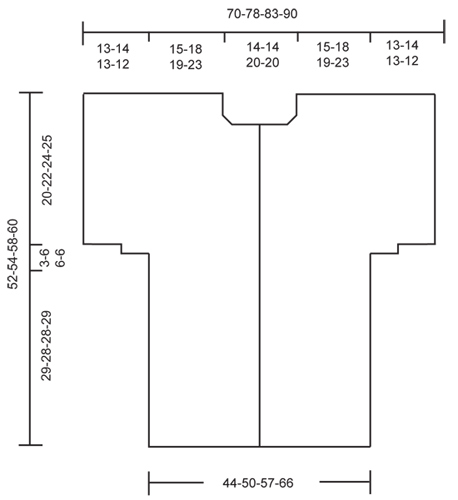
Dear Robyn! You are right - the 5 ch at each end are the sleeves. Just attach them to the edge of your work - please see the schematic drawing at the end of the pattern. Happy knitting!
11.04.2017 - 13:30
|
|||||||||||||||||||
Verano#veranocadigan |
|||||||||||||||||||
|
|
|||||||||||||||||||
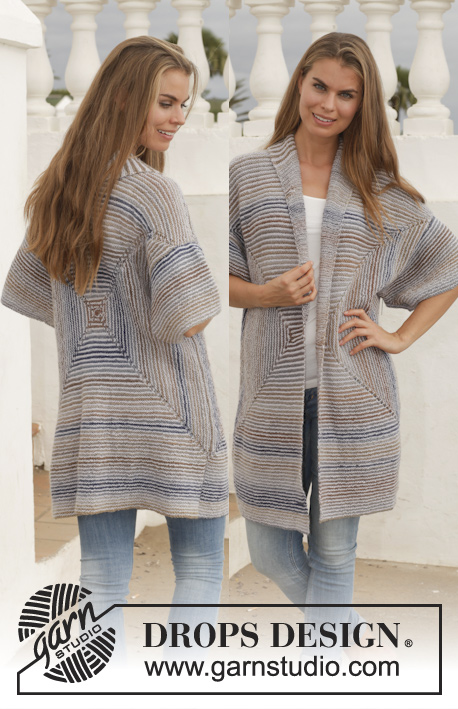
Crochet DROPS jacket with lace pattern and double treble crochet in ”Cotton Merino”. Size: S - XXXL.
DROPS 153-14 |
|||||||||||||||||||
|
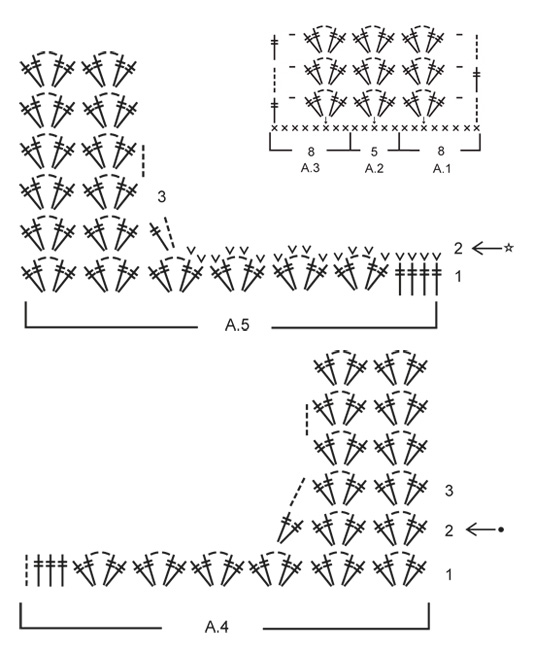
CROCHET INFO: Replace first dtr at beg of every dtr row with 4 ch. PATTERN: See diagrams A.1 - A.5. CROCHET TIP: ROW 1 in diagram A.4 and A.5 are not worked on back piece but on front piece. BUTTONHOLES: Do not dec for buttonholes but sew the buttons on to left band and button between two dtr/triple tr in right band. Sew on buttons measured from cast-on edge as follows: SIZE S/M: 12, 20, 28, 36 and 44 cm SIZE L/XL: 14, 22, 30, 38 and 46 cm SIZE XXL: 10, 20, 30, 40 and 50 cm SIZE XXXL: 12, 22, 32, 42 and 52 cm ---------------------------------------------------------- BACK PIECE: Worked back and forth. Work 83-95-108-120 ch on hook size 5 mm with Cotton Merino. Work first row as follows (= WS): 1 dc in 2nd ch from hook = 1 dc, 1 dc in each of the next 1-3-1-3 ch, * skip 1 ch, 1 dc in each of the next 4 ch *, repeat from *-* 16-18-21-23 times = 66-76-86-96 dc. Continue to work as follows: ROW 1 (= RS): Work A.1 1 time, then work A.2 until 8 dc remain (= 10-12-14-16 times in width) and finish with A.3 1 time. REMEMBER THE CROCHET TENSION! ROW 2 (= WS): Turn piece and work A.3 1 time, A.2 (= 10-12-14-16 times in width), A.1 1 time. ROW 3 (= RS): Turn piece and work A.1 1 time, A.2 (= 10-12-14-16 times in width), A.3 1 time. Repeat 2nd and 3rd row until piece measures approx. 29-28-28-29 cm - adjust to finish with 3rd row (= RS). Fasten off. Continue to work as follows: * Work 10-5-5-5 loose ch, beg from WS and continue A.3, A.2 and A.1 over back piece as before and finish with 10-5-5-5 loose ch, turn piece. Continue to work as follows: ROW 1 (= RS): Work 5 ch, in 10th ch from hook work 2 dtr + 2 ch + 2 dtr (= 1 repetition of A.1), work A.2 2-1-1-1 time (work last repetition of A.2 around the 2 ch in A.1 from previous row). Then continue with A.2 10-12-14-16 times in total over the entire back piece as before and finish row as follows: Work A.2 around the 2 ch in A.3 from previous row, then continue with A.2 1-0-0-0 times, and then A.3 the last 1 dtr will be in 1st ch on previous row. Cut the yarn and turn piece *, in size L/XL – XXL – XXXL repeat *-* 1 more time, AT THE SAME TIME work 2 extra repetitions of A.2 over back piece. I.e. work 1 extra repetition of A.2 over the inc repetition from previous row in each side of piece = 16-18-20 repetitions in total of A.2 in size L/XL – XXL – XXXL. Do not repeat *-* in size S/M but continue as explained below: Work 13-13-13-13 loose ch, beg from WS and continue with A.2 in ch-space from A.3 on previous row, A.2 over sleeves and back piece as before, and A.2 in ch-space in A.1 on previous row and finish with 13-13-13-13 loose ch. Continue to work as follows: ROW 1 (= RS): Work A.1 and A.2 1 time over the new sts. Continue with A.2 over sleeves and back piece as before and finish with 1 repetition of A.2 and A.3. Continue this pattern until piece measures approx. 49-51-55-57 cm - adjust to finish after a row from WS. Then finish each shoulder separately as follows: RIGHT SHOULDER: Work A.1 1 time and A.2 5-6-6-7 times in total, then work 2nd row of diagram A.4 – READ CROCHET TIP! Turn and work 3rd row of A.4, and continue row with A.2 and A.1 as before. Continue like this until piece measures 52-54-58-60 cm in total. Fasten off. LEFT SHOULDER: Work left shoulder the same way but reversed, and work A.3 instead of A.1 and 2nd row of A.5 instead of A.4. Beg with 2nd row of A.5 in the middle of row, so that there are 4-4-6-6 repetitions of A.2 in width for neck. RIGHT FRONT PIECE: Worked back and forth. Work 45-52-58-64 ch on hook size 5 mm with Cotton Merino. Work first row as follows (= WS): 1 dc in 2nd ch from hook, 1 dc in each of the next 4-1-2-3 ch, * skip 1 ch, 1 dc in each of the next 4 ch *, repeat from *-* 7-9-10-11 times in total and finish with 1 dc in each of the next 4 ch = 37-42-47-52 dc. ROW 1 (= RS): 4 ch (= 1 dtr), 1 dtr in each of the next 3 dc (= 4 dtr for band) NOTE: Work band with every other row dtr and triple tr. Then work A.2 5-6-7-8 times in total, finish with A.3 1 time. Repeat this pattern, with 4 dtr/triple tr for band towards mid front until piece measures approx. 29-28-28-29 cm – adjust according to back piece and finish with a row from RS. Fasten off. Then work 10-5-5-5 loose ch for sleeve and continue as on back piece. When piece measures 42-44-46-48 cm, work as follows on 1st row from WS: Pattern as before until 3 repetitions of A.2 and 4 dtr remain. Work pattern according to diagram A.5 over these sts. Turn and work A.5, continue row with pattern as before. Continue like this back and forth until piece measures 52-54-58-60 cm in total. Fasten off. LEFT FRONT PIECE: Work as right but reversed. Work according to diagram A.1 instead of A.3, and when neck dec beg, work according to A.4 instead of A.5. ASSEMBLY: Place front piece on top of back piece and work the shoulders as follows: * 1 dc through both layers, 3 ch, skip 2 dtr *, repeat from *-*. Work the sides tog as follows: 1 dc, * 3 ch, 1 dc in ch-space on next row *, repeat from *-*. Work tog under sleeves as follows: * 1 dc in ch in next dtr-group, 3 ch *, repeat from *-* and finish with 1 dc. Sew buttons on left band and button through two dtr/triple tr in right band. NECK EDGE: Work a neck edge as follows, beg from WS: ROW 1: Fasten yarn with 1 dc at the edge, * 3 ch, skip approx. 2 cm, 1 dc *, repeat from *-* around the entire neck edge. Turn piece. ROW 2: 4 ch, 3 dtr in first ch-space, * 3 dtr in next ch-space *, repeat from *-* along the entire row, and finish with 1 dtr in first ch on previous row. Turn piece. ROW 3: * 3 ch, skip 3 dtr, 1 dc between the next two dtr-groups *, repeat from *-* along the entire row. Turn piece. ROW 4: 2 ch, 1 dc in first ch-space, * 2 ch, 1 dc in next ch-space *, repeat from *-* along the entire row. Fasten off. |
|||||||||||||||||||
Diagram explanations |
|||||||||||||||||||
|
|||||||||||||||||||
 |
|||||||||||||||||||
 |
|||||||||||||||||||
Have you finished this pattern?Tag your pictures with #dropspattern #veranocadigan or submit them to the #dropsfan gallery. Do you need help with this pattern?You'll find 8 tutorial videos, a Comments/Questions area and more by visiting the pattern on garnstudio.com. © 1982-2026 DROPS Design A/S. We reserve all rights. This document, including all its sub-sections, has copyrights. Read more about what you can do with our patterns at the bottom of each pattern on our site. |
|||||||||||||||||||


With over 40 years in knitting and crochet design, DROPS Design offers one of the most extensive collections of free patterns on the internet - translated to 17 languages. As of today we count 324 catalogues and 12290 patterns translated into English (UK/cm). 12290
We work hard to bring you the best knitting and crochet have to offer, inspiration and advice as well as great quality yarns at incredible prices! Would you like to use our patterns for other than personal use? You can read what you are allowed to do in the Copyright text at the bottom of all our patterns. Happy crafting!
Post a comment to pattern DROPS 153-14
We would love to hear what you have to say about this pattern!
If you want to leave a question, please make sure you select the correct category in the form below, to speed up the answering process. Required fields are marked *.