
Popular categories
Looking for a yarn?


Comments / Questions (8)
![]() Ria Van Der Holst wrote:
Ria Van Der Holst wrote:
Hoe ziet de achterkant er uit? Ik snap de meerderingen/ minderingen in patroon op het achterdek niet.
30.01.2025 - 11:32
![]() Sylvie wrote:
Sylvie wrote:
Bonjours les augmentations son faite après les 5 mailles du début ou avant A 1 merci
28.12.2018 - 08:21DROPS Design answered:
Chère Sylvie, 4 mailles sont augmentées selon les diagrammes A.2 et A.3, au debut de A.2 et a la fin de A.3. 4 mailles supplémentaires (pour que le nombre de mailles ne change pas) sont augmentées entre A.1 et le jersey, côté jersey (au debut et a la fin de la partie jersey), de chaque côté sur les devants et le dos. Bon tricot!
28.12.2018 - 10:50
![]() Briggs wrote:
Briggs wrote:
Im Abschnitt AB- UND AUFNAHME IM MUSTER, VORDER- UND RÜCKENTEIL steht .. "wird wie vorher 1 zusätzliche M in A.2/A.3 abgenommen" und zwar in jeder Hinreihe. Die Abn. in A.2/A.3 wurden aber zuvor in der Rückreihe gemacht. Wenn ich die M in der Hinreihe abn., was mache ich dann, wenn ich bei A2 und A3 die regulären Ab- und Zun. im Muster habe?
25.09.2018 - 18:16
![]() Briggs wrote:
Briggs wrote:
Nach Beginn des Raglans: wie viele M werden re zwischen A1 und dem Ärmel gestrickt? Ich stricke die kleinste Größe, d.h. 9 M re, aber 3 M werden davon für das neue A1-Muster genommen. Dann muss ich für den Raglan mind. 2x abnehmen, bevor ich nach 2cm erst zu dem Abschnitt AB- UND AUFNAHME IM MUSTER, VORDER- UND RÜCKENTEIL komme. Dann bleiben höchstens noch 4 M übrig. Auf dem Foto sieht es nach mehr aus
25.09.2018 - 18:05
![]() Briggs wrote:
Briggs wrote:
Ich bin kein Spammer und habe auch noch nie eine Frage bei Ihnen gestellt!!
25.09.2018 - 17:57
![]() Kim wrote:
Kim wrote:
This pattern fine UNTIL sleeves are joined. The raglan decrease instructions DO NOT look like the picture!
02.02.2017 - 02:42DROPS Design answered:
Dear Kim, make sure to not forget dec and inc in pattern front and back, ie dec 1 st in A.2/A.3 and inc 1 st outside A.1 to inc number of sts worked in stocking st. So that you will inc 33-39 sts in stocking st between both A.1 and dec 30-36 sts (see size) for raglan. Happy knitting!
02.02.2017 - 10:26
![]() Jette Bjærge wrote:
Jette Bjærge wrote:
Jeg er meget i tvivl mht til målene. Skal skabelonen betyde at ved 58 cm i brystmål, så er målet omkring brystet 116 cm hele vejen rundt. Jeg er normalt en str 40 men det ser ud som om jeg kan "krybe" i en small :-)
12.02.2014 - 11:59DROPS Design answered:
Hej Jette. Maalene stemmer, modellen skal ogsaa falde meget löst, som du ogsaa kan se paa billedet. God fornöjelse med den
12.02.2014 - 13:05
![]() Patricia wrote:
Patricia wrote:
Dank voor de uitleg van deze vest was een van mijn favoriten
26.09.2013 - 12:44
|
||||||||||||||||||||||
Maiden Shield |
||||||||||||||||||||||
|
|
||||||||||||||||||||||
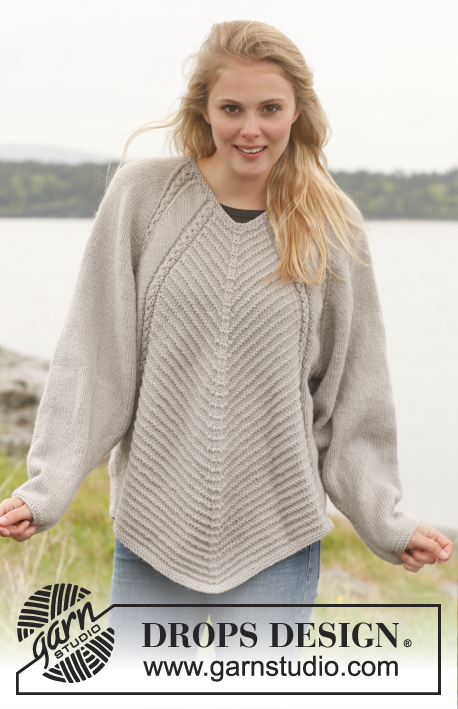
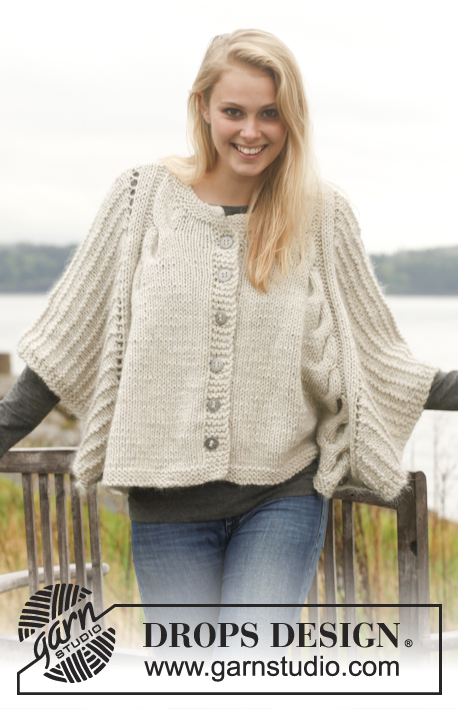
Knitted DROPS jacket with textured pattern, wide sleeves and deep raglan in ”Lima”. Size: S - XXXL.
DROPS Extra 0-958 |
||||||||||||||||||||||
|
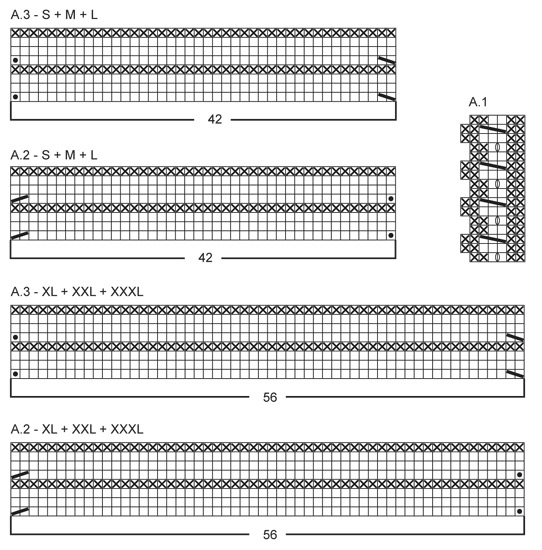
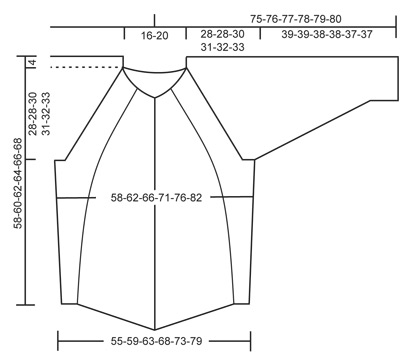
GARTER ST (back and forth on circular needle): K all rows. 1 ridge = 2 rows K. GARTER ST (in the round on double pointed needles): * K 1 round and P 1 round *, repeat from *-*. 1 ridge = 2 rounds. PATTERN: See diagrams A.1 to A.3 – choose diagram for correct size. The diagrams show all rows in pattern seen from RS. BUTTONHOLES: Dec for buttonholes on right band. 1 buttonhole = K tog second and third st from edge and make 1 YO. Dec for buttonholes when piece measures (measured in the side where piece is shortest): SIZE S: 1, 10, 19, 28, 37 and 46 cm. SIZE M: 2, 11, 20, 29, 38 and 47 cm. SIZE L: 3, 12, 21, 30, 39 and 48 cm. SIZE XL: 3, 12, 21, 30, 39 and 48 cm. SIZE XXL: 3, 12, 21, 30, 39 and 48 cm. SIZE XXL: 3, 12, 21, 30, 39 and 48 cm. INCREASE TIP: All inc are done from RS! Inc 1 st by making 1 YO. On next row P YO twisted to avoid holes. DECREASE TIP (applies to raglan): Dec for raglan on each side of A.1 in every transition between sleeves and body. FROM RS: Dec as follows before A.1: K 2 tog. Dec as follows after A.1: Slip 1 st as if to K, K 1, psso. FROM WS: Dec as follows before A.1: P 2 twisted tog. Dec as follows after A.1: P 2 tog. ---------------------------------------------------------- BODY: Worked back and forth on circular needle from mid front. Cast on 230-246-262-282-302-326 sts (incl 5 band sts in each side towards mid front) on circular needle size 4 mm with Lima. Work 2 ridges in GARTER ST - see explanation above. Switch to circular needle size 5 mm and insert 2 markers 60-64-68-73-78-84 sts in from each side (= 110-118-126-136-146-158 sts between markers on back piece). Work next row as follows from RS: 5 band sts in garter st, work A.3 (= 42-42-42-56-56-56 sts), A.1 (= 6 sts), 14-22-30-12-22-34 sts in stocking st (marker in the side is in the mid of these sts), A.1 (= 6 sts), A.2 (= 42-42-42-56-56-56 sts), A.3 (= 42-42-42-56-56-56 sts), A.1 (= 6 sts), work 14-22-30-12-22-34 sts in stocking st (marker in the side is in the mid of these sts) A.1 (= 6 sts), A.2 (= 42-42-42-56-56-56 sts), and finish with 5 band sts in garter st. Continue pattern like this. REMEMBER THE KNITTING TENSION and remember to dec for BUTTONHOLES on right band - see explanation above. READ ALL OF THE FOLLOWING SECTION BEFORE CONTINUING! INC IN THE SIDES: When piece measures 6-6-6-7-7-7 cm, inc 1 st on each side of both markers (= 4 sts inc). Repeat inc every 8-8-8-9-9-9 cm 2 more times (= 3 times in total) = 242-258-274-294-314-338 sts. DEC AND INC IN PATTERN FRONT AND BACK: AT THE SAME TIME when piece measures approx. 7-7-7-8-8-8 cm – adjust so that next row is with inc and dec in A.2/A.3 - dec 1 extra st in A.2 and A.3 on both front and back piece so that section with diagonal stripes becomes smaller. Dec 1 st in A.2 by working the last 2 sts before dec the same way as dec, i.e. K 2 tog. Dec 1 st in A.3 by working the next 2 sts after dec the same way as dec, i.e. slip 1 st as if to K, K 1, psso (= 4 sts dec in total). To avoid reducing no of sts, inc in addition on same row as dec in A.2/A.3. Inc 1 st outside A.1 towards stocking st section in each side on both front and back piece - READ INCREASE TIP (= 4 sts inc in total). No of sts on body will thus not vary (excl inc in the sides). Section in garter st mid front and mid back becomes smaller and stocking st section in each side becomes bigger. Repeat this dec and inc every 4-4-5-5-5-5 cm 4 more times (= 5 dec in total in pattern in A.2/A.3 and 5 inc in stocking st section). ARMHOLES: When piece measures 26-28-28-29-30-31 cm (inc and dec should now be done), work next row as follows from WS: Work 57-61-65-69-74-80 sts on left front piece (i.e. 5 band sts in garter st, A.2 over the next 37-37-37-51-51-51 sts, A.1 (= 6 sts) and 9-13-17-7-12-18 sts in stocking st), cast off 12-12-12-14-14-14 sts for armhole, work 104-112-120-128-138-150 sts on back piece (i.e. 9-13-17-7-12-18 sts in stocking st, A.1 (= 6 sts) A.2 over the next 37-37-37-51-51-51 sts, A.3 over the next 37-37-37-51-51-51 sts. A.1 (= 6 sts) and 9-13-17-7-12-18 sts in stocking st), cast off 12-12-12-14-14-14 sts for armhole and work the last 57-61-65-69-74-80 sts on right front piece (i.e. 9-13-17-7-12-18 sts in stocking st, A.1 (= 6 sts), A.3 over the next 37-37-37-51-51-51 sts and 5 band sts in garter st). Put piece aside and knit the sleeves. SLEEVE: Work in the round on double pointed needles, switch to circular needle when needed. Cast on 44-46-46-48-50-52 sts on double pointed needles size 4 mm with Lima. Work 2 ridges in GARTER ST - see explanation above. Insert 1 marker at beg of round (= mid under sleeve). Switch to double pointed needles size 5 mm and work in stocking st. AT THE SAME TIME when piece measures 15-14-12-11-10-9 cm, inc 2 sts mid under sleeve (i.e. 1 st each side of marker). Repeat inc every other round 30-31-32-33-33-34 more times (= 31-32-33-34-34-35 inc) = 106-110-112-116-118-122 sts on needle. On next round (after last inc - piece measures approx. 39-39-38-38-37-37 cm), cast off the middle 12-12-12-14-14-14 sts under sleeve (i.e. cast off 6-6-6-7-7-7 sts on each side of marker) = 94-98-100-102-104-108 sts remain on needle. Put piece aside and knit another sleeve. YOKE: READ ALL OF THE FOLLOWING SECTION BEFORE CONTINUING! Slip sleeves on to same circular needle as body where armholes were cast off (without working them first) = 406-430-450-470-494-526 sts on needle. Insert 1 marker in every transition between body and sleeves (= 4 markers) and move markers upwards when working. Then work in stocking st and pattern as before while AT THE SAME TIME also working A.1 in every transition between body and sleeves (markers should be in the middle of A.1). RAGLAN: AT THE SAME TIME on 1st row after body and sleeves have been placed tog on to same circular needle (= RS), beg dec for raglan – READ DECREASE TIP (= 8 sts dec). Repeat dec every other row (i.e. every row from RS) 30-30-32-34-35-36 more times (= 31-31-33-35-36-37 times in total) and then every row (both from RS and from WS) 8-10-9-8-8-9 times in total. DEC AND INC IN PATTERN FRONT AND BACK: AT THE SAME TIME when 2-3-4-0-1-2 cm have been worked after body and sleeve were put on to same circular needle, dec 1 extra st in A.2/A.3 as before and inc 1 st outside A.1 towards stocking st section in each side front and back as before = 4 sts dec and 4 sts inc on row. Repeat this dec/inc every other row (i.e. on every row from RS) 33-33-33-39-39-39 times in total (these dec/inc are done in addition to raglan but does not affect no of sts). ADJUSTING DIAGONAL LINES ON BACK PIECE: AT THE SAME TIME when piece measures approx. 46-48-50-52-54-56 cm (measured along the shortest side on garment), dec and inc in A.2/A.3 on back piece every 8th row instead every 4th row (this only applies to the ordinary dec/inc in diagram (not the extra dec/inc every other row to make the middle section smaller). When this is done, the diagonal lines mid back will even out and make the neck line at the back straight. Repeat this dec/inc every 8th row 2 more times, then work pattern in A.2/A.3 without the ordinary inc and dec (continue dec to make the mid section smaller as before). NECK EDGE: After last dec for raglan there are 94-102-114-126-142-158 sts on needle and last buttonhole should be as close to neck edge as possible. Work 1 row pattern from WS as before. Switch to circular needle size 4 mm and K 1 row from RS while AT THE SAME TIME dec 14-18-24-26-32-38 sts evenly (do not dec over band sts) = 80-84-90-100-110-120 sts. K 3 rows (1st row = WS) and then loosely cast off with K from RS. ASSEMBLY: Sew the openings under the sleeves. Sew on buttons. |
||||||||||||||||||||||
Diagram explanations |
||||||||||||||||||||||
|
||||||||||||||||||||||
 |
||||||||||||||||||||||
 |
||||||||||||||||||||||
Have you finished this pattern?Tag your pictures with #dropspattern or submit them to the #dropsfan gallery. Do you need help with this pattern?You'll find 18 tutorial videos, a Comments/Questions area and more by visiting the pattern on garnstudio.com. © 1982-2026 DROPS Design A/S. We reserve all rights. This document, including all its sub-sections, has copyrights. Read more about what you can do with our patterns at the bottom of each pattern on our site. |
||||||||||||||||||||||


With over 40 years in knitting and crochet design, DROPS Design offers one of the most extensive collections of free patterns on the internet - translated to 17 languages. As of today we count 324 catalogues and 12290 patterns translated into English (UK/cm). 12290
We work hard to bring you the best knitting and crochet have to offer, inspiration and advice as well as great quality yarns at incredible prices! Would you like to use our patterns for other than personal use? You can read what you are allowed to do in the Copyright text at the bottom of all our patterns. Happy crafting!
Post a comment to pattern DROPS Extra 0-958
We would love to hear what you have to say about this pattern!
If you want to leave a question, please make sure you select the correct category in the form below, to speed up the answering process. Required fields are marked *.