
Popular categories
Looking for a yarn?


Comments / Questions (40)
![]() Beverley wrote:
Beverley wrote:
Next question. If 1 repetition is 8 rows (2 rows at narrowest), on row 9 do you start the repetition again until row 16, if so, what happens to next 4 rows from row 17 to row 20 to complete A4?
15.08.2021 - 21:53DROPS Design answered:
Dear Beverley, when working the short rows, you will work the stitches in A.4 just as shown in the diagram (= every row is worked with A.4 at the beg of row from RS/end of row from WS), then work the ridge pattern after A.4 as frollwos: row 1-4 ridge pattern on row 3 to 6, then work row 1-2 ridge pattern on row 7-8 short rows; then row 3-4 ridge pattern on row 3-4 next repeat short rows, etc... Hope this will help. Happy knitting!
16.08.2021 - 08:29
![]() Beverley wrote:
Beverley wrote:
Just to clarify my question, there are 8 rows to a pattern but the 1st two rows don’t contain and ridge stitches. On row 3 to 8 these have ridge stitches ( total of 6 rows) but the pattern for ridge stitches has 4 rows ). What pattern of ridge stitch do I knit on row 7 and 8 of the main pattern?
15.08.2021 - 21:24DROPS Design answered:
Dear Beverly, you just have to always repeat the 4 rows in the ridge pattern, this means you will always repeat these 4 rows over the first 12 sts ridge pattern (after A.4) and repeat the 4 rows ridge pattern after A.5 (see previous answer). Happy knitting!
16.08.2021 - 08:25
![]() Beverley wrote:
Beverley wrote:
Hi, I understand the principles of how to knit this by knitting as instructions then turn to go back then kip it the next row plus a few more of the pattern and so on. What I don’t understand is on row 5 out of 8 when you start A5 for the first time and which row of the 4 ridge stiches rows that constructed the 6 ridge stitches? Is it the same row as the 12?
15.08.2021 - 19:24DROPS Design answered:
Dear Beverley, you will work the stitches in A.5 just when you will work row 5 to 8, ie the first time you work row 5, work row 1 in A.5, then work on row 6 to 8, you will work row 2 to 4. Next time you will work row 5 -8 in short rows, you will then work row 5 to 8 in A.5 etc. The 6 sts ridge pattern are worked then repeating the 4 rows the same way, ie when working row 5-8 short rows, work row 1 to 4 ridge pattern. Happy knitting!
16.08.2021 - 08:19
![]() Sally wrote:
Sally wrote:
When working the short rows, when it says "Work 1row over all stitches" does "all stitches" mean all the stitches worked so far or all the stitches cast on?
23.03.2019 - 17:16DROPS Design answered:
Dear Sally, when working the short rows, "work 1 row over all stitches" means to work all stitches on left needle = the onen previously worked with the short rows as well as the other ones. Happy knitting!
25.03.2019 - 10:36
![]() Deb wrote:
Deb wrote:
Are the charts to be read from left to right or right to left? Thank you.
21.11.2018 - 21:58DROPS Design answered:
Hi Deb, The charts are read from bottom right to left on first row. If you are working back and forth the next row is read from left to right, if you are working in the round continue the next row from right to left. Happy knitting!
22.11.2018 - 07:46
![]() Kate Gomes wrote:
Kate Gomes wrote:
Is this garment knitted from the top down?
15.10.2018 - 21:15DROPS Design answered:
Dear Mrs Gomes, the cape is worked sideways with short rows. Happy knitting!
16.10.2018 - 09:10
![]() Torunn Riise-Larsen wrote:
Torunn Riise-Larsen wrote:
Og hva skal stikkes når det står: "strikk 1 p over a4, snu og strikk tilbake. Men hva slags masker skal man bruke? Synes ikke det er så lett å forstå oppskriften deres...
02.10.2018 - 17:13DROPS Design answered:
Hei Torunn. Vendinger er det samme som forkortede pinner: altså på hver pinne fra retten strikker du over fler masker enn forrige pinne. Du skal strikke dette samtidig som du strikker mønster etter diagram - så når det står snu og strikk tilbake følger du anvisningene i diagrammet som vanlig. Altså første gang strikker du en omgang A.4, snur og strikker neste omgang A.4 tilbake. Så snur du arbeidet igjen og strikker neste omgang A.4 og strikker videre 2 masker rett og 12 masker åpne rille. Så snur du og strikker tilbake osv. Dette gjentar du til halsen måler 35 cm i den korteste siden. God fornøyelse.
03.10.2018 - 14:19
![]() Torunn Riise-Larsen wrote:
Torunn Riise-Larsen wrote:
Ang. vendinger. Skal det gjøres etter at hele A4, dvs 20 pinner, er strikket. Eller etter hver pinne av a4?
02.10.2018 - 15:52
![]() Patricia wrote:
Patricia wrote:
Pourriez vous mettre une vidéo pour le commencement du diagramme A4 svp merci ?
18.11.2016 - 16:21DROPS Design answered:
Bonjour Patricia, votre demande a été enregistrée, mais en attendant la vidéo, lisez le diagramme en commençant en bas à droite sur l'endroit de droite à gauche et de gauche à droite sur l'envers. Retrouvez sous la légende la signification de chaque symbole. Bon tricot!
18.11.2016 - 17:43
![]() Maple wrote:
Maple wrote:
Thanks for your answer. but i don't understand..i understand how to read the diagram but i don't understand the shoulder piece paragraph. so confused. can you write it step by step. for example, step 1, knit 1 row . step 2, p 1 rows. sorry i am too dumb..
28.06.2016 - 02:22DROPS Design answered:
Dear Maple, The Shoulder piece paragraph explains how to work the sts, ie which pattern will be used to work the sts, at the same time work the short rows to get the correct shape. For any further individual assistance, you are welcome to contact the store where you bought your yarn. Happy knitting!
28.06.2016 - 08:29
|
|||||||||||||||||||||||||||||||||||||||||||
Miss Marple#missmarpleset |
|||||||||||||||||||||||||||||||||||||||||||
 |
 |
||||||||||||||||||||||||||||||||||||||||||
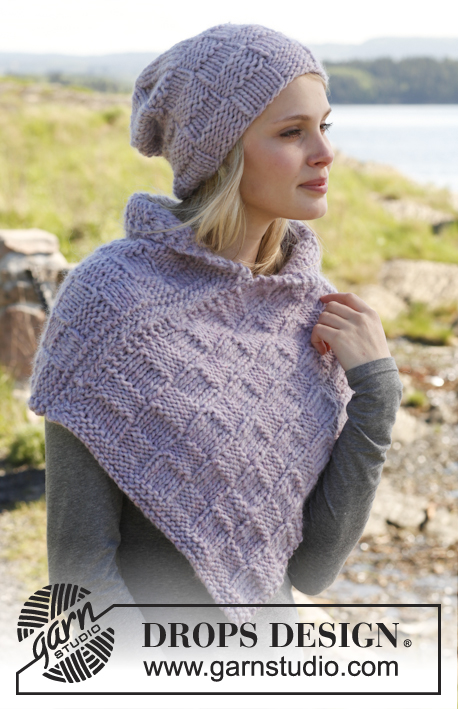
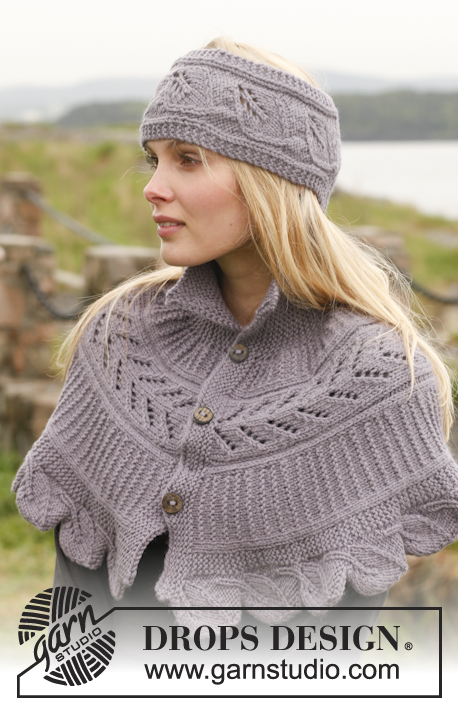
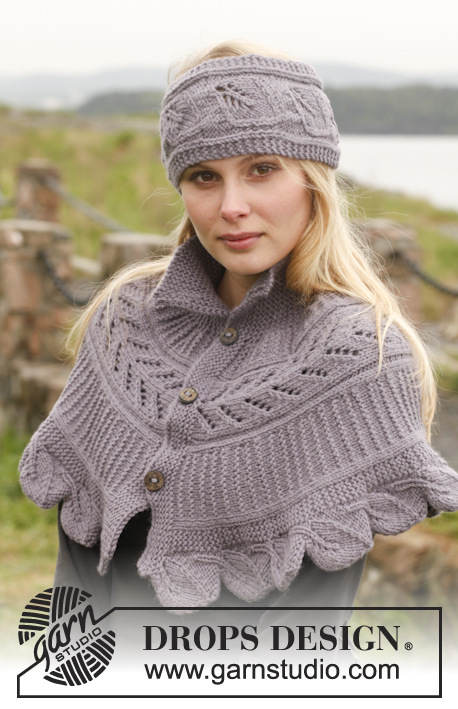
Knitted DROPS head band and cape with leaf pattern in ”Nepal”.
DROPS 149-41 |
|||||||||||||||||||||||||||||||||||||||||||
|
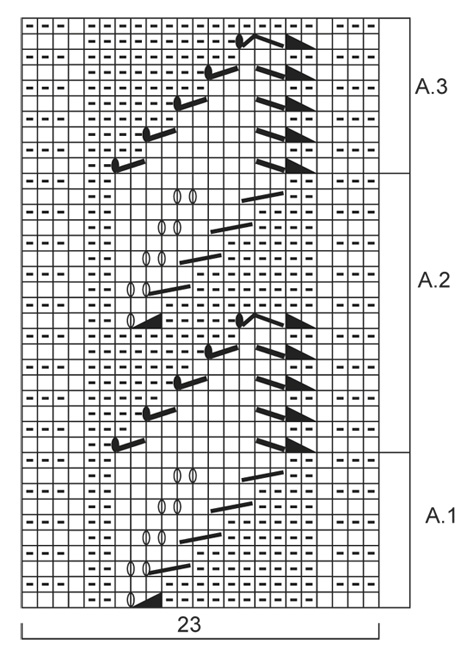
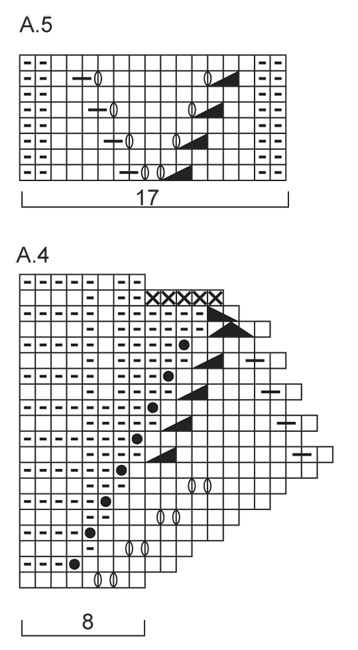
GARTER ST (back and forth on needle): K all rows. 1 ridge = 2 rows K. PATTERN HEAD BAND: See diagrams A.1 to A.3. Diagrams show all rows in pattern from RS. CAPE: See diagrams A.4 to A.5. Diagrams show all rows in pattern from RS. RIDGE PATTERN (back and forth on needle): Row 1: K from RS. Row 2: P from WS. Row 3: K from RS. Row 4: K from WS. SHORT ROWS: Work short rows as follows: * Work 1 row over A.4, turn and work back. Work 1 row over A.4 + 2 sts K + 12 sts ridge pattern, turn and work back. Work 1 row over A.4 + 2 sts K + 12 sts ridge pattern + 2 sts K + A.5 + 2 sts K + 6 sts ridge pattern, turn and work back. Work 1 row over all sts, turn and work back *. Repeat from *-*, i.e. 8 rows at the widest and 2 rows at the most narrow in 1 repetition. ---------------------------------------------------------- HEAD BAND: Cast on 23 sts on needle size 5 mm with Nepal. Work in GARTER ST - see explanation above - for 3 cm. Then work according to A.1. When A.1 has been worked 1 time vertically, continue according to A.2. When piece measures approx. 46 cm, adjust after one whole repetitions of A.2, work according to A.3. Work A.3 1 time vertically, then work in garter st for 3 cm, or desired measurements. Cast off. Sew together cast on and cast off edges with neat sts. ---------------------------------------------------------- CAPE: Worked back and forth on circular needle. Cast on 67 sts on circular needle size 5 mm with Nepal. Work 5 RIDGES in garter st - see explanation above. Then work pattern as follows: A.4, 2 sts in stocking st, ridge pattern over the next 12 sts, 2 sts in stocking st, A.5, 2 sts in stocking st, 6 sts ridge pattern, 18 sts in garter st. AT THE SAME TIME work SHORT ROWS - see explanation above. Work short rows until neck measures 35 cm in the shorter side (or to desired measurements), adjust after one whole repetition over A.4. Work 3 ridges in garter st, on next row from RS dec for buttonholes as follows: Work 16 sts, K 2 tog, 1 YO, * work 13 sts, K 2 tog, 1 YO *, repeat from *-* 3 times, finish with 4 sts K. Continue in garter st until 5 ridges have been worked in total, cast off. Sew the buttons on to the left band. |
|||||||||||||||||||||||||||||||||||||||||||
Diagram explanations |
|||||||||||||||||||||||||||||||||||||||||||
|
|||||||||||||||||||||||||||||||||||||||||||
 |
|||||||||||||||||||||||||||||||||||||||||||
 |
|||||||||||||||||||||||||||||||||||||||||||
Have you finished this pattern?Tag your pictures with #dropspattern #missmarpleset or submit them to the #dropsfan gallery. Do you need help with this pattern?You'll find 18 tutorial videos, a Comments/Questions area and more by visiting the pattern on garnstudio.com. © 1982-2026 DROPS Design A/S. We reserve all rights. This document, including all its sub-sections, has copyrights. Read more about what you can do with our patterns at the bottom of each pattern on our site. |
|||||||||||||||||||||||||||||||||||||||||||


With over 40 years in knitting and crochet design, DROPS Design offers one of the most extensive collections of free patterns on the internet - translated to 17 languages. As of today we count 324 catalogues and 12290 patterns translated into English (UK/cm). 12290
We work hard to bring you the best knitting and crochet have to offer, inspiration and advice as well as great quality yarns at incredible prices! Would you like to use our patterns for other than personal use? You can read what you are allowed to do in the Copyright text at the bottom of all our patterns. Happy crafting!
Post a comment to pattern DROPS 149-41
We would love to hear what you have to say about this pattern!
If you want to leave a question, please make sure you select the correct category in the form below, to speed up the answering process. Required fields are marked *.