
Popular categories
Looking for a yarn?
















Comments / Questions (46)
 Marja Boverhuis-Godijn wrote:
Ik snap niet, hoe je de meerderenden moet breien in de mouwen. Hoe krijg ik in Godsnaam patroon M1 kloppend? Ik brei maat 3/4. Kunt U het alstublieft iets duidelijker uitleggen? Hartelijk dank hiervoor.
02.08.2026 - 06:32DROPS Design answered:
Dag Marja,
M.1 zal niet steeds passen rondom de arm, maar zodra je voldoende steken hebt om een herhaling in de breedte erbij te maken, kun je M.1 weer oppakken. Het belangrijkste is dat patroon M.1 mooi doorloopt in de hoogte over het middenboven van de mouw naar de zijkanten toe. Aan de onderkant (van de oksel tot onder de manchet ) zal dat inderdaad niet helemaal lukken.
04.08.2026 - 16:07
Marja Boverhuis-Godijn wrote:
Als je van rond breinaald overgaat op gewone naalden, als het voor- en achterband apart gebreid moeten worden, hoe brei je dan het tel patroon in de teruggaande naalden?
17.07.2026 - 14:35DROPS Design answered:
Dag Marja,
Zorg ervoor dat de teruggaande naalden steeds de even naalden zijn in het telpatroon, zodat je geen kabels hoeft te breien aan de verkeerde kant. Verder brei je de rechte steken averecht aan de verkeerde kant en de averechte steken brei je recht aan de verkeerde kant.
18.07.2026 - 10:34
 Marty wrote:
Bonsoir Madame he vous remercie pour tous vos éclaircissements , mais il y a des zones d’ombre. Est il possible de se parler au telephone ? Avec ma prof de tricot lundi prochain. Je vous remercie Dominique
08.06.2026 - 21:48DROPS Design answered:
Bonjour Dominique, pour toute assistance complémentaire individualisée, merci de bien vouloir vous rapprocher de votre magasin de laine, même par mail ou téléphone. Ou bien vous pouvez volontiers poser vos questions ici. Merci pour votre compréhension. Bon tricot!
09.06.2026 - 08:39
Marty wrote:
Bonjour Madame Je n arrive pas à comprendre comment tricoter les manches Dois tricoter ainsi : 2 endroit, 6 m diagramme 1, 10 diagramme 2, 17 diagramme 3, 10 diagramme 2 , 6 diagramme 1 et 2 endroit . Et rang 2 refaire 2 end et diagramme 1 etc… Je vous remercie Dominique
08.06.2026 - 15:23DROPS Design answered:
Bonjour Marty, vous ne tricotez pas 2 m endroit à proprement parler mais les 2 dernières mailles de M.1 (au7ème rang, il faudra tricoter 1 m end, 1 m env pour coller au diagramme). Et de la même façon, vous terminez par les 2 premières mailles de M.1 (au 8ème rang, il faudra tricoter 1 m env, 1 m end). Pour les autres au milieu, c'est juste, tricotez les diagrammes dans cet ordre. Bon tricot!
08.06.2026 - 16:27
Marty Dominique wrote:
Bonjour Madame je ne comprends pas l explication des manches à partir des 53 mailles . Je ne comprends pas comment continuer ainsi: les 8 dernieres mailles de M1 etc. Merci Dominique
02.06.2026 - 11:02DROPS Design answered:
Bonjour Mme Marty, avez-vous vu la réponse ci-dessous? Pour commencer le tour, vous tricotez les 2 dernières mailles de M.1, puis vous tricotez les 6 m de M.1, vous tricotez ensuite M.2, puis M.3, puis M.2 et vous terminez le tour par les 8 premières mailles de M.1: les 6 m du diagramme et les 2 premières mailles du diagramme. Bon tricot!
03.06.2026 - 08:02
Marty wrote:
Bonjour Madame je ne comprends pas l explication des manches à partir des 53 mailles . Je ne comprends pas comment continuer ainsi: les 8 dernieres mailles de M1 etc. Merci Dominique
01.06.2026 - 10:09DROPS Design answered:
Bonjour Mme Marty, vous tricotez d'abord les 2 dernières mailles de M.1 puis vous tricotez 1 fois les 6 mailles du diagramme. Bon tricot!
02.06.2026 - 10:15
Marty wrote:
Bonsoir Madame Je tricote la taille 11/12 ans à 44.5 je comprends qu il faut que je fasse le M4 . Mais je travaille sur les 107 mailles (devant en l occurence) . À ce moment là je ne comprends pas car j ai M1 M2 M3 . Merci de votre retour Cordialement Dominique
23.03.2026 - 18:47DROPS Design answered:
Bonjour Dominique, vous arrêtez maintenant de tricoter les autres diagrammes et vous tricotez maintenant seulement M.4 (frise avec le losange que l'on voit sur les épaules sur la photo). Bon tricot!
24.03.2026 - 08:41
 Jeanett Dam wrote:
Jeg kender ikke den foreslåede garntype. Er det en blød type, der ikke kradser?
14.03.2026 - 20:01DROPS Design answered:
Hei Jeanett. Om det kradser eller ikke er veldig personlig. Ull er ull og noen vil mene at all ull kradser. Personlig syns jeg det er mykt og kan ha det rett på huden/ermene, (men helst ikke ved halsen). mvh DROPS Design
16.03.2026 - 13:55
Mieke Zaremba wrote:
Hoeveel bolletjes van 50 gram nodig voor een jongen van 9
24.11.2025 - 14:41DROPS Design answered:
Dag Mieke,
Bovenaan bij de materialenlijst staat per maat aangegeven hoeveel gram je nodig hebt. (Het eerste getal geldt voor maat S, het tweede getal voor maat M, enzovoort). 1 bol weegt meestal 50 gram, maar let erop dat dit per garensoort verschillend kan zijn. Dus als er bijvoorbeeld 400 gram staat dan zou je 8 bollen nodig hebben als 1 bol 50 gram weegt.
24.11.2025 - 20:30
 Robyn wrote:
Hello, I have a question about completing the neck ribbing. How do you fold and sew the ribbing for the neck and maintain the elasticity of the opening? I used a simple whip stitch, but it was too tight. Do you use a special stitch? Please advise. Thank you!
01.09.2025 - 16:11DROPS Design answered:
Hi Robyn, Here is a link to a video showing you how to sew down the double neck: https://www.garnstudio.com/video.php?id=1637&lang=us Regards, Drops Team.
02.09.2025 - 11:07
|
||||||||||
Fabian |
||||||||||
 |
 |
|||||||||
Aran Sweater in Karisma Superwash
DROPS Children 5-3 |
||||||||||
|
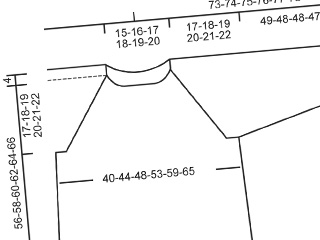
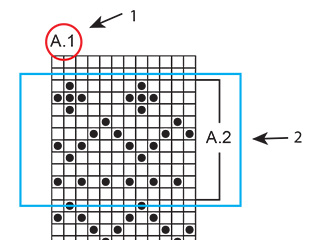
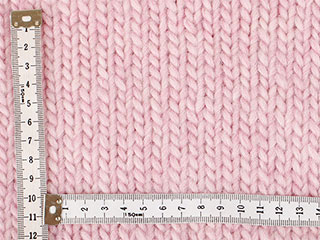
Gauge: 20 sts x 26 rows on larger needles in Pattern 1 = 10 x 10 cm . Rib: * K 1, P 2 * Pattern: See charts (1 chart = 1 repeat). The pattern is seen from the right side. The chart for Pattern 4 has arrows indicating the starting point for different sizes; the other charts are identical for all sizes. Body: Cast on 132-141 (144-153-159) sts on smaller circular needles; join and knit 4 cm rib, change to larger circular needles and knit 1 row, increasing 34-37 (46-49-55) sts evenly distributed on the row = 166-178 (190-202-214) sts. Establish the pattern on the next row as follows: * 12-18 (24-30-36) sts of Pattern 1 (place a marker after 6-9 (12-15-18) sts for the side), Pattern 3, Pattern 2, Pattern 3, Pattern 2, Pattern 3 *, repeat * - * over the remaining sts. Knit in pattern as established until the work measures 21-23 (25-27-27) cm . Divide the work in two at the side markers and knit the rest of each part separately. Front: = 83-89 (95-101-107) sts. When the work measures 33.5-36.5 (40.5-42.5-44.5) cm , knit Pattern 4 (start at the appropriate arrow on the chart). When the work measures 36-39 (43-45-47) cm , bind off the center 23-23 (25-27-27) sts for the neck. Then bind off at each neck edge every other row: 2 sts 2 times, 1 st 2 times. Bind off after Pattern 4 is complete. The work measures approx. 40-43 (47-49-51) cm . Back: = 83-89 (95-101-107) sts. Knit as for front until 4 rows of Pattern 4 remain, then bind off the center 33-33 (35-37-37) sts for the neck. Dec 1 st at each neck edge on the next row. Bind off after Pattern 4. The work measures approx. 40-43 (47-49-51) cm . Sleeves: Cast on 30-36 (36-36-39) sts on smaller needles; join and place a marker at the join. Knit 4 cm rib. Change to larger needles and knit 1 row, increasing 13-7 (11-15-14) sts evenly distributed on the row = 43-43 (47-51-53) sts. Establish the pattern on the next row as follows: The last 3-3 (5-7-8) sts of Pattern 1, Pattern 2, Pattern 3, Pattern 2, the first 3-3 (5-7-8) sts of Pattern 1. Inc 1 st each side of marker 19-20 (22-20-23) times: Sizes 3/4: every other row Sizes 5/6 + 7/8: alternately every other and every 3rd row Sizes 9/10 + 11/12: alternately every 3rd and every 4th row = 81-83 (91-91-99) sts. Knit the increased sts into Pattern 1 as you go along. When the work measures 24-27 (31-34-38) cm , bind off 3 sts each side of marker. Then bind off 5 sts at each side for sleeve caps 3 times every other row. Bind off when the work measures 27-30 (34-37-41) cm . Assembly: Sew shoulder and sleeve seams. Pick up approx. 84-96 sts on smaller double pointed needles around the neck; join and knit 8 cm rib. Bind off loosely, fold the rib over double against the wrong side and sew. Sew the sleeves to the body. |
||||||||||
Diagram explanations |
||||||||||
|
||||||||||
 |
||||||||||
 |
||||||||||
Have you finished this pattern?Tag your pictures with #dropspattern or submit them to the #dropsfan gallery. Do you need help with this pattern?You'll find 9 tutorial videos, a Comments/Questions area and more by visiting the pattern on garnstudio.com. © 1982-2026 DROPS Design A/S. We reserve all rights. This document, including all its sub-sections, has copyrights. Read more about what you can do with our patterns at the bottom of each pattern on our site. |
||||||||||

With over 40 years in knitting and crochet design, DROPS Design offers one of the most extensive collections of free patterns on the internet - translated to 17 languages. As of today we count 333 catalogues and 12537 patterns translated into English (UK/cm). 12537
We work hard to bring you the best knitting and crochet have to offer, inspiration and advice as well as great quality yarns at incredible prices! Would you like to use our patterns for other than personal use? You can read what you are allowed to do in the Copyright text at the bottom of all our patterns. Happy crafting!
Post a comment to pattern DROPS Children 5-3
We would love to hear what you have to say about this pattern!
If you want to leave a question, please make sure you select the correct category in the form below, to speed up the answering process. Required fields are marked *.