
Popular categories
Looking for a yarn?


Comments / Questions (12)
![]() Tine wrote:
Tine wrote:
Synes ikke jeg kan få størrelsen til at passe... hvordan kan det være, man ska ta IND efter ribben?? Mvh Tine
12.12.2024 - 11:10DROPS Design answered:
Hej Tine, fordi det glatstrikkede strikkes på tykkere pinde og fylder mere :)
12.12.2024 - 14:16
![]() Marie wrote:
Marie wrote:
Bonjour, ” tour suivant ainsi : Rabattre 4 m pour l'emmanchure…” Pourquoi diviser les mailles à rabattre ? Je n’arrive pas à un joli résultat. Ne pourrais-je pas rabattre les 7 mailles de l’emmanchure d’un seul coup et terminer le tour par les 71-77-89-95-101 m jacquard du dos ? Cordialement, Marie
15.01.2023 - 19:20DROPS Design answered:
Bonjour Marie, le début des tours se fait sur le côté, raison pour laquelle on rabat d'abord les 4 premières mailles puis les 3 dernières mailles du tour (en plus des 7mailles de l'autre côté pour la 2ème emmanchure) pour que les emmanchures soient bien placées sur les côtés. Bon tricot!
16.01.2023 - 09:35
![]() Susanne Krause wrote:
Susanne Krause wrote:
Ich bin am HalsbündchenTipp zum Abnehmen 2...sie schreiben 1 Masche vor derMarkierung 2 Maschen abnehmen??? Welche Markierung meinen Sie...das ist für mich nicht ersichtlich und finde auch keinen Hinweis darauf? LG
21.07.2022 - 08:14DROPS Design answered:
Liebe Susanne, Bei der deutschen Version scheint etwas zu fehlen: 1 R re str und GLEICHZEITIG gleichmäßig verteilt auf 123-127-139-147-159 M zunehmen (nicht über die mittleren 7 M vorne zunehmen). Setzen Sie eine Markierung in die mittlere M vorne. Dann im Rippenmuster stricken (= 2 M re/2 M li), aber die Mittel-M auf der Vorderseite mit 2 Links-M auf jeder Seite re stricken (von der vorderen Mitte nach außen zählen, um herauszufinden, wie das Rippenmuster in der hinteren Mitte beginnt).
31.07.2022 - 23:26
![]() Welada Albazzaz wrote:
Welada Albazzaz wrote:
I didn't understand dec tip 1 .. can you help me please?
13.04.2022 - 02:58DROPS Design answered:
Hi Welada, Decrease tip-1 is when you are decreasing for the V-neck and are working back and forth. You only decrease from the right side. There is 1 edge stitch by the neck (on each side of the neck) so on one shoulder you decrease before the edge stitch by the neck, on the other shoulder after the edge stitch by the neck. After the edge stitch you slip 1 stitch as if to knit, knit 1 and pass the slipped stitch over. Before the edge stitch you knit 2 together. Hope this helps and happy knitting!
13.04.2022 - 08:55
![]() Lien wrote:
Lien wrote:
Hei, kan det være en feil med mål i oppskriften? Strikker denne i str. 11/12 år. Skal omkrets virkelig være 84 cm? Det er ganske stort. Mitt arbeid måler kun 60 cm, og det er ikke noe feil med strikkefastheten min. Takk på forhånd for svar.
05.11.2020 - 15:48DROPS Design answered:
Hej Lien. Om du håller stickfastheten ( 26 m x 34 p glstrikk på 10 x 10 cm) så ska du ha 2,6 m / cm. På bolen har du 216 m och 216 m/2,6 = 83,1 cm så måtten i måttskissen ska vara riktiga. Mvh DROPS Design
06.11.2020 - 12:13
![]() Anita wrote:
Anita wrote:
Salve, in merito alle diminuzioni applicate alle coste del collo a V, va passata senza lavorarla la maglia centrale e quella precedente?
24.04.2019 - 23:56DROPS Design answered:
Buongiorno Anita. Sì esatto, deve passare senza lavorare la maglia centrale è quella precedente. Buon lavoro!
25.04.2019 - 08:42
![]() Ute Rudolf wrote:
Ute Rudolf wrote:
Hab es selber rausbekommen. Man liest die Strickschrift einmal von recht nach links und wenn man die Rückreihe strickt dann von links nach rechts. Also zu deutsch " wie der Ochse pflügt" . :-)
23.07.2017 - 18:51
![]() Ute Rudolf wrote:
Ute Rudolf wrote:
Hallo und guten Abend , ich stricke gerade diese wunderschöne Weste und will nun den Rücken in Reihen fertig stricken. Wie muss ich nun das Muster in der Rückreihe stricken? Linke Maschen in der Farbe wie sie erscheinen? Oder linke Maschen laut Strickschrift? Oder? Vielen Dank für die Hilfe.
21.07.2017 - 22:03DROPS Design answered:
Liebe Frau Rudolf, von der rechten Seite lesen Sie das Diagram von rechts nach links (= rechte Maschen), und von der Rückseite lesen Sie das Diagram von links nach rechts (= linke Maschen). Viel Spaß beim stricken!
24.07.2017 - 09:00
![]() Annette Andersen wrote:
Annette Andersen wrote:
Hej. Er der nogensteder anvisning på hvordan man strikker farvet mønster på vrangpind?
30.12.2015 - 20:09DROPS Design answered:
Hej, Ja klike på "Video-knappen" og se første video i listen. God fornøjelse!
25.01.2016 - 14:53
![]() Johanne wrote:
Johanne wrote:
Bonjour, pour la taille 3/4, après avoir fait les diminutions, il me reste 156m, tel que mentionné. À 27cm de hauteur totale, si je compte le nombre de mailles pour faire le rang suivant, j'obtiens un total de 163m. De plus, les devants droit et gauche n'ont pas le même nombre de mailles (droit: 39m et gauche: 32m). Est-ce une erreur?
05.12.2015 - 02:25DROPS Design answered:
Bonjour Johanne, on tricote effectivement 39 m pour le devant gauche mais on glisse les 7 dernière de ces 39 m en attente pour l'encolure, il reste bien 32 m pour le devant gauche, comme on en a pour le devant droit. Bon tricot!
07.12.2015 - 09:38
|
|||||||
Henry#henryvest |
|||||||
|
|
|||||||
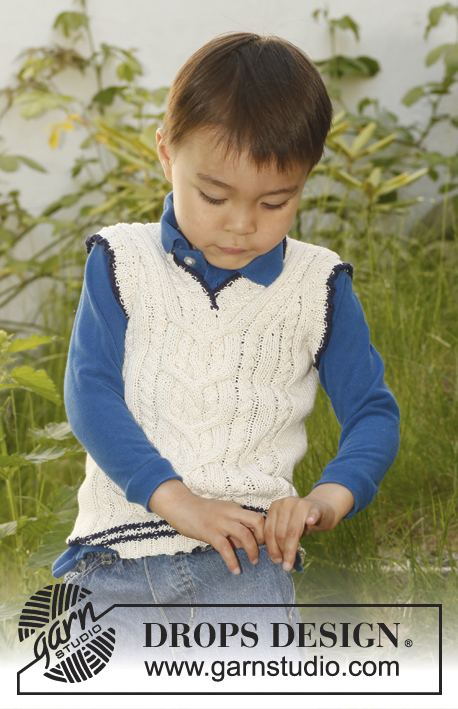
Knitted vest / slipover with pattern in DROPS Alpaca. Size children 3 to 12 years.
DROPS Children 23-32 |
|||||||
|
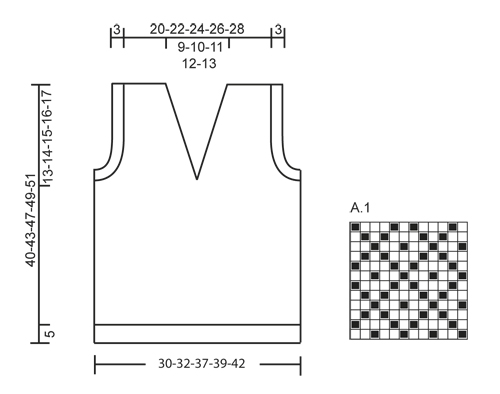
PATTERN: See diagram A.1. Work entire pattern in stocking st. DECREASE TIP 1 (applies to dec in V-neck): Dec inside of 1 edge st which is worked K on all rows. All dec are done from RS. Dec after 1 edge st as follows: Slip 1 st as if to K, K 1, psso. Dec before 1 edge st as follows: K 2 tog. DECREASE TIP 2 (applies to rib in V-neck): Beg 1 st before st with marker, slip 2 sts as if to K tog, K 1, pass the slipped sts over. ---------------------------------------------------------- BODY: Worked in the round on circular needle. Cast on 188-204-232-244-260 sts on circular needle size 2 mm with dark grey eco Alpaca. K 1 round, then work rib = K 2/P 2. When rib measures 5 cm, switch to circular needle size 2.5 mm and light grey eco. K 1 round while AT THE SAME TIME dec 32-36-40-40-44 sts evenly = 156-168-192-204-216 sts. Then work in stocking st and PATTERN - see explanation above. When piece measures 27-29-32-33-34 cm, work next round as follows: Cast off 4 sts for armhole, work 39-42-48-51-54 sts pattern as before (= left front piece), slip the last 7 sts worked on a stitch holder for V-neck at the front, work 32-35-41-44-47 sts pattern as before (= right front piece), cast off 7 sts for armhole, work 71-77-89-95-101 sts pattern as before (= back piece) and cast off the last 3 sts for armhole, cut the thread. Finish each part separately. BACK PIECE: = 71-77-89-95-101 sts. Continue pattern as before. AT THE SAME TIME cast off for armholes at beg of every row in each side as follows: 3 sts 1 time, 2 sts 2-2-3-4-4 times and 1 st 3-3-4-3-3 times = 51-57-63-67-73 sts. When piece measures 38-41-45-47-49 cm, cast off the middle 21-23-27-29-31 sts for neck and finish each shoulder separately. Then cast off 1 st on next row from neck = 14-16-17-18-20 sts remain on shoulder. Work pattern until piece measures 40-43-47-49-51 cm and then loosely cast off. RIGHT FRONT PIECE: = 32-35-41-44-47 sts. Continue pattern as before while AT THE SAME TIME dec for armhole in the side as on back piece. AT THE SAME TIME dec for V-neck towards mid front - READ DECREASE TIP 1: Dec 1 st every 4 rows a total of 8-9-11-12-13 times. After all cast offs, 14-16-17-18-20 sts remain on shoulder. Work pattern until piece measures 40-43-47-49-51 cm and then loosely cast off (cast off on same row in pattern as on back piece). LEFT FRONT PIECE: = 32-35-41-44-47 sts. Work as right front piece but reversed. ASSEMBLY: Sew the shoulder seams. ARMHOLE EDGE: Knit up approx. 72 to 94 sts at the one armhole on double pointed needles size 2 mm with dark grey. K 1 round while AT THE SAME TIME adjusting the no of sts to 88-92-100-108-112. Then work rib = K 2/P 2. When armhole edge measures 3 cm, LOOSELY cast off with K over K and P over P. Repeat around the other armhole. NECK EDGE: Beg mid back and knit up approx. 96 to 128 sts around the neck (incl the 7 sts from stitch holder at the front) on circular needle size 2 mm with dark grey eco. K 1 round while AT THE SAME TIME inc evenly to 123-127-139-147-159 sts (do not inc over the middle 7 sts at the front). Place a marker in the middle st in front. Then work rib (= K 2/P 2) but work the middle st at the front K with 2 P sts on each side (count outwards from mid front to find out how the rib starts mid back). AT THE SAME TIME on 2nd round in rib, dec 2 sts mid front - READ DECREASE TIP 2. Repeat dec every other round 3 more times. When neck edge measures 3 cm, LOOSELY cast off with K over K and P over P. |
|||||||
Diagram explanations |
|||||||
|
|||||||
 |
|||||||
Have you finished this pattern?Tag your pictures with #dropspattern #henryvest or submit them to the #dropsfan gallery. Do you need help with this pattern?You'll find 8 tutorial videos, a Comments/Questions area and more by visiting the pattern on garnstudio.com. © 1982-2026 DROPS Design A/S. We reserve all rights. This document, including all its sub-sections, has copyrights. Read more about what you can do with our patterns at the bottom of each pattern on our site. |
|||||||


With over 40 years in knitting and crochet design, DROPS Design offers one of the most extensive collections of free patterns on the internet - translated to 17 languages. As of today we count 324 catalogues and 12290 patterns translated into English (UK/cm). 12290
We work hard to bring you the best knitting and crochet have to offer, inspiration and advice as well as great quality yarns at incredible prices! Would you like to use our patterns for other than personal use? You can read what you are allowed to do in the Copyright text at the bottom of all our patterns. Happy crafting!
Post a comment to pattern DROPS Children 23-32
We would love to hear what you have to say about this pattern!
If you want to leave a question, please make sure you select the correct category in the form below, to speed up the answering process. Required fields are marked *.