DROPS Kid-Silk uni colour 75% Mohair, 25% Silk |
5.05 € /25g |
Order |
Clicking the ORDER button will redirect you to Saules siulas website
The yarn cost is calculated from the pattern’s smallest size and the yarn’s cheapest product type. Looking for an even better price? You might find it on the DROPS Deals!
-------------------------------------------------------
Alternative Yarn – See how to change yarns here
Yarn Groups A to F – Use the same pattern and change the yarn here
Yarn usage using an alternative yarn – Use our yarn converter here
-------------------------------------------------------
DROPS Kid-Silk uni colour 75% Mohair, 25% Silk 5.05 € /25g Order |
Clicking the ORDER button will redirect you to Saules siulas website
The yarn cost is calculated from the pattern’s smallest size and the yarn’s cheapest product type. Looking for an even better price? You might find it on the DROPS Deals!
= K from RS, P from WS | |
= P from RS, K from WS |
Each of our patterns has specific tutorial videos to help you.
These step-by-step tutorials might also help you:
Why is the knitting/crochet tension so important?
Knitting tension is what determines the final measurements of your work, and is usually measured per 10 x 10 cm. It is provided like so: number of stitches in width x number of rows in height - eg: 19 stitches x 26 rows = 10 x 10 cm.
The knitting tension is very individual; some people knit/crochet loosely while others work tightly. You adjust the knitting tension with the needle size, which is why the suggested needle size is only meant as a guide! You need to adjust this (up or down) to ensure that YOUR knitting tension matches the knitting tension provided in the pattern. If you work with a different knitting tension than provided you will have a different yarn consumption, and your work will have different measurements than what the pattern suggests.
The knitting tension also determines which yarns can replace each other. As long as you achieve the same knitting tension you can replace one yarn with another.
See DROPS lesson: How to measure your tension/gauge
See DROPS video: How to make a gauge tension swatch
How do I know how many balls of yarn I need?
The required amount of yarn is provided in grams, eg: 450 g. To calculate how many balls you’ll need you first need to know how many grams are in 1 ball (25g, 50g or 100g). This information is available if you click on the individual yarn quality on our pages. Divide the amount required with the amount of each ball. For example, if each ball is 50g (the most common amount), the calculation will be as follows: 450 / 50 = 9 balls.
Can I use a different yarn than what the pattern suggests?
The important thing when changing from one yarn to another is that the knitting/crochet tension remains the same. This is so that the measurements of the finished piece will be the same as on the sketch provided. It is easier to achieve the same knitting tension using yarns from the same yarn group. It is also possible to work with multiple strands of a thinner yarn to achieve the knitting tension of a thicker one. Please try our yarn converter. We recommend you to always work a test swatch.
Please NOTE: when changing yarn the garment might have a different look and feel to the garment in the photo, due to individual properties and qualities of each yarn.
See DROPS lesson: Can I use a different yarn than the one mentioned in the pattern?
What are the yarn groups?
All our yarns are categorised into yarn groups (from A to F) according to thickness and knitting tension – group A contains the thinnest yarns and group F the thickest. This makes it easier for you to find alternative yarns to our patterns, should you wish to switch yarn. All yarns within the same group have a similar knitting tension and can easily replace each other. However, different yarn qualities have different structures and properties which will give the finished work a unique look and feel.
How do I use the yarn calculator?
At the top of all our patterns you’ll find a link to our yarn calculator, which is a helpful tool should you wish to use a different yarn than suggested. By filling in the yarn quality you wish to replace, the amount (in your size) and number of strands, the calculator will present good alternative yarns with the same knitting tension. Additionally it will tell you how much you’ll require in the new qualities and whether you’ll need to work with multiple strands. Most skeins are 50g (some are 25g or 100g).
If the pattern is worked with multiple colours, every colour will have to be calculated separately. Similarly, if the pattern is worked with several strands of different yarns (for example 1 strand Alpaca and 1 strand Kid-Silk) you will have to find alternatives for each, individually.
Why do you show discontinued yarns in the patterns?
Since different yarns have different qualities and textures we have chosen to keep the original yarn in our patterns. However, you can easily find options among our available qualities by using our yarn calculator, or simply pick a yarn from the same yarn group.
It is possible that some retailers still have discontinued yarns in stock, or that someone has a few skeins at home that they would like to find patterns for.
The yarn calculator will provide both alternative yarn as well as required amount in the new quality.
What size should I knit?
If you think it's hard to decide what size to make, it can be a good idea to measure a garment you own already and like the size of. Then you can pick the size by comparing those measures with the ones available in the pattern's size chart.
You'll find the size chart at the bottom of the pattern.
See DROPS lesson: How to read size chart
Why do I get the wrong knitting tension with the suggested needle size?
The needle size provided in the pattern serves only as a guide, the important thing is to follow the knitting tension. And since knitting tension is very individual, you will have to adjust the needle size to ensure that YOUR tension is the same as in the pattern – maybe you’ll have to adjust 1, or even 2 needle sizes, up or down to achieve the correct tension. For this, we recommend that you work test swatches.
Should you work with a different knitting tension than the one provided, the measurements of the finished garment might deviate from the measurement sketch.
See DROPS lesson: How to measure your tension/gauge
See DROPS video: How to make a tension/gauge swatch
Why is the pattern worked top-down?
Working a garment top-down provides more flexibility and room for personal adjustment. For example it is easier to try the garment on while working, as well as making adjustments to length of yoke and shoulder caps.
The instructions are carefully explaining every step, in the correct order. Diagrams are adjusted to the knitting direction and are worked as usual.
How do I work according to a knitting diagram?
The diagram depicts all rows/rounds, and every stitch seen from the right side. It is read from bottom to top, from right to left. 1 square = 1 stitch.
When working back and forth, every other row is worked from the right side and every other row is worked from the wrong side. When working from the wrong side, the diagram will have to be worked reversed: from left to right, knit stitches are purled, purl stitches are knit etc.
When working in the round every round is worked from the right side and the diagram are worked from right to left on all rounds.
See DROPS lesson: How to read knitting diagrams
How do I work according to a crochet diagram?
The diagram depicts all rows/rounds, and every stitch seen from the right side. It is worked from bottom to top, from right to left.
When working back and forth every other row is worked from the right side: from right to left and every other row is worked from the wrong side: from left to right.
When working in the round, every row in the diagram are worked from the right side, from right to left.
When working a circular diagram you start in the middle and work your way outwards, counter clockwise, row by row.
The rows usually start with a given number of chain stitches (equivalent to the height of the following stitch), this will either be depicted in the diagram or explained in the pattern.
See DROPS lesson: How to read crochet diagrams
How do I work several diagrams simultaneously on the same row/round?
Instructions for working several diagrams after each other on the same row/round, will often be written like so: “work A.1, A.2, A.3 a total of 0-0-2-3-4 times". This means you work A.1 once, then A.2 is worked once, and A.3 is repeated (in width) the number of times provided for your size – in this case like so: S = 0 times, M = 0 times, L=2 times, XL= 3 times and XXL = 4 times.
The diagrams are worked as usual: begin with the first row in A.1, then work the first row in A.2 etc.
See DROPS lesson: How to read knitting diagrams
See DROPS lesson: How to read crochet diagrams
Why are the sleeves shorter in larger sizes?
The total width of the garment (from wrist-to-wrist) will be larger in the larger sizes, despite the actual sleeves being shorter. The larger sizes have longer sleeve caps and wider shoulders, so there will be a good fit in all sizes.
Where on the garment is the length measured?
The measurement sketch/schematic drawing provides information regarding the full length of the garment. If it’s a jumper or a jacket the length is measured from the highest point on the shoulder closest to the neckline, and straight down to the bottom of the garment. It is NOT measured from the tip of shoulder. Similarly, the length of yoke is measured from the highest point on the shoulder and down to where yoke is split into body and sleeves.
On a jacket measures are never taken along bands, unless specifically stated. Always measure inside band stitches when measuring the length.
See DROPS lesson: How to read a schematic drawing
What is a repeat?
Diagrams are often repeated on the round or in height. 1 repeat is the diagram the way it appears in the pattern. If it says to work 5 repeats of A.1 in the round, then you work A.1 a total of 5 times after/next to each other in the round. If it says to work 2 repeats of A.1 vertically/in height you work the entire diagram once, then begin again at the start and work the entire diagram one more time.
Why does the piece start with more chain stitches than it’s worked with?
Chain stitches are slightly narrower than other stitches and to avoid working the cast-on edge too tight, we simply chain more stitches to begin with. The stitch count will be adjusted on the following row to fit the pattern and measurement sketch.
Why increase before the rib edge when the piece is worked top-down?
The rib edge is more elastic and will contract slightly compared to, for example, stocking stitch. By increasing before the rib edge, you avoid a visible difference in width between the rib edge and the rest of the body.
Why increase in the cast-off edge?
It’s very easy to cast off too tightly, and by making yarn overs while casting off (and simultaneously casting these off) you avoid a too tight cast off edge.
See DROPS video: How to bind off with yarn overs (yo)
How do I increase/decrease on every 3rd and 4th row/round alternately?
To achieve an even increase (or decrease) you can increase on, for example: every 3rd and 4th row alternately, like so: work 2 rows and increase on the 3rd row, work 3 rows and increase on the 4th. Repeat this until the increase is complete.
See DROPS lesson: Increase or decrease 1 st on every 3rd and 4th row alternately
How can I work a jacket in the round instead of back and forth?
Should you prefer to work in the round instead of back and forth, you may of course adjust the pattern. You’ll need to add steeks mid-front (usually 5 stitches), and follow the instructions. When you would normally turn and work from the wrong side, simply work across the steek and continue in the round. At the end you’ll cut the piece open, pick up stitches to work bands, and cover the cut edges.
See DROPS video: How to knit steeks and cut open
Can I work a jumper back and forth instead of in the round?
Should you prefer to work back and forth instead of in the round, you may of course adjust the pattern so you work the pieces separately and then assemble them at the end. Divide the stitches for the body in 2, add 1 edge stitch in each side (for sewing) and work the front and back pieces separately.
See DROPS lesson: Can I adapt a pattern for circular needles into straight needles?
Why is the pattern slightly different than what I see in the photo?
Pattern repeats can vary slightly in the different sizes, in order to get the correct proportions. If you’re not working the exact same size as the garment in the photo, yours might deviate slightly. This has been carefully developed and adjusted so that the complete impression of the garment is the same in all sizes.
Make sure to follow instructions and diagrams for your size!
How do I make a women’s size garment into a men’s size one?
If you have found a pattern you like which is available in women’s size it’s not very difficult to convert it to men’s size. The biggest difference will be the length of sleeves and body. Start working on the women size that you think would fit across the chest. The additional length will be worked right before you cast off for the armhole/sleeve cap. If the pattern is worked top-down you can add the length right after the armhole or before the first decrease on sleeve.
Regarding additional yarn amount, this will depend on how much length you add, but it is better with a skein too many than too few.
How do I prevent a hairy garment from shedding?
All yarns will have excess fibres (from production) that might come off as lint or shedding. Brushed yarns (ie hairier yarns) have more of these loose, excess fibres, causing more shedding.
Shedding also depends on what is worn under or over the garment, and whether this pulls at the yarn fibres. It’s therefore not possible to guarantee that there will be no shedding
Below are some tips on how to get the best result when working with hairier yarns:
1. When the garment is finished (before you wash it) shake it vigorously so the looser hairs come off. NOTE: do NOT use a lint roller, brush or any method that pulls at the yarn.
2. Place the garment in a plastic bag and put it in your freezer - the temperature will cause the fibres to become less attached to each other, and excess fibres will come off easier.
3. Leave in the freezer for a few hours before taking it out and shaking it again.
4. Wash the garment according to the instructions on the yarn label.
Why does my garment pill?
Pilling is a natural process that happens to even the most exclusive of fibers. It's a natural sign of wear and tear that is hard to avoid, and that is most visible in high friction areas of your garment like a sweater's arms and cuffs.
You can make your garment look as new by removing the pilling, using a fabric comb or a pill/lint remover.
Parker |
|||||||
|
|||||||
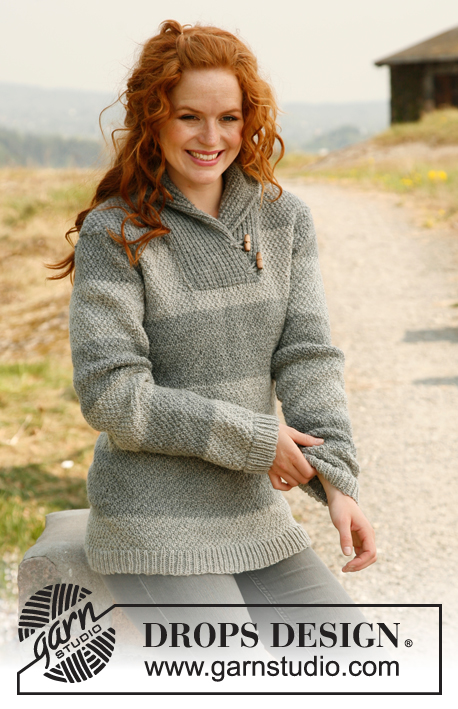
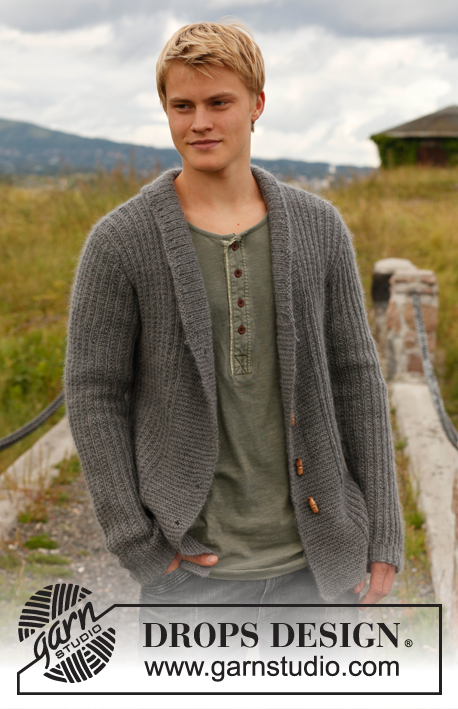
Knitter sweater for men with shawl collar, in DROPS Alpaca and DROPS Kid-Silk. Size: S to XXXL.
DROPS 135-45 |
|||||||
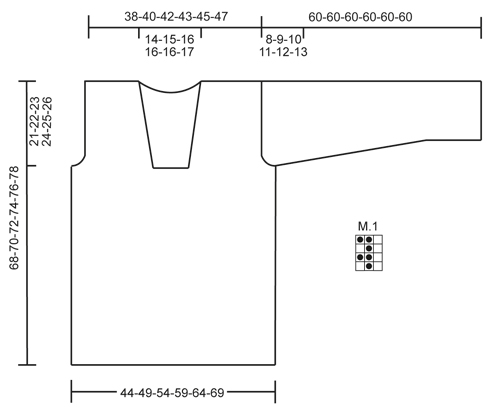
PATTERN: See diagram M.1 – diagram shows pattern from RS. ---------------------------------------------------------- FRONT PIECE: Worked back and forth on needle. Cast on 94-105-115-126-136-147 sts (includes 1 edge st in each side) on needle size 5.5 mm with 1 thread Alpaca + 1 thread Kid-Silk. Work as follows (from RS): * K 3, K 2 tog, K 2 *, repeat from *-* until 3-0-3-0-3-0 sts remain, K these sts = 81-90-99-108-117-126 sts. Work next row from WS as follows: K 1 edge st * P 1, K 2 *, repeat from *-* until 2 sts remain, P 1 and K 1 edge st. Then work diagram M.1 over all sts, with 1 edge st in each side worked K on all rows (diagram M.1 starts and ends with 1 K st, seen from RS, before edge st in each side). When piece measures approx. 47-48-49-50-51-52 cm, work next row as follows from RS: Cast off 4 sts for armhole, work 26-30-34-38-42-46 sts in diagram M.1 as before (= left front piece), cast off 21-22-23-24-25-26 sts for neck, and work the rest of row in diagram M.1 as before (= 30-34-38-42-46-50 sts). Turn and cast off 4 sts for armhole, work the rest of row = 26-30-34-38-42-46 sts remain on right front piece. Slip sts in the left side on a stitch holder. RIGHT SIDE: Continue to work diagram M.1 over sts on needle, while at the same time casting off for armhole at the beg of every row from the side: 3 sts 0-0-1-1-2-2 times, 2 sts 0-1-1-2-2-3 times and 1 st 2-3-3-4-4-5 times. AT THE SAME TIME when piece measures 54-55-56-57-58-59 cm, dec 1 st towards the neck, repeat dec when piece measures 60-61-62-63-64-65 cm. After all cast offs and dec are done, 22-23-24-25-26-27 sts remain on needle. Cast off when piece measures 68-70-72-74-76-78 cm. LEFT SIDE: Slip the stitches on the stitch holder back on needle and work as right side but reversed. BACK PIECE: Cast on and work as on front piece until piece measures 47-48-49-50-51-52 cm. Now cast off for armholes at beg of every row in each side: 4 sts 1 time, 3 sts 0-0-1-1-2-2 times, 2 sts 0-1-1-2-2-3 times and 1 st 2-3-3-4-4-5 times = 69-72-75-78-81-84 sts. When piece measures 66-68-70-72-74-76 cm, cast off the middle 25-26-27-28-29-30 sts for neck. Work each shoulder (= 22-23-24-25-26-27 sts) separately until piece measures 68-70-72-74-76-78 cm, cast off. SLEEVE: Worked back and forth on needle. Cast on 57-57-60-60-63-66 sts (includes 1 edge st in each side) on needle size 5.5 mm with 1 thread Alpaca + 1 thread Kid-Silk. K 1 row from RS while at the same time dec 6 sts evenly = 51-51-54-54-57-60 sts. Work next row from WS as follows: K 1 edge st * P 1, K 2 *, repeat from *-* until 2 sts remain, finish with P 1 and K 1 edge st. Then work diagram M.1 over all sts, with 1 edge st in each side worked K on all rows. (Diagram M.1 starts and ends with K 1, seen from RS, before edge st in each side.) When piece measures 12 cm, inc 1 st in each side inside edge st. Repeat inc every 4½-4½-4½-3-3-3 cm a total of 9-9-9-12-12-12 times = 69-69-72-78-81-84 sts – work the inc sts gradually in diagram M.1. When piece measures 52-51-50-49-48-47 cm (shorter measurements in the larger sizes because of longer sleeve cap and broader shoulder width) cast off at beg of every row in each side: 4 sts 1 time, 2 sts 3 times and 1 st 2-4-5-6-8-9 times. Then cast off 2 sts in each side until piece measures 59 cm, then cast off 3 sts 1 time in each side. Cast off, the piece measures approx. 60 cm in all sizes. ASSEMBLY: Sew the shoulder seams. SHAWL COLLAR: Beg mid front on left side of sts cast off for neck. Knit up on circular needle size 5.5 mm with 1 thread Alpaca and 1 thread Kid-Silk: 38 to 45 sts up to shoulder, then knit up 26 to 32 sts in the back of neck, and finally 38 to 45 sts down along left side of neck dec = 102 to 122 sts (do not knit up where sts were dec in front of neck). K 1 row from WS while AT THE SAME TIME inc no of sts to 128-134-140-146-152-158. Then work rib as follows (from RS): 2 sts worked K on all rows, * K 1, P 2 *, repeat from *-* and finish with K 1 and 2 sts worked K on all rows. Continue like this until collar measures approx. 5 cm. Now inc 1 st in each of the middle 12 P-sections, seen from RS (= back of neck) = 140-146-152-158-164-170 sts. Continue with K over K and P over P until collar measures approx. 11-11-12-12-13-13 cm - adjust so that next row is from RS. Work 4 rows in stocking st over all sts, then cast off all sts with K from RS. The outermost edge is supposed to roll. Place the collar double (right side over left side) at the bottom of neck opening and sew it to the neck line through both layers. MORE ASSEMBLY: Sew in sleeves and sew under arm and side seams in one inside 1 edge st. |
|||||||
Diagram explanations |
|||||||
|
|||||||
Have you made this or any other of our designs? Tag your pictures in social media with #dropsdesign so we can see them! Do you need help with this pattern?You'll find tutorial videos, a Comments/Questions area and more by visiting the pattern on garnstudio.com. © 1982-2024 DROPS Design A/S. We reserve all rights. This document, including all its sub-sections, has copyrights. Read more about what you can do with our patterns at the bottom of each pattern on our site. |
With over 40 years in knitting and crochet design, DROPS Design offers one of the most extensive collections of free patterns on the internet - translated to 17 languages. As of today we count 309 catalogues and 11530 patterns translated into English (UK/cm). 11530
We work hard to bring you the best knitting and crochet have to offer, inspiration and advice as well as great quality yarns at incredible prices! Would you like to use our patterns for other than personal use? You can read what you are allowed to do in the Copyright text at the bottom of all our patterns. Happy crafting!
Comments / Questions (103)
Christina Nanneson wrote:
Hej, jag lyckas inte få ihop mönster M1 med mönstret på bilden. Kan jag få en förklaring? Med vänlig hälsning Christina
06.01.2022 - 16:38DROPS Design answered:
Hei Christina. Diagrammet går over 3 masker som gjentar seg. Tenk deg diagrammet i høyden der det 3 striper som går oppover. 1. stripe (blank firkant), denne stripen strikkes kun som rett masker, 2. stripe (sort prikk), denne stripen strikkes kun som vrang masker, mens 3. stripe strikkes rett både fra retten og fra vrangen (blir som perlestrikk). Da får du det mønstret du ser på bildet. mvh DROPS Design
14.01.2022 - 13:41Lise Girard wrote:
Bonjour ! Je fais la grandeur Small et je suis sur le devant côté droit . Rabattre pour emmanchure au début de ch rang à partir du côté : 0-0-1-1-2-2 fois 3 m , 0-1-1-2-2-3 fois 2 m , 2-3-3-4-4-5 fois 1 m. Combien faut-il que je tricote de rangs avant de rabattre 2 fois 1 m ? Merci pour votre précieuse aide .
12.10.2021 - 00:55DROPS Design answered:
Bonjour Mme Girard, en taille S, vous rabattez dès le premier rang tricoté sur le côté à partir de l'emmanchure 1 maille, tricotez 1 rang retour et rabattez 1 maille au début du rang suivant à partir de l'emmanchure. Bon tricot!
12.10.2021 - 08:58Kathi wrote:
I don’t understand how you can knit 2 together on RS row and never increase and magically maintain a constant stitch count. Each row is getting progressively smaller. What am I missing?
01.10.2021 - 18:32DROPS Design answered:
Dear Kathi, please let us know exactly which part of the pattern your question is referencing? We would be able to give you better answer then. Thank you, Happy Stitching!
03.10.2021 - 12:12Tara Kazimir wrote:
Thank you for answering. To clarify, the 26 sts on the back neck, covers the entire back. Not the first 26 sts. I pick up from the middle left, all across the back neck, then down the right side to the dec.
07.01.2021 - 20:32DROPS Design answered:
Dear Mrs Kazimir, you start picking up sts along the first side of front piece, after the cast off sts on mid front until shoulder, then pick up sts along the cast off sts for neck on back piece and pick up sts along the 2nd side of front piece from shoulder to the cast off sts on mid front. (the middle sts for neck on mid front are leaving unworked, the sides of collar will be sewn later along these stitches). Happy knitting!
08.01.2021 - 07:29Tara Kazimir wrote:
Hi. I am to the knitting the shawl/collar. I am confused about where I am picking up stitches. Reading the pattern, I started on the left middle. I understand the back 26 stitches, but then I'm lost at " and finally 35-45 sts down along the left side neck" where is this left side? Do I start in the middle of the chest, pick up back of neck and then down the side? I am confused. Thank you for your assistance
07.01.2021 - 03:13DROPS Design answered:
Hi Tara, The knitted up stitches are first along the cast-off stitches on the left front piece (not along the decreased stitches further down), then across the back of the neck and finally the same number of stitches are knitted up along the right front piece. Happy knitting!
07.01.2021 - 07:37Yang wrote:
Hello, In the beginning of the front piece, after CO, k3, K2tg, k2, from RS? I'm on WS after CO & turn the piece.
21.12.2020 - 13:40DROPS Design answered:
Hi Yang, The first row after casting on will be your right side for the rest of the piece. Happy knitting!
22.12.2020 - 06:56Pertegaz wrote:
Pertegaz comment assembler un col châle catalogue 75 modèle 45
11.11.2020 - 15:53Pertegaz wrote:
Comment assembler un col châle catalogue 75 modèle 45 pas assez d\\\' explication suis bloque au montage du col
11.11.2020 - 15:48DROPS Design answered:
Bonjour Mme Pertegaz, pouvez-vous écrire votre question dans la rubrique du modèle que vous tricotez? Le Catalogue DROPS 75 n'a que 28 modèles. Merci!
11.11.2020 - 16:17Nancy Hokenson wrote:
Where are the charts? I see where the info about how to read a chart is there but I do not see an actual chart. I have looked at ravelry, pinterest downloads and do not see them. thank you
27.09.2020 - 23:35DROPS Design answered:
Hi Nancy, The only diagram you are using is M.1, which is to the right of the sketch with measurements. Happy knitting!
28.09.2020 - 07:41Schlosser Mathilde wrote:
Ich möchte den Pullover mit Alpaca air stricken. Wieviel Gramm benötige ich bei Größe L. Danke
06.09.2020 - 12:09DROPS Design answered:
Liebe Frau Schlosser, hier finden Sie wie man die neue Garnmenge je nach der Größe kalkuliert. Viel Spaß beim stricken!
07.09.2020 - 09:10