
Popular categories
Looking for a yarn?


Comments / Questions (21)
![]() Hanne RASTUM wrote:
Hanne RASTUM wrote:
Hvordan (hvor mange masker og n° pinne) på rysjen? Jeg finner ikke beskrivelse på den
06.10.2024 - 12:40DROPS Design answered:
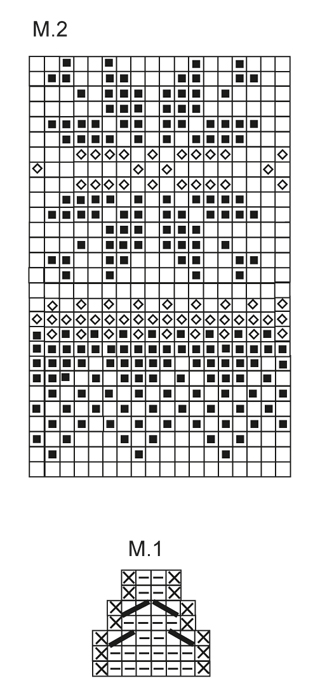
Hej Hanne, du starter med rysjen her: TUNIKA: Arb strikkes rundt på rundp. Legg opp 408-448-488-528-568-608 m på rundp 3,5 med mørk grå, strikk M.1 Når du har strikket M.1 er rysjen klar :)
23.10.2024 - 15:06
![]() Hanne RASTUM wrote:
Hanne RASTUM wrote:
Il y a un problème avec la description du modèle qui commence avec le diagramme 1 et non avec les côtes apparemment 2 x2 . Pour les côtes doivent ils être tricotés avec l'aiguille 4.5 et un rang en jersey en faisant des diminutions pour arriver au diagramme M.1 avec 224 mailles pour le modèle M? combiens de mailles pour faire la bordure des emmanchures?
06.10.2024 - 12:14DROPS Design answered:
Bonjour Mme Rastum, en taille M on commence par 448 mailles et on tricote d'abord le diagramme M.1 = on va ainsi répéter 56 fois les 8 mailles du diagramme; en même temps, on va diminuer aux rangs 3 et 5 pour former une sorte de bordure volantée (retrouvez en une similaire dans cette vidéo), il reste ainsi 4 m dans chaque A.1 soit 4x56=224 m et vous avez maintenant des côtes 2/2. Bon tricot!
07.10.2024 - 08:11
![]() Elina Korhonen wrote:
Elina Korhonen wrote:
Tein mallitilkun 10x10cm Merino extra fine - langalla väri 07, puikot 5,5, jolloin sain 18s vaakasuunnassa. Aloin kutomaan varsinaista työtä värillä 34. Olen kutonut jo 20cm,jossa on kirjoneuletta aluksi. Miksi tällä värillä muodostuu enemmän silmukoita, 23s kymmenelle sentille. En mitannut kirjoneuleen kohdalta, vaan kolmen sentin päästä kirjoneuleesta. Pitääkö jokaisesta väristä tehdä erikseen mallitilkku. Näin ainakin näyttäisi olevan.
02.01.2022 - 15:57
![]() Widera wrote:
Widera wrote:
Mich würde interessieren, ob die Wolle mit dem hohen Schurwollanteil kratzt oder nicht. Sieht super aus, das Teil!!
09.03.2017 - 13:17DROPS Design answered:
Liebe Widera, dies ist wirklich persönnlich, lieber direkt mit Ihrem DROPS Laden besprechen. Sie werden Ihnen helfen können. Viel Spaß beim stricken!
09.03.2017 - 14:05
![]() Sabine Scheugenpflug wrote:
Sabine Scheugenpflug wrote:
Hallo liebes Garnstudio-Team,in der anleitung steht nach 22cm auf beiden seiten abnehmen sind da die 22cm ab anschlag oder ab M2 gemeint? lg
22.02.2014 - 08:25DROPS Design answered:
Liebe Sabine, es sind 22 cm ab dem Anschlag gemeint. Soweit nicht anders angegeben, beziehen sich die Maßangaben immer auf die Gesamtlänge, d.h. die Länge ab Anschlag. Viel Spaß beim Weiterstricken!
22.02.2014 - 10:16
![]() Jette Lund Hansen wrote:
Jette Lund Hansen wrote:
Skøn, lækker tunika. Nem og alligevel lidt udfordrende (mønstret) at strikke. Er blevet en ynglingstrøje.
12.11.2011 - 10:58
![]() Ineke wrote:
Ineke wrote:
Een heel leuk model vooral voor de jongeren .Door dit model willen ze wel weer gebreiden truien aan.
08.06.2011 - 19:12
![]() Petra wrote:
Petra wrote:
This one is beautiful too. I think I would make the bottom ribbed like the top rib though as I think it would be more fitted that way and maybe make it abit longer too :)
01.06.2011 - 17:30
![]() Gaëlle wrote:
Gaëlle wrote:
Très féminin et d'une grande légèreté. J'aime beaucoup.
31.05.2011 - 14:14
![]() Nasy wrote:
Nasy wrote:
I would make it a little longer, so I can wear with leggings more comfortable :D
29.05.2011 - 21:05
|
||||||||||||||||||||||
Po#potunic |
||||||||||||||||||||||
|
|
||||||||||||||||||||||
Knitted DROPS tunic with Norwegian pattern, flounce at the bottom and rib on yoke in ”Nepal”. Size: S to XXXL.
DROPS 131-7 |
||||||||||||||||||||||
|
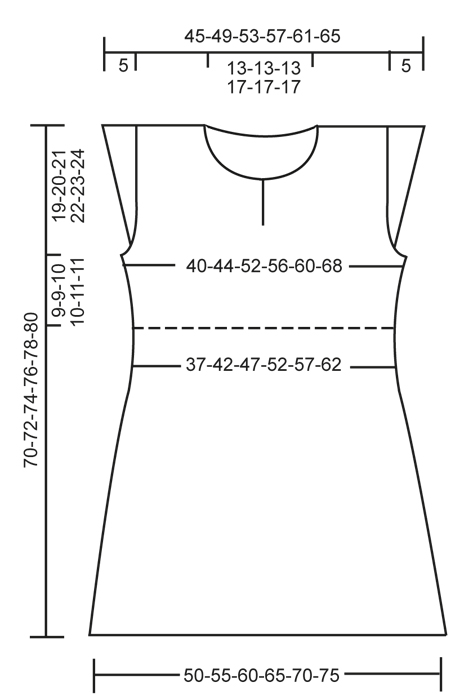
PATTERN: See diagrams M.1 and M.2 – the diagrams show 1 repetition of the pattern. DECREASE TIP: Work until 2 sts remain before marker, K 2 tog, marker, slip 1 st as if to K, K 1, psso. GARTER ST (in the round on circular needle): 1 ridge = 2 rounds * K 1 round and P 1 round *, repeat from *-*. GARTER ST (back and forth on needle): K all rows. INCREASE TIP: Inc inside outermost st in garter st in each side by making 1 YO, on next row K YO twisted (i.e. work in back loop of st instead of front) to avoid holes. -------------------------------------------------------- TUNIC: Worked in the round on circular needle. Cast on 408-448-488-528-568-608 sts on circular needle size 3.5 mm with dark grey and work diagram M.1. After diagram M.1, there are 204-224-244-264-284-304 sts on needle. Then work K over K and P over P for 2 cm. Switch to circular needle size 4.5 mm and K 1 round while at the same time dec 24-26-28-30-32-34 sts evenly = 180-198-216-234-252-270 sts. Insert 4 markers in the piece as follows (round beg in the side): Work 20-22-24-26-28-30 sts, insert a marker, work 50-55-60-65-70-75 sts, insert a marker, work 40-44-48-52-56-60 sts, insert a marker, work 50-55-60-65-70-75 sts, insert a marker, work the last 20-22-24-26-28-30 sts on the round (markers show where to dec sts). Then work diagram M.2 (= 10-11-12-13-14-15 repetitions on the round), then continue in stocking st and with dark grey. REMEMBER THE KNITTING TENSION! When piece measures 20-21-21-22-22-23 cm, dec 1 st on each side of the 4 markers – see DECREASE TIP (= 8 sts dec). Repeat dec every 8th round a total of 6 times = 132-150-168-186-204-222 sts. When piece measures 42-43-43-44-44-45 cm, switch to circular needle size 3.5 mm. Work 1 round in stocking st while at the same time inc 28-26-40-38-36-50 sts evenly = 160-176-208-224-240-272 sts. NOW MEASURE PIECE FROM HERE! Then work rib as follows from the side (= beg of round): P 1, * K 2, P 2 *, repeat from *-* the entire round and finish with P 1. When rib measures 8-8-9-9-10-10 cm, work next round as follows: 5-5-9-9-9-13 sts in GARTER ST – see explanation above, work 70-78-86-94-102-110 sts in rib as before, 10-10-18-18-18-26 sts in garter st, 70-78-86-94-102-110 sts in rib as before, and the last 5-5-9-9-9-13 sts in garter st. Continue like this until 4 rounds in garter st (2 ridges) have been worked over sts in each side. Work next round as follows: Cast off 1-1-5-5-5-9 sts (for armhole), 4 sts in garter st, 70-78-86-94-102-110 sts in rib, 4 sts in garter st, cast off 2-2-10-10-10-18 sts (for armhole), 4 sts in garter st, 70-78-86-94-102-110 sts in rib as before, 4 sts in garter st and cast off 1-1-5-5-5-9 sts (= armhole), cut the thread. Finish front and back piece separately. BACK PIECE: = 78-86-94-102-110-118 sts. Continue in rib and 4 sts in garter st in each side. When rib section measures 12-12-13-13-14-14 cm, inc 1 st in each side towards armhole - READ INCREASE TIP. Repeat inc every 4 rows a total of 6 times = 10 sts in garter st in each side and 90-98-106-114-122-130 sts in total. When rib section measures 26-27-29-30-32-33 cm, cast off the middle 26-26-26-34-34-34 sts for neck = 32-36-40-40-44-48 sts remain on each shoulder. Work 2 cm over each shoulder. Then either cast off or slip sts on a stitch holder. It will look nicer if you sew the shoulder seams tog without casting off first. FRONT PIECE: = 78-86-94-102-110-118 sts. Continue as follows: 4 sts in garter st, 30-34-38-42-46-50 sts in rib, 10 sts in garter st, 30-34-38-42-46-50 sts in rib and 4 sts in garter st. When 6 rows in garter st have been worked over the middle 10 sts, divide the piece in the middle for split. Finish each part separately. RIGHT SIDE: = 39-43-47-51-55-59 sts. Then work 5 sts in garter st towards the neck and 4 sts in garter st towards the armhole. At the same time when piece measures 12-12-13-13-14-14 cm, inc 1 st towards the armhole as on back piece. Repeat inc every 4 rows a total of 6 times. There are now 10 sts in garter st towards the armhole and 45-49-53-57-61-65 sts in total. When piece measures 21-22-23-24-25-26 cm, cast off on every row from neck: 9 sts 1 time, 2 sts 1-1-1-2-2-2 times and 1 st 2-2-2-4-4-4 times = 32-36-40-40-44-48 sts remain on shoulder. When rib section measures 28-29-31-32-34-35 cm, either cast off sts or slip them on a stitch holder. LEFT SIDE: Work as right side but with inc, dec and cast offs in the opposite side. ASSEMBLY: Sew the shoulder seams. NECK EDGE: Knit up approx. 66 to 86 sts around the neck on circular needle size 3.5 mm with dark grey. K 3 rows back and forth, cast off with K. |
||||||||||||||||||||||
Diagram explanations |
||||||||||||||||||||||
|
||||||||||||||||||||||
 |
||||||||||||||||||||||
 |
||||||||||||||||||||||
Have you finished this pattern?Tag your pictures with #dropspattern #potunic or submit them to the #dropsfan gallery. Do you need help with this pattern?You'll find 15 tutorial videos, a Comments/Questions area and more by visiting the pattern on garnstudio.com. © 1982-2026 DROPS Design A/S. We reserve all rights. This document, including all its sub-sections, has copyrights. Read more about what you can do with our patterns at the bottom of each pattern on our site. |
||||||||||||||||||||||


With over 40 years in knitting and crochet design, DROPS Design offers one of the most extensive collections of free patterns on the internet - translated to 17 languages. As of today we count 324 catalogues and 12290 patterns translated into English (UK/cm). 12290
We work hard to bring you the best knitting and crochet have to offer, inspiration and advice as well as great quality yarns at incredible prices! Would you like to use our patterns for other than personal use? You can read what you are allowed to do in the Copyright text at the bottom of all our patterns. Happy crafting!
Post a comment to pattern DROPS 131-7
We would love to hear what you have to say about this pattern!
If you want to leave a question, please make sure you select the correct category in the form below, to speed up the answering process. Required fields are marked *.