
Popular categories
Looking for a yarn?


Comments / Questions (22)
![]() Lene wrote:
Lene wrote:
Super opskrift
16.02.2015 - 16:54
![]() Dorte wrote:
Dorte wrote:
Denne opskrift har jeg strikket i small. Jeg måtte korrigere den i rygbredden, da den efter opskriften blev for smal. Ligeledes passer ærmegab ikke Til ærmet. Men efter rettelserne, blev det en meget sød og anvendelig jakke.
04.07.2012 - 21:48
![]() Donatienne wrote:
Donatienne wrote:
J'ai réalisé ce modèle en Vivaldi noir: il est vraiment magnifique et je le porte avec un plaisir fou. Merci et continuez à créer des modèles originaux comme celui-ci, je n'aime que les extravagances.
26.11.2011 - 02:50
![]() Nasy wrote:
Nasy wrote:
Just finished this one a week ago..for my friend. it's so adorable she liked it very much. Thanks :)
18.07.2011 - 01:02
![]() Lucka wrote:
Lucka wrote:
Moc pěkné, doufám, že zakryje moje špíčky :-) Very pretty, I hope it will cover my not ideal waistline :-)
26.01.2011 - 09:55
![]() Eve Rudschies wrote:
Eve Rudschies wrote:
For me one of the first choices, original, practical, for very figut and every season. give us the pattern quickly
25.01.2011 - 10:06Patricia wrote:
Tres joli mais pourquoi il n y a pas d explication
22.01.2011 - 14:25
![]() Virginia wrote:
Virginia wrote:
Again grandaughter would love
17.01.2011 - 11:30
![]() Dominique wrote:
Dominique wrote:
Pratique bien pensé; les explications ?
17.01.2011 - 10:27
![]() Mona wrote:
Mona wrote:
Sehr schön
15.01.2011 - 08:05
|
|||||||||||||
Spumino#spuminocardigan |
|||||||||||||
 |
 |
||||||||||||
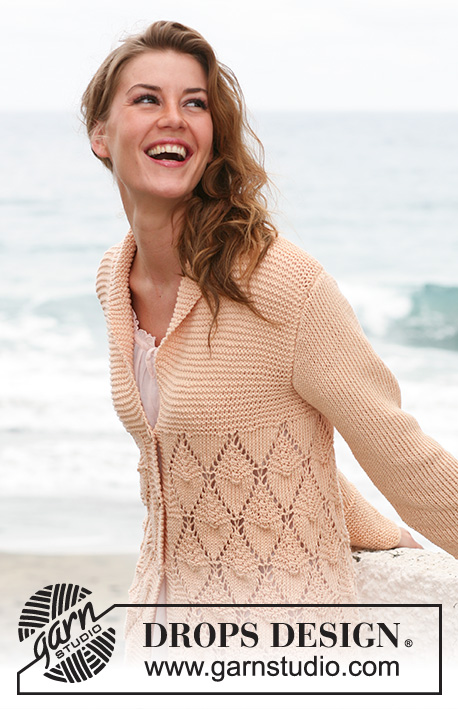
Knitted DROPS jacket with short sleeves worked sideways in "Vivaldi". Size: S - XXXL
DROPS 130-34 |
|||||||||||||
|
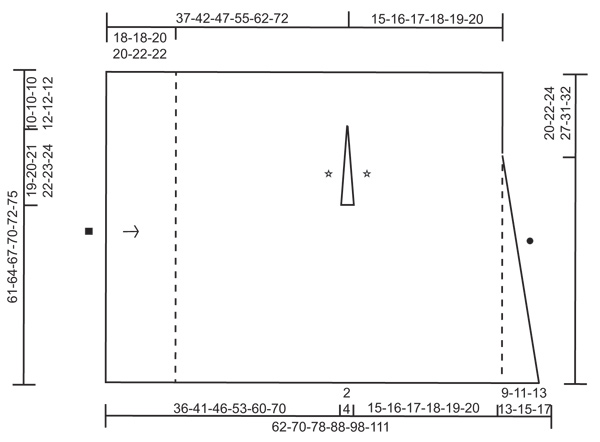
FISHERMANS RIB (back and forth on needle): ROW 1 (RS): 5 sts in garter st, * K 1, 1 YO, slip 1 st as if to P *, repeat from *-*, finish with K 1 and 5 sts in garter st. ROW 2 (WS): 5 sts in garter st, * 1 YO, slip 1 st as if to P, K tog YO and slipped st *, repeat from *-* and finish with 1 YO, slip 1 st as if to P and 5 sts in garter st. ROW 3 (RS): 5 sts in garter st, * K tog YO and slipped st, 1 YO, slip 1 st as if to P *, repeat from *-* and finish with K tog YO and slipped st and 5 sts in garter st. Repeat 2nd and 3rd row. GARTER ST (back and forth on circular needle): K all rows. GARTER ST (in the round on double pointed needles): 1 ridge = 2 rounds * K 1 round and P 1 round *, repeat from *-*. --------------------------------------------------------- JACKET: The garment is worked back and forth on circular needle because of no of sts. Work the jacket from mid front on left front piece and out towards the side, cast off for sleeves and continue until mid back of back before casting off. Then work right front piece the same way but reversed from mid front before the garment is sewn tog mid back. Finish by knitting and sewing in the sleeves. LEFT FRONT PIECE: LOOSELY cast on 168-177-186-195-201-210 sts on circular needle size 3.5 mm with Vivaldi. Work 1st row (from WS) as follows: 5 sts in GARTER ST - see explanation above -, * P 2 tog, K 1 *, repeat from *-* and finish with P 2 tog and 5 sts in Garter st = 115-121-127-133-137-143 sts. Continue to work as follows (1st row = RS): 5 sts in garter st, FISHERMANS RIB - see explanation above - until 5 sts remain, 5 sts in garter st. Continue working like this until piece measures 18-18-20-20-22-22 cm (adjust to finish after 1 row from WS). Switch to circular needle size 4 mm and continue in stocking st with 5 sts in garter st in each side (on 1st row with stocking st, K tog 1 YO and 1 st so that no of sts is correct = 115-121-127-133-137-143 sts. REMEMBER THE KNITTING TENSION! When piece measures approx. 36-41-46-53-60-70 cm - adjust so that next row is worked from RS - slip the outermost 55-57-59-65-67-69 sts in the left side of piece (seen from RS) on a stitch holder. Work 6-6-6-10-10-10 rows in stocking st with 5 sts in garter st in the side as before (= approx. 2-2-2-4-4-4 cm) over the remaining 60-64-68-68-70-74 sts on needle. Cut the thread. Then slip these sts on a stitch holder. Slip the 55-57-59-65-67-69 sts from the first stitch holder back on circular needle size 4 mm and work armhole from RS as follows: Size S + M + L: Cast off the first 36-38-40 sts at beg of row, work the remaining 19 sts on needle as before. Now insert a marker in the outermost st in the right side of needle (seen from RS - this marks where the sleeve cap is sewn into the armhole). Turn piece, work the 19 sts on needle as before and then cast on 36-38-40 sts at the end of row. Cut the thread. Size XL + XXL + XXXL: Cast off the first 21-22-23 sts at beg of row, work the remaining 44-45-46 sts on needle as before, turn piece. Work the 44-45-46 sts on the needle as before, turn piece. Cast off the first 21-22-23 sts at beg of row and work the remaining 23 sts as before. Now insert a marker in the outermost st in the right side of needle (seen from RS - this marks where the sleeve cap is sewn into the armhole). Turn piece, work the 23 sts as before, cast on 21-22-23 new sts at the end of row, turn piece. Work the 44-45-46 sts on the needle as before, turn piece. Work the 44-45-46 sts on needle as before and cast on 21-22-23 new sts at the end of row. Cut the thread. ALL SIZES: Now slip the 60-64-68-68-70-74 sts on the stitch holder back on the needle and work in stocking st with 5 sts in garter st in each side over the 115-121-127-133-137-143 sts (1st row = from RS). When piece measures 51-57-63-72-80-91 cm (measured in the left side of piece seen from RS, the piece measures approx. 52-58-64-74-82-93 cm in the right side), work short rows to give extra width mid back (start at beg of row from WS = from neckline), work all sts in stocking st as before with 5 sts in garter st in each side. Work the first 38-42-46-52-58-60 sts on needle and then slip these sts on a stitch holder, work the remaining sts on the needle, turn piece and work back over all sts, * work the first 7-6-5-5-4-4 sts on the needle, then slip sts on the same stitch holder and work the remaining sts on the needle, turn piece and work back over all sts *, repeat from *-* a total of 10-12-15-15-17-20 times. Turn piece, work the remaining 7-7-6-6-11-3 sts. Now slip all the sts back on the needle = 115-121-127-133-137-143 sts and K 4 rows over all sts before LOOSELY casting off = mid back of jacket. The piece now measures approx. 52-58-64-73-81-92 cm in the left side (seen from RS) and 62-70-78-88-98-111 cm in the right side, measured in knitting direction! RIGHT FRONT PIECE: Cast on and work as left front piece but reversed, i.e. all measurements that were done in the left side of piece (seen from RS) are now done in the right side of piece (seen from RS). When working the 6-6-6-10-10-10 rows under the sleeve, adjust so that the first row is worked from WS (instead of RS) and the outermost 55-57-59-65-67-69 sts in the left side of piece (seen from WS, not RS) are slipped on a stitch holder. Continue to follow explanation for armhole from WS (instead of RS). Finish by working short rows mid back by starting at beg of row from RS (instead of beg of row from WS). SLEEVE: Worked in the round on double pointed needles. Cast on 51-54-56-59-63-67 sts on double pointed needles size 3.5 mm with Vivaldi. Work 4 rounds in GARTER ST - see explanation above. Insert a marker at beg of round = mid under sleeve. Switch to double pointed needles size 4 mm and work in stocking st in the round. When piece measures 15 cm, cast off 4 sts mid under sleeve (= 2 sts on each side of the marker). Continue in stocking st back and forth until piece measures 20 cm. Now start to dec 1 st at beg of every row in each side. Repeat dec a total of 4-4-5-5-6-7 times in each side. Then cast off 5 sts at beg of the next 2 rows before loosely casting off all sts, sleeve measures approx. 25-25-26-26-27-28 cm. ASSEMBLY: Sew the jacket tog mid back inside the cast off edge so that there are 4 ridges (8 rows in garter st) mid back. Sew in the sleeves - NOTE: Sew sleeve cap against the marker on the shoulder and sew the sleeve in each side along the opening of armhole marked with a star in the chart. |
|||||||||||||
Diagram explanations |
|||||||||||||
|
|||||||||||||
 |
|||||||||||||
Have you finished this pattern?Tag your pictures with #dropspattern #spuminocardigan or submit them to the #dropsfan gallery. Do you need help with this pattern?You'll find 16 tutorial videos, a Comments/Questions area and more by visiting the pattern on garnstudio.com. © 1982-2026 DROPS Design A/S. We reserve all rights. This document, including all its sub-sections, has copyrights. Read more about what you can do with our patterns at the bottom of each pattern on our site. |
|||||||||||||


With over 40 years in knitting and crochet design, DROPS Design offers one of the most extensive collections of free patterns on the internet - translated to 17 languages. As of today we count 324 catalogues and 12290 patterns translated into English (UK/cm). 12290
We work hard to bring you the best knitting and crochet have to offer, inspiration and advice as well as great quality yarns at incredible prices! Would you like to use our patterns for other than personal use? You can read what you are allowed to do in the Copyright text at the bottom of all our patterns. Happy crafting!
Post a comment to pattern DROPS 130-34
We would love to hear what you have to say about this pattern!
If you want to leave a question, please make sure you select the correct category in the form below, to speed up the answering process. Required fields are marked *.