
Popular categories
Looking for a yarn?


































Comments / Questions (41)
 Carol wrote:
I dont understand rows 11/12 after the cable row I am ending up with too may stitches on my needle for the following row, I must be reading it wrong for the YO's ? could you explain where i could be going wrong. I am usually able to work out cables but am getting very frustrated. Thank you.
18.10.2026 - 08:35DROPS Design answered:
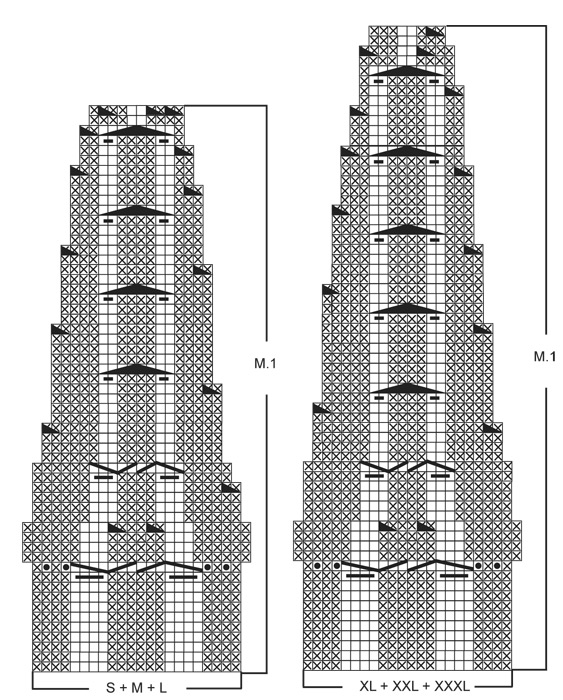
Dear Carol, in the 11th row you start with 2 purl stitches, 1 yarn over, 2 purl stitches 1 yarn over (the yarn overs are worked twisted in the next row). Then you work the first cable: slip 4 sts on cable needle in front of piece, 1 YO, P3, 1 YO, K4 tog into back of loop from cable needle. You increase 2 stitches (2 yarn overs) but decrease 3 (k4tog) so the net result is -1 stitch. In the 2nd cable you work the reflection: slip 3 sts on cable needle behind piece, K4 tog, 1 YO, P3 from cable needle, 1 YO . Again you have 2 yarn overs (+2sts) but k4tog (-3 sts), so you decrease 1 stitch overall in this cable. Then you work the purl section: purl 1, yarn over, purl 2, yarn over, purl 1. So in the purl sections you have increased 2 sts in each, but in the cable sections you have decreased 1 stitch per cable; in total, you will have 2 increases on each M.1 repeat of this row. That is, for each repeat of M.1 you should have 24 stitches; multiply it according to the number of times you work M.1 in your size to get the number of stitches. Happy knitting!
18.10.2026 - 20:58
EVT wrote:
My question got cut off. Trying again. I don't understand the M1. Row 11 says P1, 1 YO, K YO into back of loop on next row. But next row says P everything (I am knitting in circles). How should it be? Should there be a hole left? Should I purl or knit?
26.09.2026 - 09:57DROPS Design answered:
Dear EVT, you knit the yarn over into the back loop, so it's twisted and there is no hole left. In the next row you don't purl everything; the stitches where the increases where worked are knitted from the wrong side, so you knit these stitches, including the yarn overs. Remember that the symbols have different meanings when worked on right side rows and wrong side rows. Happy knitting!
28.09.2026 - 00:28
 EVT wrote:
I don't understand the M1. Row 11 says P1, 1 YO, --> K YO into back of loop on next row
25.09.2026 - 15:56DROPS Design answered:
Dear EVT, that's correct. In this symbol, you work 1 purl stitch and 1 yarn over. Then, on the next row, when working over the yarn over, it will be knitted twisted, or into the back loop. Happy knitting!
27.09.2026 - 23:26
 Marion wrote:
Ist bei dem Diagramm nur die Hinreihe gezeichnet und zurück wie die Maschen erscheinen, oder muss die Rückreihe auch nach Diagramm gearbeitet werden? Danke im voraus
10.08.2026 - 10:34DROPS Design answered:
Liebe Marion, bei den Hinreihen liest man rechts nach links und bei Rückreihen liest man links nach rechts - siehe Zeichenerklärung um zu wissen, wie die Maschen bei den Hin- (auf der Vorderseite) und bei den Rückreihen (auf der Rückseite) gestrickt werden. Viel Spaß beim Stricken!
10.08.2026 - 16:23
Susanne wrote:
Ich würde gerne wissen, warum nach dem Bündchen Maschen abgenommen werden?
07.02.2026 - 09:20DROPS Design answered:
Liebe Susanne, das wird für die Passform gemacht, das Bündchen soll nicht zu eng werden. Viel Spaß beim Stricken!
08.02.2026 - 08:38
Lynette wrote:
Thanks for getting back.Im sorry my real problem is the first symbol on graph the 4 sts slipped I've tried it's the yarn front and back I dont get .does yarn come back to front after slipping sts leaving loop in front .does this stitch have a name . beautiful cardigan love to finish it .had visions of making 2nd one for a gift .
24.04.2023 - 23:30DROPS Design answered:
Dear Lynette, on the 7th symbol, work as follows from wrong side: place yarn towards you (towards wrong side of piece), slip the next 4 stitches as if to purl (without working them ), place the yarn away from you and knit the next stitches as shown in diagram. Happy knitting!
25.04.2023 - 08:45
 Lynette wrote:
Pattern graph 4 sts as to purl yarn behind, the jumper version is different do you have visual explanation as to do this
23.04.2023 - 00:03DROPS Design answered:
Dear Lynette, this symbol is different because it's worked on a wrong side row on the jacket (and since jumper is worked in the round, this is worked on a right side row on jumper). Happy knitting!
24.04.2023 - 10:47
Pat wrote:
For the mid elevation do you start knitting from the marker to the end and then turn Do you have to do the elevation ?
24.02.2023 - 20:23DROPS Design answered:
Dear Pat, if you don't want to work an elevation, you can skip it and go to NECKLINE directly. Happy knitting!
26.02.2023 - 22:50
Pat wrote:
If the diagram shows right side stitches only, what stitches do you do on the wrong side
16.02.2023 - 13:55DROPS Design answered:
Dear Pat, the diagrams shows all the rows, seen from RS, this means read them from the bottom corner on the right side towards the left from RS and from the left towards the right from WS - and see symbols to know if you have to K or P the stitches from WS. Happy knitting!
16.02.2023 - 14:02
Lynette Bailey wrote:
How can I purl wrong side circular needle ,back to start right side pattern 121/29 first row.
18.09.2022 - 08:53DROPS Design answered:
Dear Mrs Bailey, from wrong side read the diagram left towards the right and work as explained by the symbols: x = knit from wrong side, white = purl from wrong side. Happy knitting!
19.09.2022 - 11:43
|
||||||||||||||||||||||||||||||||||||||||
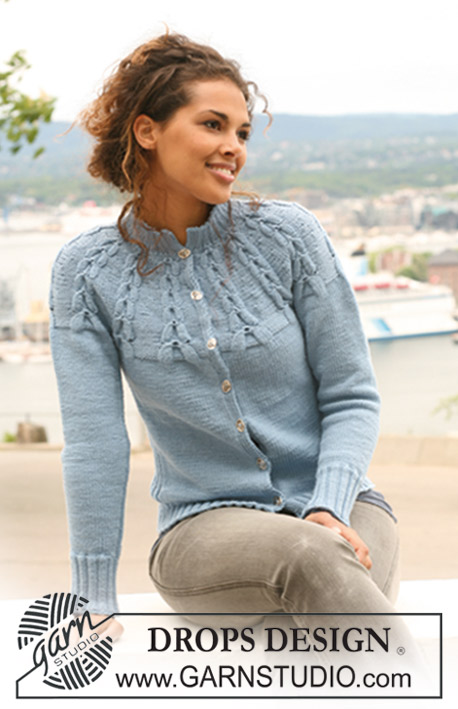
Ice Storm Cardigan#icestormcardigan |
||||||||||||||||||||||||||||||||||||||||
|
|
||||||||||||||||||||||||||||||||||||||||
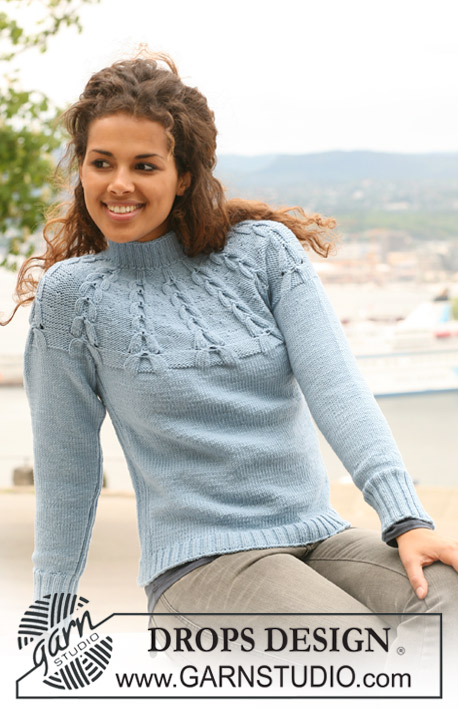
Knitted DROPS jacket with round yoke and cables in ”Karisma”. Size S - XXXL.
DROPS 121-29 |
||||||||||||||||||||||||||||||||||||||||
|
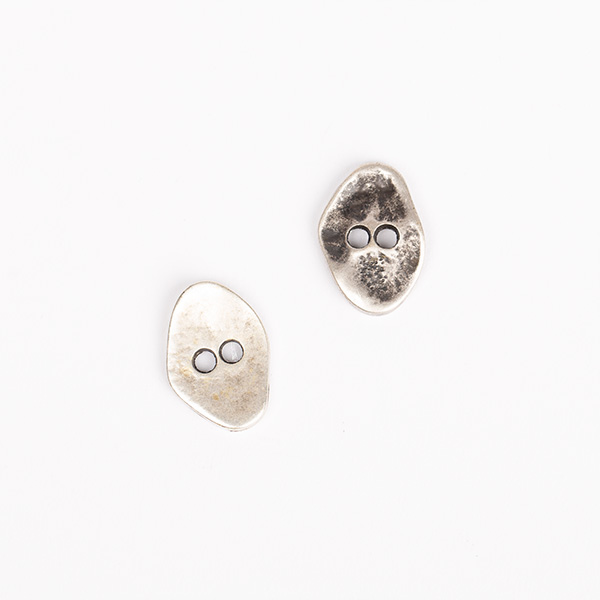
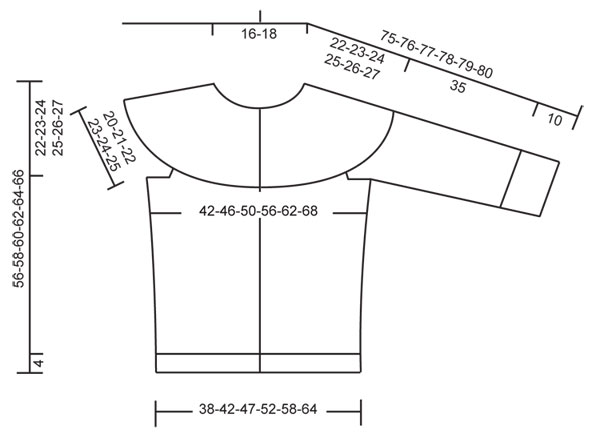
GARTER ST (back and forth on needle): K all rows. INCREASING TIP: Inc each side of the rib-section each side on body piece and mid under sleeve. Make all inc from RS! Inc 1 st by picking up st from previous row and K this. PATTERN: See diagram M.1 – see diagram for your size. Diagram shows the pattern from RS and row 1 in diagram = RS. BUTTONHOLES: Make buttonholes on right front band. 1 buttonhole = make 1 YO after 4th st from the edge and then K tog 5th and 6th st. Make buttonholes when piece measures: SIZE S: 4, 12, 20, 28, 36, 45 and 54 cm SIZE M: 4, 13, 21, 30, 38, 47 and 56 cm SIZE L: 4, 13, 22, 31, 40, 49 and 58 cm SIZE XL: 5, 13, 21, 29, 37, 45, 53 and 61 cm SIZE XXL: 5, 13, 22, 30, 39, 47, 55 and 63 cm SIZE XXXL: 5, 14, 23, 32, 41, 49, 57, 65 cm -------------------------------------------------------- JACKET: Worked back and forth on circular needle from mid front. BODY PIECE: Cast on 212-228-260-288-320-352 sts (includes 7 front band sts each side towards front edge) on circular needle size 3.5 mm with Karisma. P 1 row from WS, then continue in rib as follows from RS: 1 GARTER ST - see above, K1, P1, K1, P1, K1, P1, * K2, P2 *, repeat from *-* until 9 sts remain, finish with K2, P1, K1, P1, K1, P1, K1 and 1 GARTER ST. Continue like this until piece measures 4 cm. Now insert 2 markers in piece, 56-60-68-76-84-92 sts in from each side. Change to circular needle size 4 mm and continue in stocking st with 7 front band sts each side as before (= 1 garter st, K1, P1, K1, P1, K1 and P1 as seen from RS) and the 14 middle sts each side (i.e. 7 sts each side of marker) in rib (= P2, K2, P2, K2, P2, K2 and P2). AT THE SAME TIME on first row in stocking st dec 9-9-12-14-16-18 sts evenly on each front piece and 20-20-26-26-30-34 sts evenly on back piece – NOTE: Do not dec on front bands or on the 14 rib sts each side = 174-190-210-234-258-282 sts. REMEMBER THE KNITTING TENSION AND REMEMBER BUTTONHOLES ON RIGHT FRONT BAND! When piece measures 8 cm inc 1 st each side of the 14 rib sts each side – See INCREASING TIP! Repeat the inc on every 7 cm a total of 4 times = 190-206-226-250-274-298 sts. When piece measures 34-35-36-37-38-39 cm work next row as follows from RS: work 44-48-53-59-65-71 sts (= right front piece), cast off the 14 rib sts (i.e. 7 sts each side of marker), work 74-82-92-104-116-128 sts (= back piece), cast off the 14 rib sts (i.e. 7 sts each side of marker) and work the remaining 44-48-53-59-65-71 sts (= left front piece). Put piece aside and knit the sleeves. SLEEVE: Cast on 56-56-60-60-64-64 sts on double pointed needles size 3.5 mm with Karisma. K 1 round, then work rib, K2/ P2. When rib measures 10 cm change to double pointed needles size 4 mm. Work next round as follows: K2, P2, K2, P2, then stocking st until 6 sts remain on round, AT THE SAME TIME dec 6-4-6-6-8-8 sts evenly on these stocking sts, finish with P2, K2 and P2 = 50-52-54-54-56-56 sts. Continue like this with stocking st and 14 rib sts mid under sleeve. When piece measures 13-12-11-12-11-14 cm inc 2 sts mid under sleeve (i.e. 1 st each side of rib section) – See INCREASING TIP! Repeat the inc on every 2.5-2.5-2.5-2-2-1.5 cm a total of 12-13-14-16-17-19 times = 74-78-82-86-90-94 sts. When piece measures 45 cm for all sizes cast off the 14 rib sts mid under sleeve = 60-64-68-72-76-80 sts. Put piece aside and knit the other sleeve. YOKE: Slip sleeves on the same circular needle as body piece where cast off for armhole = 282-306-334-366-398-430 sts. Work 2-3-4-2-3-4 cm stocking st (with front bands as before). AT THE SAME TIME after 1 cm stocking st dec 4-6-6-0-5-10 sts evenly – do not dec on front bands. Repeat the dec in Size L + XXL + XXXL after another 1-1-2 cm stocking st = 278-300-322-366-388-410 sts. Work next row as follows from RS: 7 front band sts as before, work M.1 (= 22 sts – see diagram for your size) a total of 12-13-14-16-17-18 times and finish with 7 front band sts as before. Continue pattern like this AT THE SAME TIME dec as shown in diagram. After M.1 there are 98-105-112-126-133-140 sts left on needle. ELEVATION MID BACK: Insert a marker mid on needle (i.e. in SIZE S + L + XL + XXXL between the 2 middle sts and in SIZE M + XXL in the middle st on needle = mid back). Beg from WS by marker and work K over K and P over P until 18 sts remain on needle (i.e. stop just before P2 as seen from WS), turn piece, slip first st, tighten thread and work row until 19 sts remain on needle (i.e. stop just before K2 as seen from RS). Turn piece, slip first st, tighten thread and work row until 25-25-25-32-32-32 sts remain on needle (i.e. stop just before P2 as seen from WS), turn piece, slip first st, tighten thread and work row until 26-26-26-33-33-33 sts remain (i.e. stop just before K2 as seen from RS). Turn piece, slip first st, tighten thread and work row until 32-32-32-46-46-46 sts remain on needle (i.e. stop just before P2 as seen from WS), turn piece, slip first st, tighten thread and work row until 33-33-33-47-47-47 sts remain ( i.e. stop just before K2 as seen from RS). Turn piece, slip first st, tighten thread and work row until 39-39-39-52-52-52 sts remain on needle (i.e. stop just before P2 as seen from WS), turn piece, slip first st, tighten thread and work row until 40-40-40-53-53-53 sts remain (i.e. stop just before K2 as seen from slip from RS. SIZE S + M + L finish here, cut the thread. SIZE XL + XXL + XXXL: Turn piece, slip first st, tighten thread and work row until 59 sts remain on needle (i.e. stop just before P2 as seen from WS), turn piece, slip first st, tighten thread and work row until 60 sts remain (i.e. stop just before K2 as seen from RS), cut the thread. NECKLINE: Change to circular needle size 3.5 mm. Beg from RS and K 2 rows on all sts (work front bands as before), AT THE SAME TIME on last row inc 11-10-9-4-3-2 sts evenly = 109-115-121-130-136-142 sts. Continue in rib as follows from RS: 7 front band sts as before, * K2, P1 *, repeat from *-* until 9 sts remain, finish with K2 and 7 front band sts as before. Continue like this until neckline measures 4-5 cm. Cast off with K over K and P over P. ASSEMBLY: Sew openings under sleeves. Sew on buttons. |
||||||||||||||||||||||||||||||||||||||||
Diagram explanations |
||||||||||||||||||||||||||||||||||||||||
|
||||||||||||||||||||||||||||||||||||||||
 |
||||||||||||||||||||||||||||||||||||||||
 |
||||||||||||||||||||||||||||||||||||||||
Have you finished this pattern?Tag your pictures with #dropspattern #icestormcardigan or submit them to the #dropsfan gallery. Do you need help with this pattern?You'll find 14 tutorial videos, a Comments/Questions area and more by visiting the pattern on garnstudio.com. © 1982-2026 DROPS Design A/S. We reserve all rights. This document, including all its sub-sections, has copyrights. Read more about what you can do with our patterns at the bottom of each pattern on our site. |
||||||||||||||||||||||||||||||||||||||||






With over 40 years in knitting and crochet design, DROPS Design offers one of the most extensive collections of free patterns on the internet - translated to 17 languages. As of today we count 333 catalogues and 12525 patterns translated into English (UK/cm). 12525
We work hard to bring you the best knitting and crochet have to offer, inspiration and advice as well as great quality yarns at incredible prices! Would you like to use our patterns for other than personal use? You can read what you are allowed to do in the Copyright text at the bottom of all our patterns. Happy crafting!
Post a comment to pattern DROPS 121-29
We would love to hear what you have to say about this pattern!
If you want to leave a question, please make sure you select the correct category in the form below, to speed up the answering process. Required fields are marked *.