
Popular categories
Looking for a yarn?


Comments / Questions (10)
![]() Anita wrote:
Anita wrote:
Hallo Ik begrijp nld 1 niet van deze muts met het plaatsen van de markeerder kom inde war er staat in de 2e dat begrijp ik niet Dank u voor antwoord
05.01.2026 - 16:15DROPS Design answered:
Dag Anita,
In de eerste naald herhaal je wat tussen de sterretjes staat. Hierdoor plaats je 3 markeerdraden in totaal. Op de tweede naald meerder je naast de steken die markeerdraden bevatten.
05.01.2026 - 19:20
![]() Huguette wrote:
Huguette wrote:
Est-ce-que je peux tricoter ce modèle en lainebaby merino merci
13.02.2025 - 20:28DROPS Design answered:
Bonjour Huguette, vous pouvez tout à fait utiliser Baby Merino, doublez la quantité Alpaca pour savoir la quantité correspondante en Baby Merino -pour votre taille - retrouvez notre convertisseur, ici. Bon tricot!
14.02.2025 - 09:21
![]() Huguette wrote:
Huguette wrote:
Bonjour, dois-je faire les diminutions toute à gauche ou une à droite et l'autre à gauche du marqueur merci beaucoup
21.01.2025 - 20:12DROPS Design answered:
Bonjour Huguette, vous devez diminuer de chaque côté de chaque marqueur, comme indiqué sous DIMINUTIONS:, retrouvez cette façon de faire (pour une manche dans la vidéo, mais la technique sera la même ici) dans cette vdiéo, vous avez 3 marqueurs, vous diminuez ainsi 2 mailles à chaque marqueur, soit 6 mailles à chaque tour de diminutions. Bon tricot!
22.01.2025 - 09:11
![]() Cristina wrote:
Cristina wrote:
Non avevo letto tutto, ho capito
08.12.2024 - 19:47
![]() Cristina wrote:
Cristina wrote:
Perché il lavoro con alpaca deve misurare 34-35 cm mentre in kid silk 24-25 cm? C'è per caso un errore di scrittura?
08.12.2024 - 19:38
![]() Dozy wrote:
Dozy wrote:
Hi! Do you perhaps have videos of the increases and decreases done in this pattern specifically? I’m trying to picture how it looks. Is there supposed 1 stitch in between each increase or 3? Thanks
12.04.2024 - 21:17DROPS Design answered:
Dear Dozy, you can find all the relevant videos we have for each pattern, if you click on the word "videos just below the title line, above the patern text itself. Happy Crafting!
13.04.2024 - 00:10
![]() Anne Piotet wrote:
Anne Piotet wrote:
Hi I think this model is fantastic and I am nearly at the end of it ( with other garns…) but how do you finish it properly? The instructions say:‘[Cut the strand, pull it through the remaining stitches, tighten ]and fasten well on the wrong side.’ ? When arriving at the end we have a closed surface ( like the exterior of a sausage, closed on both ends!): it is not possible to have access anymore at the wrong size:-)
09.01.2024 - 10:23DROPS Design answered:
Dear Mrs Piotet, there was a mistake in the English pattern, the strands should be weaved in from right side. Happy knitting!
10.01.2024 - 14:15
![]() Renée Azéma wrote:
Renée Azéma wrote:
Bonjour, pour faire le bonnet, les explications disent : poser un marqueur dans la maille. Je ne vois pas comment faire, car les marqueurs ronds se mettent devant la maille ou derrière la maille, sur l'aiguille ou le fil de l'aiguille circulaire. Ou alors, faut-il entourer la maille avec un autre fil de couleur comme c'est expliqué dans votre vidéo "around...". Merci de votre aide.
10.04.2023 - 08:43DROPS Design answered:
Bonjour Mme Azéma, si vous n'avez effectivement pas de marqueur qui peuvent être accrochés sur une maille , vous pouvez alors utiliser un fil marqueur et l'enrouler autour de la maille, comme dans cette vidéo. Bon tricot!
11.04.2023 - 14:05
![]() Veronica wrote:
Veronica wrote:
This question is not related to this pattern; I could not find any other way of making contact. Can you tell me what the yarn thickness will be, and what needles to use, if I work with one strand of Alpaca wool and one strand of Alpaca silk brushed? Thanking you.
16.11.2022 - 15:06DROPS Design answered:
Dear Veronica, you might get a tension between 15-12 sts depending on the desired texture - check out some ideas of patterns with that tension including some with Alpaca + Brushed Alpaca Silk. Happy knitting!
16.11.2022 - 15:46
![]() Nora wrote:
Nora wrote:
Hallo, werden beiden Seiten der Mütze (Alpaca und Kids-Silk) einfädrig gestrick oder zweifädrig? LG
15.11.2022 - 13:44DROPS Design answered:
Liebe Nora, Alpaca und Kid-Silk werden jeweils einfädig gestrickt, zuerst stricken Sie mit 1 Faden Alpaca dann mit 1 Faden Kid-Silk. Viel Spaß beim stricken!
15.11.2022 - 14:26
|
|
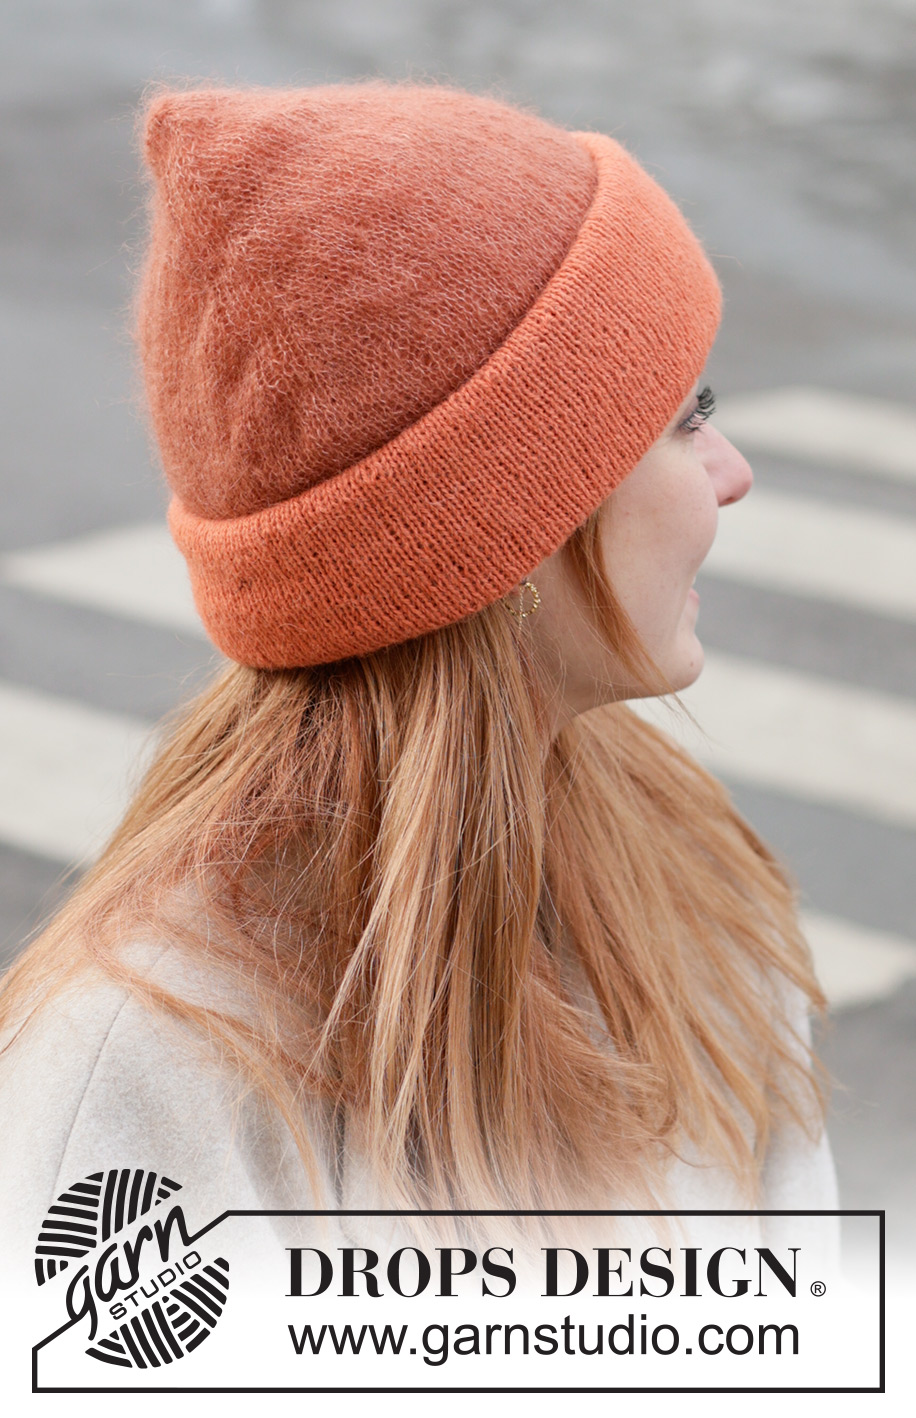
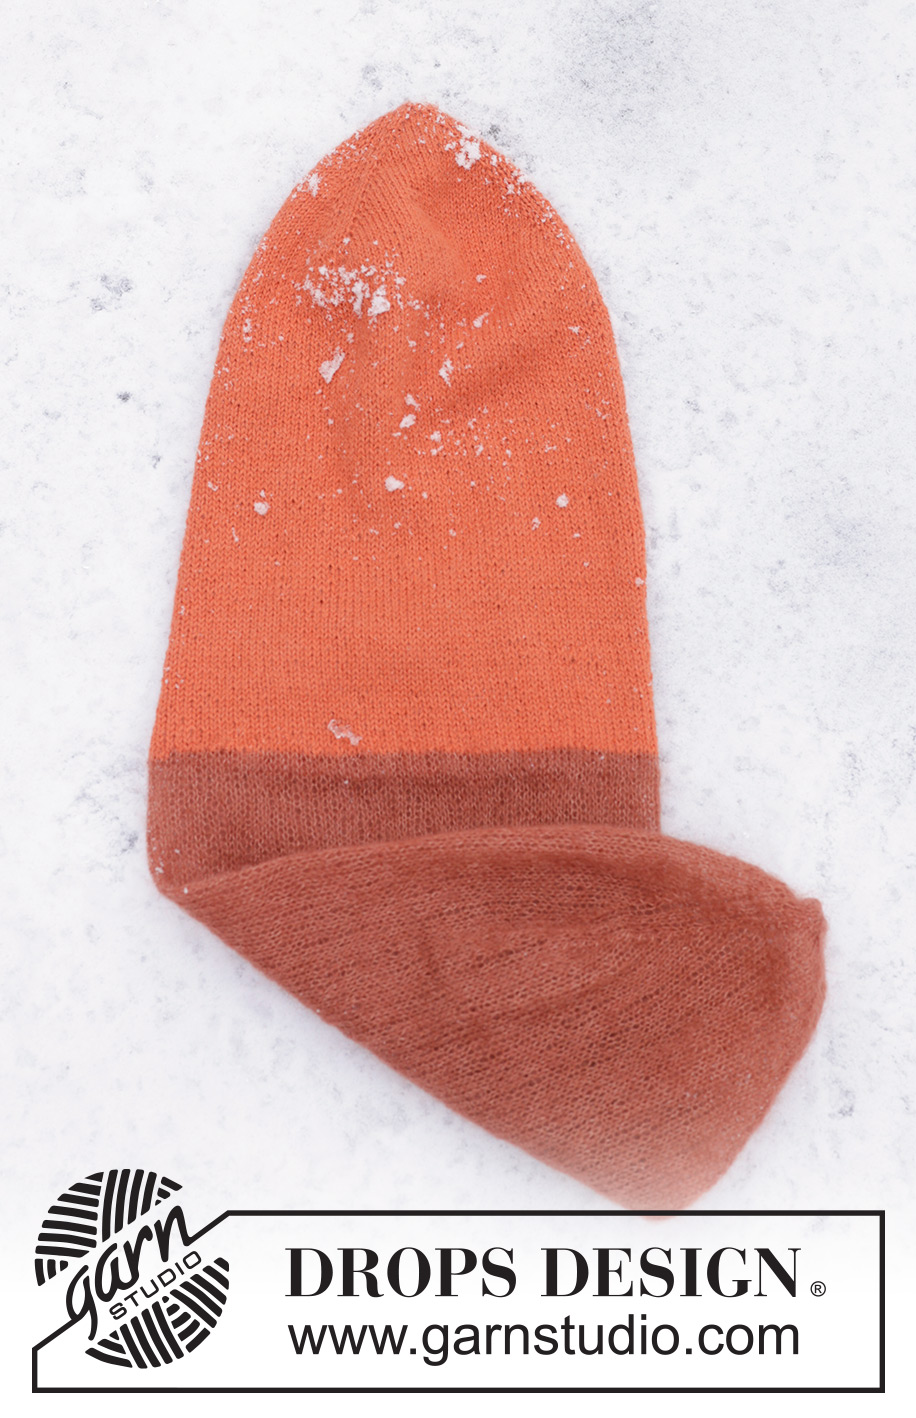
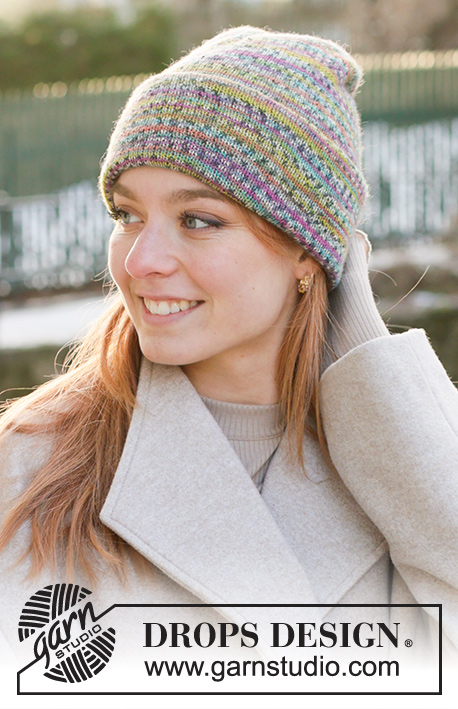
Mapel Hat#mapelhat |
|
 |
 |
Knitted double-sided hat / hipster-hat in DROPS Alpaca and DROPS Kid-Silk. The piece is worked in stocking stitch.
DROPS 234-50 |
|
|
------------------------------------------------------- EXPLANATIONS FOR THE PATTERN: ------------------------------------------------------- INCREASE TIP: Increase on each side of the marker-stitch as follows: Work until there is 1 stitch left before the marker-stitch, make 1 yarn over, knit 3 (marker-stitch is the middle stitch), 1 yarn over (2 stitches increased). On the next round knit the yarn overs twisted to avoid holes. DECREASE TIP: Decrease on each side of the marker-stitch as follows: Work until there are 3 stitches left before the marker-stitch, slip 1 stitch as if to knit, knit 1 and pass the slipped stitch over the knitted stitch, knit 3 (marker-stitch is the middle stitch), knit 2 together. ------------------------------------------------------- START THE PIECE HERE: ------------------------------------------------------- HAT - SHORT OVERVIEW OF THE PIECE: The hat is worked in the round with double pointed needles; change to circular needle when there are enough stitches. The hat starts with increases and finishes with decreases, changing yarns halfway (it will look like a tube, tightened at each end). This tube is pushed into itself, so the hat is double and can be used inside out. When the bottom of the hat is folded up, the inside yarn will show on the fold-up. HAT: Cast on 12-12 stitches with double pointed needles size 3.5 mm and DROPS Alpaca. ROUND 1: * Knit 3 and insert a marker in the second of these 3 stitches, 1 yarn over, knit 1, 1 yarn over *, work from *-* to the end of the round (3 marker-stitches). ROUND 2: Knit, yarn overs knitted twisted = 18-18 stitches. Continue with stocking stitch and increase 1 stitch on each side of all 3 marker-stitches – read INCREASE TIP (= 6 stitches increased). Increase like this every 2nd round a total of 17-18 times = 120-126 stitches. The piece measures approx. 11-12 cm from the cast-on edge. REMEMBER THE KNITTING TENSION! Allow the markers to follow your work onwards; they are used again later. NOTE! It is important to close the hole in the cast-on edge now. Use a needle and tack through the stitches, tighten and fasten the strand well on the wrong side. Continue with stocking stitch until the piece measures 34-35 cm. Half the hat is finished. Change to DROPS Kid-Silk and continue with stocking stitch for a further 23-24 cm. NOTE! Fasten the strands well after changing yarns as they are difficult to fasten later. Now decrease 1 stitch on each side of all 3 marker-stitches – read DECREASE TIP (= 6 stitches decreased). Decrease like this every 2nd round a total of 17-18 times = 18-18 stitches. Work the next round as follows: * Knit 2 together, knit 1 *, work from *-* to the end of the round = 12-12 stitches. Cut the strand, pull it through the remaining stitches, tighten and fasten well on the right side. Push one end of the hat into the other, so it is double. It can be used inside-out. Fold the bottom 10 cm up to the right side. |
|
Have you finished this pattern?Tag your pictures with #dropspattern #mapelhat or submit them to the #dropsfan gallery. Do you need help with this pattern?You'll find 12 tutorial videos, a Comments/Questions area and more by visiting the pattern on garnstudio.com. © 1982-2026 DROPS Design A/S. We reserve all rights. This document, including all its sub-sections, has copyrights. Read more about what you can do with our patterns at the bottom of each pattern on our site. |
|


With over 40 years in knitting and crochet design, DROPS Design offers one of the most extensive collections of free patterns on the internet - translated to 17 languages. As of today we count 324 catalogues and 12290 patterns translated into English (UK/cm). 12290
We work hard to bring you the best knitting and crochet have to offer, inspiration and advice as well as great quality yarns at incredible prices! Would you like to use our patterns for other than personal use? You can read what you are allowed to do in the Copyright text at the bottom of all our patterns. Happy crafting!
Post a comment to pattern DROPS 234-50
We would love to hear what you have to say about this pattern!
If you want to leave a question, please make sure you select the correct category in the form below, to speed up the answering process. Required fields are marked *.