
Categorías populares
¿Buscas un hilo?


Comentarios / Preguntas (80)
![]() Sylvie escribió:
Sylvie escribió:
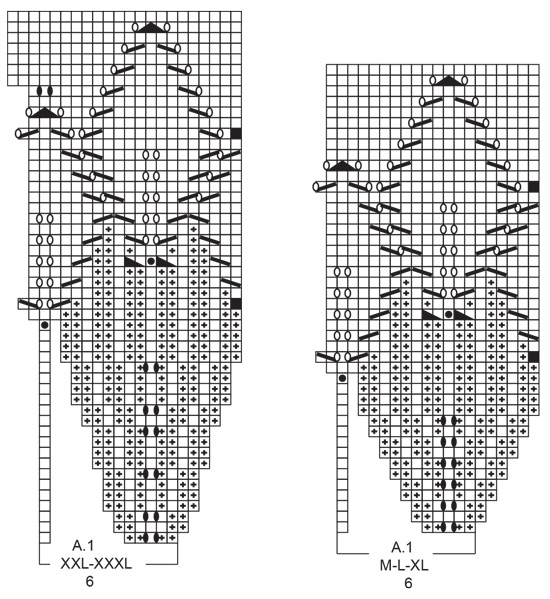
Bonjour,je fais le modèle Large. Dans la A.1, ligne 25 ,le grand triangle est sur 4 mailles et moi j’en prends 3, 1 glissée, 2 ensemble, passer la maille glissée sur les 2 ensemble,alors à la fin du motif, j’ai 2 mailles en trop. Expliquez-moi comment faire, merci
04.05.2024 - 15:55DROPS Design respondió:
Bonjour Sylvie, sauf erreur de ma part, il n'y a pas de triangle sur 4 mailles dans A.1, quelle taille tricotez-vous que nous puissions vérifier encore une fois?
06.05.2024 - 08:09
![]() Sylvie escribió:
Sylvie escribió:
Je ne comprends pas le diagramme À.1.La première ligne indique 6 mailles et j’en compte 8 ,4 envers,2 endroit et 2 jetées. Me donner un suivi SVP
29.04.2024 - 17:00DROPS Design respondió:
Bonjour Sylvie, au tout 1er rang du diagramme A.1 on répète A.1 sur 6 mailles, mais effectivement, comme on fait 2 jetés, on aura 8 mailles dans chaque A.1 à la fin de ce tour. Le 1er tour de A.1 va se tricoter ainsi: *2 m env, 1 jeté, 1 m end,1 jeté, 2 m env, 1 m end*, répétez de *à* tout le tour. Bon tricot!
30.04.2024 - 07:41
![]() Vaillant Isabelle escribió:
Vaillant Isabelle escribió:
Bonsoir, voilà je ne comprend pas bien dans les explications on nous demande de décaler le motif ,mais c est tout les motifs ? Je suis désolée je n arrive pas a comprendre . Merci par avance Isabelle.
28.03.2024 - 23:05DROPS Design respondió:
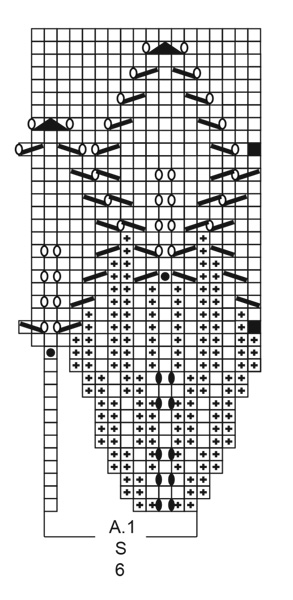
Bonjour Mme Vaillant, procédez comme indiqué par le symbole du carré noir dans la légende: glissez la 1ère maille du tour sur l'aiguille droite, sans la tricoter, et continuez le diagramme comme indiqué: la dernière maille de chaque motif se tricote avec la 1ère maille du motif suivant, autrement dit, la 1ère maille du tour sera tricotée avec la dernière diminution du dernier motif du tour. Bon tricot!
02.04.2024 - 14:00
![]() Anja escribió:
Anja escribió:
Hej, Hvilken størrelse pinde skal jeg lave strikkeprøven på? Mvh Anja
15.02.2024 - 11:05DROPS Design respondió:
Hei Anja. Bruk den pinnestr. som selve plagget strikkes i (ikke vrangbord). Strikkefastheten er oppgitt i glattstrikk. På denne modellen er det pinne 4 :) mvh DROPS Design
15.02.2024 - 12:15
![]() Anna-Lena Karlsson escribió:
Anna-Lena Karlsson escribió:
Har en fråga om varv 23. 20 m på varvet innan. Tolkar det som att, lyft en maska utan att sticka den, följ mönstret. Men jag får inte maskorna att räcka i slutet? Ska jag inte sticka en rät mellan omslagen i slutet? Saknas en maska för sista sticka ihop maskor i slutet av rapporten? Hoppas ni förstår vad jag menar😊 Tacksam för hjälp
02.09.2023 - 09:21DROPS Design respondió:
Hei Anna-Lena Når du har 1 maske igjen på omgangen, skal denne masken og den masken du løftet over i begynnelsen av omgangen strikkes sammen (= ta 1 maske løs av pinnen som om den skulle strikkes rett, strikk 1 rett, løft den løse masken over masken som ble strikket). Da skal du ha nok masker. mvh DROPS Design
11.09.2023 - 13:59
![]() Pam Monty escribió:
Pam Monty escribió:
En las referencias del diagrama en español, para los 3 puntos en el mismo punto dice \"2 puntos disminuidos \". Es incorrecto debería ser \"2 puntos aumentados\".
29.08.2023 - 09:39
![]() Amanda Ellynor Kristensen escribió:
Amanda Ellynor Kristensen escribió:
Hejsa, Jeg skal til at starte mønster A.1 i M, hvor der er en masse hvide hvide feltet som ikke er “tegnet op” som hvis feltet men ligner blot “luft”. Skal disse forstås som hvide felter, altså retstrik eller hvorledes skal det forståes. På forhånd mange tak og tak for gode opskrifter Mvh Amanda
27.07.2023 - 11:05DROPS Design respondió:
Hei Amanda. Nei, der er det ingen maske, hopp frem til neste blanke rute. Og når du har økt nok masker vil diagrammet komme sammen. mvh DROPS Design
27.07.2023 - 14:59
![]() Mitzi Russell escribió:
Mitzi Russell escribió:
Please help! Doing size M and completed round 19 with k2tgether, k, y.o., k, y.o., k. Round 20 starts. with 3 knits, but I only have 2 knits?? The pattern so far seems to be aligned.
18.07.2023 - 15:49DROPS Design respondió:
Dear Mitzi, round 20 is worked similarly to round 18, where you need to take into account that the pattern has been displaced. The last stitch on round 19 compensates for the first stitch on round 20 and corresponds to the blank square seen at the beginning of round 20. So, in the first repeat of round 20, the first knit stitch is the last knit stitch on the previous round and then knit 2, purl 2 and continue with the chart . Then, on the second repeat, you work the first knit stitch over the last stitch of the previous repeat in the previous round. Happy knitting!
20.07.2023 - 14:11
![]() Breige McShane escribió:
Breige McShane escribió:
Exactly as you said - you finish row 17 with the slip stitch. (which is the 1st purl stitch.) Then on row 18 you have the 2nd purl stitch at the beginning of the row?????You show beginning of row with a knit stitch. I am stuck and do not know how I can begin row 18 with a knit
17.07.2023 - 16:50DROPS Design respondió:
Dear Breige, round 17 is finished with k2tog, where you work the together the last stitch on the round and the slipped stitch (previous first stitch of the round). This last stitch will look like a knit stitch and corresponds to the blank square seen at the beginning of round 18. So, in the first repeat of round 18, you don't have to work the first knit stitch, you immediately start on the purl stitch over the purl stitch. Then, on the second repeat, you work the knit stitch over the last stitch of the previous repeat in the previous round. Happy knitting!
20.07.2023 - 14:05
![]() Breige McShane escribió:
Breige McShane escribió:
Truly I am not getting this and need a very explicit explanation. I have started row 17 with a slip stich which is the first purl stitch. Then I start A1 with the second purl stitch. I complete all of A1 finishing with the first slipped stitch which is the first purl stitch and then I have the second purl stitch to start the row. You show the next row starting with l knit stitch and then one purl stitch.
16.07.2023 - 16:55DROPS Design respondió:
Dear Breige, we have slipped the first stitch in order to work the decrease at the end of the last repeat of A.1, where you will work ssk (slip stitch, knit 1 and pass over slipped stitch over knit stitch). Then, we continue the next row as indicated: knit over purl and purl over knit.
17.07.2023 - 13:49
|
|||||||||||||||||||||||||||||||
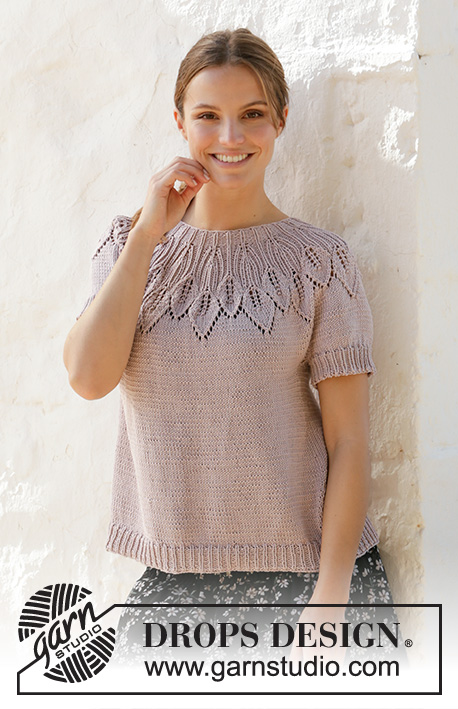
Lavender Charm Top#lavendercharmtop |
|||||||||||||||||||||||||||||||
 |
 |
||||||||||||||||||||||||||||||
Top a punto con canesú redondo en DROPS Muskat. La prenda está realizada de arriba abajo con el patrón de hojas y patrón de calados. Talla: S-XXXL
DROPS 213-22 |
|||||||||||||||||||||||||||||||
|
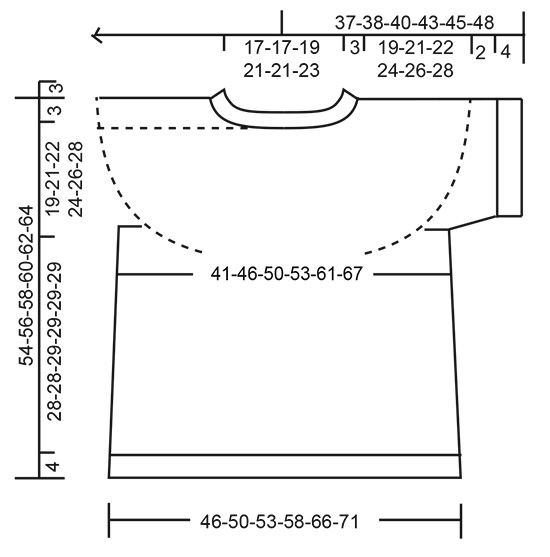
EXPLICACIONES PARA REALIZAR LA LABOR: ---------------------------------------------------------- PATRÓN: Ver diagrama A.1. Elegir el diagrama correspondiente a tu talla. TIP PARA LOS AUMENTOS (aplicar a los lados del cuerpo): Trabajar hasta que queden 2 puntos antes del marcapuntos, 1 hebra, 4 derechos (el marcapuntos se encuentra en medio de estos 4 puntos), 1 hebra. En la siguiente vuelta trabajar las hebras de derecho retorcido para evitar que se formen agujeros, Después trabajar los nuevos puntos en punto jersey. TIP PARA LAS DISMINUCIONES (aplicar a las mangas): Disminuir 1 punto a cada lado del marcapuntos como sigue: Trabajar hasta que queden 3 puntos antes del marcapuntos y trabajar 2 puntos juntos de derecho, 2 derechos ( el marcapuntos se encuentra entre estos 2 puntos), deslizar 1 punto como de derecho, 1 derecho, pasar el punto deslizado sobre el punto trabajado. TIP PARA EL REMATE: Para evitar que el borde de remate quede tenso usar agujas de mayor tamaño. Si sigue quedando tenso, hacer 1 hebra después de aprox. cada 4º punto y cerrarlos como puntos normales. ---------------------------------------------------------- COMENZAR LA LABOR AQUÍ: ---------------------------------------------------------- TOP - RESUMEN DE LA LABOR: Trabajar el escote y el canesú en redondo con una aguja circular desde el centro de la espalda, de arriba abajo. Ahora dividir el canesú para el cuerpo y las cenefas de las mangas y continuar el cuerpo en redondo con una aguja circular, de arriba abajo. Trabajar las cenefas de las mangas en redondo y con agujas de doble punta, de arriba abajo. ESCOTE: Montar 96-96-102-114-114-120 puntos con una aguja circular de 3 mm con Muskat. Trabajar 1 vuelta de derecho. Trabajar el elástico (= 2 reveses/ 1 derecho). Cuando la labor mida 3 cm, cambiar a una aguja circular de 4 mm. Insertar 1 marcapuntos al inicio de la vuelta en el centro de la espalda, medir el canesú desde este marcapuntos! CANESÚ: Trabajar A.1 (= 6 puntos) en redondo sobre todos los puntos (= 16-16-17-19-19-20 veces en horizontal). RECORDAR MANTENER LA TENSIÓN DEL TEJIDO! Cuando se haya trabajado A.1 1 vez en vertical, hay 288-320-340-380-418-440 puntos en la aguja y la labor ahora mide aprox.14-16-16-16-18-18 cm desde el marcapuntos. Trabajar de derecho en redondo hasta que la labor mida 19-21-22-24-26-28 cm desde el marcapuntos Ahora dividir la labor para el cuerpo y las mangas como sigue: Trabajar los primeros 40-45-49-53-60-65 puntos (= mitad de la espalda), deslizar los siguientes 63-69-72-84-89-90 puntos a un gancho auxiliar para las cenefas de la manga y montar 6-6-6-6-8-10 puntos nuevos bajo la manga, trabajar los siguientes 81-91-98-106-120-130 puntos (= delantero), deslizar los siguientes 63-69-72-84-89-90 puntos a un gancho auxiliar para la cenefa de la manga y montar 6-6-6-6-8-10 puntos nuevos bajo la manga, trabajar los últimos 41-46-49-53-60-65 puntos (= mitad de la espalda). CUERPO: = 174-194-208-224-256-280 puntos. Insertar 1 marcapuntos en medio de los 6-6-6-6-8-10 puntos cada manga (= en los lados del cuerpo). Hay 87-97-104-112-128-140 puntos entre los marcapuntos en el delantero y la espalda. Mover los marcapuntos hacia arriba a la vez que se trabaja; deberían utilizarse para aumentar más tarde en los lados. Trabajar todos los puntos de derecho. Cuando la labor mida 4 cm desde la división, aumentar 1 punto a cada lado de ambos marcapuntos - leer TIP PARA LOS AUMENTOS (= 4 puntos aumentados). Aumentar de esta manera cada 4 cm 5-4-4-5-5-5 veces en total = 194-210-224-244-276-300 puntos. Cuando la labor mida 28-28-29-29-29-29 cm desde la división, aumentar 13-12-13-14-15-15 puntos repartidos = 207-222-237-258-291-315 puntos. Cambiar a una aguja circular de 3 mm y trabajar el elástico (= 1 derecho/ 2 reveses) 4 cm. Rematar de derecho - leer TIP PARA EL REMATE. La labor mide 32-32-33-33-33-33 cm desde donde se hizo la división. CENEFA DE LA MANGA: Deslizar los 63-69-72-84-89-90 puntos desde el gancho auxiliar a un lado de la labor en agujas de doble punta de 4 mm y recoger además 1 punto en cada uno de los 6-6-6-6-8-10 puntos nuevos montados bajo la manga = 69-75-78-90-97-100 puntos. Trabajar en punto jersey en redondo 2 cm. Cambiar a agujas de doble punta de 3 mm y trabajar el elástico (= 1 derecho/1 revés) y AL MISMO TIEMPO disminuir, en la primera vuelta, 0-0-0-0-1-1 punto = 69-75-78-90-96-99 puntos. Cerrar cuando el elástico mida 4 cm con derecho sobre derecho y revés sobre revés. Trabajar la cenefa para la otra manga de la misma manera. |
|||||||||||||||||||||||||||||||
Explicaciones del diagrama |
|||||||||||||||||||||||||||||||
|
|||||||||||||||||||||||||||||||
 |
|||||||||||||||||||||||||||||||
 |
|||||||||||||||||||||||||||||||
 |
|||||||||||||||||||||||||||||||
¿Terminaste este patrón?Entonces, etiqueta tus fotos con #dropspattern #lavendercharmtop o envíalas a la galería #dropsfan. ¿Necesitas ayuda con este patrón?Encontrarás 28 videos tutoriales, un espacio para comentarios/preguntas y más visitando la página del patrón en garnstudio.com © 1982-2026 DROPS Design A/S. Todos los derechos reservados. Este documento, incluyendo todas sus sub-secciones, está protegido por los derechos de autor (copyright). Lee más acerca de lo que puedes hacer con nuestros patrones en la parte de abajo de cada patrón de nuestro sitio. |
|||||||||||||||||||||||||||||||


Con más de 40 años en el diseño de modelos de punto y de ganchillo, DROPS Design ofrece una de las más vastas colecciones de patrones gratuitos en el internet - traducidos en 17 idiomas. Al día de hoy, contamos con 324 catálogos y 12290 patrones - de los cuales 11685 están traducidos en español.
Nosotros trabajamos con mucho esmero para brindarte lo mejor que las labores de punto y ganchillo tienen para ofrecer,inspiración y consejos, así como hilos de magnífica calidad a precios increíbles! Te gustaría usar nuestros patrones para otro fin además del uso personal? Puedes leer acerca de lo que estás permitida a hacer en el texto de Copyright en la parte de abajo de todos nuestros patrones. Felices labores!
Escribe un comentario sobre DROPS 213-22
¡Nos encantaría saber qué piensas acerca de este patrón!
Si quieres escribir una pregunta referente al patrón, por favor asegúrate de elegir la categoría correcta en el formulario debajo, para acelerar el proceso de respuesta. Los campos obligatorios están marcados con un *.