
Categorías populares
¿Buscas un hilo?


Comentarios / Preguntas (80)
![]() Luhaib escribió:
Luhaib escribió:
I didn’t quite understand the explanation for the stitch (work 3 stitches in stitch as follows: Knit the stitch but wait to drop the stitch off the needle, make 1 yarn over on right needle and knit the stitch 1 more time, then drop the stitches of the needle = 3 stitches (= 2 stitches increased). Is there a video tutorial for this stitch? Or a name for it I could search YouTube maybe?
17.08.2025 - 19:54DROPS Design respondió:
Hi Mrs Luhaib, please see the video HERE. Happy knitting!
17.08.2025 - 21:03
![]() Kathrin escribió:
Kathrin escribió:
Ich bin gerade dabei den Pulli von oben nach unten zu stricken. Das Muster A 1 habe ich nun bis zur 12 Runde gestrickt. In der letzten Reihe sind durch Umschläge nochmal 2 Maschen dazu gekommen. In der nächsten Runde tauchen diese nicht mehr auf und dafür am Rand jeweils 1 Masche mehr. Nehme ich am Anfang der Runde eine Masche zu komme ich trotzdem nicht auf eine Übereinstimmung der Runde vorher mit den Maschen in der neuen Runde. Und was ist mit den Umschlägen? Wie geht's weiter?
12.07.2025 - 22:17DROPS Design respondió:
Liebe Kathrin, denken Sie daran, eine Markierung zwischen jedem Rapport in der Breite einzusetzen, so können Sie jeweils die Maschenanzahl prüfen. Wenn Sie eine unterschiedliche Maschenanzahl in jedem A.1 haben, teilen Sie bitte gerne die gestrickte Größe, so können wir auch mal weiter schauen. Viel Spaß beim Stricken!
24.07.2025 - 14:14
![]() Michelle Dumas escribió:
Michelle Dumas escribió:
Désolée j’ai oublier de vous dire la grandeur , c’est xxl
22.04.2025 - 19:44
![]() Michelle Dumas escribió:
Michelle Dumas escribió:
Bonjour je ne comprend pas la fin du rg. 21 avec l’espace vide et le point suivant Merci à l’avance
22.04.2025 - 16:59DROPS Design respondió:
Bonjour Mme Dumas, vous devez décaler ce tour d'une maille: glissez la 1ère maille du tour sur l'aiguille droite, sans la tricoter, puis continuez le diagramme comme indiqué, quand il reste 1 maille de A.1, tricotez cette maille ensemble avec la m suivante (diminution à la fin du rang, celle qui "déborde"), continuez ainsi tout le tour et, à la fin du tour, tricotez la dernière maille et la 1ère maille du tour ensemble pour la dernière diminution du tour. Bon tricot!
23.04.2025 - 07:27
![]() Michelle Dumas escribió:
Michelle Dumas escribió:
Bonjour je ne comprend pas la fin du rg. 21 avec l’espace libre et le point suivant
22.04.2025 - 16:52
![]() Louane escribió:
Louane escribió:
Mon échantillon de laine ne correspond pas à "l'échantillon du modèle, du coup, je ne sais pas combien je dois monter de mailles. Mon échantillon de laine 24 mailles pour 10 cm alors que pour le patron c'est 21 mailles pour 10cm. Pour la taille xxxl, je doit monter combien de mailles pour le coup? Pourriez mod
29.01.2025 - 11:43DROPS Design respondió:
Bonjour Louane, soit vous utilisez des aiguilles plus grosses pour obtenir le bon échantillon, soit, si votre laine ne le permet pas, vous devrez tout recalculer les explications en fonction de votre propre tension, vous pouvez vous inspirer d'un modèle de tension similaire - cf ici pour les modèles de tension 26-23 mailles pour 10 cm. Bon tricot!
29.01.2025 - 13:53
![]() Elisa escribió:
Elisa escribió:
Buongiorno, avrei una domanda per il diagramma A1 taglia S. Devo iniziare la riga numero 15 e il diagramma dice " sulla prima ripetizione di A1 il giro viene spostato di 1 maglia come segue: passare la prima maglia sul ferro destro senza lavorarla, poi lavorare A1 in tondo. Ogni volta che inizio di nuovo il diagramma devo sempre passare la prima maglia del diagramma sul ferro destro senza lavorarla, o la sposto solo a inizio giro quindi una sola volta? Grazie mille!
12.08.2024 - 15:51
![]() Sabine escribió:
Sabine escribió:
Ich habe für diesen Pullover in Größe XXXL ein Knäuel Wolle mehr gebraucht als in der Anleitung angegeben.
27.06.2024 - 18:05
![]() Paola Zordan escribió:
Paola Zordan escribió:
Buongiorno, nello schema A1, alla riga 17, come devo iniziare? Se passo la prima maglia senza lavorarla, poi devo lavorare 1 rovescio e continuo il lavoro normalmente e poi tutte le ripetizioni sono complete (cioè con 2 rovesci, 1 dritto, 2 rovesci...)?
12.05.2024 - 23:23DROPS Design respondió:
Buonasera Paola, si, passa la prima maglia senza lavorarla, poi lavora il motivo come indicato, quindi con 1 rovescio, 1 diritto, 2 rovesci e così via. Buon lavoro!
15.05.2024 - 20:04
![]() Sylvie escribió:
Sylvie escribió:
Bonjour, ne tenez pas compte de ma dernière question, j’ai confondu 2 sigles.
04.05.2024 - 19:17
|
|||||||||||||||||||||||||||||||
Lavender Charm Top#lavendercharmtop |
|||||||||||||||||||||||||||||||
 |
 |
||||||||||||||||||||||||||||||
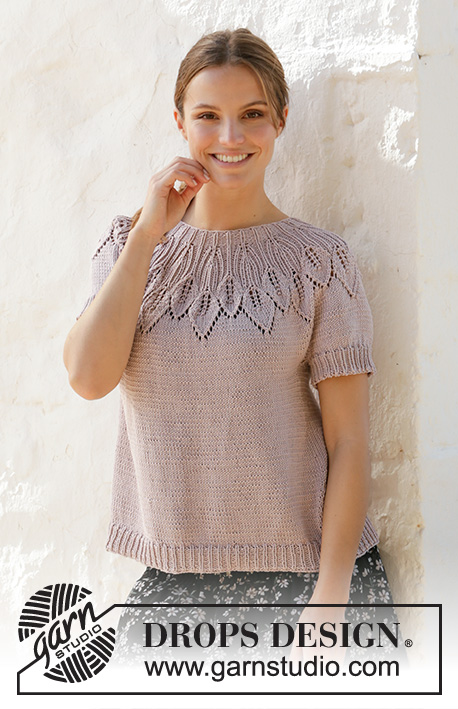
Top a punto con canesú redondo en DROPS Muskat. La prenda está realizada de arriba abajo con el patrón de hojas y patrón de calados. Talla: S-XXXL
DROPS 213-22 |
|||||||||||||||||||||||||||||||
|
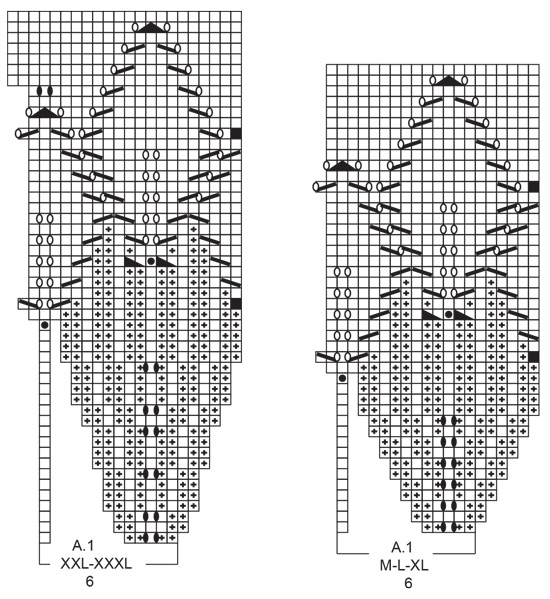
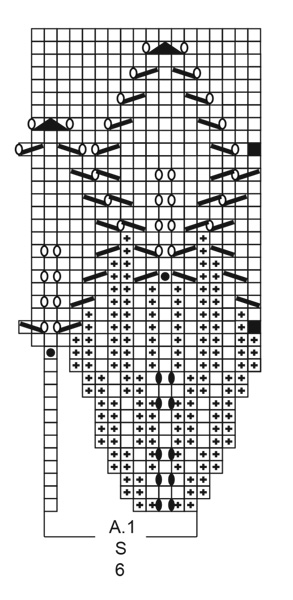
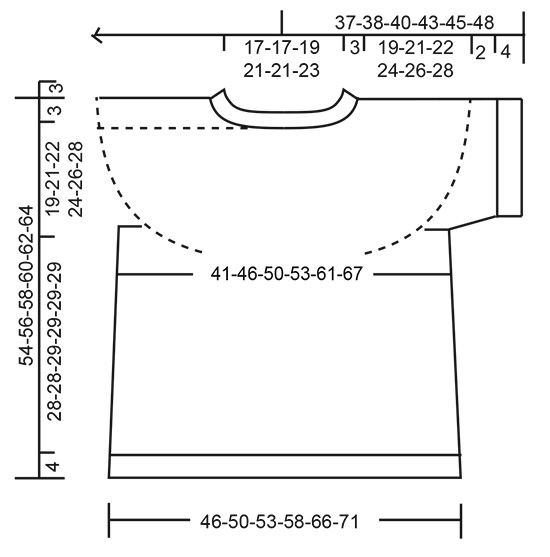
EXPLICACIONES PARA REALIZAR LA LABOR: ---------------------------------------------------------- PATRÓN: Ver diagrama A.1. Elegir el diagrama correspondiente a tu talla. TIP PARA LOS AUMENTOS (aplicar a los lados del cuerpo): Trabajar hasta que queden 2 puntos antes del marcapuntos, 1 hebra, 4 derechos (el marcapuntos se encuentra en medio de estos 4 puntos), 1 hebra. En la siguiente vuelta trabajar las hebras de derecho retorcido para evitar que se formen agujeros, Después trabajar los nuevos puntos en punto jersey. TIP PARA LAS DISMINUCIONES (aplicar a las mangas): Disminuir 1 punto a cada lado del marcapuntos como sigue: Trabajar hasta que queden 3 puntos antes del marcapuntos y trabajar 2 puntos juntos de derecho, 2 derechos ( el marcapuntos se encuentra entre estos 2 puntos), deslizar 1 punto como de derecho, 1 derecho, pasar el punto deslizado sobre el punto trabajado. TIP PARA EL REMATE: Para evitar que el borde de remate quede tenso usar agujas de mayor tamaño. Si sigue quedando tenso, hacer 1 hebra después de aprox. cada 4º punto y cerrarlos como puntos normales. ---------------------------------------------------------- COMENZAR LA LABOR AQUÍ: ---------------------------------------------------------- TOP - RESUMEN DE LA LABOR: Trabajar el escote y el canesú en redondo con una aguja circular desde el centro de la espalda, de arriba abajo. Ahora dividir el canesú para el cuerpo y las cenefas de las mangas y continuar el cuerpo en redondo con una aguja circular, de arriba abajo. Trabajar las cenefas de las mangas en redondo y con agujas de doble punta, de arriba abajo. ESCOTE: Montar 96-96-102-114-114-120 puntos con una aguja circular de 3 mm con Muskat. Trabajar 1 vuelta de derecho. Trabajar el elástico (= 2 reveses/ 1 derecho). Cuando la labor mida 3 cm, cambiar a una aguja circular de 4 mm. Insertar 1 marcapuntos al inicio de la vuelta en el centro de la espalda, medir el canesú desde este marcapuntos! CANESÚ: Trabajar A.1 (= 6 puntos) en redondo sobre todos los puntos (= 16-16-17-19-19-20 veces en horizontal). RECORDAR MANTENER LA TENSIÓN DEL TEJIDO! Cuando se haya trabajado A.1 1 vez en vertical, hay 288-320-340-380-418-440 puntos en la aguja y la labor ahora mide aprox.14-16-16-16-18-18 cm desde el marcapuntos. Trabajar de derecho en redondo hasta que la labor mida 19-21-22-24-26-28 cm desde el marcapuntos Ahora dividir la labor para el cuerpo y las mangas como sigue: Trabajar los primeros 40-45-49-53-60-65 puntos (= mitad de la espalda), deslizar los siguientes 63-69-72-84-89-90 puntos a un gancho auxiliar para las cenefas de la manga y montar 6-6-6-6-8-10 puntos nuevos bajo la manga, trabajar los siguientes 81-91-98-106-120-130 puntos (= delantero), deslizar los siguientes 63-69-72-84-89-90 puntos a un gancho auxiliar para la cenefa de la manga y montar 6-6-6-6-8-10 puntos nuevos bajo la manga, trabajar los últimos 41-46-49-53-60-65 puntos (= mitad de la espalda). CUERPO: = 174-194-208-224-256-280 puntos. Insertar 1 marcapuntos en medio de los 6-6-6-6-8-10 puntos cada manga (= en los lados del cuerpo). Hay 87-97-104-112-128-140 puntos entre los marcapuntos en el delantero y la espalda. Mover los marcapuntos hacia arriba a la vez que se trabaja; deberían utilizarse para aumentar más tarde en los lados. Trabajar todos los puntos de derecho. Cuando la labor mida 4 cm desde la división, aumentar 1 punto a cada lado de ambos marcapuntos - leer TIP PARA LOS AUMENTOS (= 4 puntos aumentados). Aumentar de esta manera cada 4 cm 5-4-4-5-5-5 veces en total = 194-210-224-244-276-300 puntos. Cuando la labor mida 28-28-29-29-29-29 cm desde la división, aumentar 13-12-13-14-15-15 puntos repartidos = 207-222-237-258-291-315 puntos. Cambiar a una aguja circular de 3 mm y trabajar el elástico (= 1 derecho/ 2 reveses) 4 cm. Rematar de derecho - leer TIP PARA EL REMATE. La labor mide 32-32-33-33-33-33 cm desde donde se hizo la división. CENEFA DE LA MANGA: Deslizar los 63-69-72-84-89-90 puntos desde el gancho auxiliar a un lado de la labor en agujas de doble punta de 4 mm y recoger además 1 punto en cada uno de los 6-6-6-6-8-10 puntos nuevos montados bajo la manga = 69-75-78-90-97-100 puntos. Trabajar en punto jersey en redondo 2 cm. Cambiar a agujas de doble punta de 3 mm y trabajar el elástico (= 1 derecho/1 revés) y AL MISMO TIEMPO disminuir, en la primera vuelta, 0-0-0-0-1-1 punto = 69-75-78-90-96-99 puntos. Cerrar cuando el elástico mida 4 cm con derecho sobre derecho y revés sobre revés. Trabajar la cenefa para la otra manga de la misma manera. |
|||||||||||||||||||||||||||||||
Explicaciones del diagrama |
|||||||||||||||||||||||||||||||
|
|||||||||||||||||||||||||||||||
 |
|||||||||||||||||||||||||||||||
 |
|||||||||||||||||||||||||||||||
 |
|||||||||||||||||||||||||||||||
¿Terminaste este patrón?Entonces, etiqueta tus fotos con #dropspattern #lavendercharmtop o envíalas a la galería #dropsfan. ¿Necesitas ayuda con este patrón?Encontrarás 28 videos tutoriales, un espacio para comentarios/preguntas y más visitando la página del patrón en garnstudio.com © 1982-2026 DROPS Design A/S. Todos los derechos reservados. Este documento, incluyendo todas sus sub-secciones, está protegido por los derechos de autor (copyright). Lee más acerca de lo que puedes hacer con nuestros patrones en la parte de abajo de cada patrón de nuestro sitio. |
|||||||||||||||||||||||||||||||


Con más de 40 años en el diseño de modelos de punto y de ganchillo, DROPS Design ofrece una de las más vastas colecciones de patrones gratuitos en el internet - traducidos en 17 idiomas. Al día de hoy, contamos con 324 catálogos y 12290 patrones - de los cuales 11685 están traducidos en español.
Nosotros trabajamos con mucho esmero para brindarte lo mejor que las labores de punto y ganchillo tienen para ofrecer,inspiración y consejos, así como hilos de magnífica calidad a precios increíbles! Te gustaría usar nuestros patrones para otro fin además del uso personal? Puedes leer acerca de lo que estás permitida a hacer en el texto de Copyright en la parte de abajo de todos nuestros patrones. Felices labores!
Escribe un comentario sobre DROPS 213-22
¡Nos encantaría saber qué piensas acerca de este patrón!
Si quieres escribir una pregunta referente al patrón, por favor asegúrate de elegir la categoría correcta en el formulario debajo, para acelerar el proceso de respuesta. Los campos obligatorios están marcados con un *.