
Categorías populares
¿Buscas un hilo?


Comentarios / Preguntas (80)
![]() Sharon Hunt escribió:
Sharon Hunt escribió:
Hello, how do you measure for length? My gauge is fine. But I cannot decide how to measure for length. If I lay flat I get 10 inches. If I hold up the project and measure the length is 11 inches. How does drops do this? Thanks
29.03.2026 - 11:18DROPS Design respondió:
Dear Mrs Hunt, then you might have to hang up your work to measure it to avoid getting the piece becoming too long when worn. Happy knitting!
07.04.2026 - 11:38
![]() Sharon Hunt escribió:
Sharon Hunt escribió:
H! In regards to my last question it appears that I figured it out. Thanks for all your help so far on all questions I post here.
22.03.2026 - 19:19
![]() Sharon Hunt escribió:
Sharon Hunt escribió:
Hello, Making XXXL, 120 sts on my needles after rib. Worked the first p2, yo k1 yo p2. When working the next set of sts in this round am I supposed to start with a k1 then p2. Just not working out if I follow pattern after working the first set of 5 sts. Starting over again after completing this section in XXL. Cannot recall having this problem. Thanks as always for your help.
22.03.2026 - 11:39DROPS Design respondió:
Dear Mrs Hunt, when working A.1 first row A.1 should fit over rib P2, K1 as you work on first round {P2, (YO), K1, (YO), P2, K1} so that you will increase ine very other K section of the rib you worked before. And you repeat the 6 sts repeat all the round. Can this help? Happy knitting!
23.03.2026 - 09:12
![]() Sharon Hunt escribió:
Sharon Hunt escribió:
Hi after working and completing the round with the misplaced stitch. The round above begins with knit st. Where as on my work the beg. starts with a purl. Thanks for your help with this problem. Not sure what am doing wrong.
10.03.2026 - 17:05DROPS Design respondió:
Dear Mrs Hunt, when displacing the round 1 st, this is done at the beginning of the round as this first stitch of the round will be worked together with the last stitch last repeat in the round; and as you work the last stitch each A.1 is worked together with the first stitch next A.1 = this stitch (the decrease), is now the first stitch next repeat, so the next round starts with the decrease, then P1, the round is displaced just there where there is the black square at the beg of the row, afterwards, you just start the rounds as before. Happy knitting!
11.03.2026 - 07:27
![]() Sharon Hunt escribió:
Sharon Hunt escribió:
Hi worked the increase from one to 2 stitches. Thinking back because it seems like this is a hole from the base of the stitch. Are the inc. sts knitted twisted. Thanks
09.03.2026 - 06:52DROPS Design respondió:
Hi Sharon, Yes, the yarn overs are worked twisted on the next round as described in the Increase Tip at the top of the pattern. Regards, Drops Team.
09.03.2026 - 06:58
![]() Lene escribió:
Lene escribió:
Har læst kommentarerne vedr. pind 23 og 24 og forstår at jeg skal strikke den sidste maske og den første maske som er taget løst af. Men nu er spørgsmålet så er denne maske nu den først på næste pind og ses som retmasken på pind 24? Og betyder det at vrangmaskerne stadigvæk skal følge hinanden ? Jeg strikker størrelse xxl
15.02.2026 - 10:08DROPS Design respondió:
Hei Lene. Ja, vrangmaskerne skal stadigvæk skal følge hinanden. Om du forstørrer bildet av toppen, ser du det også tydelig :) mvh DROPS Design
16.02.2026 - 11:07
![]() Christine escribió:
Christine escribió:
I hope you can assist. We do not have access to Drops Yarn in South Africa. I would like to knit this with a cotton/acrylic blend with a gauge of about 24sts on 4mm.....which size should I knit? On a lucky note, a friend brought me some Belle yarn and I am looking forward to trying the patterns using Belle.
02.11.2025 - 20:45
![]() Josette escribió:
Josette escribió:
In het telpatoon staan er maar vijf steken en in de beschrijving staat dat je zes steken moet breien, sorry dat versta ik niet, graag een antwoord groeten Josette
04.10.2025 - 16:17
![]() Diana Follett escribió:
Diana Follett escribió:
I could not find measurements for the sizes. Am I just overlooking them? Thank you and I love the patterns and can't wait to try your yarn.
29.09.2025 - 16:55DROPS Design respondió:
Hi Diana, There is a size chart at the bottom of the pattern, with all the measurements for the different sizes. Regards, Drops team.
30.09.2025 - 06:39
![]() Luhaib escribió:
Luhaib escribió:
I am not understanding this (on the first repeat of A.1, the round is displaced by 1 stitch as follows: Slip the first stitch onto the right needle without working it, then work A.1 in the round). Does it mean we do this slip stitch only on the first stitch at the beginning of the round or always when we reach the first stitch of the repeated round? I have worked this round with only the first stitch to be slipped then didn’t repeat it again but afterwards the stitches don’t align.
22.08.2025 - 19:00DROPS Design respondió:
Dear Mme Luhaib, this round should be displaced by 1 stitch as follows: slip the first stitch onto the right needle without working it, then work A.1 in the round, at the end of round knit the last stitch together with the first stitch in this round. You have to slip 1 stitch only once, at the beginning of the round. Happy knitting!
22.10.2025 - 09:57
|
|||||||||||||||||||||||||||||||
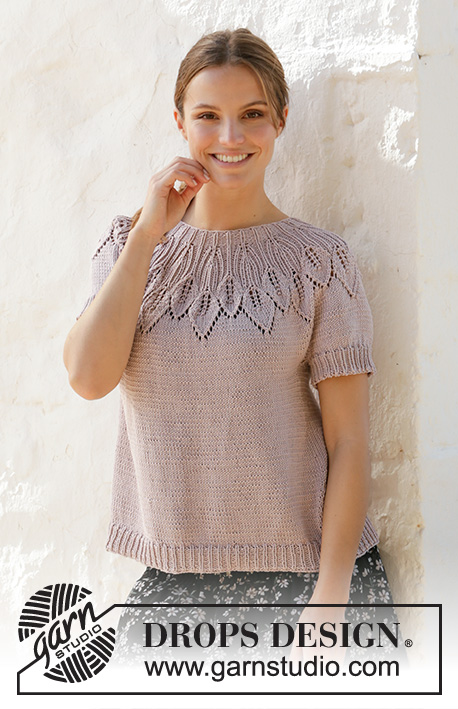
Lavender Charm Top#lavendercharmtop |
|||||||||||||||||||||||||||||||
 |
 |
||||||||||||||||||||||||||||||
Top a punto con canesú redondo en DROPS Muskat. La prenda está realizada de arriba abajo con el patrón de hojas y patrón de calados. Talla: S-XXXL
DROPS 213-22 |
|||||||||||||||||||||||||||||||
|
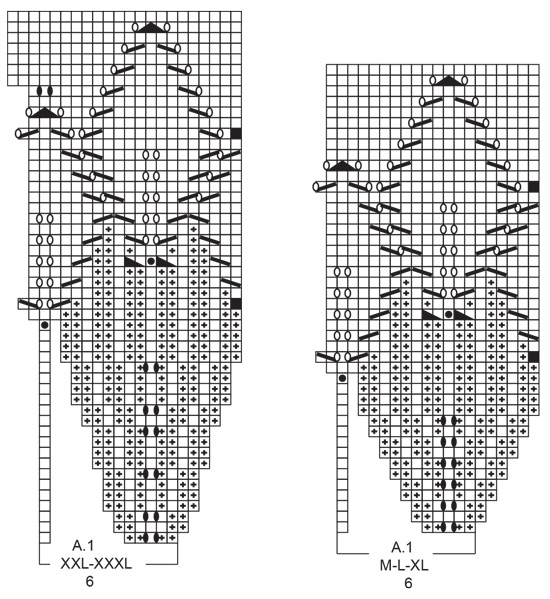
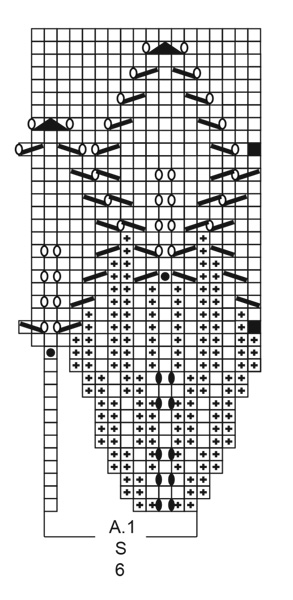
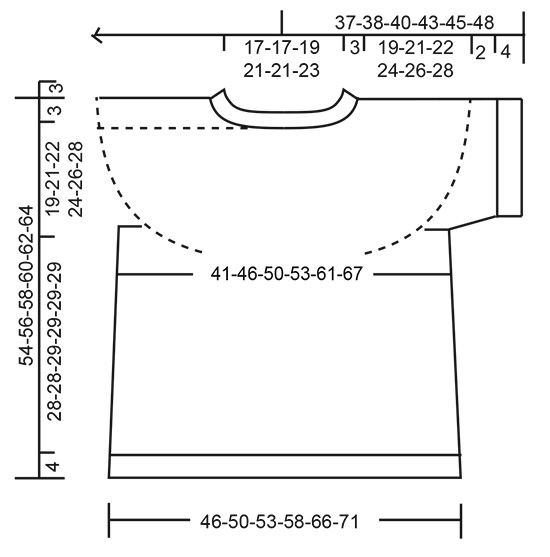
EXPLICACIONES PARA REALIZAR LA LABOR: ---------------------------------------------------------- PATRÓN: Ver diagrama A.1. Elegir el diagrama correspondiente a tu talla. TIP PARA LOS AUMENTOS (aplicar a los lados del cuerpo): Trabajar hasta que queden 2 puntos antes del marcapuntos, 1 hebra, 4 derechos (el marcapuntos se encuentra en medio de estos 4 puntos), 1 hebra. En la siguiente vuelta trabajar las hebras de derecho retorcido para evitar que se formen agujeros, Después trabajar los nuevos puntos en punto jersey. TIP PARA LAS DISMINUCIONES (aplicar a las mangas): Disminuir 1 punto a cada lado del marcapuntos como sigue: Trabajar hasta que queden 3 puntos antes del marcapuntos y trabajar 2 puntos juntos de derecho, 2 derechos ( el marcapuntos se encuentra entre estos 2 puntos), deslizar 1 punto como de derecho, 1 derecho, pasar el punto deslizado sobre el punto trabajado. TIP PARA EL REMATE: Para evitar que el borde de remate quede tenso usar agujas de mayor tamaño. Si sigue quedando tenso, hacer 1 hebra después de aprox. cada 4º punto y cerrarlos como puntos normales. ---------------------------------------------------------- COMENZAR LA LABOR AQUÍ: ---------------------------------------------------------- TOP - RESUMEN DE LA LABOR: Trabajar el escote y el canesú en redondo con una aguja circular desde el centro de la espalda, de arriba abajo. Ahora dividir el canesú para el cuerpo y las cenefas de las mangas y continuar el cuerpo en redondo con una aguja circular, de arriba abajo. Trabajar las cenefas de las mangas en redondo y con agujas de doble punta, de arriba abajo. ESCOTE: Montar 96-96-102-114-114-120 puntos con una aguja circular de 3 mm con Muskat. Trabajar 1 vuelta de derecho. Trabajar el elástico (= 2 reveses/ 1 derecho). Cuando la labor mida 3 cm, cambiar a una aguja circular de 4 mm. Insertar 1 marcapuntos al inicio de la vuelta en el centro de la espalda, medir el canesú desde este marcapuntos! CANESÚ: Trabajar A.1 (= 6 puntos) en redondo sobre todos los puntos (= 16-16-17-19-19-20 veces en horizontal). RECORDAR MANTENER LA TENSIÓN DEL TEJIDO! Cuando se haya trabajado A.1 1 vez en vertical, hay 288-320-340-380-418-440 puntos en la aguja y la labor ahora mide aprox.14-16-16-16-18-18 cm desde el marcapuntos. Trabajar de derecho en redondo hasta que la labor mida 19-21-22-24-26-28 cm desde el marcapuntos Ahora dividir la labor para el cuerpo y las mangas como sigue: Trabajar los primeros 40-45-49-53-60-65 puntos (= mitad de la espalda), deslizar los siguientes 63-69-72-84-89-90 puntos a un gancho auxiliar para las cenefas de la manga y montar 6-6-6-6-8-10 puntos nuevos bajo la manga, trabajar los siguientes 81-91-98-106-120-130 puntos (= delantero), deslizar los siguientes 63-69-72-84-89-90 puntos a un gancho auxiliar para la cenefa de la manga y montar 6-6-6-6-8-10 puntos nuevos bajo la manga, trabajar los últimos 41-46-49-53-60-65 puntos (= mitad de la espalda). CUERPO: = 174-194-208-224-256-280 puntos. Insertar 1 marcapuntos en medio de los 6-6-6-6-8-10 puntos cada manga (= en los lados del cuerpo). Hay 87-97-104-112-128-140 puntos entre los marcapuntos en el delantero y la espalda. Mover los marcapuntos hacia arriba a la vez que se trabaja; deberían utilizarse para aumentar más tarde en los lados. Trabajar todos los puntos de derecho. Cuando la labor mida 4 cm desde la división, aumentar 1 punto a cada lado de ambos marcapuntos - leer TIP PARA LOS AUMENTOS (= 4 puntos aumentados). Aumentar de esta manera cada 4 cm 5-4-4-5-5-5 veces en total = 194-210-224-244-276-300 puntos. Cuando la labor mida 28-28-29-29-29-29 cm desde la división, aumentar 13-12-13-14-15-15 puntos repartidos = 207-222-237-258-291-315 puntos. Cambiar a una aguja circular de 3 mm y trabajar el elástico (= 1 derecho/ 2 reveses) 4 cm. Rematar de derecho - leer TIP PARA EL REMATE. La labor mide 32-32-33-33-33-33 cm desde donde se hizo la división. CENEFA DE LA MANGA: Deslizar los 63-69-72-84-89-90 puntos desde el gancho auxiliar a un lado de la labor en agujas de doble punta de 4 mm y recoger además 1 punto en cada uno de los 6-6-6-6-8-10 puntos nuevos montados bajo la manga = 69-75-78-90-97-100 puntos. Trabajar en punto jersey en redondo 2 cm. Cambiar a agujas de doble punta de 3 mm y trabajar el elástico (= 1 derecho/1 revés) y AL MISMO TIEMPO disminuir, en la primera vuelta, 0-0-0-0-1-1 punto = 69-75-78-90-96-99 puntos. Cerrar cuando el elástico mida 4 cm con derecho sobre derecho y revés sobre revés. Trabajar la cenefa para la otra manga de la misma manera. |
|||||||||||||||||||||||||||||||
Explicaciones del diagrama |
|||||||||||||||||||||||||||||||
|
|||||||||||||||||||||||||||||||
 |
|||||||||||||||||||||||||||||||
 |
|||||||||||||||||||||||||||||||
 |
|||||||||||||||||||||||||||||||
¿Terminaste este patrón?Entonces, etiqueta tus fotos con #dropspattern #lavendercharmtop o envíalas a la galería #dropsfan. ¿Necesitas ayuda con este patrón?Encontrarás 28 videos tutoriales, un espacio para comentarios/preguntas y más visitando la página del patrón en garnstudio.com © 1982-2026 DROPS Design A/S. Todos los derechos reservados. Este documento, incluyendo todas sus sub-secciones, está protegido por los derechos de autor (copyright). Lee más acerca de lo que puedes hacer con nuestros patrones en la parte de abajo de cada patrón de nuestro sitio. |
|||||||||||||||||||||||||||||||


Con más de 40 años en el diseño de modelos de punto y de ganchillo, DROPS Design ofrece una de las más vastas colecciones de patrones gratuitos en el internet - traducidos en 17 idiomas. Al día de hoy, contamos con 324 catálogos y 12290 patrones - de los cuales 11685 están traducidos en español.
Nosotros trabajamos con mucho esmero para brindarte lo mejor que las labores de punto y ganchillo tienen para ofrecer,inspiración y consejos, así como hilos de magnífica calidad a precios increíbles! Te gustaría usar nuestros patrones para otro fin además del uso personal? Puedes leer acerca de lo que estás permitida a hacer en el texto de Copyright en la parte de abajo de todos nuestros patrones. Felices labores!
Escribe un comentario sobre DROPS 213-22
¡Nos encantaría saber qué piensas acerca de este patrón!
Si quieres escribir una pregunta referente al patrón, por favor asegúrate de elegir la categoría correcta en el formulario debajo, para acelerar el proceso de respuesta. Los campos obligatorios están marcados con un *.