Comentarios / Preguntas (148)
![]() Nathasja escribió:
Nathasja escribió:
Når man har lukket af til ærmerne - skal man så fortsat strikke 1 kantmaske i retstrik eller skal man strikke rent glatstrik uden kantmasken?
13.10.2025 - 23:52DROPS Design respondió:
Hej Nathasja. Du fortsätter att sticka 1 kantmaske. Mvh DROPS Design
14.10.2025 - 07:28
![]() Nathasja escribió:
Nathasja escribió:
Når man skal strikke forstykket står der bare at man skal gøre det på samme måde som bagstykket indtil man når 60 cm. Vil det sige at man også skal lukke af til ærmerne ved samme afstand som på bagstykket?
08.10.2025 - 12:04DROPS Design respondió:
Hej Nathasja. Ja det stämmer. Mvh DROPS Design
09.10.2025 - 06:55
![]() Jeanette escribió:
Jeanette escribió:
Ikke en veldig god oppskrift for større størrelse dessverre. Strikket denne i en størrelse større enn hva størrelseguiden anbefalte for å få den litt løs og god, men den er tettsittende med for korte ermer. Må gjøre ganske mange justeringer før den kan sys sammen å brukes. (Strikkefastheten er overholdt.)
22.09.2025 - 19:54
![]() Mary-Ann Edsbäcker escribió:
Mary-Ann Edsbäcker escribió:
1)Hur syr man i ärmarna när sidsömmarna inte är ihopsydda först? 2) De 8 cm , när syr man ihop dem? Förstår inte vad sprund innebär.
17.09.2025 - 22:46DROPS Design respondió:
Hei Mary-Ann. Ermtoppen (de siste cm) er strikket frem og tilbake, legg da øverste del av ermtoppen mot erm åpningen og sy ermet i. Deretter sys sidesømmen, start med "hullet" under ermet og sy sidesømmen (innenfor 1 kantmaske) til det gjenstår 8 cm. Gjør dette på begge sider og du får en splitt i hver side å genseren. mvh DROPS Design
06.10.2025 - 09:19
![]() Ingela escribió:
Ingela escribió:
Kan man sticka ärmarna på vanliga stickor och sy ihop dem sedan? Jag får inte till det med övningarna. Det blir stora hål.
17.09.2025 - 13:26DROPS Design respondió:
Hi Ingela, you can if it is easier for you. Happy knitting!
17.09.2025 - 13:37
![]() Sarah escribió:
Sarah escribió:
Hi, I'm starting on the back piece - it's unclear which bit you continue doing for 8cm. I've cast on, then done a purl row, then done 2 knit stitches knit 1 purl 1 knit 1 and 2 knit stitches. When I go to do the next row doing the 2 knit stitches knit 1 purl 1 knit 1 and knit 2 stitched, the purl and knit stitches don't match up with the last row so wouldn't make ribbing. Is this correct? Or should I be purling every other row too? Thanks
12.09.2025 - 22:47DROPS Design respondió:
Hi, the rib has 8 cm in hight. Purl 1 row from the wrong side. Then work as follows – from the right side: 2 edge stitches in GARTER STITCH – see description above, *knit 1, purl 1 *, work from *-* until there are 3 stitches left, knit 1 and 2 edge stitches in garter stitch. Next row (wrong side): 2 edge stitches in garter stitch, *purl 1, knit 1 *, work from *-* until there are 3 stitches left, purl 1 and 2 edge stitches in garter stitch. Happy knitting!
18.09.2025 - 23:24
![]() Rossana Iacuessa escribió:
Rossana Iacuessa escribió:
Salve, Sto provando a realizzare la taglia M di questo progetto ma non capisco il disegno del modello nè la spiegazione. Il dietro: quando dice, dopo avere fatto il bordo iniziale di 8 cm, proseguire a maglia rasata fino a quando il lavoro misura 48 cm, il bordo di 8 cm è compreso oppure no?
12.09.2025 - 13:39DROPS Design respondió:
Buongiorno Rossana, se non diversamente indicato le misure si intendono dall'inizio del lavoro. Buon lavoro!
14.09.2025 - 09:25
![]() Lefevre escribió:
Lefevre escribió:
Bonjour \\r\\nLa taille L correspond à 44 ou 46\\r\\net le taille XL 46 ou 48 ?\\r\\nMarie Laurence lefevre
29.08.2025 - 19:40DROPS Design respondió:
Bonjour Mme Lefevre, pour trouver quelle taille vous devez tricoter, l'idéal est de mesurer un vêtement que vous avez et dont vous aimez la forme, comparez ces mesures à celles du schéma pour trouver la taille correspondante. Retrouvez plus d'info ici. Bon tricot!
01.09.2025 - 16:06
![]() Els escribió:
Els escribió:
Wat is de kleur van de trui op de foto van Maria uit Norway in de dropsfangallery?
25.08.2025 - 13:45DROPS Design respondió:
Dag Els,
Dat zou ik zo niet weten, want het is er niet bij vermeld, maar vermoedelijk is het robijnrood nr 07.
27.08.2025 - 10:26
![]() Esme escribió:
Esme escribió:
When working the sleeve cap and it says 'then continue working back and forth', how many cms is this for? I just went straight from casting off 3 stitches each side of the marker and then onto casting off at beginning of each row and my sleeve now looks very short....
06.06.2025 - 03:37DROPS Design respondió:
Dear Esme, after you have worked 3 sts on each side of the marker mid under sleeve, you work now back and forth on needle casting off 2 stitches at the beginning of next 2 rows and then 3 stitches at the beginning of next 2 rows. Cast off all remaining stitches. Sleeve cap should measure approx. 3 cm - see chart (1 row casting off mid under sleeve + 4 rows + 1 cast off row). Happy knitting!
06.06.2025 - 08:21
Grey Pearl#greypearlsweater |
|
 |
 |
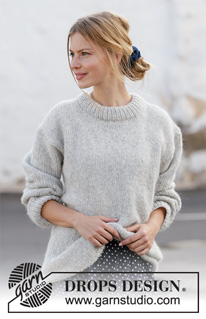
Jersey de punto en DROPS Air. Tallas S – XXXL.
DROPS 210-36 |
|
|
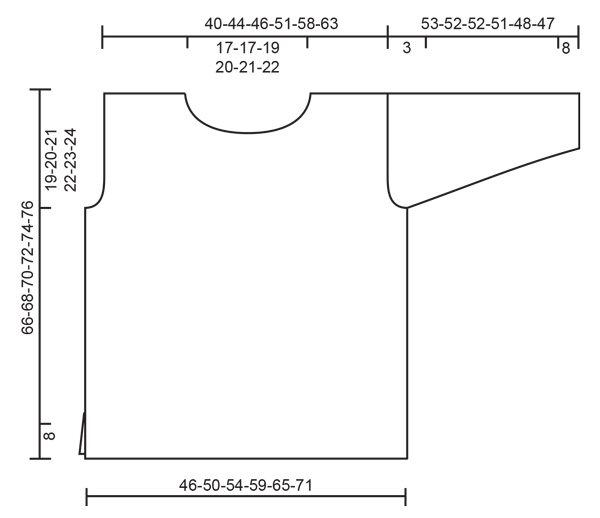
EXPLICACIONES PARA REALIZAR EL PATRÓN: ------------------------------------------------ PUNTO MUSGO (tejido de ida y vuelta): Tejer todas las hileras de derecho. 1 surco en altura = tejer 2 hileras de derecho. TIP PARA DISMINUIR (distribuidos equitativamente): Para calcular cómo disminuir equitativamente, contar el número total de puntos en la aguja (p. ej. 89 puntos) y dividirlo entre el número de disminuciones a hacer (p. ej. 13) = 6.8. En este ejemplo, disminuir tejiendo juntos de derecho cada 5º y 6º punto y cada 6º y 7º punto alternadamente (aprox.). TIP PARA AUMENTAR (aplica a las mangas): Comenzar 1 punto antes del hilo marcador, 1 lazada, tejer 2 puntos (el hilo marcador está entre estos 2 puntos), 1 lazada. En la vuelta siguiente, tejer las lazadas retorcidas de derecho para evitar que se formen agujeros. ------------------------------------------------ COMENZAR LA PIEZA AQUÍ: ------------------------------------------------ JERSEY – RESUMEN DE LA PIEZA: El jersey se teje de ida y vuelta en 2 partes que son cosidas entre sí cuando están terminadas. Las mangas se tejen en redondo con agujas de doble punta/aguja circular corta. ESPALDA: Montar 89-97-103-113-125-137 puntos con aguja circular tamaño 4.5 mm y Air. Tejer 1 hilera de revés por el lado revés, después tejer de la manera siguiente – por el lado derecho: 2 puntos de orillo en PUNTO MUSGO – ver descripción arriba, * 1 derecho, 1 revés *, tejer de *a* hasta que resten 3 puntos, tejer 1 punto derecho y 2 puntos de orillo en punto musgo. Continuar así hasta que la pieza mida 8 cm. Cambiar a aguja circular tamaño 5.5 mm y tejer 1 hilera de derecho por el lado derecho disminuyendo 13-15-15-17-19-21 puntos distribuidos equitativamente -–leer TIP PARA DISMINUIR = 76-82-88-96-106-116 puntos. Continuar con punto jersey y 1 punto de orillo en punto musgo a cada lado. Cuando la pieza mida 47-48-49-50-51-52 cm, rematar para las sisas en los dos lados al principio de cada hilera de la manera siguiente: Rematar 3 puntos 1-1-1-1-1-1 vez, 2 puntos 1-1-1-1-1-1 vez y 1 punto 1-1-2-2-2-3 veces = 64-70-74-82-92-100 puntos. Continuar con punto jersey hasta que la pieza mida 64-66-68-70-72-74 cm. Ahora rematar los 26-26-28-30-32-34 puntos centrales para el escote y cada hombro es terminado separadamente. Después rematar al principio de la hilera siguiente a partir del escote de la manera siguiente: 1 punto 1 vez = 18-21-22-25-29-32 puntos en el hombro. Continuar tejiendo hasta que la pieza mida 66-68-70-72-74-76 cm y rematar. Tejer el otro hombro de la misma manera. FRENTE: Montar y tejer como se hizo para la pieza de la espalda hasta que la pieza mida 60-62-64-66-68-70 cm. Ahora colocar los 20-20-22-24-26-28 puntos centrales en 1 hilo para el escote y terminar cada hombro separadamente. Después rematar al principio de cada hilera a partir del escote de la manera siguiente: 2 puntos 1 vez y 1 punto 2 veces = 18-21-22-25-29-32 puntos restantes en el hombro. Continuar tejiendo hasta que la pieza mida 66-68-70-72-74-76 cm, después rematar. Tejer el otro hombro de la misma manera. MANGAS: Las mangas se tejen de abajo para arriba, en redondo, con agujas de doble punta/aguja circular corta. La pieza es entonces dividida y tejida de ida y vuelta para la copa de la manga. Montar 46-48-50-52-52-56 puntos con agujas de doble punta tamaño 4.5 mm y Air. Tejer 1 vuelta de derecho, después tejer el resorte (1 derecho/1 revés) durante 8 cm. Cambiar a agujas de doble punta tamaño 5.5 mm y continuar con punto jersey. En la primera vuelta disminuir 8-8-8-8-8-10 puntos distribuidos equitativamente = 38-40-42-44-44-46 puntos. Insertar un hilo marcador al principio de la vuelta = centro bajo la manga. Continuar con punto jersey y, AL MISMO TIEMPO, cuando la pieza mida 10-10-10-10-12-12 cm, aumentar 1 punto a cada lado del hilo marcador – leer TIP PARA AUMENTAR. Las lazadas se tejen retorcidas en la vuelta siguiente para evitar que se formen agujeros. Aumentar así a cada 3½-3½-3-3-2-2 cm un total de 11-12-13-13-15-15 veces = 60-64-68-70-74-76 puntos. Cuando la manga mida 50-49-49-48-45-44 cm, rematar 3 puntos a cada lado del hilo marcador (= 6 puntos rematados en el centro bajo la manga), después continuar tejiendo de ida y vuelta. Rematar para la copa de la manga al principio de cada hilera en los dos lados de la manera siguiente: 2 puntos 1 vez, 3 puntos 1 vez, después rematar los puntos restantes. Tejer la otra manga de la misma manera. ENSAMBLAJE: Coser las costuras de los hombros. Coser las mangas y coser las costuras de los lados, en el interior de 1 punto de orillo y hasta que resten 8 cm en la parte de abajo = abertura. ORILLA DEL ESCOTE: Levantar aprox. 92-106 puntos con aguja circular tamaño 4.5 mm alrededor del escote (incluyendo los puntos en el hilo y el número debe ser múltiplo de 2). Tejer en resorte (1 derecho/1 revés) durante 9 cm. Después rematar. Doblar el resorte en la parte de arriba hacia el lado revés y coserlo. Para evitar que la orilla del escote quede apretada y virada hacia fuera, asegurarse de que la costura sea elástica. |
|
 |
|
¿Terminaste este patrón?Entonces, etiqueta tus fotos con #dropspattern #greypearlsweater o envíalas a la galería #dropsfan. ¿Necesitas ayuda con este patrón?Encontrarás 30 videos tutoriales, un espacio para comentarios/preguntas y más visitando la página del patrón en garnstudio.com © 1982-2026 DROPS Design A/S. Todos los derechos reservados. Este documento, incluyendo todas sus sub-secciones, está protegido por los derechos de autor (copyright). Lee más acerca de lo que puedes hacer con nuestros patrones en la parte de abajo de cada patrón de nuestro sitio. |
|


Escribe un comentario sobre DROPS 210-36
¡Nos encantaría saber qué piensas acerca de este patrón!
Si quieres escribir una pregunta referente al patrón, por favor asegúrate de elegir la categoría correcta en el formulario debajo, para acelerar el proceso de respuesta. Los campos obligatorios están marcados con un *.