
Categorías populares
¿Buscas un hilo?


Comentarios / Preguntas (44)
![]() Juliane escribió:
Juliane escribió:
Hallo, sind die * richtig gesetzt? Es stoßen A4 und A1 aneinander - das ergibt eine Asymmetrie und nicht genügend Linksbereiche. Mir scheint die Anleitung an dieser Stelle fehlerhaft zu sein. Danke fürs Überprüfen! Viele Grüße, Juliane
07.10.2025 - 19:42DROPS Design respondió:
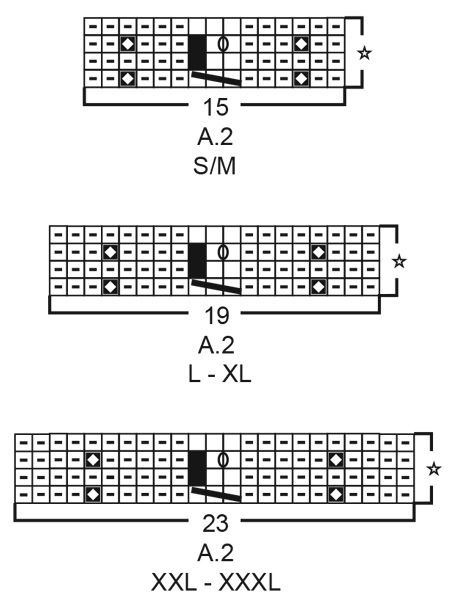
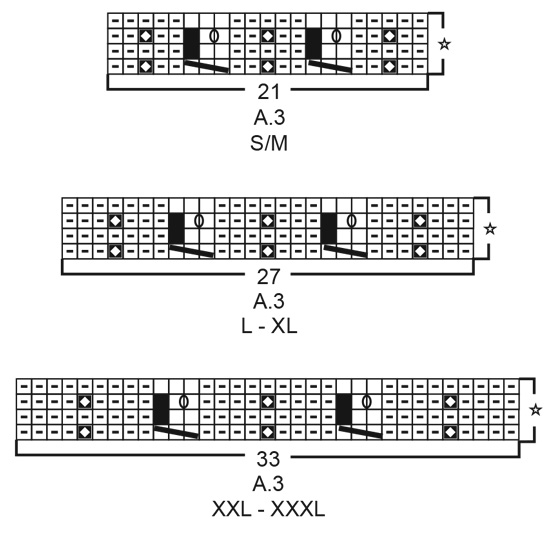
Liebe Juliane, ja, die Sternchen sind richtig gesetzt, die beiden Muster stoßen nicht direkt aneinander: * 1-1-6-6 Maschen links, A.1 (= 8 Maschen), A.2 (= 15-19-19-23 Maschen), A.1 (= 8 Maschen), A.3 (= 21-27-27-33 Maschen), A.4 (= 8 Maschen), A.2 (= 15-19-19-23 Maschen) und A.4 (= 8 Maschen) *, von *-* noch 1 x wiederholen. D.h. Sie stricken noch 1 bzw. 6 Linksmaschen nach A.4 und dann kommt erst wieder A.1. Die beiden Bereiche, in denen A.1 und A.4 nebeneinander liegen, sind genau an den Seiten des Rocks. Viel Spaß beim Stricken!
23.10.2025 - 01:04
![]() Aurelia escribió:
Aurelia escribió:
Bonjour, je souhaiterais faire des tutos entiers de votre gamme de pull de snood de jupe et de châles en me filme en train de tricoter du début à la fin sur Youtube je voulais voir avec vous si cela vous dérangeait si vous prenez sur vos modèles de votre site en vous citant dans mes vidéos. Merci de me contacter via facebook en entrant mon nom et mon prénom.
07.10.2025 - 11:56
![]() Aurelia escribió:
Aurelia escribió:
Bonsoir merci pour votre réponse je commence enfin à m'en sortir, je voulais savoir s'il était possible de m'expliquer avec les mêmes motifs pour faire un châle à manches longues si vous avez un tuto n'hésitez pas à me le faire savoir. Cordialement Aurélia.
04.10.2025 - 17:00
![]() Aurelia escribió:
Aurelia escribió:
Je n'ai pas compris ? Je dois faire autour un rang 1 de A1,6m envers,rang 1 de a2,6menvers,rang1 de A3, 6menvers, rang 1 de A4 et idem sur les autres rangs ?
24.09.2025 - 17:14DROPS Design respondió:
Bonjour Aurélie, au tout 1er tour, vous tricotez le 1er tour des diagrammes dans l'ordre indiqué (avec les mailles envers), au 2ème tour, vous tricotez le 2ème tour des diagrammes et ainsi de suite, après le 4ème tour, A.2 et A.3 sont terminés (= 4 tours chacun), au 5ème tour, vous tricotez le 5ème tour de A.1 et A.4 mais vous tricotez de nouveau le 1er tour de A.2 et A.3 (vous les répétez en hauteur). Quand les diagrammes sont terminés en hauteur, vous devez les répéter, mais ils ne vont pas tous se répéter en même temps car ils se tricotent sur un nombre de rangs différents. Bon tricot!
25.09.2025 - 16:33
![]() Aurelia escribió:
Aurelia escribió:
Désolé de vous déranger j'espère que je ne vous embête pas, je voulais savoir si on devait tricoter le rang 1 de tous les diagrammes en même temps au premier tour ou pas merci pour vos réponses si rapide
24.09.2025 - 15:49DROPS Design respondió:
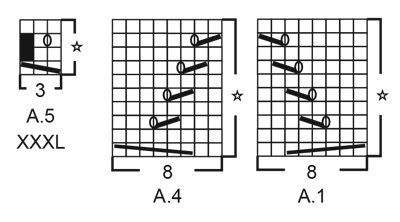
Bonjour Aurélia, les diagrammes ne se répètent pas tous sur le même nombre de rangs en hauteur, donc si au 1er rang, vous tricotez bien le 1er rang de A.1, A.2, A.3, et A.4, lorsque le diagramme est terminé en hauteur (les 4 rangs de A.2 et A.3), vous les recommencez au 1er rang alors que vous continuez A.1 et A.4 comme le diagramme le montre. A.1 et A.4 se répètent sur 10 rangs et en même temps, A.2 et A.4 se répètent sur 4 rangs. Bon tricot!
24.09.2025 - 16:48
![]() Aurelia escribió:
Aurelia escribió:
Bonjour, je voulais savoir s’il y avais des vidéos qui explique le point avec le petit carré blanc sur fond noir ? Je n’arrive pas à le faire
23.09.2025 - 11:57DROPS Design respondió:
Bonjour Aurélia, retrouvez ici, en vidéo comment on tricote ce type de torsades (même si la technique est un peu différente: on passe de 3 mailles à 2 mailles endroit et de nouveau à 3 mailles endroit). Bon tricot!
24.09.2025 - 16:47
![]() Aurelia escribió:
Aurelia escribió:
Je n'arrive pas a comprendre le diagramme a.2 a faire les points j'ai toujours que 24m sa serait simpas si possible de faire un petit tuto en montrant tout les points des diagrammes si possible en français jen demande beaucoup désolé j'espère que c'est faisable.
20.09.2025 - 23:10DROPS Design respondió:
Bonjour Aurélia, en taille XXL et XXXL, vous devez avoir 23 mailles dans chaque A.2: 4 m env, 1 m en côtes anglaises, 5 m envers, une torsade ajourée sur 3 mailles (on diminue 1 m au 1er rang et on fait 1 jeté au 3ème rang; on aura ainsi 2 m après le 1er et le 2ème rang et 3 m après le 3ème et le 4ème rang), 5 m env, 1 m en côtes anglaises et 4 m envers. Retrouvez ici comment tricoter ce type de torsades (un peu différente dans la vidéo, mais l'idée est la même). Bon tricot!
24.09.2025 - 07:27
![]() Aurelia escribió:
Aurelia escribió:
Bonsoir, auriez vous des vidéos qui explique le diagramme a.2 du modèle 199-46 pour la jupe je n'arrive pas a la faire et je ne trouve pas le modèle sur youtube merci de me répondre rapidement bon tricot
20.09.2025 - 19:33DROPS Design respondió:
Bonjour Aurelia, nous n'avons pas de video sur ce diagramme. Quel probleme avez-vous? J'envoyerai la demande pour preparer le video sur ce sujet. Bon tricot!
20.09.2025 - 20:23
![]() Cindy Royea escribió:
Cindy Royea escribió:
I am knitting s/m size. When I add the stitches in the pattern they add up to 168, which is correct but when I finish the 1st round, I have 15 stitches left over??? I checked and I didn’t miss any charts. What am I doing wrong?
03.02.2025 - 18:17DROPS Design respondió:
Hi Cindy, In your size, the first round consists of purl 1 + A.1 (8stitches) + A.2 (15 stitches) + A.1 (8) + A.3 (21 stitches) + A.4 (8 stitches) + A.2 (15) + A.4 (8), which is then repeated one more time. 1 + 8 + 15 + 8 + 21 + 8 + 15 + 8 = 84. And 84 x 2 = 168. Hope this helps and happy knitting!
04.02.2025 - 07:01
![]() Daniela Blindu escribió:
Daniela Blindu escribió:
Ho lavorato ai ferri questa gonna in merino extra fine, l'ho comprata da un negozio in Romania andrele.ro, la prima volta ho ordinato 5 bobine, poi quando non ne ho avuto abbastanza ne ho ordinate altre 2, lo stesso codice 51, perché è l'ombra diverso? Non penso di poter indossare questa gonna.
30.11.2024 - 14:49
|
||||||||||||||||||||||||||||||||||
Cable Waterfall#cablewaterfallskirt |
||||||||||||||||||||||||||||||||||
 |
 |
|||||||||||||||||||||||||||||||||
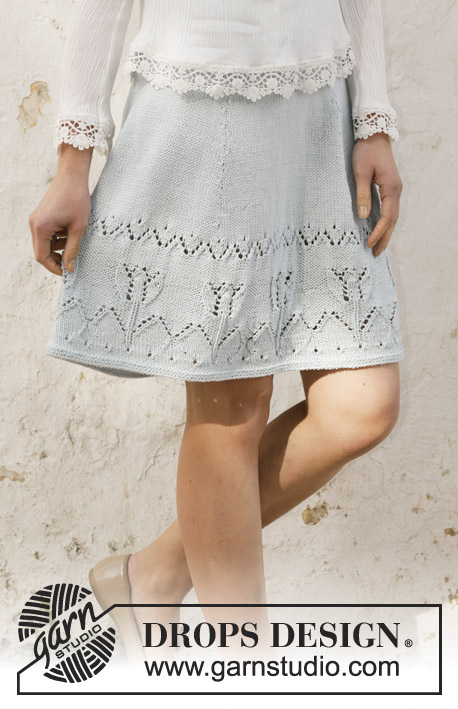
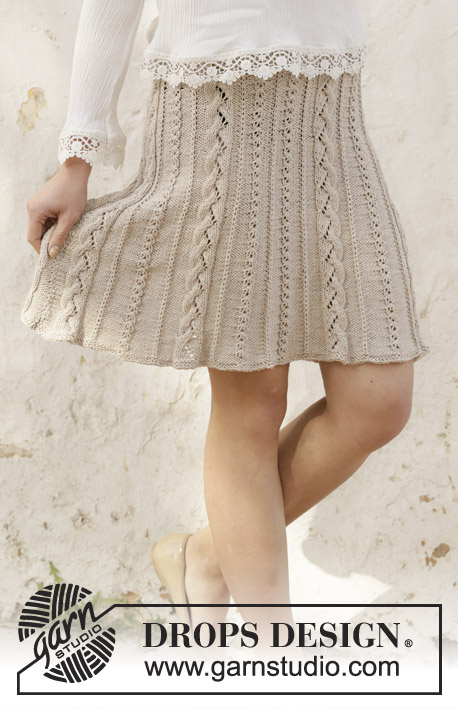
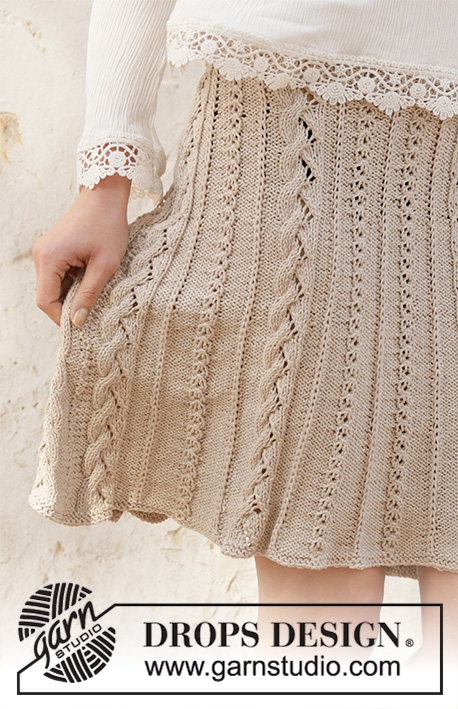
Falda de punto en DROPS Cotton Light. La prenda está realizada de arriba abajo con trenzas y patrón de calados. Tallas S - XXXL.
DROPS 199-46 |
||||||||||||||||||||||||||||||||||
|
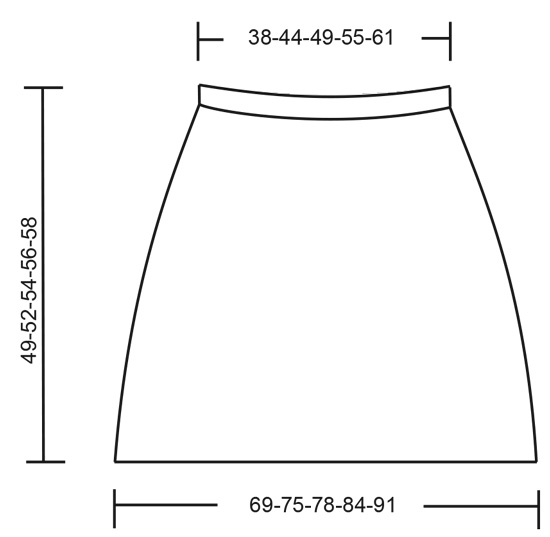
EXPLICACIONES PARA REALIZAR EL PATRÓN: ------------------------------------------------------- PLIEGUE/PUNTO MUSGO (trabajado en redondo): 1 pliegue = 2 vueltas. Trabajar 1 vuelta de derecho y 1 vuelta de revés. PATRÓN: Ver los diagramas A.1-A.5. Elegir el diagrama correspondiente a la talla. A.5 solo se aplica para la talla XXXL. TIP-PARA TEJER: Todas las cuentas de puntos, al trabajar las trenzas y el patrón de calados en la falda, se basan en las trenzas pequeñas, cada una de 3 puntos; tener en cuenta que el número de puntos de las trenzas pequeñas puede variar entre 3 y 2 y esto afectará al número de puntos en la vuelta. TIP-1 PARA LOS AUMENTOS (repartidos): Para calcular cómo aumentar puntos repartidos, contar el número total de puntos en la aguja (p.e 184 puntos) y dividirlo entre el número de aumentos a trabajar (p.e 12) = 15.3. En este ejemplo, aumentar trabajando 1 hebra después de aprox. cada 15º puntos. En la siguiente vuelta trabajar las hebras retorcidas para evitar que se formen agujeros. TIP-2 PARA LOS AUMENTOS (para aumentar en las secciones de revés): Aumentar 1 punto en la sección de revés trabajando 1 hebra. En la siguiente vuelta trabajar la hebra de revés retorcido para evitar que se forme un agujero. Después trabajar los nuevos puntos de revés. NOTA: Quedará mejor si se aumenta alternadamente al comienzo y al final de la sección de revés (no en el medio). ------------------------------------------------------- COMENZAR LA LABOR AQUÍ: ------------------------------------------------------- FALDA - RESUMEN DE LA LABOR: La labor se trabaja en redondo con aguja circular, de arriba abajo. Primero trabajar un borde en punto jersey para el elástico. El resto de la falda se trabaja con trenzas y patrón de calados. BORDE: Montar 160-184-206-232-256 puntos con aguja circular de 3 mm y Cotton Light. Trabajar en punto jersey 2 cm . Trabajar 1 vuelta de revés (= borde de doblaje). Trabajar en punto jersey 2 cm. Después trabajar 1 vuelta de derecho en la que se aumenten 8-12-0-2-0 puntos repartidos - leer TIP-1 PARA LOS AUMENTOS = 168-196-206-234-256 puntos. Después trabajar la falda como se describe debajo. FALDA: Cambiar a aguja circular de 4 mm. La 1ª fila se trabaja como sigue: TALLAS S/M, L, XL y XXL: * Trabajar 1-1-6-6 puntos de revés, A.1 (= 8 puntos), A.2 (= 15-19-19-23 puntos), A.1 (= 8 puntos), A.3 (= 21-27-27-33 puntos), A.4 (= 8 puntos), A.2 (= 15-19-19-23 puntos) y A.4 (= 8 puntos)*, trabajar desde * a * 1 vez más. TALLA XXXL: * Trabajar A.5 (= 3 puntos), 7 reveses, trabajar A.1 (= 8 puntos), A.2 (= 23 puntos), A.1 (= 8 puntos), A.3 (= 33 puntos), A.4 (= 8 stitches), A.2 (= 23 puntos), A.4 (= 8 puntos) y 7 reveses *, trabajar desde * a * 1 vez más. TODAS LAS TALLAS: Continuar con el patrón como se describe arriba y leer TIP PARA TEJER! Cuando la labor mida 8 cm desde el borde de doblaje, aumentar 1 punto en cada 2ª sección de revés de la vuelta - leer TIP-2 PARA LOS AUMENTOS (= 15-15-15-15-16 puntos aumentados). Repetir este aumento cuando la labor mida 12 cm desde el borde de doblaje, pero ahora aumentar en las secciones de revés en las que no se aumentó la última vez= 198-226-236-264-288 puntos. Continuar el patrón como antes con 1 punto más en cada sección de revés. RECUERDE MANTENER LA TENSIÓN DEL TEJIDO! Cuando la labor mida 16 cm desde el borde de doblaje, aumentar 1 punto en cada 2ª sección de revés (= 15-15-15-15-16 puntos aumentados). Cuando la labor mida 22-22-22-23-23 cm, aumentar 1 punto en las secciones de revés restantes (= 15-15-15-15-16 puntos aumentados). Aumentar de esta manera cada 2ª sección de revés cada 6-6-6-7-7 cm hasta que se haya aumentado 2 veces más en cada sección de revés (un total de 4 veces incluyendo los aumentos en la sección de revés descritos al principio de la falda) = 288-316-326-354-384 puntos. Continuar trabajando hasta que la labor mida 48-51-53-55-57 cm desde el borde de doblaje en la parte superior (o hasta la largura deseada; queda 1 cm para finalizar). Cambiar a aguja circular de 3 mm. Trabajar 2 PLIEGUES en redondo sobre todos los puntos - leer descripción arriba. Cambiar de nuevo a aguja circular de 4 mm y rematar de derecho (esto se hace para evitar que el borde de remate quede tenso). La falda mide aprox. 49-52-54-56-58 cm desde el borde de doblaje hasta abajo. TERMINACIÓN: Doblar el borde hacia el lado revés y coser con pequeñas puntadas; dejar una pequeña abertura para pasar la cinta elástica. |
||||||||||||||||||||||||||||||||||
Explicaciones del diagrama |
||||||||||||||||||||||||||||||||||
|
||||||||||||||||||||||||||||||||||
 |
||||||||||||||||||||||||||||||||||
 |
||||||||||||||||||||||||||||||||||
 |
||||||||||||||||||||||||||||||||||
 |
||||||||||||||||||||||||||||||||||
¿Terminaste este patrón?Entonces, etiqueta tus fotos con #dropspattern #cablewaterfallskirt o envíalas a la galería #dropsfan. ¿Necesitas ayuda con este patrón?Encontrarás 20 videos tutoriales, un espacio para comentarios/preguntas y más visitando la página del patrón en garnstudio.com © 1982-2026 DROPS Design A/S. Todos los derechos reservados. Este documento, incluyendo todas sus sub-secciones, está protegido por los derechos de autor (copyright). Lee más acerca de lo que puedes hacer con nuestros patrones en la parte de abajo de cada patrón de nuestro sitio. |
||||||||||||||||||||||||||||||||||


Con más de 40 años en el diseño de modelos de punto y de ganchillo, DROPS Design ofrece una de las más vastas colecciones de patrones gratuitos en el internet - traducidos en 17 idiomas. Al día de hoy, contamos con 324 catálogos y 12290 patrones - de los cuales 11685 están traducidos en español.
Nosotros trabajamos con mucho esmero para brindarte lo mejor que las labores de punto y ganchillo tienen para ofrecer,inspiración y consejos, así como hilos de magnífica calidad a precios increíbles! Te gustaría usar nuestros patrones para otro fin además del uso personal? Puedes leer acerca de lo que estás permitida a hacer en el texto de Copyright en la parte de abajo de todos nuestros patrones. Felices labores!
Escribe un comentario sobre DROPS 199-46
¡Nos encantaría saber qué piensas acerca de este patrón!
Si quieres escribir una pregunta referente al patrón, por favor asegúrate de elegir la categoría correcta en el formulario debajo, para acelerar el proceso de respuesta. Los campos obligatorios están marcados con un *.