
Categorías populares
¿Buscas un hilo?


Comentarios / Preguntas (21)
![]() Unni Sand escribió:
Unni Sand escribió:
Allerede på p 2 går det galt for mig. Når der er slået 36 masker op og rapporter går hen over 5 masker, er der jo en maske til overs til sidst. 5 m x 6 ganger = 35 m. Ikke 36 m. Hvad forstår jeg ikke?
14.01.2024 - 18:34DROPS Design respondió:
Hej Unni, jo 2 kantmasker diagram A.1=5m x 6 = 30m + 2 første m i A.1 + 2 kantmasker = 36m
16.01.2024 - 14:15
![]() Ilona escribió:
Ilona escribió:
Kupiłam włóczki tyle ile w opisie (i takiej jak w opisie). Skończyła mi się właśnie cała gruba włóczka i mam może jakiś metr szalika. Natomiast tej cienkiej mam jeszcze 2,5 motka. Chyba coś jest nie tak w opisie. Rozczarowanie.
25.02.2023 - 17:09DROPS Design respondió:
Witaj Ilono, niestety sama nie wykonywałam tego szalika, a w pozostawionych do niego komentarzach nie widzę żadnego związanego ze zbyt małą ilością włóczki. Na myśl przychodzi mi tylko pytanie czy przed wykonaniem wykonałaś próbkę i była ona zgodna z tą w opisie?
27.02.2023 - 08:55
![]() Sara escribió:
Sara escribió:
Hej jag skulle vilja att första och sista maskan på halsduken/kantmaskorna alltid blir räta från rätsidan Hur gör jag då? (Hur får jag kanten att inte bli varannan r varannan a utan bara r m från rätsidan/framsidan? )
13.01.2022 - 14:26DROPS Design respondió:
Hej Sara. Då får du sticka de räta från rätsidan och aviga från avigsidan, men tänk på att en slätstickad kant ofta rullar sig (det är därför man oftast gör kanter i rätstickning). Mvh DROPS Design
14.01.2022 - 14:12
![]() Lola escribió:
Lola escribió:
Bonjour, je ne comprends pas comment tricoter le premier rang : faut-il tricoter un rang à l'envers ou commencer directement par le motif A1 ? Merci !
24.11.2021 - 11:40DROPS Design respondió:
Bonjour Lola, vous tricotez d'abord 1 rang en mailles envers (ce rang est l'envers de l'écharpe) puis tricotez le rang suivant sur l'endroit avec le motif A.1 (=1er rang de A.1 = sur l'endroit). Bon tricot!
24.11.2021 - 15:42
![]() Zazou escribió:
Zazou escribió:
Bonjour, Je suis débutante en tricot et ne comprends pas le début de l'ouvrage. Si je dois faire 6x A1, donc 6x5 mailles = 30, que dois-je faire des 6 mailles restantes ? Dois-je commencer directement par le rang 1 de A1, ou faire le premier rang à l'envers ? Merci de m'éclairer ! Meilleures salutations, Zazou
21.02.2021 - 10:04DROPS Design respondió:
Bonjour Zazou, vous devez tricoter ainsi vos 36 mailles: 2 mailles au point mousse, répétez ensuite 6 fois les 5 mailles de A.1, il reste 4 mailles: tricotez les 2 premières mailles de A.1 (ainsi le motif est symétrique de chaque côté) et terminez par 2 mailles point mousse. Le 1er rang de A.1 se lit de droite à gauche sur l'endroit. Retrouvez ici plus d'infos sur les diagrammes. Bon tricot!
22.02.2021 - 08:39
![]() Oksana escribió:
Oksana escribió:
I watched the video before writing to you. But the matter is that on the video there is no " thread over the piece so that it is towards you", cause the thread is behind the work and there is no " slip yarn over purlwise" cause all the stitches within the pattern are Knitted. So please, - what to follow than - video or description? If description, please specify this place. thank you!
13.11.2019 - 14:56DROPS Design respondió:
Dear Oksana, the video is showing this row from the RS (as worked in the round), but you are here working back and forth, so that this row is worked from WS, the yarn should be towards you (ready to work the next purled st), then slip the yarn over, purl 3 sts, slip the yarn over and pass yarn behind work, ready to work next stitch which is a knitted stitch. Happy knitting!
13.11.2019 - 15:34
![]() Pál Anikó Noémi escribió:
Pál Anikó Noémi escribió:
Sajnos nincs diagram ehhez a sálhoz.
12.11.2019 - 10:56DROPS Design respondió:
Kedves Anikó, köszönjük, hogy felhívta a figyelmünket a technikai hibára, ami javításra került, így már látható a diagram. Sikeres kézimunkázást kívánunk!
15.11.2019 - 02:48
![]() Ulrika escribió:
Ulrika escribió:
Hej, diagrammet går inte att se. Under rubriken Diagram finns endast en liten ruta, som inte går att klicka på eller annat. Jag har köpt garn och skulle börja sticka, men nu går det inte, då diagrammet inte syns, vad har hänt? MVH Ulrika
06.04.2019 - 17:08DROPS Design respondió:
Hej. Nu finns diagrammet även på den svenska översättningen. Mvh DROPS Design
08.04.2019 - 08:57
![]() Jas Chua escribió:
Jas Chua escribió:
Diagram A1 first row, last 2 sts, is it a K2 tog?
21.03.2019 - 11:02DROPS Design respondió:
Dear Mrs Chua, last 2 sts should be purled together - diagram text will be edited. Thank you, happy knitting!
21.03.2019 - 12:41
![]() Cathy escribió:
Cathy escribió:
Ik vind het patroon onduidelijk of mis ik iets? 36 steken opzetten, de eerste 2 steken in ribbelsteek, 6x 5steken in A1 en dan blijf ik met 4 steken over... Als het patroon alle naalden langs de goede zijde weergeeft, hoe wordt de teruggaande naald gebreid? Dank voor uw reactie.
29.12.2018 - 18:05DROPS Design respondió:
Dag Cathy,
Nadat je 6 keer A.1 hebt gebreid, brei je de volgende 2 steken alleen de eerste 2 steken van A.1, dan nog 2 steken in ribbelsteek.
01.01.2019 - 19:15
|
||||||||||||||||||||||||||||
Polar Winter#polarwinterscarf |
||||||||||||||||||||||||||||
 |
 |
|||||||||||||||||||||||||||
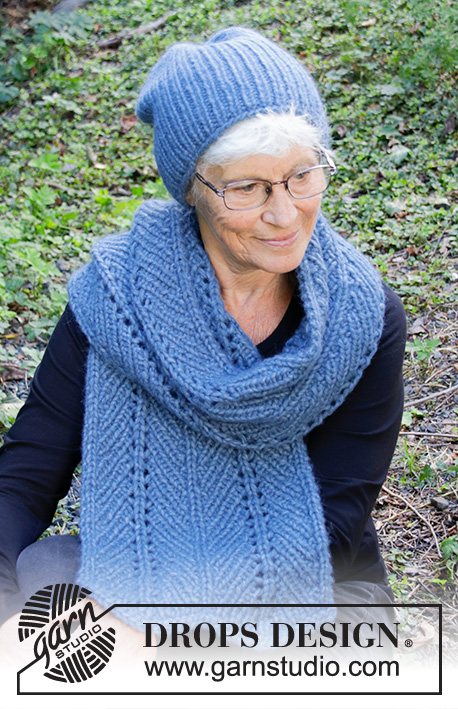
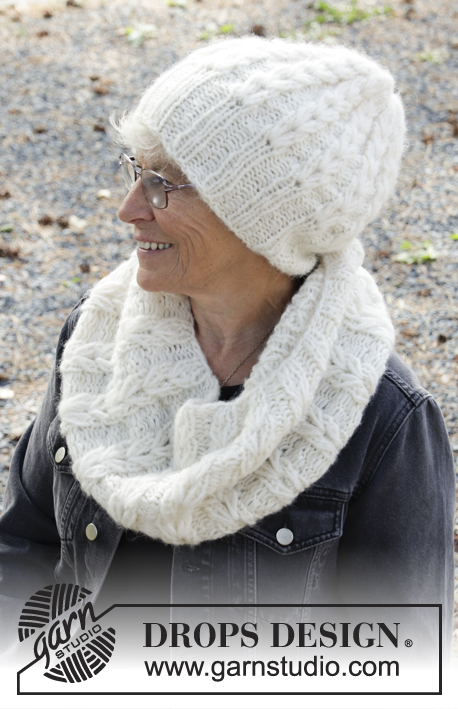
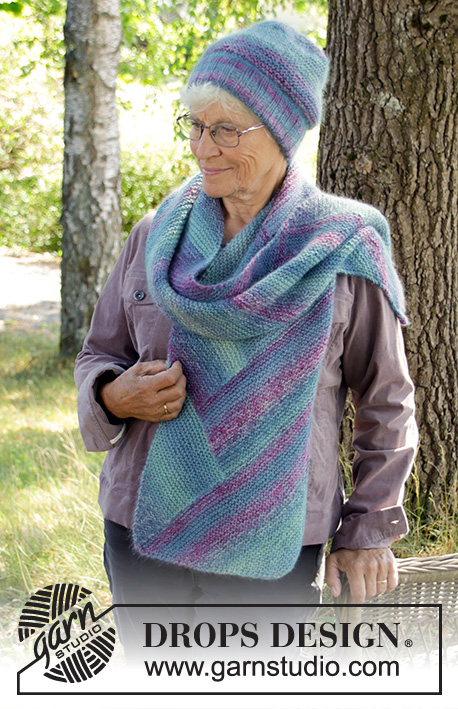
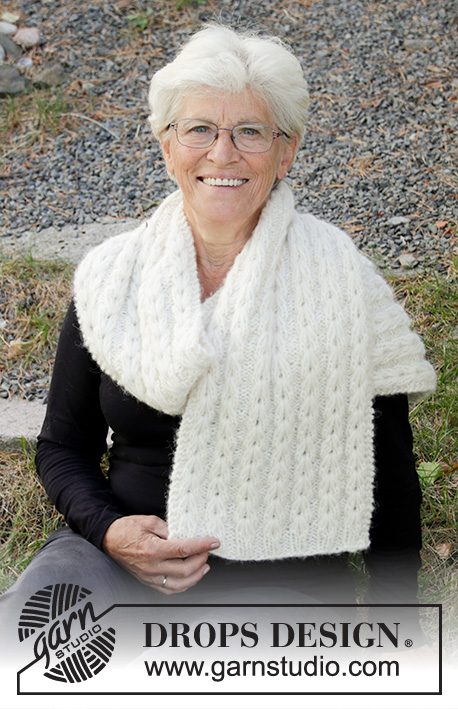
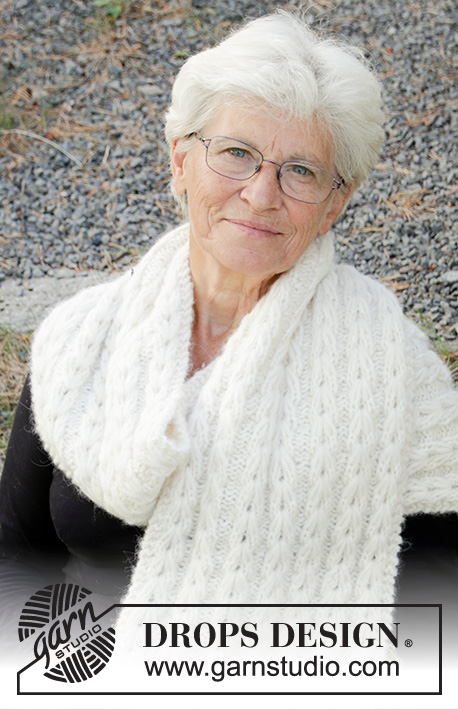
Bufanda de punto en DROPS Air y DROPS Brushed Alpaca Silk. La pieza está tejida de ida y vuelta con textura.
DROPS 192-20 |
||||||||||||||||||||||||||||
|
EXPLICACIÓN PARA REALIZAR EL PATRÓN: ----------------------------------------------------- PUNTO MUSGO (de ida y vuelta): 1 surco = tejer 2 hileras de derecho. PATRÓN: Ver diagramas A.1 y A.2. Los diagramas muestran todas las hileras del patrón vistas por el lado derecho. ----------------------------------------------------- COMENZAR LA PIEZA AQUÍ: ----------------------------------------------------- BUFANDA – RESUMEN CORTO DE LA PIEZA: Tejer la pieza de ida y vuelta en aguja circular. BUFANDA: Montar 36 puntos en aguja circular tamaño 7 mm con 1 hilo Air y 1 hilo Brushed Alpaca Silk (= 2 hilos). Tejer 1 hilera de revés por el lado revés, después tejer el patrón de la manera siguiente por el lado derecho: 2 puntos en PUNTO MUSGO – leer explicación arriba, A.1 (= 5 puntos) 6 veces en total a lo ancho, tejer los primeros 2 puntos de A.1, 2 puntos en punto musgo. En la primera hilera, disminuir 6 puntos (las disminuciones se muestran en el diagrama) = 30 puntos. En la 3ª hilera, aumentar 7 puntos (los aumentos se muestran en el diagrama) = 37 puntos. Después de haber tejido todo el diagrama A.1 verticalmente, repetir las últimas 6 hileras del diagrama hasta que la pieza mida 151 cm. ¡RECORDARSE DE MANTENER LA MISMA TENSIÓN DE TEJIDO DE LA MUESTRA! Ahora tejer A.2 (= 5 puntos) sobre cada repetición de A.1. En la 5ª hilera de A.2, disminuir 7 puntos en la hilera (las disminuciones se muestran en el diagrama) = 30 puntos. En la 7ª hilera, aumentar 6 puntos en la hilera (los aumentos se muestran en el diagrama) = 36 puntos. Después de haber tejido el diagrama A.2 entero verticalmente, la bufanda mide aprox 156 cm. Rematar los puntos con derecho sobre derecho y revés sobre revés. |
||||||||||||||||||||||||||||
Explicaciones del diagrama |
||||||||||||||||||||||||||||
|
||||||||||||||||||||||||||||
 |
||||||||||||||||||||||||||||
¿Terminaste este patrón?Entonces, etiqueta tus fotos con #dropspattern #polarwinterscarf o envíalas a la galería #dropsfan. ¿Necesitas ayuda con este patrón?Encontrarás 16 videos tutoriales, un espacio para comentarios/preguntas y más visitando la página del patrón en garnstudio.com © 1982-2026 DROPS Design A/S. Todos los derechos reservados. Este documento, incluyendo todas sus sub-secciones, está protegido por los derechos de autor (copyright). Lee más acerca de lo que puedes hacer con nuestros patrones en la parte de abajo de cada patrón de nuestro sitio. |
||||||||||||||||||||||||||||


Con más de 40 años en el diseño de modelos de punto y de ganchillo, DROPS Design ofrece una de las más vastas colecciones de patrones gratuitos en el internet - traducidos en 17 idiomas. Al día de hoy, contamos con 324 catálogos y 12290 patrones - de los cuales 11675 están traducidos en español.
Nosotros trabajamos con mucho esmero para brindarte lo mejor que las labores de punto y ganchillo tienen para ofrecer,inspiración y consejos, así como hilos de magnífica calidad a precios increíbles! Te gustaría usar nuestros patrones para otro fin además del uso personal? Puedes leer acerca de lo que estás permitida a hacer en el texto de Copyright en la parte de abajo de todos nuestros patrones. Felices labores!
Escribe un comentario sobre DROPS 192-20
¡Nos encantaría saber qué piensas acerca de este patrón!
Si quieres escribir una pregunta referente al patrón, por favor asegúrate de elegir la categoría correcta en el formulario debajo, para acelerar el proceso de respuesta. Los campos obligatorios están marcados con un *.