
Categorías populares
¿Buscas un hilo?


Comentarios / Preguntas (9)
![]() Michelle escribió:
Michelle escribió:
When moving from m1 to m2 what do I do with the first two stitches when they move over
24.02.2026 - 18:19DROPS Design respondió:
Hi Maichelle, row 13: at the beginning put 2 sts on a cable needle behind the work (2 first sts in M1 diagram), then K 2, P 2 from the cable needle. Happy knitting!
08.04.2026 - 15:29
![]() Barbara Vagianos escribió:
Barbara Vagianos escribió:
How is the best way to adjust this pattern for a larger size? I want to make it for a 34.5 inch bust. Should I try to get a larger gauge and following the instructions for size L or should I add more cable repeats? Thanks for your help.
29.08.2025 - 16:59DROPS Design respondió:
Dear Barbara, if you modify the gauge then it will be difficult to ensure that you have the correct gauge when working the different steps of the pattern. It would be best to cast on more initial stitches and work more cable repeats for a larger size. Happy knitting!
31.08.2025 - 20:54
![]() Petra Mannsshardt escribió:
Petra Mannsshardt escribió:
Wie ist das zu verstehen? Ich habe die Schultern zusammen genäht und wollte jetzt den Halsausschnitt sticken. 80 Maschen Plus die ca 88 Maschen vom hilfsfaden aufnehmen? Das kommt mir so viel vor. Da ich „Anfängerin“ bin , kenne ich mich da nicht so aus.
09.04.2024 - 13:29
![]() Jean Grimble escribió:
Jean Grimble escribió:
I am reading the chart. I have 208 stitches on my needles. The chart says to knit 5 repeats of Pattern 1 (80 sts) , then Pattern 2 one time (16 stiches) for a total of 96 stitches. Repeat that sequence and you have 192 stitches, leaving 16 stitches. Am I to knit 8 stiches either side of the cables????? The photo of the pattern does not indicate this. Bear with me, this is my first time reading a chart!!! I am sure this is my confusion!!
30.06.2023 - 17:05DROPS Design respondió:
Dear Jean, the repeats are not horizontally but rather vertically. That is, you will work 1st row of M.1 on the whole row, then the 2nd row of M.1, e.t.c. After working all rows of M.1, instead of working M.2 you need to work M.1 again, until you have worked all of M.1 5 times vertically in total. On the next row, work 1st row of M.2, which will displace the pattern slightly, as explained in the pattern. After the last row of M.2, start working M.3 and repeat M.3 until you reach the final measurements. Happy knitting!
30.06.2023 - 21:09
![]() Ellen Rachich escribió:
Ellen Rachich escribió:
Your instructions are not very clear when decreasing or armholes...please explain when we start knitting front And start decreasing
03.04.2021 - 22:22DROPS Design respondió:
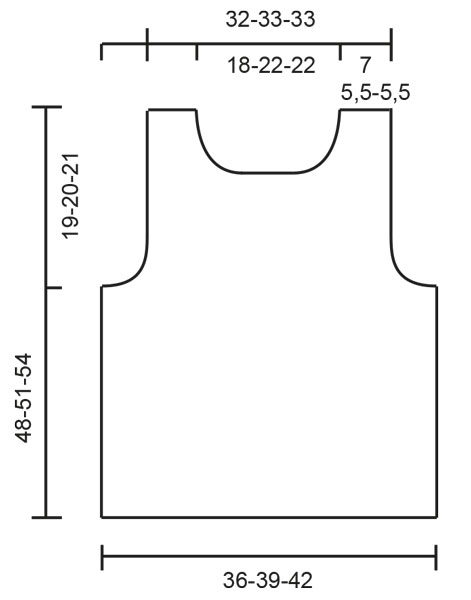
Dear Ellen, the numbers that are not in the description can be calculated from teh schematic drawing: you start decreasing for the armhole, when the piece is 29-31-33 cm long (depending on the size you are making). Happy Knitting!
04.04.2021 - 21:30
![]() Ellen Rachich escribió:
Ellen Rachich escribió:
How can I make this into a vneck for size small?
16.03.2021 - 20:12DROPS Design respondió:
Dear Mrs Rachich, we are unfortunately not able to adjust every pattern to every single request - please contact your yarn store for any assistance adjusting the pattern to your own wishes. Thanks for your comprehension. Happy knitting!
17.03.2021 - 08:37
![]() Robyn escribió:
Robyn escribió:
For shaping the shoulders; since the middle 28 stitches are on a stitch holder how can I continue knitting in full rows? Surely I'll have to focus on one shoulder at a time rejoining the yarn for the second shoulder? Can you clarify?
21.06.2020 - 23:23DROPS Design respondió:
Dear Robyn, after you have slipped the middle 28 sts for neck on a thread/stitch holder, continue each shoulder separately continuing dec for armhole as before and slipping more sts on same thread for neck. When first shoulder is finished, just work the 2nd one the same way but mirrored. Happy knitting!
22.06.2020 - 08:45
![]() Robyn escribió:
Robyn escribió:
I don't understand how to continue after the last part of the Body instruction, "Knit the rest of each part separately." Doesn't that mean I'll have to cut and rejoin the yarn for the back? Thank you
16.06.2020 - 00:18DROPS Design respondió:
Dear Robyn, that's right you will slip all stitches for back piece on a thread or on a extra needle and continue first front piece, then join yarn to work back piece to the end. Happy knitting!
16.06.2020 - 09:04Heather escribió:
What does this mean at the front "then put sts at each neck edge on the st holder every other row: 2 sts 2 times, 1 st 2 times = 40-48-48 sts on the st holder and 19-17-17 sts on each shoulder". I normally bind off for neck shaping, not sure about the way this is worded. Can you explain a little more in detail what I am to do here. I am stuck at this point and no local yarn store to assist. Thanks.!
19.07.2017 - 20:48DROPS Design respondió:
Dear Heather, When working rows from neckline work the first 2 sts, then put them on the same st holder as sts for neckline, work to the end of row, work next row as before, then at the beg of next row work the first 2 sts and slip them on the st holder, continue row as before, work next row, then at the beg of next row, work the first st and slip it on the st holder. Repeat the last 2 rows = 6 sts are slipped on the st holder. Happy knitting!
20.07.2017 - 09:34
|
|||||||||||||||||||
Whiteout#whiteouttop |
|||||||||||||||||||
 |
 |
||||||||||||||||||
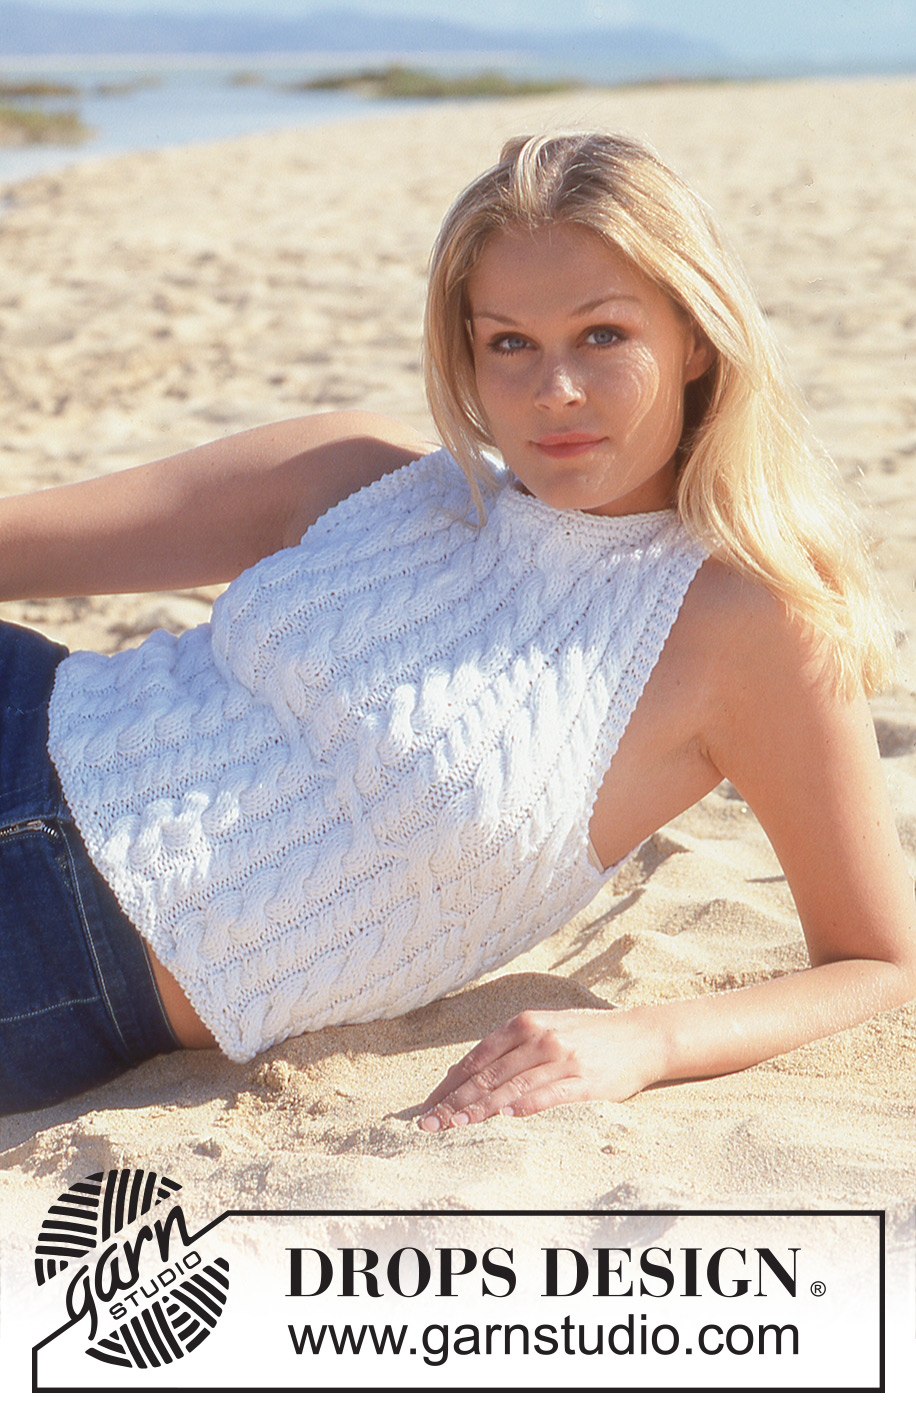
Top DROPS con torsadas, en “Paris”.
DROPS 64-9 |
|||||||||||||||||||
|
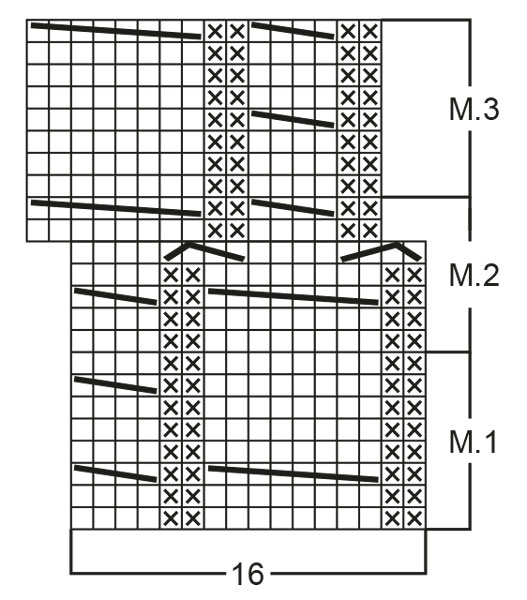
Muestra: 18 pts x 23 hileras en pt jersey = 10 x 10 cm. 1 repetición del patrón mide aprox 6 cm de ancho. Tip para la elaboración del tejido: Hacer todas las disminuciones por el lado derecho de la labor de la manera siguiente: Disminuir 2 pts: Después de 3 pts de orillo: deslizar 1 pt como de derecho, tejer 2 pjd, pasar el pt desl por encima. Antes de 3 pts de orillo: tejer 3 pjd. Disminuir 1 pt: Después de 3 pts de orillo: deslizar 1 pt como de derecho, 1 d, pasar el pt desl por encima. Antes de 3 pts de orillo: tejer 2 pjd. Patrón: Ver diagrama (1 diagrama = 1 repetición). El diagrama muestra el patrón visto por el lado derecho. Pt musgo (de ida y vuelta): Tejer todas las hileras de derecho. Pt musgo (en redondo): * 1 vta de derecho y 1 vta de revés *, repetir de *a*. Cuerpo: Montar 130-140-152 pts en ag circular tamaño 4.5 mm; unir y tejer 4 hileras en pt musgo, aumentando 62-68-72 pts distribuidos equitativamente en la última hilera = 192-208-224 pts. Tejer 5 repeticiones de M.1, después M.2 1 vez (M.2 desvía el patrón 2 pts – es decir, las torsadas pequeñas se convierten en torsadas grandes y viceversa). Después tejer M.3 hasta finalizar las medidas. Cuando la labor mida 28-30-32 cm, colocar marcapuntos en los lados (frente y espalda cada uno = 96-104-112 pts). Asegurarse que para la Talla S: una torsada pequeña esté al centro del frente Talla M y L: una torsada grande esté al centro del frente. Continuar en el patrón de torsadas como está establecido, pero tejer 14 pts de cada lado (7 pts de cada lado del marcapuntos) en pt musgo, después rematar 8 pts de cada lado (4 pts de cada lado del marcapuntos) para las sisas. Terminar cada parte separadamente. Frente: = 88-96-104 pts. Mantener 3 pts en pt musgo del lado de las sisas hasta el fin y formar las sisas disminuyendo en el interior de los 3 pts de orillo a cada 2 hileras: 2 pts 2-2-4 veces, 1 pt 1-3-3 veces = 78-82-82 pts. Cuando la labor mida 42-45-48 cm, colocar los 28-36-36 pts centrales en un gancho auxiliar para el escote, después, colocar pts de cada orilla del escote en el gancho auxiliar, a cada 2 hileras: 2 pts 2 veces, 1 pt 2 veces = 40-48-48 pts en el gancho auxiliar y 19-17-17 pts en cada hombro. Cuando la labor mida 47-50-53 cm, tejer 1 hilera de derecho sobre los pts de los hombros (hilera por el lado derecho), disminuyendo 3-2-2 pts distribuidos equitativamente a lo largo de la hilera = 16-15-15 pts. Tejer 2 hileras en pt musgo, rematar. Espalda: = 88-96-104 pts. Formar las sisas de cada lado como se hizo para el frente = 78-82-82 pts. Cuando la labor mida 46-49-52 cm, colocar los 36-44-44 pts centrales en un gancho auxiliar para el escote. Después, colocar 2 pts de cada orilla del escote en el gancho auxiliar en la hilera siguiente = 19-17-17 pts restantes en cada hombro. Cuando la labor mida 47-50-53 cm, tejer 1 hilera de derecho (hilera por el lado derecho) sobre los pts de los hombros, disminuyendo 3-2-2 pts distribuidos equitativamente a lo largo de la hilera = 16-15-15 pts. Tejer 2 hileras en pt musgo, rematar. Ensamblaje: Hacer la costura de los hombros. Con las ag de doble punta tamaño 4.5 mm, levantar aprox 80-100 pts alrededor del escote (incl. los pts en los ganchos auxiliares). Unir y tejer 1 hilera en pt jersey, disminuyendo 14-20-20 pts distribuidos equitativamente en la hilera. Tejer 4 hileras en pt musgo, rematar. |
|||||||||||||||||||
Explicaciones del diagrama |
|||||||||||||||||||
|
|||||||||||||||||||
 |
|||||||||||||||||||
 |
|||||||||||||||||||
¿Terminaste este patrón?Entonces, etiqueta tus fotos con #dropspattern #whiteouttop o envíalas a la galería #dropsfan. ¿Necesitas ayuda con este patrón?Encontrarás 23 videos tutoriales, un espacio para comentarios/preguntas y más visitando la página del patrón en garnstudio.com © 1982-2026 DROPS Design A/S. Todos los derechos reservados. Este documento, incluyendo todas sus sub-secciones, está protegido por los derechos de autor (copyright). Lee más acerca de lo que puedes hacer con nuestros patrones en la parte de abajo de cada patrón de nuestro sitio. |
|||||||||||||||||||


Con más de 40 años en el diseño de modelos de punto y de ganchillo, DROPS Design ofrece una de las más vastas colecciones de patrones gratuitos en el internet - traducidos en 17 idiomas. Al día de hoy, contamos con 324 catálogos y 12290 patrones - de los cuales 11675 están traducidos en español.
Nosotros trabajamos con mucho esmero para brindarte lo mejor que las labores de punto y ganchillo tienen para ofrecer,inspiración y consejos, así como hilos de magnífica calidad a precios increíbles! Te gustaría usar nuestros patrones para otro fin además del uso personal? Puedes leer acerca de lo que estás permitida a hacer en el texto de Copyright en la parte de abajo de todos nuestros patrones. Felices labores!
Escribe un comentario sobre DROPS 64-9
¡Nos encantaría saber qué piensas acerca de este patrón!
Si quieres escribir una pregunta referente al patrón, por favor asegúrate de elegir la categoría correcta en el formulario debajo, para acelerar el proceso de respuesta. Los campos obligatorios están marcados con un *.