
Categorías populares
¿Buscas un hilo?


Comentarios / Preguntas (24)
![]() Nel Verkaik escribió:
Nel Verkaik escribió:
Fijn, dank je wel, ik kan weer verder.
21.10.2024 - 09:14
![]() Nel Verkaik escribió:
Nel Verkaik escribió:
Dank voor uw antwoord. Mijn 2e vraag is duidelijk, maar mijn 1e vraag niet. Het gaat over de eerste nld. Van A2, Het 2e symbool. Er staat doe 2 st. Op de kabelnld. Achter het werk, dan 2 recht, 2 averecht en dan de 2 van de kabelnld. Er staat dus of 2 recht of 2 averecht te veel. Ik weet nu niet of ik de twee steken recht of av. Moet breien.? Vriendelijke groet Nel
19.10.2024 - 22:41DROPS Design respondió:
Dag Nel,
Oeps...ik zie dat er een fout stond in het 5e symbool. De 2 averecht moest er niet in staan. Als het goed is, is het nu aangepast.
20.10.2024 - 18:46
![]() Nel Verkaik escribió:
Nel Verkaik escribió:
Hallo, De eerste nld. van telpatroon A2 staat bij het 2e symbool zet 2 steken op een kabelnaald en houd deze achter het werk, 2 recht, 2 averecht, 2 recht van de kabelnaald. Wat moet ik weg laten om 4 st.te krijgen? En begrijp ik het goed dat de 2e nld. dus de verkeerde kant begint met 2 recht en dan 4 averecht/4 recht/2 averecht? Bij voorbaat bedankt en vriendelijke groet.
15.10.2024 - 16:53DROPS Design respondió:
Dag Nel,
Je zet 2 steken op een kabelnaald en houdt deze voor het werk (niet achter het werk) dan brei je de volgende 2 steken en daarna brei je weer de 2 steken van de kabelnaald. Je hebt nu 4 steken gebreid. Je hoeft niets weg te laten en het aantal steken blijft ook hetzelfde. De tweede naald (en alle even naalden) brei je inderdaad op de verkeerde kant waarbij de eerste 2 steken van het telpatroon averecht worden gebeid. (Een leeg vakje wordt namelijk recht aan de goede kant gebreid en averecht aan de verkeerde kant.)
19.10.2024 - 11:04
![]() KJW escribió:
KJW escribió:
Hello, I too am having problems with the pattenr for the headband. Per your response above, we are supposed to start from “bottom corner on the right side from RS and read from the right towards the left, read the WS rows from the left towards the right.” To confirm this means on the diagram for thr 9 st: we start with the bottom row with the 3 cables on it (RS) from the right and then the next row above it (WS) we begin on the left and P2, K2, P4, K1. Correct?
27.01.2024 - 19:03DROPS Design respondió:
Hi KJW, Yes, the first row is with cables, the second row from left to right and from the wrong side is P2, K4, P4, K2 . Happy knitting!
29.01.2024 - 06:41
![]() Sharon Hunt escribió:
Sharon Hunt escribió:
Thanks for your response. Am still a bit confused. The instruction says to work the short rows over 6cm and that is how I ended up with 10 rows by counting my swatch height. So my question is do I begin the short rows every time I work a first row? The answer to this would help because the 6cm is confusing me. Thanks.
04.09.2022 - 23:39DROPS Design respondió:
Dear Sharon, start working the short rows as explained below. After working the 6 rows explained in the SHORT ROWS section, you work A.2 normally (alongside the edge stitches) and when the work measures 6 cm (or a multiple of it) work short rows again. Happy knitting!
04.09.2022 - 23:48
![]() Sharon Hunt escribió:
Sharon Hunt escribió:
Hi, it seems like the short rows will be done on every 10th row. Is this correct? In this case the 10 row does not always end on the right side. Would it be ok to assume that one adjust the pattern so the short rows begin on the right side? Thanks so much for your help. Sharon
03.09.2022 - 12:14DROPS Design respondió:
Dear Sharon, short rows are worked at the start of rows 1 and 4, one from the right side and the other one from the wrong side, so that you have short rows both in the left and right sides of the garment. At the same time, you work A.2 only in the rows which have no short rows (so only in rows 3 (from the right side) and row 6 (from the wrong side)). You can check in the following video how to work short rows (without including A.2): https://www.garnstudio.com/video.php?id=438&lang=en. Happy knitting!
04.09.2022 - 23:10
![]() Sharon Hunt escribió:
Sharon Hunt escribió:
Where would I start the short row pattern on neckwarmer? On the short row pattern, row 3 it says to knit over all stitches. Does this mean the stitches on the chart included. Thanks for your help.
02.09.2022 - 07:32DROPS Design respondió:
Dear Mrs Hunt, start the short rows with row 1 from right side and work 2 rows over the first 6 stitches, then work 1 row on all sts (row 3) as before and now work 2 rows over the first 6 sts. Turn and work 1 row from WS as before. You have now worked 2 extra rows (1 ridge) on each side of the cable. Happy knitting!
02.09.2022 - 09:03
![]() Elly Meye escribió:
Elly Meye escribió:
Wat is de functie van de verkorte naalden in de halswarmer van Drops 180-10? Als je de instructie volgt wordt de sjaal aan beide zijkanten iets ruimer dan het middelste kabeldeel. Het lijkt mij eigenlijk logischer om alleen de buitenrand van de halswarmer meer ruimte te geven en de binnenrand (= de halsrand) juist niet. Of begrijp ik de instructie verkeerd?
12.10.2020 - 16:55DROPS Design respondió:
Dag Elly,
Dit wordt waarschijnlijk gedaan omdat anders het gedeelte in ribbelsteek gaat samentrekken t.o.v. de kabel, zodat de halswarmer beter valt. Als je wilt dat de hij aan de halskant meer aansluit, zou je daar de verkorte toeren over kunnen slaan of minder verkorte toeren kunnen maken.
05.11.2020 - 09:36
![]() Erika Walzl escribió:
Erika Walzl escribió:
Das Stirnband habe ich bereits gestrickt. Dort stimmt alles. Ich habe kein Problem damit Strickschriften zu lesen.
08.10.2020 - 20:40
![]() Erika Walzl escribió:
Erika Walzl escribió:
= 2 Maschen auf eine Zopfnadel hinter die Arbeit legen, 2 Maschen links, 2 Maschen rechts von der Zopfnadel Laut Punkt 5 der Diagrammschrift soll man erst 2 Maschen links stricken, lt. Diagramm sind dort aber rechte Maschen. Es müssten also 2 links, zwei rechts, ... gestrickt werden und nicht 4 rechts und 4 links?
08.10.2020 - 16:26DROPS Design respondió:
Liebe Frau Walzl, ganz herzlichen Dank für den Hinweis, die Beschreibung wird korrigiert. Viel Spaß beim stricken!
09.10.2020 - 10:53
|
|||||||||||||||||||||||||
Dovre#dovreset |
|||||||||||||||||||||||||
 |
 |
||||||||||||||||||||||||
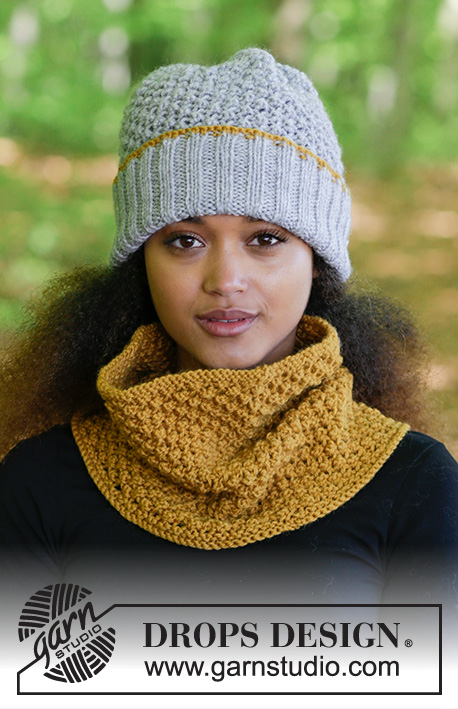
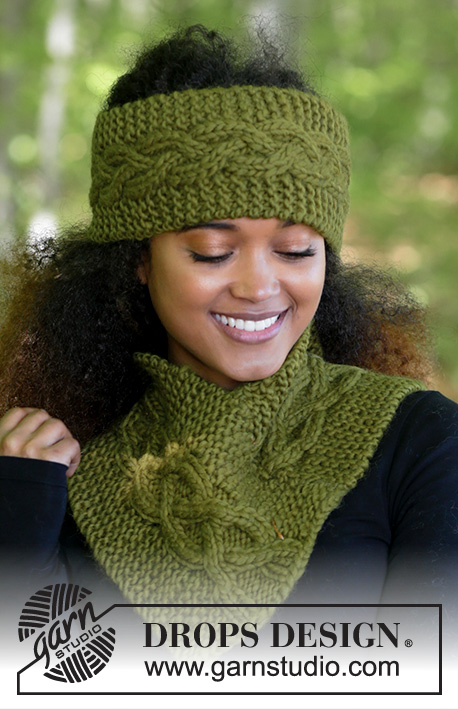
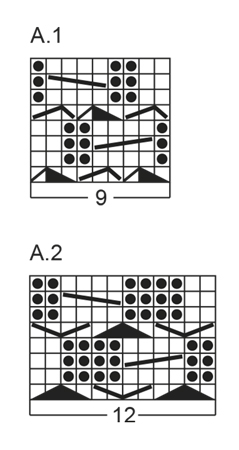
El conjunto se compone de: banda de pelo y cuello de punto con punto musgo y trenzas. Ambas prendas tejidas en DROPS Snow.
DROPS 180-10 |
|||||||||||||||||||||||||
|
INFORMACIÓN PARA REALIZAR EL PATRÓN: PUNTO MUSGO (de ida y vuelta): 1 pliegue = 2 filas de derecho PATRÓN: Banda para el pelo: Ver el diagrama A.1 Cuello: Ver el diagrama A.2 Los diagramas muestran todas las filas del patrón vistas por el lado derecho. FILAS ACORTADAS: Trabajar filas acortadas a cada lado del cuello como sigue: FILA 1 (= lado derecho): Trabajar los primeros 6 puntos en punto musgo, girar la labor. FILA 2 (= lado revés): Estirar el hilo y trabajar los 6 puntos en punto musgo. FILA 3: Trabajar sobre todos los puntos. FILA 4: Trabajar los primeros 6 puntos en punto musgo, girar la labor. FILA 5: Estirar el hilo y trabajar 6 puntos en punto musgo, girar la labor. FILA 6: Trabajar sobre todos los puntos. ----------------------------------------------------------------------- BANDA PARA EL PELO: Trabajar de ida y vuelta en aguja. Montar 17 puntos con agujas tamaño 8 mm y Snow. Trabajar la siguiente fila como sigue por el lado derecho: 4 puntos en PUNTO MUSGO - ver explicaciones arriba, A.1 (= 9 puntos), 4 puntos en punto musgo. RECUERDE MANTENER LA MISMA TENSIÓN DEL TEJIDO. Continuar con A.1 con 4 puntos en punto musgo a cada lado hasta que la labor mida 54 cm - finalizar con la última fila de A.1. Rematar flojo todos los puntos. Coser la banda en el centro de la parte posterior con grafting/ punto de colchoneta. ----------------------------------------------------------------------- CUELLO: Trabajar de ida y vuelta en aguja. Montar 24 puntos con agujas tamaño 8 mm y Snow. Trabajar la siguiente fila como sigue por el lado derecho: 6 puntos en PUNTO MUSGO - ver explicaciones arriba, A.2 (= 12 puntos), 6 puntos en punto musgo. Trabajar A.2 con 6 puntos en punto musgo a cada lado y trabajar FILAS ACORTADAS - ver las explicaciones arriba - cada 6 cm. RECUERDE MANTENER LA MISMA TENSIÓN DEL TEJIDO. Insertar 1 marcapuntos al final de la siguiente fila por el lado derecho cuando la labor mida 22 cm (el cuello se cose aquí al finalizar). Continuar hasta que la labor mida aprox 76 cm en el centro del cuello - finalizar en la última fila de A.2, rematar flojo todos los puntos. TERMINACIÓN: Coser el borde de remate entre el borde de montaje y el marcapuntos insertado en el lado para formar una punta en el delantero - coser borde con borde con pequeñas puntadas para evitar una costura abultada. |
|||||||||||||||||||||||||
Explicaciones del diagrama |
|||||||||||||||||||||||||
|
|||||||||||||||||||||||||
 |
|||||||||||||||||||||||||
¿Terminaste este patrón?Entonces, etiqueta tus fotos con #dropspattern #dovreset o envíalas a la galería #dropsfan. ¿Necesitas ayuda con este patrón?Encontrarás 20 videos tutoriales, un espacio para comentarios/preguntas y más visitando la página del patrón en garnstudio.com © 1982-2026 DROPS Design A/S. Todos los derechos reservados. Este documento, incluyendo todas sus sub-secciones, está protegido por los derechos de autor (copyright). Lee más acerca de lo que puedes hacer con nuestros patrones en la parte de abajo de cada patrón de nuestro sitio. |
|||||||||||||||||||||||||


Con más de 40 años en el diseño de modelos de punto y de ganchillo, DROPS Design ofrece una de las más vastas colecciones de patrones gratuitos en el internet - traducidos en 17 idiomas. Al día de hoy, contamos con 324 catálogos y 12290 patrones - de los cuales 11685 están traducidos en español.
Nosotros trabajamos con mucho esmero para brindarte lo mejor que las labores de punto y ganchillo tienen para ofrecer,inspiración y consejos, así como hilos de magnífica calidad a precios increíbles! Te gustaría usar nuestros patrones para otro fin además del uso personal? Puedes leer acerca de lo que estás permitida a hacer en el texto de Copyright en la parte de abajo de todos nuestros patrones. Felices labores!
Escribe un comentario sobre DROPS 180-10
¡Nos encantaría saber qué piensas acerca de este patrón!
Si quieres escribir una pregunta referente al patrón, por favor asegúrate de elegir la categoría correcta en el formulario debajo, para acelerar el proceso de respuesta. Los campos obligatorios están marcados con un *.