
Categorías populares
¿Buscas un hilo?


Comentarios / Preguntas (166)
![]() Aina Eilen Krogh escribió:
Aina Eilen Krogh escribió:
Nydelig🤩
13.06.2024 - 10:43
![]() Julia escribió:
Julia escribió:
Garnmenge für Größe S passte bei mir nicht! Sonst stimmten die Angaben für den Garnverbrauch von Drops in den letzten 10 Jahren bei mir immer. Ich musste jetzt für die letzten sechs Reihen noch Wolle nachbestellen.
24.05.2024 - 21:10
![]() Marilyn Growns escribió:
Marilyn Growns escribió:
Thankyou for all the support given over the various stages with issues I have had understanding how to knit this cardigan. I am extremely happy as I have finished it and it looks amazing:)
20.05.2024 - 14:20
![]() Marilyn Growns escribió:
Marilyn Growns escribió:
Really appreciate the support. Last question I hope. Re Raglan sleeve and raglan body. At row 17 size L - . Would this starting row look like the following..Knit pattern to 1st sleeve - K2 tog,k2,slip 1,k1, psso, repeated at end of sleeve, then immediaetly the same instruction k2 tog, k2, slip 1,k1,psso at the start of the back body, knit the rest of the pattern, then k2 tog, k2, slip 1, k1, psso and then start the decrease process again for the next sleeve? Cannot find a video for this. Thanks
08.05.2024 - 10:11DROPS Design respondió:
Dear Mrs Growns, in size L you will first decrease 8 sts for raglan 17 times on every other row, ie decrease on both sleeve and body (front and back pieces), then decrease only on body on next row from RS (18th decrease for body), then decrease again 8 sts (1st decrease on every 4th row on sleeves + 19th decrease on body); from now on, decrease on every other right side row = on every 4th row 8 sts (both body and sleeve) a total of 2 times then increase only on sleeve a total of 3 times on every 4th row - you have increased (17+1+2+3= 23 times on sleeves and 17+1+1+2=21 times on body). Happy knitting!
08.05.2024 - 13:09
![]() Marilyn Growns escribió:
Marilyn Growns escribió:
Please clarify - RAGLAN SLEEVE instruction - decrease every other row 17 times for LARGE and then decrease every row 6 times. Does this mean - Dec on the RS only 17 times - 34 rows in total (K2tog, K2,slip 1 st as if to knit, K1, psso) and thereafter decrease on the RS (K2tog, K2,slip 1 st as if to knit, K1, psso) followed by the WS (P2 twisted tog, P2, P2 tog) 6 times Thanks in advance
05.05.2024 - 08:58DROPS Design respondió:
Dear Marilyn, yes, it means just that. "Every other row" is every row from the right side, "every row" means every right side AND every wrong side row as well. Happy Crafting!
05.05.2024 - 15:30
![]() Marilyn Growns escribió:
Marilyn Growns escribió:
Drops 169-1 no w‐583. Size Large Re instruction: Yoke - slip sleeves on to same circular needle as body where armholes were cast off = 306 stitches. My question is....instructions say slip. However looking at the video on YouTube for' how to work raglan from the bottom up' the video shows 'knitting' the sleeve on NOT 'slipping' the sleeves onto the circular needle. Please could you clarify if I should SLIP or KNIT the sleeve onto the circular needle. Thanks in advance
03.05.2024 - 19:55DROPS Design respondió:
Dear Marily, honestly, it does not really matter. If you slip the stitches, then you can continue from the right side, if you knit the stitches, the next row will be from the wrong side. In both cases you should pay attention to continue the pattern from the right place in the diagram. Happy Knitting!
03.05.2024 - 23:13
![]() Marilyn Growns escribió:
Marilyn Growns escribió:
Re - Sleeve....when piece measures 48 cm ( size large) the pattern says... cast off 6 stitches mid under sleeve which leaves 60 stitches.. I have placed markers all the way up the sleeve, therefore should I decrease 3 stitches either side of the last marker? The video is not working. Thankyou
02.04.2024 - 00:10DROPS Design respondió:
Hi Marilyn, Yes you cast off 3 stitches on each side of the marker. Happy knitting!
02.04.2024 - 06:38
![]() Marilyn Growns escribió:
Marilyn Growns escribió:
Can you please let me know how often the cable is done? i cannot see it in the pattern. I am making size L. I do however note that on 16/06/21 you answered Jenny's question - every 8th row. Have I interpreted that correctly? Looking at the picture of the cardigan it looks like in total there are 11 cables to the neckline. Please could you confirm. Sorry for the many questions. I love this pattern and really want to be able to complete it. Thanks in advance
23.01.2024 - 14:54DROPS Design respondió:
Dear Mrs Growsn, cables are worked on every 8th row as follows in A.1: Row 1 with cable, Row 2 til 8 without cable, repeat these 8 rows. Happy knitting!
24.01.2024 - 08:14
![]() Marilyn Growns escribió:
Marilyn Growns escribió:
I posted 7/01/24 re the 11 decreases for size L. Decrease at the beginning of first Purl section and decrease at the end of the next purl section. Julia's question on 29/04/17 says in one row you do all decreases at the beginning of each P section and in the second decrease row you do them at the end of each P section. This contradicts what I have done and is concerning me that I have done this incorrectly. Please can you clarify. Thanks in advance
23.01.2024 - 14:35DROPS Design respondió:
Dear Mrs Growns, you should decrease 11 stitches on every decrease row = 1 stitch in each of the P-sections and work these decreases a total of 5 times. the first time you will decrease at the beg of every P-section, the 2nd time at the end of every P-section and continue like this decreasing alternately one time at the beg of every P-section and next time at the end of every P-section. Happy knitting!
24.01.2024 - 08:10
![]() Marilyn Growns escribió:
Marilyn Growns escribió:
Thanks for answering my question. However, what I am confused with is 'When piece measures 5 cm, dec 1 sts in all P-sections (= 11-11-11-12-12-12 dec per dec round)' Read decrease tip which is ' Dec 1 st by P 2 tog. Dec alternately at beg and end of P section'. From 8 stitches it would mean each purl section decreases to 6 which would make the calculation wrong. What does it mean - alternately? I am just totally confused. :(
05.01.2024 - 22:50DROPS Design respondió:
Dear Marilyn, you decrease by purling 2 together in each section once. However, in each purl section you will decrease either at the beginning or the end of the section (alternately means every other or on alternate sections). For example, in the first section you purl together the first 2 stitches, in the second section you purl together the last 2 stitches, in the third section you purl together the first 2 stitches, e.t.c. Happy knitting!
07.01.2024 - 23:34
|
||||||||||
Romantic Twist#romantictwistcardigan |
||||||||||
 |
 |
|||||||||
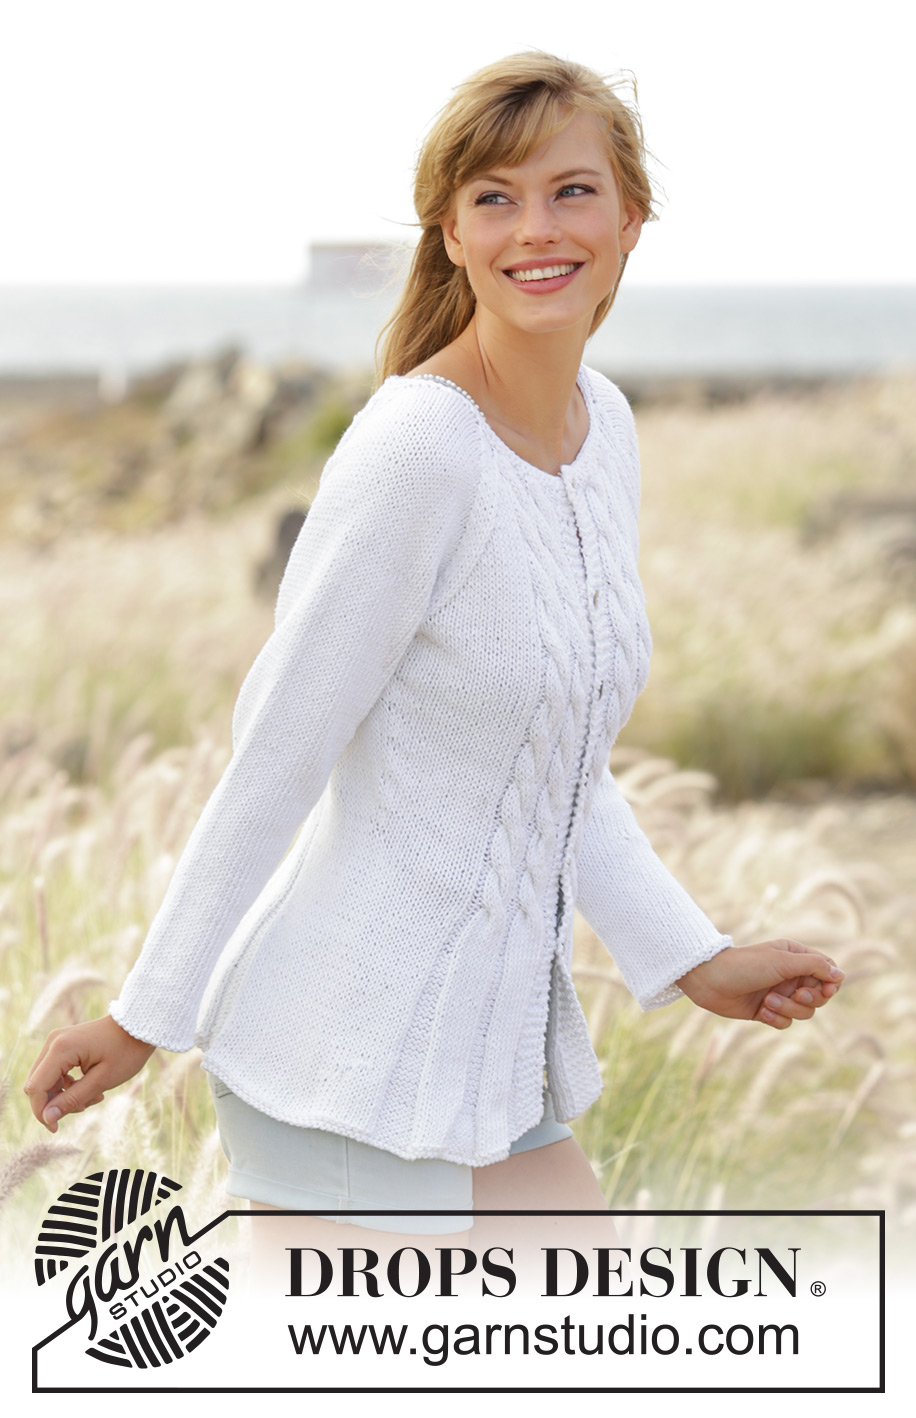
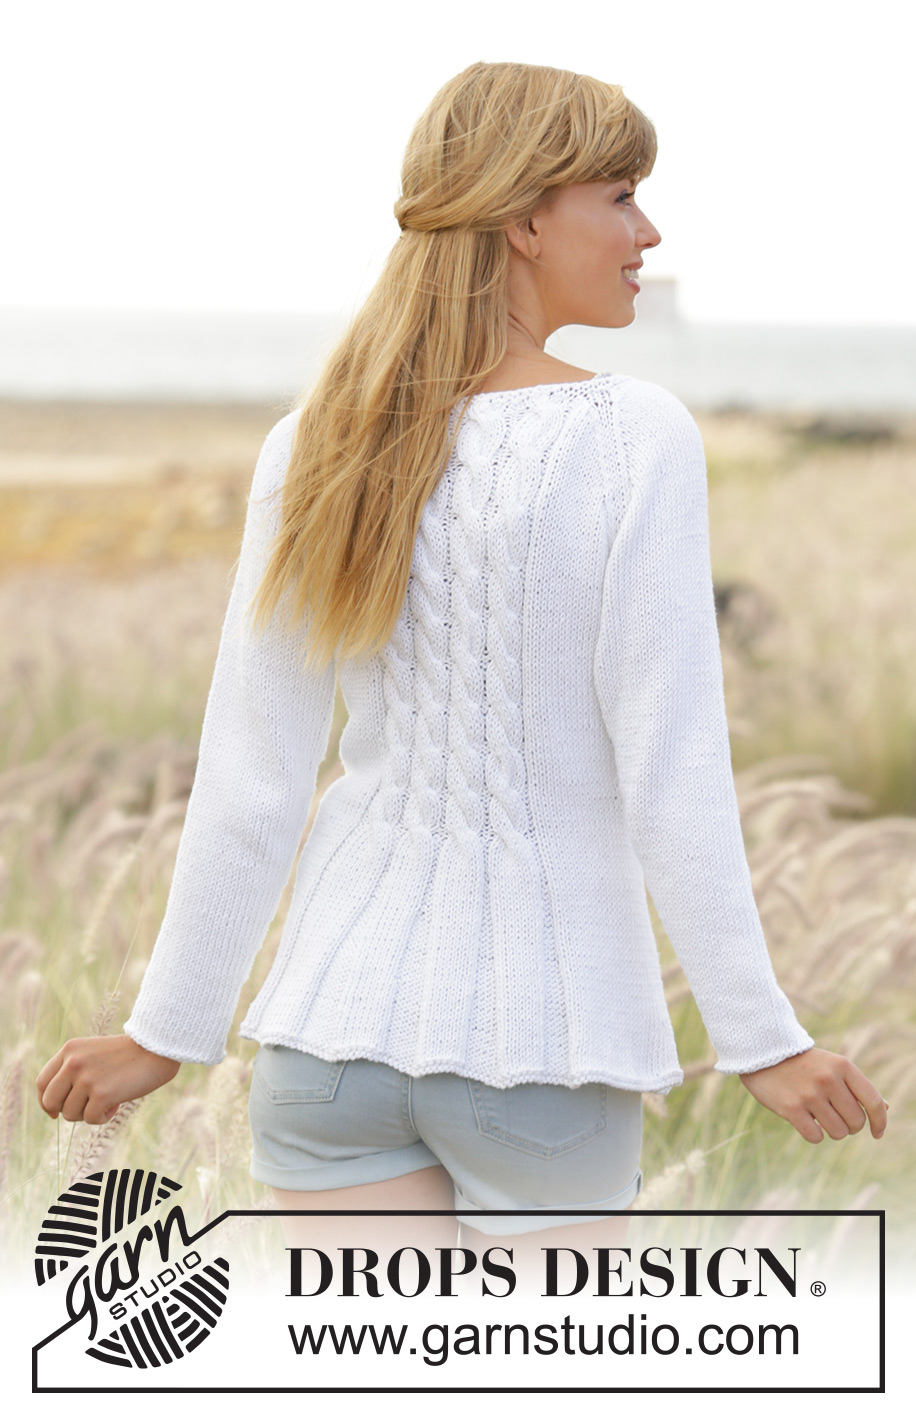
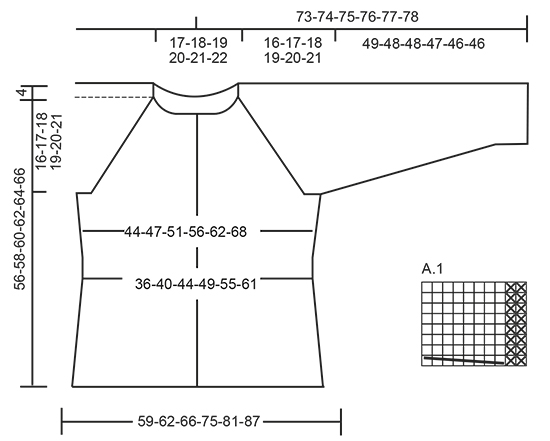
Chaqueta de punto ajustada DROPS con patrón de trenzas y raglán en ”Paris”. Talla: S - XXXL.
DROPS 169-1 |
||||||||||
|
PUNTO MUSGO (de ida y vta en ag): Trabajar todas las filas de derecho. 1 pliegue = 2 filas de derecho. PUNTO MUSGO (se trabaja en redondo): 1 pliegue = 2 vueltas. * 1 vta de derecho, 1 vta de revés*, repetir de * a *. TIP PARA LAS DISMINUCIONES: Dism 1 pt trabajando 2 pjr. Trabajar las disminuciones de modo alterno al inicio y al final de la sección de revés. PATRÓN: Ver el diagrama A.1 El diagrama muestra todas las filas del patrón visto por el LD. RAGLÁN: Dism 2 pts en cada transición entre el cuerpo y la manga. Dism como sigue por el LD: 2 pjd, 2 d. (el MP (marcapuntos) queda entre estos pts), desl 1 pt como de derecho, 1 d., pasar el pt desl por encima. Dism como sigue por el LR: 2 pjr retorcido, 2 r. (el MP queda entre estos pts), 2 pjr TIP PARA LA REALIZACIÓN DEL TRABAJO: Si la tensión del tejido no corresponde en altura y el tejido está muy prieto, las dism del raglán quedarán muy cortas y las sisas muy pequeñas. Esto se puede ajustar tejiendo filas extra sin dism, distribuidas equitativamente entre las filas con dism. OJALES: Cerrar para los ojales en la cenefa derecha. 1 ojal = trabajar juntos de derecho el 2º y 3er pt desde el centro del delantero y hacer 1 HEB (lazada). Cerrar para los ojales cuando la labor mida: TALLA S: 19, 26, 33, 40, 47 y 54 cm. TALLA M: 19, 26, 33, 40, 48 y 56 cm. TALLA L: 19, 26, 34, 42, 50 y 58 cm. TALLA XL: 19, 28, 36, 44, 52 y 60 cm. TALLA XXL: 19, 26, 33, 40, 47, 54 y 62 cm TALLA XXXL: 19, 26, 33, 40, 48, 56 y 64 cm ---------------------------------------------------------------------- CUERPO: Se trabaja de ida y vta en ag circular desde el centro del delantero. Mont 216-228-240-266-286-306 pts (incl los 5 pts de la cenefa a cada lado del centro del delantero) con ag circular tamaño 5 mm y Paris. Trabajar 1 pliegue en PUNTO MUSGO - ver las explicaciones arriba, después trabajar como sigue - por el LD: 5 pts en pt musgo, * 8 r., 8 d*, repetir de * a * un total de 2 vcs, 8 r., 27-33-39-44-54-64 pts en pt jersey, * 8 r., 8 d.*, repetir de * a * un total de 4-4-4-5-5-5 vcs, 8 r., 27-33-39-44-54-64 pts en pt jersey, * 8 r., 8 d.*, repetir de * a * un total de 2 vcs, 8 r., 5 pts en pt musgo. Continuar con este patrón hacia arriba. RECUERDE MANTENER LA MISMA TENSIÓN DEL TEJIDO. Cuando la labor mida 5 cm, dism 1 pt en todas las secciones de revés (= 11-11-11-12-12-12 dism por fila) - LEER EL TIP PARA LAS DISMINUCIONES. Repetir las dism cada 3 cm 5 vcs más = 150-162-174-194-214-234 pts. Cerrar para los OJALES en la cenefa derecha - ver las explicaciones arriba. Cuando la labor mida 21 cm trabajar como sigue: 5 pts en pt musgo. A.1 dos vcs, 2 r., pt jersey sobre los sig 27-33-39-44-54-64 pts, A.1 4-4-4-5-5-5 vcs, 2 r., pt jersey sobre los sig 27-33-39-44-54-64 pts, A.1 2 vcs, 2 r., 5 pts en pt musgo. Insertar 2 MP en la labor a 40-43-46-51-56-61 pts de cada lado (espalda = 70-76-82-92-102-112 pts). Cuando la labor mida 23 cm aum 1 pt a cada lado de cada MP (= 4 pts aum), repetir los aum cada 2.5-3-3-3.5-3.5-4 cm 5 vcs más =174-186-198-218-238-258 pts. Cuando la labor mida 40-41-42-43-44-45 cm , trabajar la sig fila (por el LD) como sigue: 43-46-49-54-59-64 pts, cerrar los 6 pts sig, trabajar 76-82-88-98-108-118 pts, cerrar los 6 pts sig y trabajar los 43-46-49-54-59-64 pts restantes. Dejar la labor en espera y trabajar las mangas. MANGA: Se trabaja en redondo con ag de doble punta. Mont 32-34-36-38-40-42 pts con ag de doble punta tamaño 5 mm con Paris. Trabajar 1 pliegue, después continuar en pt jersey. Insertar 1 MP al inicio de la vta (= centro bajo la manga). Cuando la labor mida 8 cm, aum 2 pts en el centro bajo la manga. Trabajar los aum cada 3-2.5-2.5-2.5-2-2 cm 13-13-14-15-16-16 vcs más = 60-62-66-70-74-76 pts. Cuando la labor mida 49-48-48-47-46-46 cm (medidas más cortas en las tallas más grandes debido a la mayor copa de la manga), cerrar 6 pts bajo la manga = 54-56-60-64-68-70 pts. Dejar la labor en espera y trabajar la otra manga. CANESÚ: Desl las mangas a la misma ag circular que el cuerpo, donde se cerró para las sisas = 270-286-306-334-362-386 pts. Insertar un MP en cada transición entre las mangas y el cuerpo. Continuar con el patrón como antes y AL MISMO TIEMPO dism para el RAGLÁN - ver explicaciones arriba. Trabajar las disminuciones para el cuerpo y para la manga de modo diferente. DISMINUCIONES DEL RAGLÁN EN LA MANGA: Dism cada 2ª fila 16-17-17-18-18-19 vcs, después cada fila 4-4-6-7-9-9 vcs (= un total de 20-21-23-25-27-28 vcs). DISMINUCIONES DEL RAGLÁN EN EL CUERPO: Dism cada 4ª fila 4-2-0-0-0-0 vcs, cada 2ª fila 11-16-19-21-19-16 vcs y después cada fila 0-0-2-0-7-15 vcs (= un total de 15-18-21-21-26-31 vcs). Después de completar todas las dism quedan 130-130-130-150-150-150 pts en la ag. En la sig fila dism 2 pts sobre cada trenza de A.1 = 114-114-114-132-132-132 pts. Trabajar 2 pliegues sobre todos los pts, en la 1ª fila dism 20-16-12-26-22-18 pts repartidos = 94-98-102-106-110-114 pts. Rematar. TERMINACIÓN: Coser las aberturas bajo las mangas. Coser los botones en la cenefa izquierda. |
||||||||||
Explicaciones del diagrama |
||||||||||
|
||||||||||
 |
||||||||||
¿Terminaste este patrón?Entonces, etiqueta tus fotos con #dropspattern #romantictwistcardigan o envíalas a la galería #dropsfan. ¿Necesitas ayuda con este patrón?Encontrarás 26 videos tutoriales, un espacio para comentarios/preguntas y más visitando la página del patrón en garnstudio.com © 1982-2026 DROPS Design A/S. Todos los derechos reservados. Este documento, incluyendo todas sus sub-secciones, está protegido por los derechos de autor (copyright). Lee más acerca de lo que puedes hacer con nuestros patrones en la parte de abajo de cada patrón de nuestro sitio. |
||||||||||


Con más de 40 años en el diseño de modelos de punto y de ganchillo, DROPS Design ofrece una de las más vastas colecciones de patrones gratuitos en el internet - traducidos en 17 idiomas. Al día de hoy, contamos con 324 catálogos y 12290 patrones - de los cuales 11674 están traducidos en español.
Nosotros trabajamos con mucho esmero para brindarte lo mejor que las labores de punto y ganchillo tienen para ofrecer,inspiración y consejos, así como hilos de magnífica calidad a precios increíbles! Te gustaría usar nuestros patrones para otro fin además del uso personal? Puedes leer acerca de lo que estás permitida a hacer en el texto de Copyright en la parte de abajo de todos nuestros patrones. Felices labores!
Escribe un comentario sobre DROPS 169-1
¡Nos encantaría saber qué piensas acerca de este patrón!
Si quieres escribir una pregunta referente al patrón, por favor asegúrate de elegir la categoría correcta en el formulario debajo, para acelerar el proceso de respuesta. Los campos obligatorios están marcados con un *.