
Categorías populares
¿Buscas un hilo?


Comentarios / Preguntas (46)
![]() Sarah LEBIGOT escribió:
Sarah LEBIGOT escribió:
Bonjour, Pour la seconde partie, il est indiqué de la faire en sens inverse et je ne comprend pas comment lire les diagrammes en sens inverse? Merci pour vos explications.
10.01.2017 - 00:11DROPS Design respondió:
Bonjour Mme Lebigot, la 2ème partie doit se faire en miroir, c'est-à-dire tricotez les diagrammes comme la 1ère partie, mais montez la maille de la fente de l'autre côté pour avoir 2 m point mousse en fin de rang sur l'endroit et plus en début de rang sur l'endroit. Bon tricot!
10.01.2017 - 09:47
![]() LeeAnn escribió:
LeeAnn escribió:
Ok this still did not help me please type out how to start the second piece where in the pattern chart is it started ????? Sorry to be such a pain but I have already ripped out second piece 3 times and am frustrated.
15.09.2016 - 16:43DROPS Design respondió:
Dear LeeAnn, work A.1,A.2, A.3 as on 1st piece, but after they have been worked 1 time in height, work A.4 and A.5 reversed, ie instead of working A.4, stocking st, A.5, work from RS on 2nd piece: A.5, stocking st and A.4. When piece measures 30 cm, cast on 1 st at the end of next row from RS (instead of from WS) an work this st in garter st. Hope this will help. Remember you can also get further individual assistance from the store where you bought your yarn. Happy knitting!
15.09.2016 - 17:25
![]() LeeAnn escribió:
LeeAnn escribió:
I am even more confused regarding so classy please read all my questions which basically the same except the last one being is the second piece starting with RS or WS. the answer I got was not answering my question but rather telling me how to do the second piece . there were 2 answers telling me how to do the second piece both different , so which one is correct lPease advise how to correctly do second piece and if I am starting the chart on the RS or the WS Thank you
15.09.2016 - 15:14DROPS Design respondió:
Dear LeeAnn, you are right, sorry for very first answer, at the beg of 2nd piece, work as first piece, but then work reversed all inc/moss sts so that both pieces will be mirrored. Read diagram from the bottom corner on the right side towards the left from RS and from the left towards the right from WS, ie as on 1st piece. Happy knitting!
15.09.2016 - 16:12
![]() LeeAnn escribió:
LeeAnn escribió:
I am making the So classy poncho, and I know the second piece is worked in reverse, does that also mean I will be starting the chart with the wrong side of the garment?
15.09.2016 - 03:19DROPS Design respondió:
Dear LeeAnn, on 2nd piece work diagrams A.1-A.3 as for 1st piece, but when you work A.4 and A.5, work A.5 over the first 10 sts, stocking st and finish with A.4. Then cast on 1 st at the end of row from RS (instead of at the end of row from WS). Then work A.1,A.2 and A.3 with 1 st in garter st at the beg of row and 2 sts in garter st at the end of row. Happy knitting!
15.09.2016 - 08:59
![]() LeeAnn escribió:
LeeAnn escribió:
I am confused for the second piece of the poncho, the pattern says Cast on and work the same way but reversed. So where am I starting and what is meant by reversed? Thank You.
01.09.2016 - 04:38DROPS Design respondió:
Dear LeeAnn, when working reversed you will work 2nd piece as follows from RS: 1 edge st, A.3, repeat A.2, A.1 and 1 edge st - then when casting on 1 st when piece measures 30, cast on at the end of a row from RS (instead of from WS). Happy knitting!
01.09.2016 - 10:01
![]() Yuliya escribió:
Yuliya escribió:
Thank you so much for the wonderful pattern!! The yarn was so light with heavenly texture. When ordering yarn from you for size in S-M to be on the safe side I ordered 50 gr more than you recommended. But actually used only 250gr for the whole Poncho, 50gr less was suggested. Yay!!!! It's so-so soft and Weat - such a lovely natural color. Love it!
20.06.2016 - 05:29
![]() Claudia escribió:
Claudia escribió:
I am a bit confused about beginning this pattern, is row 1 and 2 knitted to make the edge or does it start with the A1 and A2 combination. Also A1 =5 stitch and A2 is 8 therefore if cast on 107 I cannot have 12 times A1 and A2 in the width since (5+8) x 12 =156. Is that correct?
30.05.2016 - 03:02DROPS Design respondió:
Dear Claudia, you work on 1st round diagrams A.1, A.2 and A.3 with 1 edge st in garter st, ie in size M: 1 edge st, A.1 1 time in width (= 5 sts), repeat A.2 a total of 12 times in width (= 12 x 8 sts), A.3 1 time in width (= 4 sts) and 1 edge st in garter st = 107 sts. Happy knitting!
30.05.2016 - 10:32
![]() Tonje escribió:
Tonje escribió:
Da forstår jeg ikke når A2 og A3 skal strikkes?
14.03.2016 - 15:20DROPS Design respondió:
Hej Tonje, jo du strikker A1 en gang i bredden, A2 11-12-13-14 ganger i bredden og sidst A3 en gang i bredden. Spørg gerne hos din lokale DROPS forhandler hvis du har købt garnet der. God fornøjelse!
15.03.2016 - 15:52
![]() Tora escribió:
Tora escribió:
1+5+(11x8)+4+1=99.
14.03.2016 - 13:14
![]() Tonje escribió:
Tonje escribió:
Jeg får ikke mønsteret til å stemme med forklaring. A1 og A2 er til sammen 13 masker. Det står at dette skal strikkes 11 ganger i bredden, men det går altså ikke opp når man i utgangspunktet har 99 masker. Hva er det jeg gjør feil her eller ikke forstår?
14.03.2016 - 12:24DROPS Design respondió:
Hej. Det är kun A.2 som du stickar 11 gånger på bredden (A.1 stickas 1 gång). Lycka till!
14.03.2016 - 13:44
|
||||||||||||||||||||||
So Classy!#soclassyponcho |
||||||||||||||||||||||
 |
 |
|||||||||||||||||||||
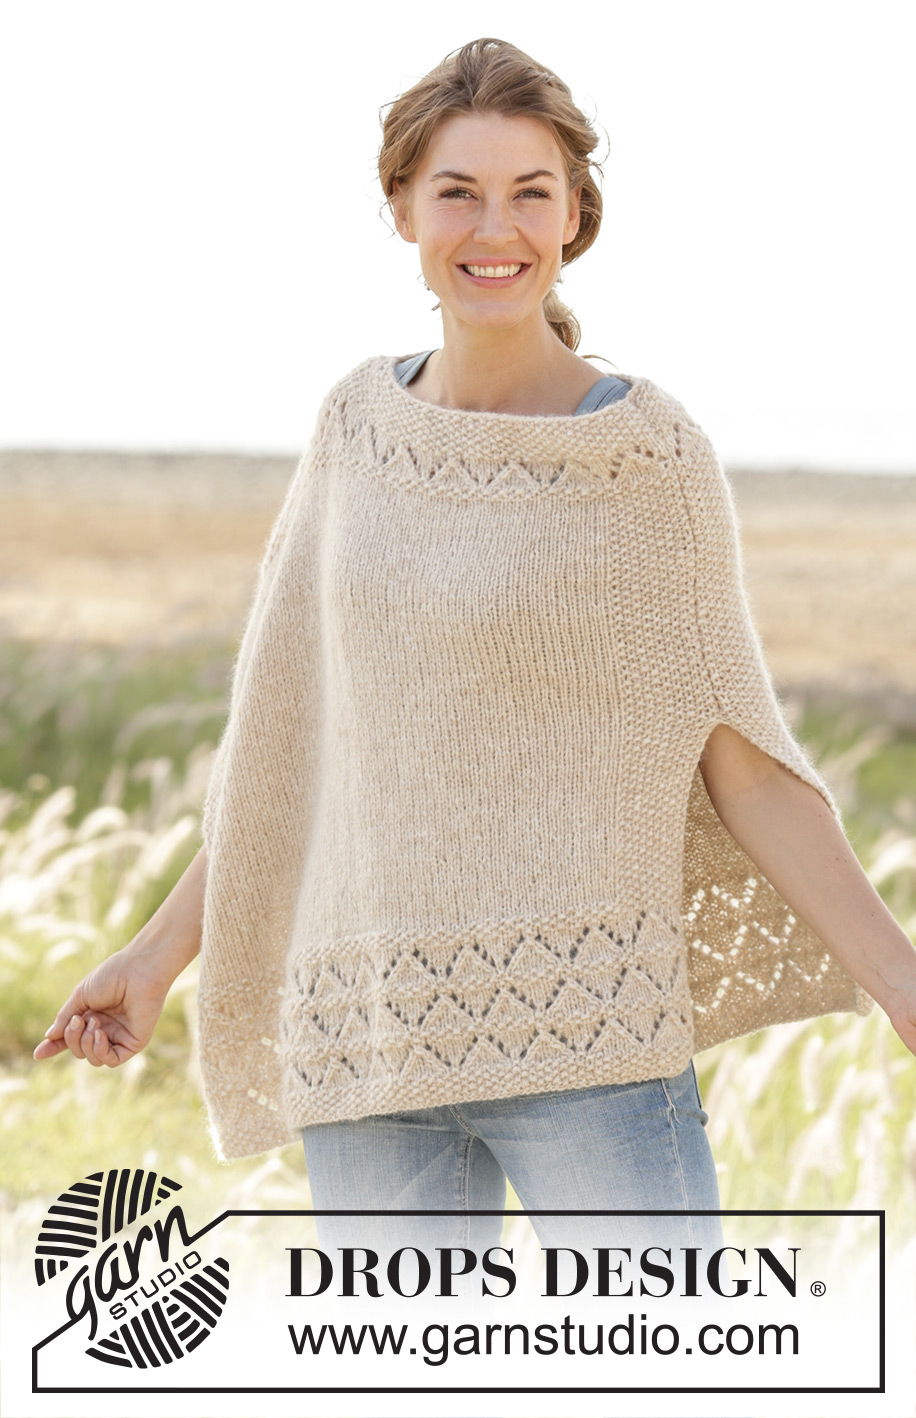
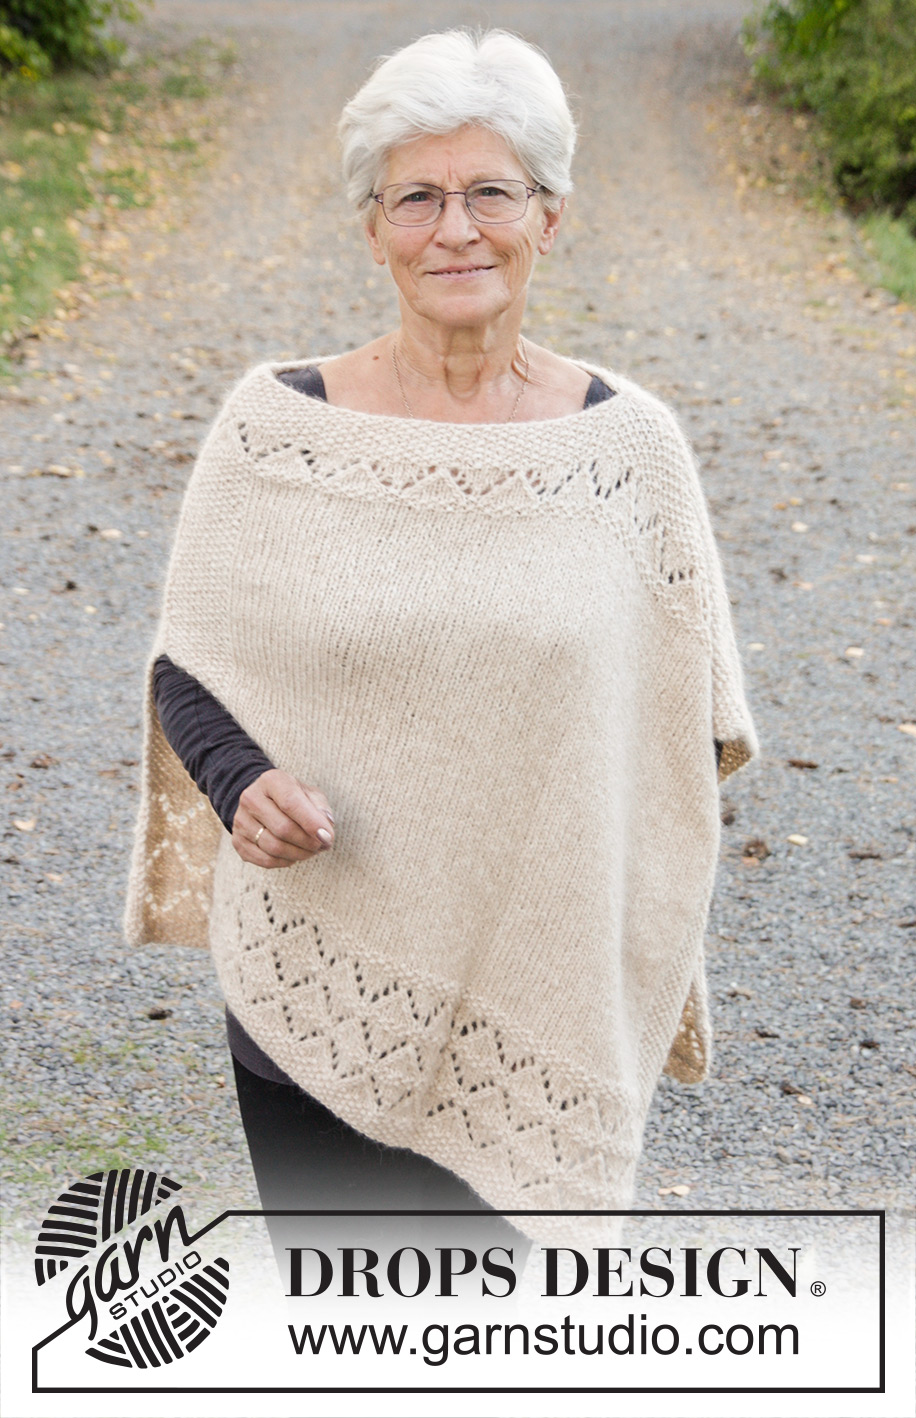
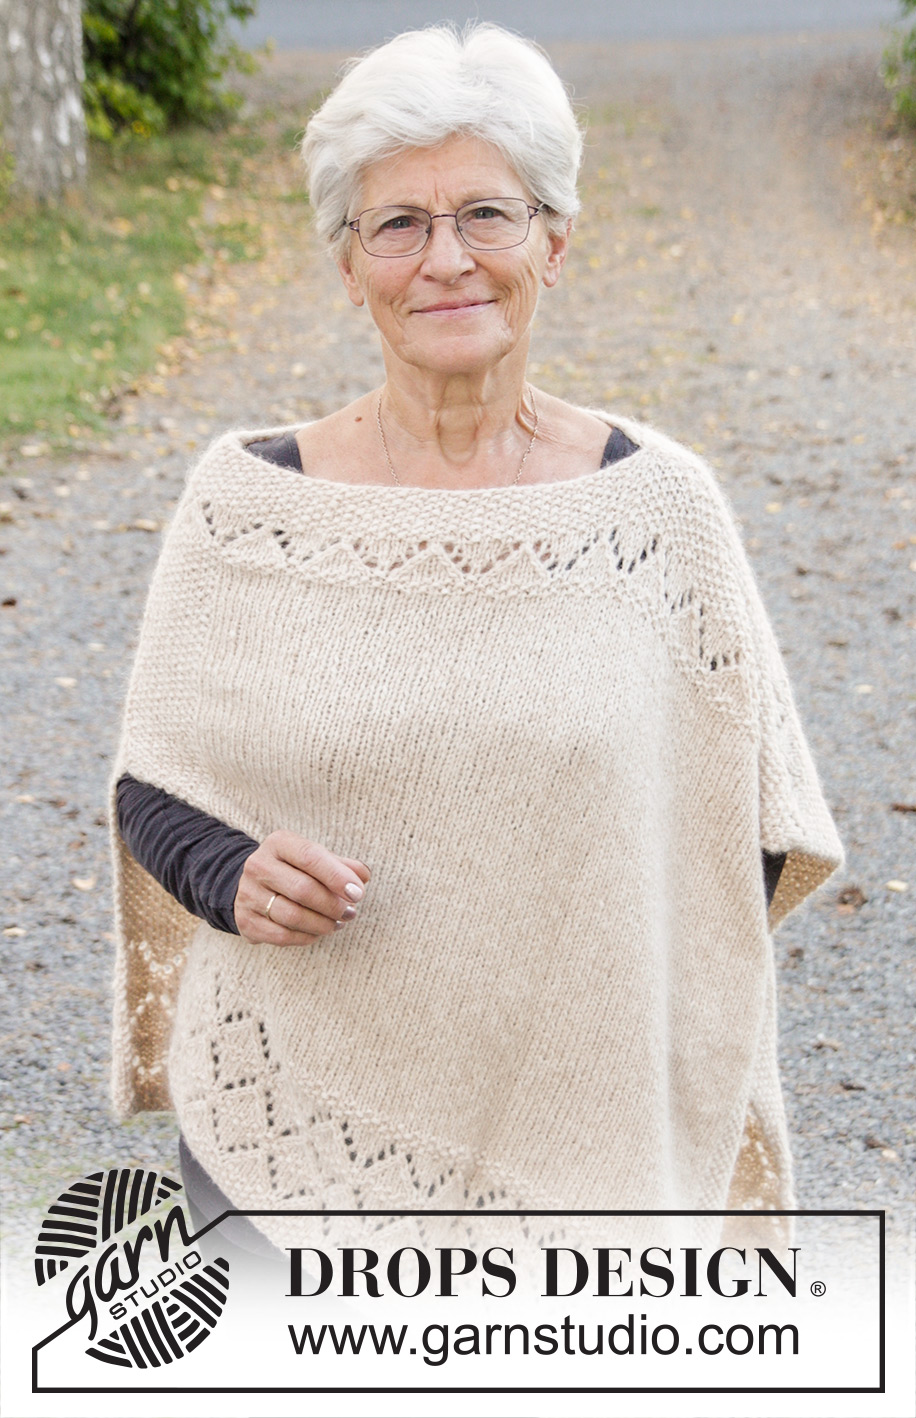
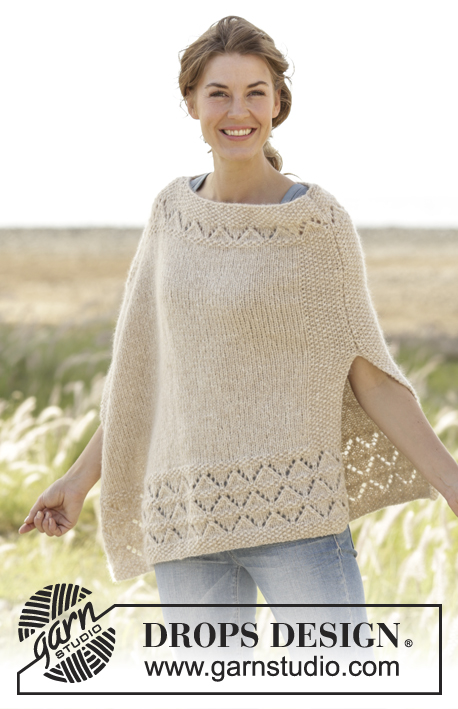
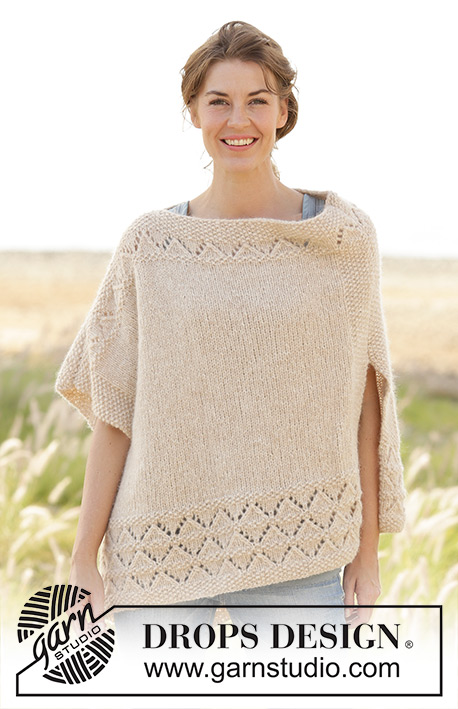
Poncho de punto DROPS en punto arroz con patrón de calados en ”Air”. Talla: S - XXXL.
DROPS 170-28 |
||||||||||||||||||||||
|
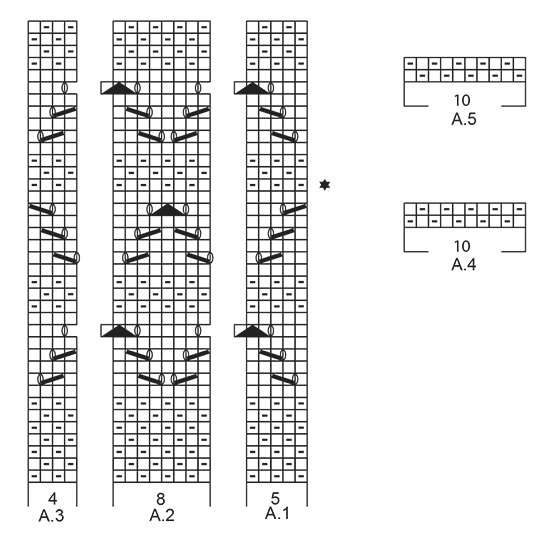
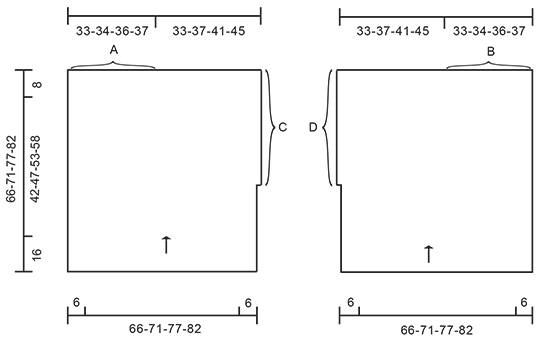
PUNTO MUSGO (de ida y vta): Trabajar todas las filas de derecho. 1 pliegue = 2 filas de derecho PATRÓN: Ver los diagramas A.1-A.5. Los diagramas muestran todas las filas del patrón visto por el LD. --------------------------------------------------------- PONCHO: Se trabaja de ida y vta en ag circular en 2 partes que se cosen al finalizar. Mont 99-107-115-123 pts (incl 1 pt orillo en pt musgo a cada lado) con ag circular tamaño 6 mm y con Air. Trabajar el patrón como sigue: 1 pt orillo en PUNTO MUSGO - ver las explicaciones arriba, A.1 (= 5 pts), A.2 (= 8 pts) repetir 11-12-13-14 vcs en el ancho, A.3 (= 4 pts), 1 pt orillo en pt musgo. ATENCIÓN: Trabajar el pt orillo en pt musgo hasta finalizar las medidas, el pt orillo pasa a ser parte del pt arroz al trabajar el diagrama. RECUERDE MANTENER LA MISMA TENSIÓN DEL TEJIDO! Cuando se han trabajado los diagramas A.1-A.3 una vez en vertical, continuar con el patrón como sigue por el LD: Trabajar A.4 (ATENCIÓN: el 1er pt del diagrama = pt orillo), trabajar 79-87-95-103 pts en pt jersey, A.5 sobre los últimos 10 pts de la fila (ATENCIÓN: el último pt del diagrama = pt orillo). Continuar de la misma manera hasta que la labor mida 30 cm desde la fila de montaje. Al final de la sig fila por el LR, mont 1 pt nuevo (marca la abertura) = 100-108-116-124 pts. Trabajar los pts nuevos en pt musgo, es decir, ahora hay 2 pts del borde en pt musgo al inicio de la fila por el LD. Cuando la labor mida 58-63-69-74 cm, trabajar el patrón, comenzar desde la fila marcada con la estrella en el diagrama como sigue: Trabajar 2 pts del borde en pt musgo, A.1, A.2 11-12-13-14 vcs en el ancho, A.3, 1 pt orillo en pt musgo. Cuando el diagrama se ha trabajado 1 vez en vertical, repetir las últimas 2 filas del diagrama hasta que la labor mida 66-71-77-82 cm. Rematar con derecho sobre revés y revés sobre derecho. Mont los pts y trabajar la otra parte de la misma manera pero a la inversa. TERMINACIÓN: Ver el diagrama con las medidas. Trabajar las costuras A y B con grafting. Ahora hacer las costuras C y D dentro del bucle exterior del pt orillo. Ahora hay 30 cm de abertura en un lado y una abertura a lo largo de todo el otro lado. Rematar. |
||||||||||||||||||||||
Explicaciones del diagrama |
||||||||||||||||||||||
|
||||||||||||||||||||||
 |
||||||||||||||||||||||
 |
||||||||||||||||||||||
¿Terminaste este patrón?Entonces, etiqueta tus fotos con #dropspattern #soclassyponcho o envíalas a la galería #dropsfan. ¿Necesitas ayuda con este patrón?Encontrarás 20 videos tutoriales, un espacio para comentarios/preguntas y más visitando la página del patrón en garnstudio.com © 1982-2026 DROPS Design A/S. Todos los derechos reservados. Este documento, incluyendo todas sus sub-secciones, está protegido por los derechos de autor (copyright). Lee más acerca de lo que puedes hacer con nuestros patrones en la parte de abajo de cada patrón de nuestro sitio. |
||||||||||||||||||||||


Con más de 40 años en el diseño de modelos de punto y de ganchillo, DROPS Design ofrece una de las más vastas colecciones de patrones gratuitos en el internet - traducidos en 17 idiomas. Al día de hoy, contamos con 324 catálogos y 12290 patrones - de los cuales 11685 están traducidos en español.
Nosotros trabajamos con mucho esmero para brindarte lo mejor que las labores de punto y ganchillo tienen para ofrecer,inspiración y consejos, así como hilos de magnífica calidad a precios increíbles! Te gustaría usar nuestros patrones para otro fin además del uso personal? Puedes leer acerca de lo que estás permitida a hacer en el texto de Copyright en la parte de abajo de todos nuestros patrones. Felices labores!
Escribe un comentario sobre DROPS 170-28
¡Nos encantaría saber qué piensas acerca de este patrón!
Si quieres escribir una pregunta referente al patrón, por favor asegúrate de elegir la categoría correcta en el formulario debajo, para acelerar el proceso de respuesta. Los campos obligatorios están marcados con un *.