
Categorías populares
¿Buscas un hilo?


Comentarios / Preguntas (46)
![]() DB escribió:
DB escribió:
I am having a hard time reading the chart. Do you have the written out version available? Thank you, DB
28.07.2021 - 12:19DROPS Design respondió:
Dear DB, we only have diagram to this pattern, but this lesson should be able to help you understanding how to read diagrams. Happy knitting!
28.07.2021 - 13:41
![]() Monica 77 escribió:
Monica 77 escribió:
Buon giorno, scusate la domanda ma sono una prncipiante :quando ho il lavoro al rovescio(ferro di ritorno) li prendo come si presentano o tutti al diritto?grazie in anticipo x la risposta
28.03.2021 - 21:42DROPS Design respondió:
Buonasera Monica, per il ferro di ritorno deve lavorare come indicato nel diagramma, che mostra tutti i ferri di lavoro. Buon lavoro!
28.03.2021 - 21:55
![]() Benedetta escribió:
Benedetta escribió:
Buongiorno, ho lavorato 15maglie x 19 ferri a maglia rasata col ferro circolare n. 6, ma ho ottenuto un quadrato 8,5 cm x 8,5 cm. Che ferri devo usare? Grazie
14.11.2020 - 10:10DROPS Design respondió:
Buongiorno Benedetta, deve provare a rifare il campione usando una misura di ferri più grande. Buon lavoro!
14.11.2020 - 15:37
![]() Eloise escribió:
Eloise escribió:
Does reverse mean backwards? Do I now knit left to right (A3 to A1)? And do I also flip the knit/purl stitches? For example, do I know knit row 8 (rather than purl it as I did with the first piece) because it’s now from the WS? Or is this still considered the RS side?
09.03.2020 - 07:26DROPS Design respondió:
Dear Eloïse, both pieces should be mirrored, ie work 2nd piece as first one but cast on 1 st at the end of row from RS instead of from WS so that the 2 sts in garter st are at the end of row from RS instead of at the beg of row from RS and so on. Happy knitting!
09.03.2020 - 12:42
![]() Eloise escribió:
Eloise escribió:
Is it absolutely necessary to knit the second piece in reverse? I find it very confusing.. is there any way to knit it as the first piece but still be able to put it together in the end? Thanks!
08.03.2020 - 22:25DROPS Design respondió:
Dear Eloise, the poncho is asymmetric, that is why you need to knit the first piece mirrored for the second, otherwise you will not be able to put the pieces together.
08.03.2020 - 22:49
![]() Chiara escribió:
Chiara escribió:
Ciao, per realizzare il poncho si può usare un filato A+A, vuol dire che uso un filato del 3 - 3,5 in doppio? Grazie
01.01.2020 - 18:47DROPS Design respondió:
Buongiorno Chiara. Sì, può sostituire il filato indicato con un filato del gruppo A usato doppio. Verifichi sempre la correttezza del campione. Buon lavoro!
02.01.2020 - 11:17
![]() Melinda Fülöp escribió:
Melinda Fülöp escribió:
Hej Hur ska man sticka den andra delen sen? Jag blir tacksam om svaret blir på svenska. Tack
16.12.2019 - 17:08DROPS Design respondió:
Hej Melinda, du stickar den andra delen på samma vis fast du lägger upp en ny maska i andra sidan. Lycka till :)
17.12.2019 - 11:38
![]() Maja escribió:
Maja escribió:
Hi, I'm a bit confused with how the written pattern corresponds to the diagram. I've now worked the first 2 rows. It says "Continue like this until piece measures 30 cm / 11 3/4'' from cast-on edge." Does this mean that I simply repeat the first 2 rows until the pattern measures 30cm, or should I keep following the diagram upwards? I'm quite a new knitter so I apologise if this is a silly question. Thanks!
26.10.2019 - 22:22DROPS Design respondió:
Hi Maja, You continue the pattern upwards. Happy knitting!
28.10.2019 - 07:42
![]() Linda escribió:
Linda escribió:
Can this be done with written instructions instead of of by diagram or chart? I absolutely love this and I do not do well by charts. I usually write the instructions down on paper which works better for me. Thanks for sharing your beautiful work and pattern.
16.08.2019 - 20:11DROPS Design respondió:
Dear Linda, you will find how to read knitting diagrams here. Happy knitting!
19.08.2019 - 08:58
![]() Katerina escribió:
Katerina escribió:
Hi, would it be possible to have a 30 cm vent in both sides?
08.03.2019 - 21:17DROPS Design respondió:
Yes, just knit the garter just add the plus stitch for the seaming where you want the split start / end. Happy Knitting.
10.03.2019 - 16:47
|
||||||||||||||||||||||
So Classy!#soclassyponcho |
||||||||||||||||||||||
 |
 |
|||||||||||||||||||||
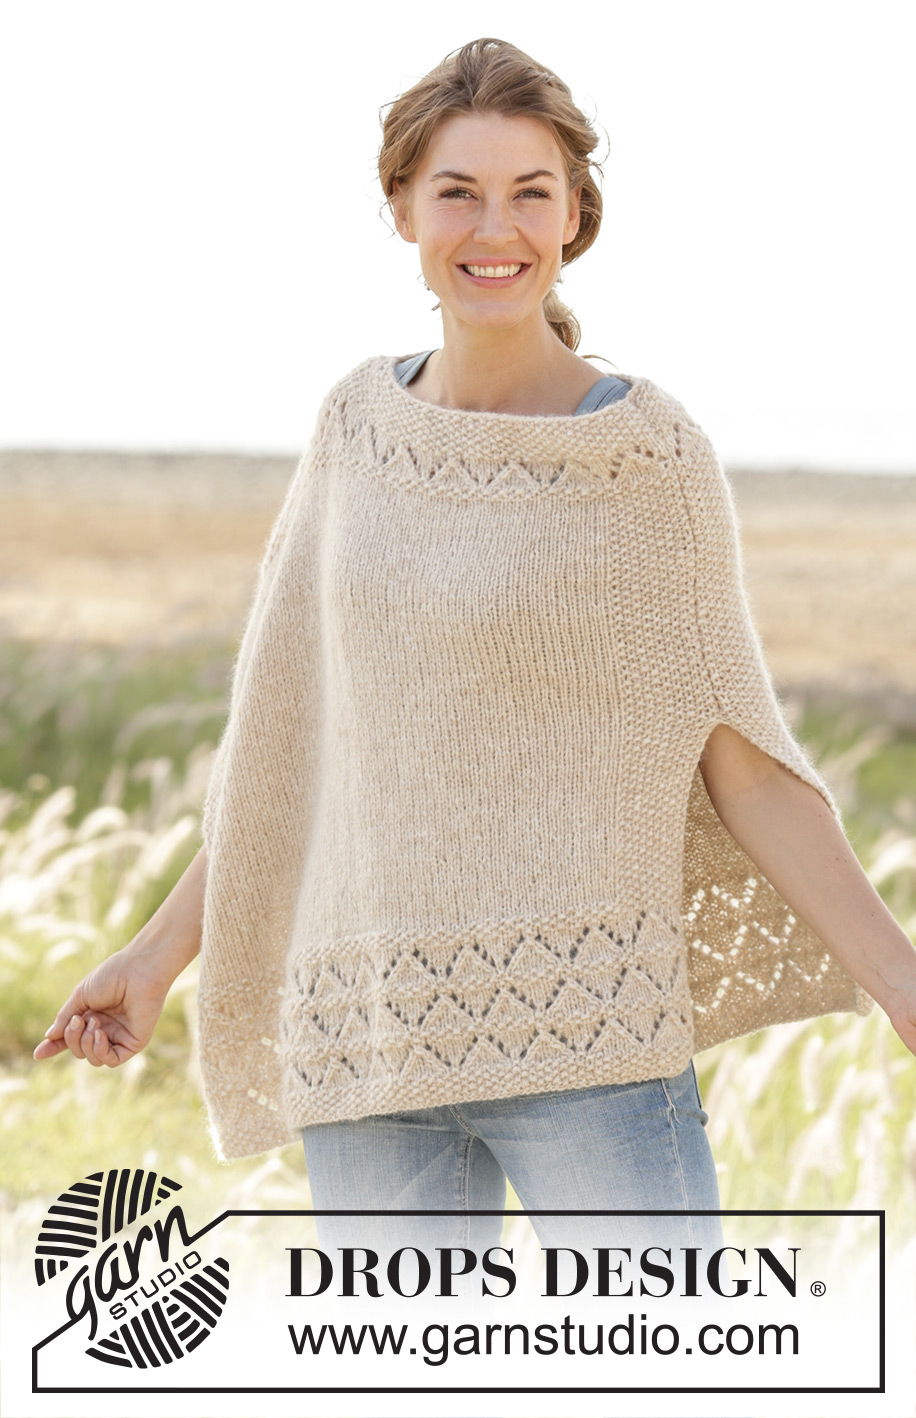
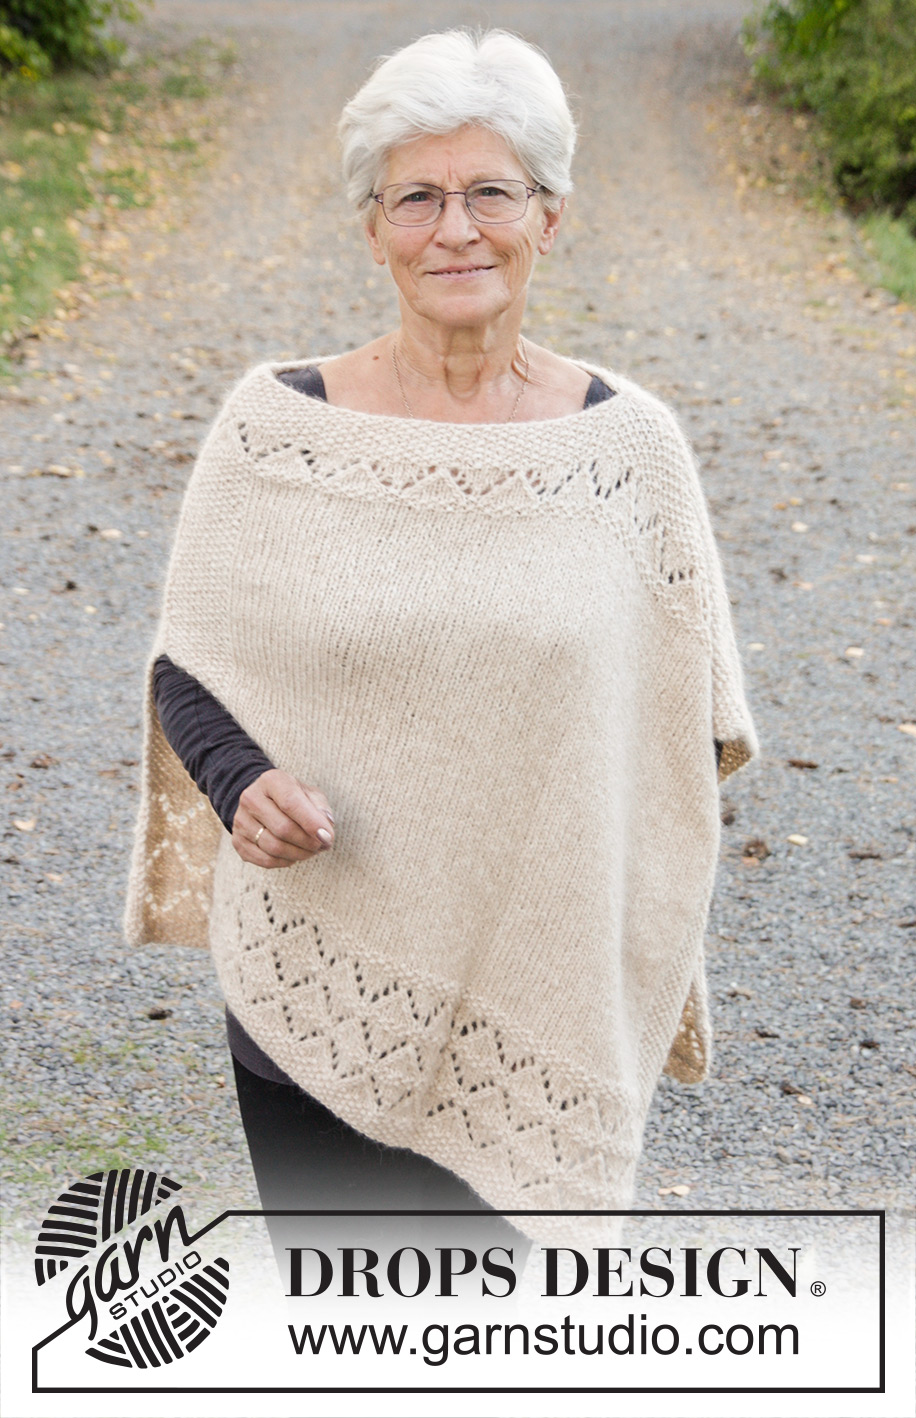
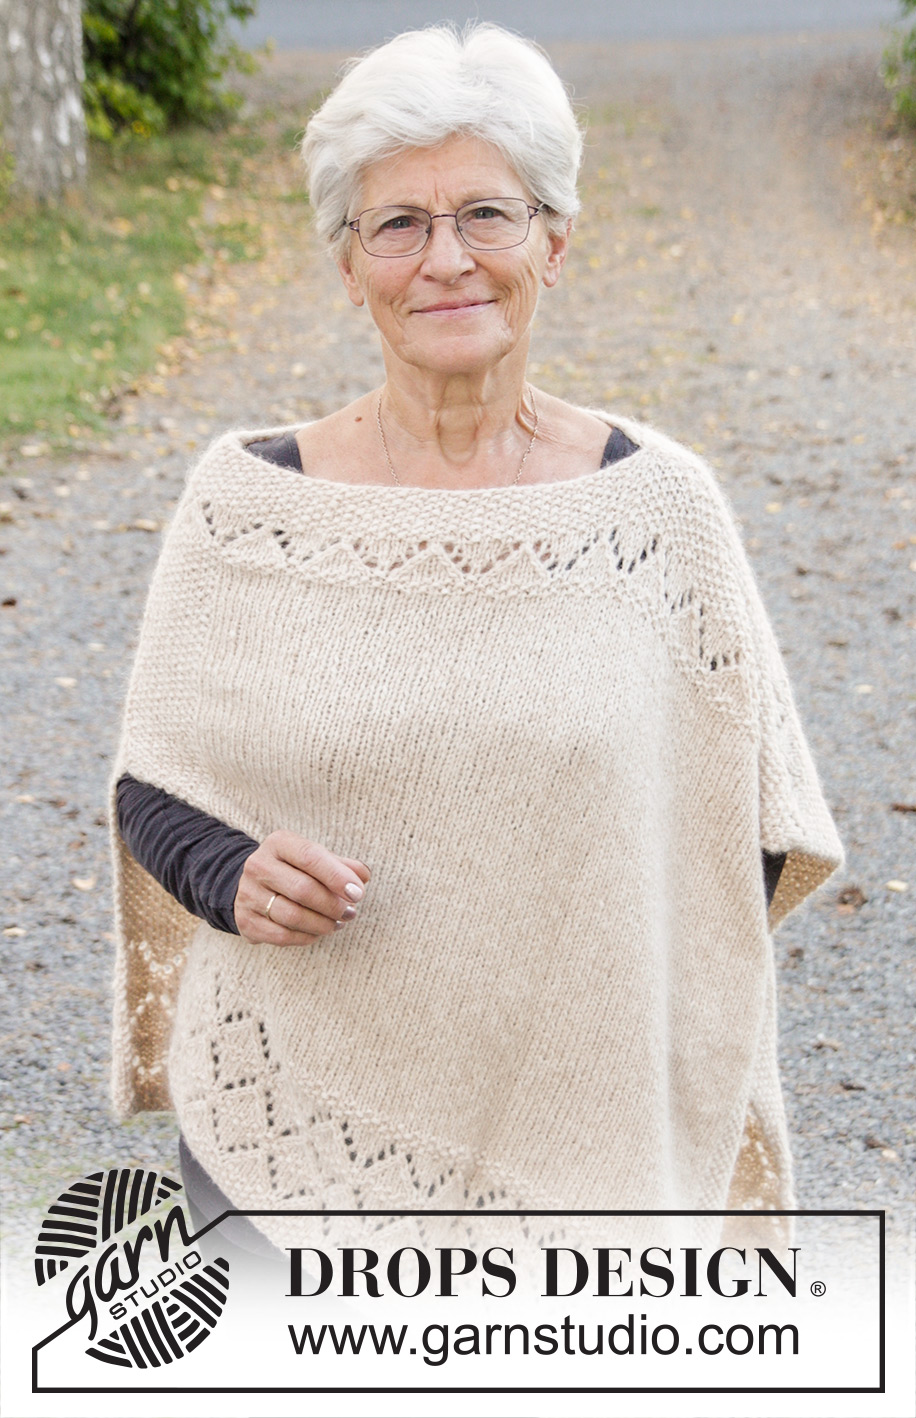
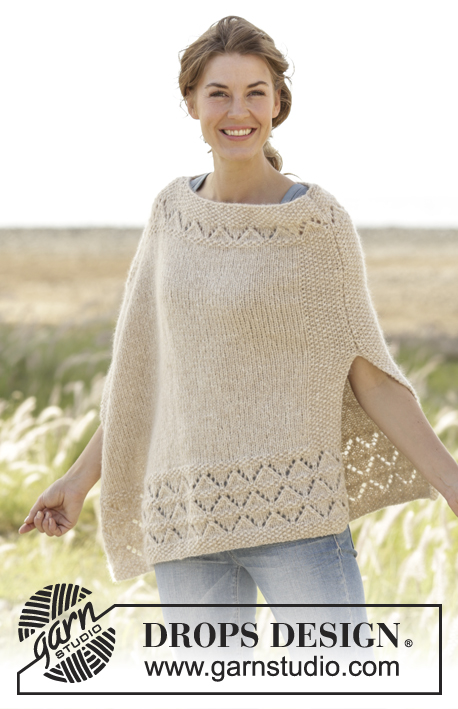
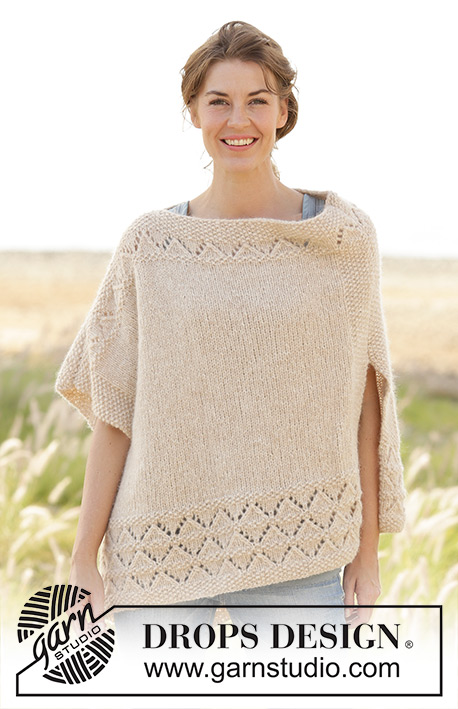
Poncho de punto DROPS en punto arroz con patrón de calados en ”Air”. Talla: S - XXXL.
DROPS 170-28 |
||||||||||||||||||||||
|
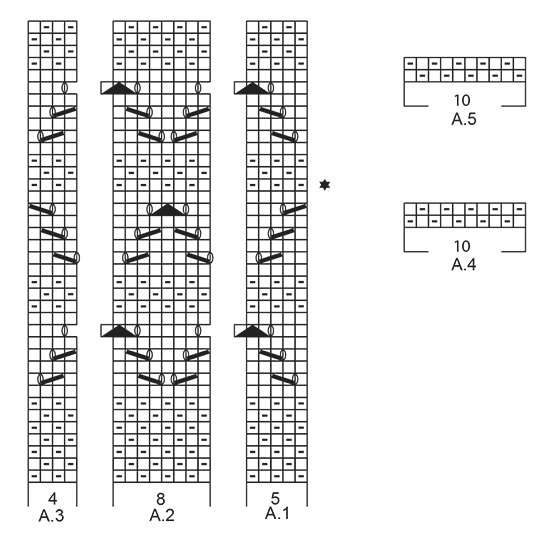
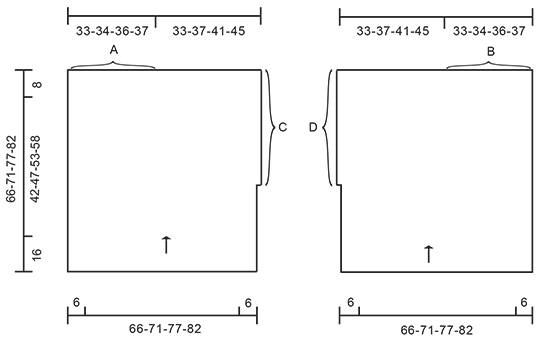
PUNTO MUSGO (de ida y vta): Trabajar todas las filas de derecho. 1 pliegue = 2 filas de derecho PATRÓN: Ver los diagramas A.1-A.5. Los diagramas muestran todas las filas del patrón visto por el LD. --------------------------------------------------------- PONCHO: Se trabaja de ida y vta en ag circular en 2 partes que se cosen al finalizar. Mont 99-107-115-123 pts (incl 1 pt orillo en pt musgo a cada lado) con ag circular tamaño 6 mm y con Air. Trabajar el patrón como sigue: 1 pt orillo en PUNTO MUSGO - ver las explicaciones arriba, A.1 (= 5 pts), A.2 (= 8 pts) repetir 11-12-13-14 vcs en el ancho, A.3 (= 4 pts), 1 pt orillo en pt musgo. ATENCIÓN: Trabajar el pt orillo en pt musgo hasta finalizar las medidas, el pt orillo pasa a ser parte del pt arroz al trabajar el diagrama. RECUERDE MANTENER LA MISMA TENSIÓN DEL TEJIDO! Cuando se han trabajado los diagramas A.1-A.3 una vez en vertical, continuar con el patrón como sigue por el LD: Trabajar A.4 (ATENCIÓN: el 1er pt del diagrama = pt orillo), trabajar 79-87-95-103 pts en pt jersey, A.5 sobre los últimos 10 pts de la fila (ATENCIÓN: el último pt del diagrama = pt orillo). Continuar de la misma manera hasta que la labor mida 30 cm desde la fila de montaje. Al final de la sig fila por el LR, mont 1 pt nuevo (marca la abertura) = 100-108-116-124 pts. Trabajar los pts nuevos en pt musgo, es decir, ahora hay 2 pts del borde en pt musgo al inicio de la fila por el LD. Cuando la labor mida 58-63-69-74 cm, trabajar el patrón, comenzar desde la fila marcada con la estrella en el diagrama como sigue: Trabajar 2 pts del borde en pt musgo, A.1, A.2 11-12-13-14 vcs en el ancho, A.3, 1 pt orillo en pt musgo. Cuando el diagrama se ha trabajado 1 vez en vertical, repetir las últimas 2 filas del diagrama hasta que la labor mida 66-71-77-82 cm. Rematar con derecho sobre revés y revés sobre derecho. Mont los pts y trabajar la otra parte de la misma manera pero a la inversa. TERMINACIÓN: Ver el diagrama con las medidas. Trabajar las costuras A y B con grafting. Ahora hacer las costuras C y D dentro del bucle exterior del pt orillo. Ahora hay 30 cm de abertura en un lado y una abertura a lo largo de todo el otro lado. Rematar. |
||||||||||||||||||||||
Explicaciones del diagrama |
||||||||||||||||||||||
|
||||||||||||||||||||||
 |
||||||||||||||||||||||
 |
||||||||||||||||||||||
¿Terminaste este patrón?Entonces, etiqueta tus fotos con #dropspattern #soclassyponcho o envíalas a la galería #dropsfan. ¿Necesitas ayuda con este patrón?Encontrarás 20 videos tutoriales, un espacio para comentarios/preguntas y más visitando la página del patrón en garnstudio.com © 1982-2026 DROPS Design A/S. Todos los derechos reservados. Este documento, incluyendo todas sus sub-secciones, está protegido por los derechos de autor (copyright). Lee más acerca de lo que puedes hacer con nuestros patrones en la parte de abajo de cada patrón de nuestro sitio. |
||||||||||||||||||||||


Con más de 40 años en el diseño de modelos de punto y de ganchillo, DROPS Design ofrece una de las más vastas colecciones de patrones gratuitos en el internet - traducidos en 17 idiomas. Al día de hoy, contamos con 324 catálogos y 12290 patrones - de los cuales 11685 están traducidos en español.
Nosotros trabajamos con mucho esmero para brindarte lo mejor que las labores de punto y ganchillo tienen para ofrecer,inspiración y consejos, así como hilos de magnífica calidad a precios increíbles! Te gustaría usar nuestros patrones para otro fin además del uso personal? Puedes leer acerca de lo que estás permitida a hacer en el texto de Copyright en la parte de abajo de todos nuestros patrones. Felices labores!
Escribe un comentario sobre DROPS 170-28
¡Nos encantaría saber qué piensas acerca de este patrón!
Si quieres escribir una pregunta referente al patrón, por favor asegúrate de elegir la categoría correcta en el formulario debajo, para acelerar el proceso de respuesta. Los campos obligatorios están marcados con un *.