
Categorías populares
¿Buscas un hilo?


Comentarios / Preguntas (38)
![]() Teresa escribió:
Teresa escribió:
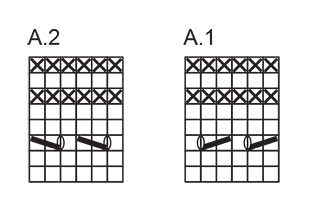
Buongiorno, trovo difficoltà nel seguire i diagrammi A.1 e A.2 Quando vado a lavorare per la prima volta il terzo ferro di entrambi, cioè quello con gli aumenti e le diminuzioni, mi ritrovo con una maglia in meno e il lavoro non viene speculare. Preciso che ho 20 maglie sul ferro, quindi mi trovo con lo schema dopo i primi 8 ferri. Sbaglio io?O c'è un errore nei diagrammi? Ringraziando e in attesa di risposta Cordiali saluti
22.12.2015 - 12:07DROPS Design respondió:
Buongiorno Teresa. Il ferro 3 viene lavorato come segue: 1 m dir, 1 gett, lavora il diag. A.1 solo sulle 6 m successive, 2 m dir, 1 gett, 2 m dir (m centrali), 1 gett, 2 m dir, lavora il diag. A.2 sulle 6 m successive , 1 gett, 1 m dir. Verifichi sempre di avere lo stesso numero di m calate e di m gettate ai due lati delle m centrali. Buon lavoro!
30.12.2015 - 17:17
![]() Teresa escribió:
Teresa escribió:
Salve, avrei una domanda riguardo allo schema. Al ferro 7, dopo il gettato, mi dice di lavorare le maglie fino alle 2 maglie centrali. Ma come devono essere lavorate?Sempre a diritto? Ferro 7: 1 m dir, 1 gettato, lavorare fino alle 2 m centrali, 1 gettato, 2 m dir (= m centrali), 1 gettato, lavorare A.2 fino a quando rimane 1 m, 1 gettato e 1 m dir = 20 m.
21.12.2015 - 14:13DROPS Design respondió:
Buongiorno Teresa. Deve lavorare le m seguendo il diagramma A.1. La ringraziamo per la segnalazione. Buon lavoro!
21.12.2015 - 16:58
![]() Olita escribió:
Olita escribió:
Hi! I was wondering how do you finish row 9 (i.e. in A2)? I seem to keep having more stitches in the "A2" diagram side, although I'm making sure to start off with the right amount. When I do the final double YO, I'm either faced with doing a YO right away and K1, or do and extra K1, then YO and the final K1. Would appreciate an answer the sooner the better! And thanx for a great pattern! :)
12.12.2015 - 21:11DROPS Design respondió:
Dear Olita, repeat diagram over the stated sts, after the last full repeat in width, work the next st as the first st in diagram, and finish as on row 7 (make sure you each yo in diag is compensated by a dec). Happy knitting!
14.12.2015 - 09:59Curtis Cleary escribió:
Does A1 restart from row 1 on row 9 of the pattern, or do i work row 3 of A1
02.12.2015 - 16:44DROPS Design respondió:
Dear Mrs Cleary, after you have worked the 8 rows in A.1 and A.2, repeat these 8 rows from 1st one as you did before, increasing on each side and either side of the 2 mid sts every row from RS - and K the 2 mid sts both from RS and from WS (as on row 7 and 8). Happy knitting!
02.12.2015 - 17:04Curtis Cleary escribió:
With the 8 stitches workable for row 9, how can I work the pattern for the remaining 2 stitches? Could you provide a written explanation for row 9 for the pattern please
30.11.2015 - 15:05DROPS Design respondió:
Dear Mrs Cleary, work the first 2 sts in diagram over the last sts to work: 6 sts as in diagram + 2 first sts (= K2 tog, YO in A.1). Happy knitting!
30.11.2015 - 16:40Curtis Cleary escribió:
So for Row 9 I would K1,yo , k2tog, double yo, k1, k2tog, double yo, k1, k2, yo, k2, yo, k2, k1, double yo, s1 k1 psso, k1, double yo, s1 k1 psso, yo, k1?
30.11.2015 - 15:02
![]() Marika Nieminen escribió:
Marika Nieminen escribió:
Hei, meneekö tähän hapsuhuiviin tosiaan vain 100 g lankaa, kun kuulostaa niin vähältä ?
03.11.2015 - 18:33DROPS Design respondió:
Tämä lanka on hyvin riittoisaa, 25 grammassa on jopa 140 metriä, joten langanmenekki on oikea.
05.11.2015 - 13:57
![]() Dedapper Arlette escribió:
Dedapper Arlette escribió:
Vanaf waar begint het patroon te lopen ??? vanaf de opzet , begrijp het niet goed !
03.11.2015 - 17:59DROPS Design respondió:
Hoi Arlette. Je begint met patroon A.1 en A.2 in nld 7 zoals beschreven: Nld 7: 1 r, 1 omsl, brei A.1 tot de 2 mid st over zijn, 1 omsl, 2 r (= mid st), 1 omsl, brei A.2 tot er 1 st overblijft, 1 omsl en 1 r = 20 st. Nld 8: 1 r, brei A.2 tot de mid st, 2 r (= mid st), brei A.1 tot er 1 st overblijft, 1 r.
04.11.2015 - 12:19
|
|||||||||||||
Calgary |
|||||||||||||
|
|
|||||||||||||
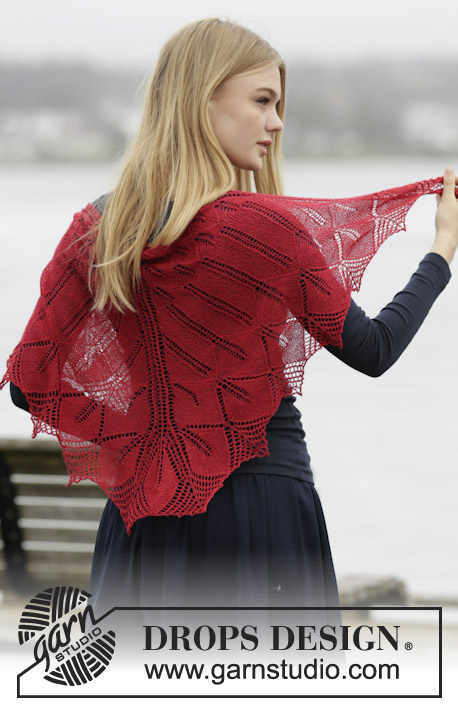
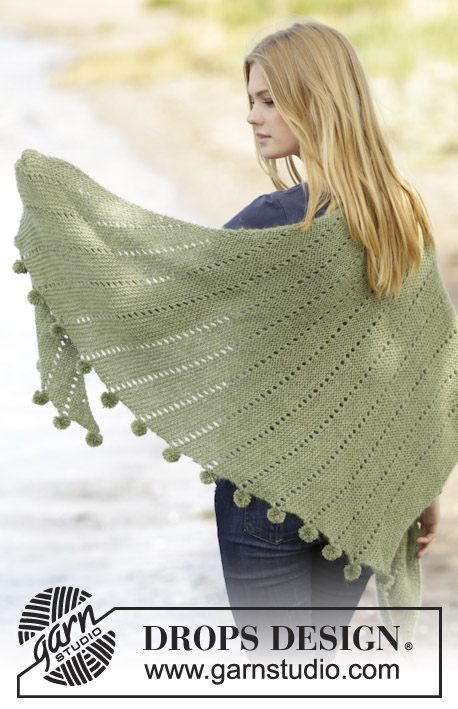
Chal de punto DROPS con patrón de calados y flecos, en “Brushed Alpaca Silk”.
DROPS Extra 0-1177 |
|||||||||||||
|
PT MUSGO (de ida y vuelta en la ag): Tejer todas las hileras de derecho. 1 surco = 2 hileras tejidas de derecho. PATRÓN: Ver diagramas A.1 y A.2. Los diagramas muestran todas las hileras en el patrón vistas por el LD. ----------------------------------------------------- CHAL: Tejido de ida y vuelta en ag circular para tener espacio suficiente para todos los pts. Tejer a partir del centro de la espalda hacia abajo en PT MUSGO y en el patrón – ver explicación arriba. Montar 4 pts en ag circular tamaño 5.5 mm con Brushed Alpaca Silk. Tejer de la manera sig: Hilera 1 (= LD): Tejer 2 d en cada pt = 8 pts. Hilera 2 (= LR): Tejer de derecho y, AL MISMO TIEMPO tejer 2 pts en el primero y en el último pt = 10 pts. Hilera 3: 1 d, 1 HEB (lazada), 8 d, 1 HEB, 1 d = 12 pts. Hilera 4: Tejer todos los pts de derecho. Hilera 5: 1 d, 1 HEB, 4 d, 1 HEB, 2 d (= pts centrales), 1 HEB, 4 d, 1 HEB, 1 d = 16 pts. Hilera 6: Tejer todos los pts de derecho. Insertar un marcapuntos entre los 2 pts centrales. Hilera 7: 1 d, 1 HEB, tejer A.1 hasta que resten los 2 pts centrales, 1 HEB, 2 d (= pts centrales), 1 HEB, tejer A.2 hasta que reste 1 pt, 1 HEB 1 d = 20 pts. Hilera 8: 1 d, tejer A.2 hasta los pts centrales, 2 d (= pts centrales), tejer A.1 hasta que reste 1 pt, 1 d. RECORDARSE DE MANTENER LA MISMA TENSIÓN DE TEJIDO DE LA MUESTRA! Repetir la 7ª y la 8ª hilera 57 veces más (tejer los pts aumentados en A.1 y A.2) = 248 pts en total y la pieza mide aprox 55 cm medida a lo largo de los pts centrales. Tejer 4 surcos sobre todos los pts (continuar con 4 aumentos en cada hilera por el LD). Rematar con 2 hilos. FLECOS: Cortar 8 hilos de Brushed Alpaca Silk de 25 cm, doblarlos en dos. Usar una ag de ganchillo y pasar el centro de los hilos a través de un pt en la parte de abajo del chal. Pasar las puntas del fleco a través del bucle y apretar. Sujetar flecos a lo largo de toda la orilla inferior del chal, sujetar un fleco en cada 3er pt. |
|||||||||||||
Explicaciones del diagrama |
|||||||||||||
|
|||||||||||||
 |
|||||||||||||
¿Terminaste este patrón?Entonces, etiqueta tus fotos con #dropspattern o envíalas a la galería #dropsfan. ¿Necesitas ayuda con este patrón?Encontrarás 17 videos tutoriales, un espacio para comentarios/preguntas y más visitando la página del patrón en garnstudio.com © 1982-2026 DROPS Design A/S. Todos los derechos reservados. Este documento, incluyendo todas sus sub-secciones, está protegido por los derechos de autor (copyright). Lee más acerca de lo que puedes hacer con nuestros patrones en la parte de abajo de cada patrón de nuestro sitio. |
|||||||||||||


Con más de 40 años en el diseño de modelos de punto y de ganchillo, DROPS Design ofrece una de las más vastas colecciones de patrones gratuitos en el internet - traducidos en 17 idiomas. Al día de hoy, contamos con 324 catálogos y 12290 patrones - de los cuales 11685 están traducidos en español.
Nosotros trabajamos con mucho esmero para brindarte lo mejor que las labores de punto y ganchillo tienen para ofrecer,inspiración y consejos, así como hilos de magnífica calidad a precios increíbles! Te gustaría usar nuestros patrones para otro fin además del uso personal? Puedes leer acerca de lo que estás permitida a hacer en el texto de Copyright en la parte de abajo de todos nuestros patrones. Felices labores!
Escribe un comentario sobre DROPS Extra 0-1177
¡Nos encantaría saber qué piensas acerca de este patrón!
Si quieres escribir una pregunta referente al patrón, por favor asegúrate de elegir la categoría correcta en el formulario debajo, para acelerar el proceso de respuesta. Los campos obligatorios están marcados con un *.