
Categorías populares
¿Buscas un hilo?


Comentarios / Preguntas (100)
![]() Mariam Khan escribió:
Mariam Khan escribió:
Hei. I A3 så er det grupper med 4 staver oppover i midten. Jeg syns diagrammet viser veldig dårlig hvordan det skal bli gjort. Skal stavene bli heklet i maskene fra forrige rundes staver eller skal de hekles i en gruppe i luftmaske buen?
29.09.2016 - 17:30DROPS Design respondió:
Hej Mariam. De förste 4 staver + 2 lm + 4 staver (rk 3) haekles om lm fra forrige omg. Naeste gruppe staver (rk 4) haekles om de 2 lm fra forrige omg. I rk 5 ligesaa. I rk 6 haekles först de 4 staver överst i de 3 lm, saa 4 lm og 1 fm nederst i de 3 lm, 3 lm, 1 fm nederst om de naeste 3 lm, 4 lm og 4 staver överst i de 3 lm. Osv.
04.10.2016 - 16:41
![]() Mariam Khan escribió:
Mariam Khan escribió:
I diagrammet er det et symbol som forklares slik: Hekle 1 st i neste st - men vent med siste gjennomtrekning (= 2 m på nåla), hekle 1 st i hver av de neste 2 st på samme måte, dra tråden gjennom alle 4 m på nåla. Jeg vet ikke om dere har skrevet feil eller om jeg misforstår. Hvis man skal vente med siste gjennomtrekning på totalt 3 staver, vil det på slutten av stav nr 3 være seks masker på nåla som skal dras gjennom. Er det slik det skal gjøres?
13.09.2016 - 19:01DROPS Design respondió:
Hej Mariam. Det er korrekt hvad der staar. Du skal slaa om og trekke igennem 1 gang hver gang, saa har du 4 m paa naalen naar du har heklet de 3 st. Dvs: du hekler 1 st, men vent med å trekke igjennom den siste løkken av st (det er nå 2 løkker på nålen), hekl st nr 2, men vent med å trekke igjennom den siste løkken av st = 3 m paa naalen, hekl st nr 3, efter förste gennemtraek har du ialt 4 m paa pinden
14.09.2016 - 11:43Maria escribió:
Very nice and easy to make 🙂
30.08.2016 - 16:29
![]() Mette Munch-Boutrup escribió:
Mette Munch-Boutrup escribió:
Jeg har hæklet denne flotte nederdel i Safran og er meget glad for den. Nu vil jeg gerne hækle den med garn der giver en lettere nederdel, evt. med en silkeagtigt overflade. Kan I hjælpe mig med hvilket drops garn jeg kan bruge (evt. kombinationer) uden at jeg skal ændrer på opskriften? Mvh Mette
22.06.2016 - 09:03DROPS Design respondió:
Hej Mette. Her er garnalternativerne til Safran, du kan eventuelt lave den i BabyAlpaca Silk. Eller tag en snak med din garnbutik, maaske har de ogsaa et alternativ.
23.06.2016 - 12:35
![]() Sacha Roest escribió:
Sacha Roest escribió:
Can you please explain the last row on the bottom of the skirt? I cant seem to make it look good. When it says skip 3dc; the ch4 stretches out to much and doesnt look right. And the ch4 insert in next ch sp looks a bit awkward aswell. As if they are too close together in certain places.
24.04.2016 - 18:43Sacha Roest respondió:
I just asked you a question but I have figured it out. Thanks anyway!
24.04.2016 - 19:09
![]() Kelly escribió:
Kelly escribió:
I was wondering if you could explain in the A1 pattern and the others, if we are supposed to work stitch/chain for stitch/chain how is it that in the first part of the A1/AX rows the number of stitches go up or down from round to round, how do we maintain the stitch count to be the same (in my case 252 stitches for each round, before we reach the next increase)? I'm confused on this part to be able to match the pattern? Please explain. Thanks Kelly
08.04.2016 - 04:45DROPS Design respondió:
Dear Kelly, A.1 is worked over 12 sts and will be repeated 12 times in total in width, there is no inc in A.1, insert a marker between each repeat so that you can check each row in diagram. After you have worked A.1 (and A.X a total of 2 times), work 12 rounds with dc while inc 36 dc evenly, then work A.2 on next round. Read more about diagrams here and how to inc evenly here. Happy crocheting!
08.04.2016 - 09:05
![]() Kelly escribió:
Kelly escribió:
I was wondering for the graph, if each stitch was individual to each chain. Most diagrams have chain's underneath the symbol to indicate where the stitch is going. Also when it says to work from 1st round in A1 (=12 dc) 21 times in width, and when AX has been worked verticall what does that mean? At this point are you supposed to actually crochet 12dc and turn 21 times? Thanks, Kelly
05.04.2016 - 00:27DROPS Design respondió:
Dear Kelly, the diagram A.1 will be worked a total of 21 times in width on the round (work first round 1 over all sts, then round 2 over all sts etc..) - inserting a marker between each repeat may help - Make 1 ch for each "-" in diagram, so that on row 3 in A.1, you will work 5 ch, 1 sc, 5 ch between the dc - A.X = row 3 to 6 in A.1. When working A.1, work to row 6 = including A.X then work again the row 3 to 6 (= A.X) then continue A.1 with next row (= row 7 in A.1, coming after A.X). Happy crocheting!
05.04.2016 - 09:31
![]() Rendi escribió:
Rendi escribió:
Hello, are the instructions available in English, please? I have not yet learned to use charts. Thank you :-)
31.01.2016 - 17:34DROPS Design respondió:
Dear Rendi, there are only diagrams to this pattern - each symbol represent 1 st/group of st as stated under diagram text, start reading from the right and read every round from the right towards the left. You are welcome to contact your DROPS store for any further individual assistance. Happy crocheting!
01.02.2016 - 11:19
![]() Sacha Roest escribió:
Sacha Roest escribió:
Please look at the terms in the diagram, maybe its a mistake... The little X says "sc in/around st", the little T: "sc in ch-space". My question is how to sc in ch-space. The term: "dc around ch-space" I get... So is this just wrong? Should the little T be called "sc around ch-space"? Or is it the same as the little X?
05.09.2015 - 20:16DROPS Design respondió:
Dear Mrs Roest, you crochet around the ch-space inserting crochet hook in the ch-space, but when you have to crochet in the st (eg in the sc below), you will insert crochet hook under both threads of st (sc in this example) from previous round. Happy crocheting!
07.09.2015 - 10:42
![]() Sacha Roest escribió:
Sacha Roest escribió:
In the diagram explanation one symbol is the "dc around ch-space" another "sc in ch-space". Is there is a difference inbetween "in" and "around"? As far as I know they are the same and the only difference is the dc and sc.. Please let me know if this is true. (I made the mistake by posting this question for uk aswell..)
03.09.2015 - 12:13DROPS Design respondió:
See answer below.
03.09.2015 - 15:35
|
|||||||||||||||||||||||||||||||||||||
Summer Escape#summerescapeskirt |
|||||||||||||||||||||||||||||||||||||
 |
 |
||||||||||||||||||||||||||||||||||||
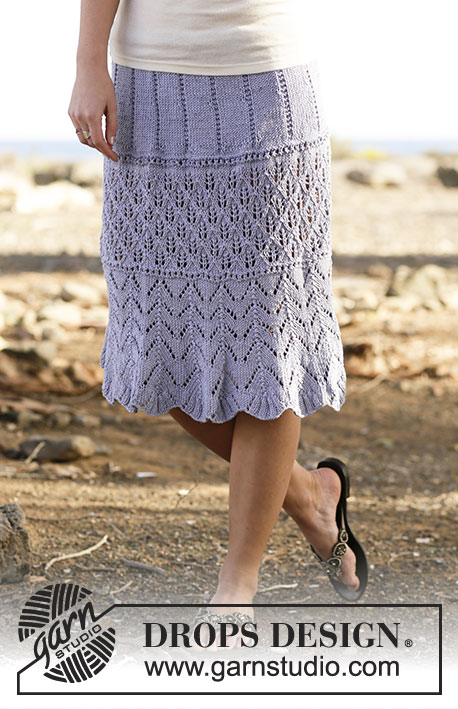
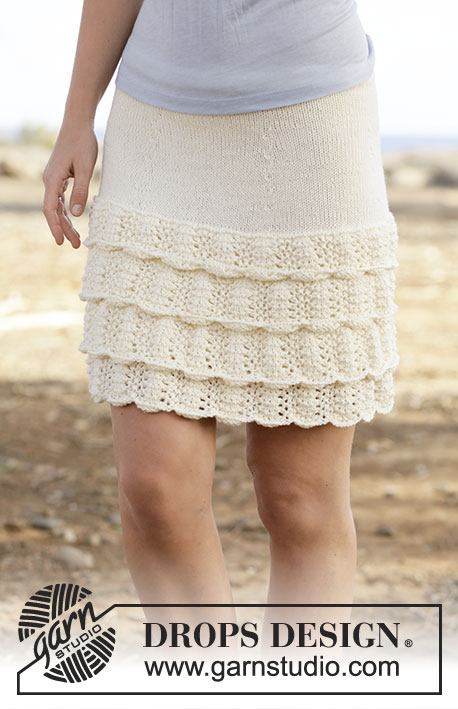
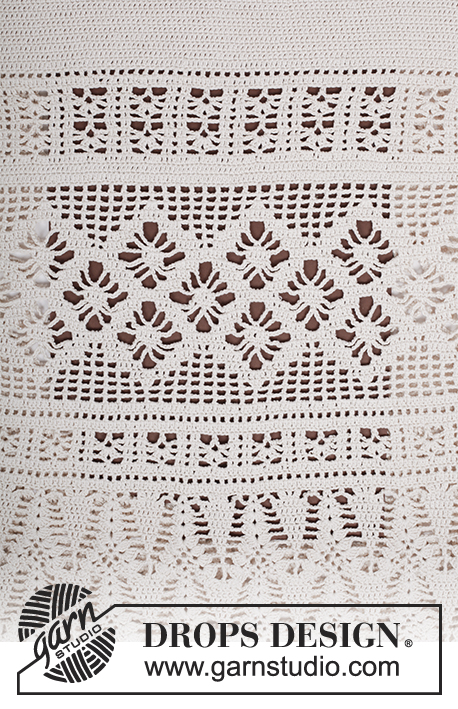
Falda de ganchillo DROPS con puntos altos, patrón de calados, trabajada de arriba abajo en “Safran”. Talla: S-XXXL.
DROPS 162-18 |
|||||||||||||||||||||||||||||||||||||
|
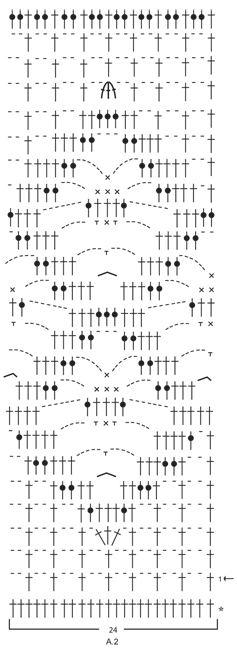
INFORMACIÓN PARA LA ELABORACIÓN DEL TRABAJO: Sustituir el primer p.a. del inicio de la hilera/vta con 3 cad. Terminar la hilera con 1 p.a. en la 3ª cad de la hilera anterior (cuando la pieza es trabajada de ida y vuelta) y terminar la vta con 1 p.bjs en la 3ª cad del inicio de la vta (cuando la pieza es trabajada en redondo). NO sustituir el primer p.b. al inicio de la vta, mas trabajar 1 cad antes del p.b. al inicio de la vta. Terminar con 1 p.bjs en la primera cad de la vta. TIP PARA AUMENTAR: Aumentar 1 p.a. trabajando 2 p.a. en el mismo p.a. TIP PARA DISMINUIR: Trabajar 1 p.a. pero no hacer la última lazada (= 2 pts en la ag), después trabajar el p.a. sig, pero en la última lazada, extraer el hilo a través de todos los 3 pts en la ag = 1 pt disminuido. PATRÓN: Ver diagramas A.1 a A.3. ----------------------------------------------------- FALDA: Trabajar de ida y vuelta, de arriba abajo hasta después de la abertura en el lado, después trabajar en redondo. Montar 186-209-232-258-279-305 cad (incl. 3 cad para virar) en ag de ganchillo tamaño 3.5 mm con Safran. Trabajar la primera hilera de la manera sig: 1 p.a. en la 4ª cad a partir de la ag, 1 p.a. en cada una de las 4 cad sig, * saltar 1 cad, 1 p.a. en cada una de las 6 cad sig *, repetir de *a* hasta que resten 3-5-7-5-5-3 cad, saltar 1 cad y terminar con 1 p.a. en cada uno de los últimos 2-4-6-4-4-2 p.a. = 158-178-198-220-238-260 p.a. Después trabajar de ida y vuelta con 1 p.a. en cada p.a. – LEER INFORMACIÓN PARA LA ELABORACIÓN DEL TRABAJO. RECORDARSE DE MANTENER LA MISMA TENSIÓN DE LA MUESTRA! Cuando 5 hileras han sido trabajadas verticalmente, insertar 6 marcapuntos en la pieza de la manera sig: El primer marcapuntos después de 14-14-16-20-21-22 p.a., después debe haber 26-30-33-36-39-43 p.a. entre cada marcapuntos, habrá 14-14-17-20-22-23 p.a. después del último marcapuntos al final de la hilera. En la hilera sig, aumentar 1 p.a. antes de todos los marcapuntos – LEER TIP PARA AUMENTAR! Repetir los aumentos a cada 2 hileras 6-6-7-8-9-10 veces más – NOTA: Aumentar alternativamente antes y después de los marcapuntos = 200-220-246-274-298-326 p.a. AL MISMO TIEMPO, cuando 12 hileras en total han sido trabajadas verticalmente, terminar la abertura en el lado y continuar la pieza en redondo, comenzar la vta en el lado – LEER INFORMACIÓN PARA LA ELABORACIÓN DEL TRABAJO! Cuando la pieza mida 24-24-25-25-25-26 cm, aumentar 28-32-30-26-38-22 pts distribuidos equitativamente en la vta sig = 228-252-276-300-336-348 pts. Ahora trabajar el patrón de la manera sig: Trabajar a partir de la 1ª vta en A.1 (= 12 p.a.) 19-21-23-25-28-29 veces a lo ancho. Cuando A.X ha sido trabajado 1 vez verticalmente, repetir A.X 1 vez más antes de continuar con la vta sig en el diagrama. Después trabajar 1-2-2-1-2-3 vtas con 1 p.a. en cada p.a. y, AL MISMO TIEMPO, en la última vta, aumentar 36-36-36-36-24-36 pts distribuidos equitativamente = 264-288-312-336-360-384 p.a. Ahora trabajar a partir de la 1ª vta en A.2 (= 11-12-13-14-15-16 repeticiones) y, AL MISMO TIEMPO, en la última vta, aumentar 12 p.a. distribuidos equitativamente en todas las tallas = 276-300-324-348-372-396 p.a. Continuar con A.1 (= 23-25-27-29-31-33 repeticiones) 1 vez verticalmente y, AL MISMO TIEMPO, en la última vta, aumentar 12-20-12-20-12-20 p.a. distribuidos equitativamente = 288-320-336-368-384-416 p.a. Ahora trabajar A.3 (= 18-20-21-23-24-26 repeticiones). Cuando A.3 ha sido trabajado verticalmente, repetir A.Z 1-1-1-2-2-2 veces más verticalmente. Ahora trabajar de la manera sig: 1 cad (= 1 p.b.), ** trabajar * 4 cad, 1 p.b. en el arco de cad sig *, repetir de *a* 2 veces más, 4 cad, saltar 3 p.a., 1 p.b. en el p.a. sig **, repetir de **a** en toda la vta, y terminar con 1 p.bjs en la primera cad de la vta. HEBILLAS PARA LOS OJALES: A lo largo de la abertura en la pieza del frente trabajar hebillas para los ojales de la manera sig (comenzar en la parte de abajo): 2 p.b. en el primer p.a., 3 cad, saltar 1 p.a., * trabajar 2 p.b. en cada uno de los 2 p.a. sig, 3 cad, saltar 1 p.a. *, repetir de *a* 3 veces en total y terminar con 2 p.b. en el último p.a. de la parte de arriba, virar y trabajar de retorno de la manera sig: 1 p.b. en cada p.b. y 3 p.b. en cada arco de cad. BORDE PARA LOS BOTONES: A lo largo del otro lado de la abertura trabajar 5 hileras de p.b. de ida y vuelta (en la 1ª hilera trabajar 2 p.b. en cada p.a. = 24 p.b.), cortar el hilo. Coser los botones en el borde para los botones. ORILLA: Trabajar una orilla en la parte de arriba de la cintura de la falda, de la manera sig, por el LD: Asegurar el hilo con 1 p.bjs en el borde de la orilla de doblez de los botones, 1 cad, * 1 cad, saltar 1 cad, 1 p.b. en la cad sig *, repetir de *a* a lo largo de toda la orilla de la cintura. Cortar y asegurar el hilo. |
|||||||||||||||||||||||||||||||||||||
Explicaciones del diagrama |
|||||||||||||||||||||||||||||||||||||
|
|||||||||||||||||||||||||||||||||||||
 |
|||||||||||||||||||||||||||||||||||||
 |
|||||||||||||||||||||||||||||||||||||
 |
|||||||||||||||||||||||||||||||||||||
¿Terminaste este patrón?Entonces, etiqueta tus fotos con #dropspattern #summerescapeskirt o envíalas a la galería #dropsfan. ¿Necesitas ayuda con este patrón?Encontrarás 12 videos tutoriales, un espacio para comentarios/preguntas y más visitando la página del patrón en garnstudio.com © 1982-2026 DROPS Design A/S. Todos los derechos reservados. Este documento, incluyendo todas sus sub-secciones, está protegido por los derechos de autor (copyright). Lee más acerca de lo que puedes hacer con nuestros patrones en la parte de abajo de cada patrón de nuestro sitio. |
|||||||||||||||||||||||||||||||||||||


Con más de 40 años en el diseño de modelos de punto y de ganchillo, DROPS Design ofrece una de las más vastas colecciones de patrones gratuitos en el internet - traducidos en 17 idiomas. Al día de hoy, contamos con 324 catálogos y 12290 patrones - de los cuales 11675 están traducidos en español.
Nosotros trabajamos con mucho esmero para brindarte lo mejor que las labores de punto y ganchillo tienen para ofrecer,inspiración y consejos, así como hilos de magnífica calidad a precios increíbles! Te gustaría usar nuestros patrones para otro fin además del uso personal? Puedes leer acerca de lo que estás permitida a hacer en el texto de Copyright en la parte de abajo de todos nuestros patrones. Felices labores!
Escribe un comentario sobre DROPS 162-18
¡Nos encantaría saber qué piensas acerca de este patrón!
Si quieres escribir una pregunta referente al patrón, por favor asegúrate de elegir la categoría correcta en el formulario debajo, para acelerar el proceso de respuesta. Los campos obligatorios están marcados con un *.