
Categorías populares
¿Buscas un hilo?


Comentarios / Preguntas (50)
![]() Diane escribió:
Diane escribió:
Bonjour, j’ai un autre problème, quand on arrive aux diminutions pour le raglan, au début, les explications disent de diminuer après A4 : glisser une m à l’endroit, 1 m end passer etc , même chose pour après A4 2 m ens à l’endroit cela fait une diminution de 4 mailles par rangs et non 8 mailles. Qu’est-ce que je ne comprends pas? C’est supposé être 8 mailles par rang x 8 pour arriver de 444 m à 380 m? Où est-ce que je me trompe?Merci
08.06.2021 - 21:09DROPS Design respondió:
Bonjour Diane, vous devez diminuer de chaque côté de chaque A.4, autrement dit: tricotez jusqu'à ce qu'il reste 2 m avant A.4, tricotez ces 2 m ensemble à l'endroit, tricotez A.4, glissez 1 m à l'end, 1 m end, passez la m glissée par-dessus la m tricotée, et répétez à chaque A.4, vous diminuez ainsi 2 mailles à chaque A.4 (=1 m avant + 1 m après) x 4 raglan = 8 mailles. Bon tricot!
09.06.2021 - 07:30
![]() Diane escribió:
Diane escribió:
Bonjour, je fais la grandeur xxxl, je suis rendu à l’empiètement, si je comprends bien, je dois commencer à la maille 72 du dos et faire le diagramme A3 à partir du 9e rang puisque j’étais là quand j’ai rabattu mes mailles pour l’emmanchure? Après, avoir fait les rangs 9 et 10, je devrai commencer le raglan? Merci
06.06.2021 - 14:50DROPS Design respondió:
Bonjour Diane, tout à fait, vous commencez au milieu dos et tricote le point ajouré comme avant avec en plus A.3 sur les manches et A.4 à chaque transition (cf flèches). Après avoir tricoté 2 rangs (= les 9 et 10 de A.3 pour vous et le rang 3 de A.4), vous commencez à diminuer pour le raglan. Bon tricot!
07.06.2021 - 07:36
![]() Kristy escribió:
Kristy escribió:
Just had a look at the Drops gallery. What outstanding knitters there are in the world!
03.06.2021 - 17:20
![]() Kristy escribió:
Kristy escribió:
Thanks it did help. I must have repeated the decrease row twice in A6. On the right track to finish and it’s looking lovely!
02.06.2021 - 13:45DROPS Design respondió:
Super, thanks for your feedback! Remember you can share your pictures with us - read more here. Happy finishing!
02.06.2021 - 16:11
![]() Kristy escribió:
Kristy escribió:
Got it. 240 sts thnx
02.06.2021 - 06:51
![]() Kristy escribió:
Kristy escribió:
I ended up with 30 stitches less after finishing A6 in the yoke. Not sure where I went wrong but do you know how many stitches should be on the needle after finishing A5 for size L? I had to rip it back to the ridges and start from A5 again, if I know how many stitches on the needle after I finish A5 that might help.
01.06.2021 - 17:44DROPS Design respondió:
Dear Kristy, after A.5 has been worked, there are 8 sts in each A.5 x 30 repeats on the round = 240 sts on needle. You now work A.6 = 8 sts a total of 30 times in the round - when A.6 has been worked, you have decreased 2 sts in each A.6 = 6 sts x 30 = 180 sts. Can this help?
02.06.2021 - 07:30
![]() Kristy escribió:
Kristy escribió:
Thank you very much for the detailed explanation. I have worked out what I did wrong on the first garment. I did not have the arrow lined up correctly on the graph and that has made the difference. I have almost finished the 2nd one and it’s looking pretty darn perfect. Thanks again!
29.05.2021 - 11:45DROPS Design respondió:
Dear Kristy, we are happy that you managed to make it work. We always try to help. Happy Knitting!
29.05.2021 - 13:27
![]() Mrs Ellis escribió:
Mrs Ellis escribió:
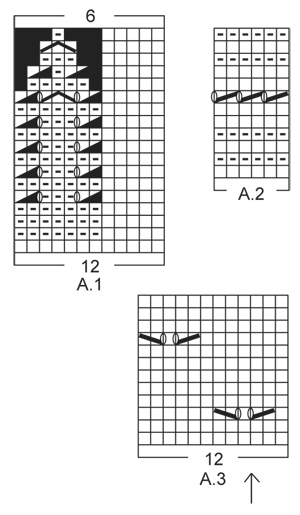
What does the arrow mean on the graph in A3? Thanks in advance
27.05.2021 - 14:08DROPS Design respondió:
Dear Mrs Ellis, the arrow in A.3 will be used when working yoke, ie the arrow in A.3 should match the middle of sleeve. Happy knitting!
28.05.2021 - 08:28
![]() Kristy escribió:
Kristy escribió:
The A4 is confusing do you have a tutorial which shows how this is done? I finished one and I notice the A4 on the front of one side of the garment is going in a different direction to the one on the opposite side, same as on the back. Something has gone wrong and I don’t want to repeat the same mistake on the second garment. A tutorial would help immensely.
27.05.2021 - 13:51DROPS Design respondió:
Dear Kristy, it's a bit tricky to get what went wrong; in the 2nd part of diagram, you will work P2 tog, YO, P3, P2 tog on row 5, 7, 9 and 11, on row 13 work P2 tog, YO, slip 1 st as if to K, K 2 tog, psso, YO, P2 tog - (2 sts dec), on row 15 work: P2 tog, P1, P2 tog, on row 17 work P3 tog = P1 remain. Remember that the first 6 sts should be always knitted. Hope this will help. Happy knitting!
28.05.2021 - 07:48
![]() Nova escribió:
Nova escribió:
Im so very disappointed in this garment. I have completed it in size L but the measurements are way off and I did the tension swatch at the beginning so I know it’s not my tension. The chest for L should measure 48cm but it only measures 43cm so it’s too small. I did everything correctly as you can see by all my questions. All that work and I have to give it away. It turned out lovely so at least it will make a nice gift.
13.04.2021 - 09:04DROPS Design respondió:
Dear Nova, we are sorry that your piece turned out to small. According to ravelry a couple of knitters made this pattern, and none of them complained about the size. If you keep the gauge and the mesurements,it should be ok. For the future we suggest checking your gauge often throughout the piece, as well as comparing the measurements to the chematic, and correct row/stitchnumber accordingly. Happy Knitting!
13.04.2021 - 09:51
|
||||||||||||||||||||||||||||
White Romance#whiteromancetop |
||||||||||||||||||||||||||||
 |
 |
|||||||||||||||||||||||||||
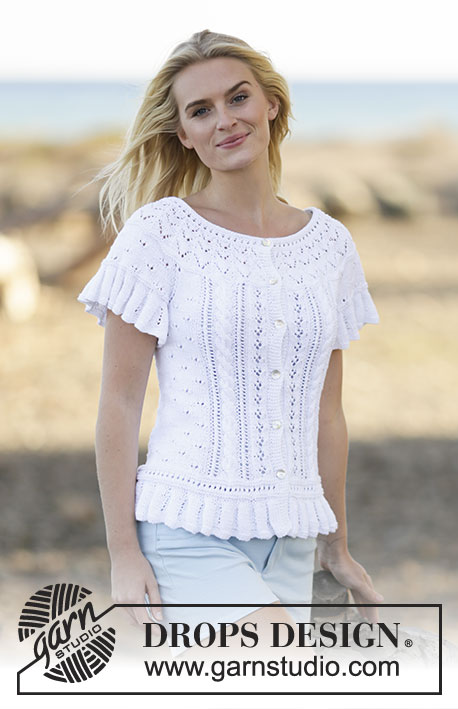
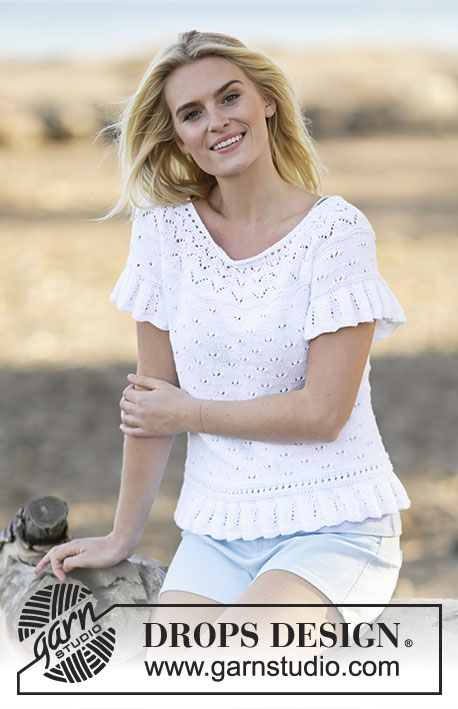
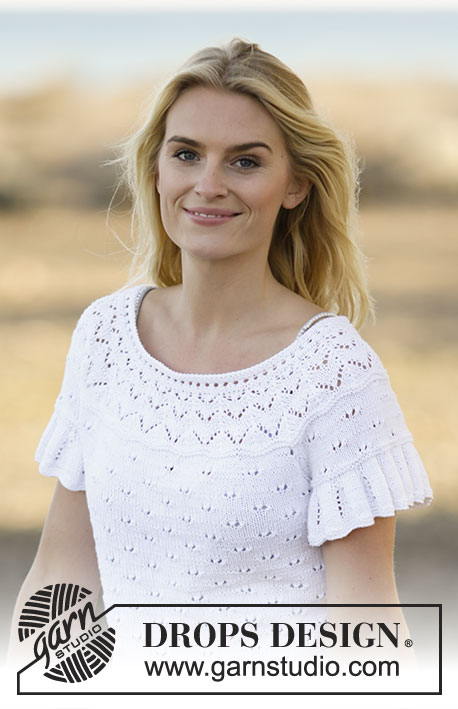
Top de punto DROPS con patrón de calados, manga corta y canesú redondo en ”Safran”. Talla: S - XXXL.
DROPS 159-12 |
||||||||||||||||||||||||||||
|
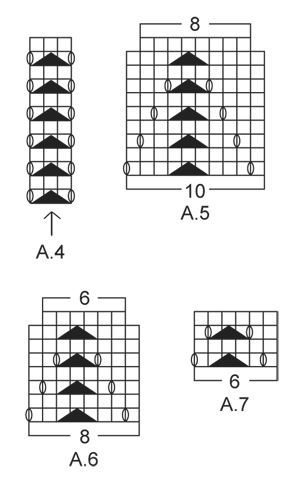
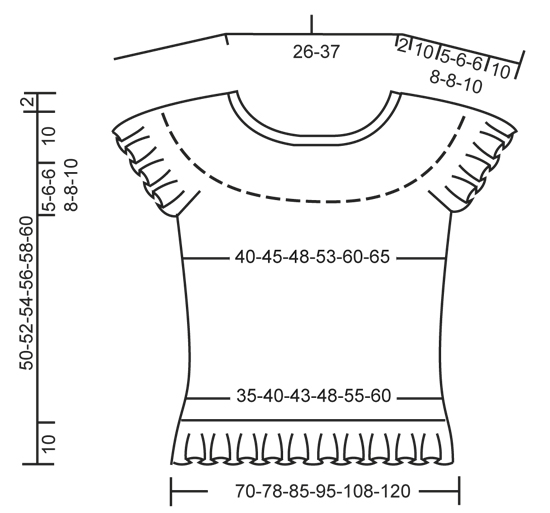
PT MUSGO (en redondo en ag circular): * 1 vta de derecho y 1 vta de revés *, repetir de *a*. 1 pliegue = 2 vtas. PATRÓN: Ver los diagramas A.1 a A.7. Los diagramas muestran todas las filas del patrón visto por el LD. TIP PARA LOS AUMENTOS: Aum 1 pt trabajando 1 HEB (lazada). En la sig vta trabajar la HEB como pt retorcido para evitar que se formen agujeros. Trabajar los pts aum en pt jersey. RAGLAN: Dism para el raglán a cada lado de A.4 en todas las transiciones entre la manga y el cuerpo. Dism como sigue después de A.4: desl 1 pt de derecho, 1 d., pasar el pt desl por encima. Dism como sigue antes de A.4: 2 pjd. ----------------------------------------------------------------------- CUERPO: Se trabaja en redondo en ag circular. Mont 336-372-408-456-516-576 pts en ag circular tamaño 2.5 mm con Safran. Trabajar 2 pliegues en pt musgo - ver explicación arriba. Cambiar a ag circular tamaño 3 mm y trabajar según el diagrama A.1. Cuando se ha completado A.1 una vez en vertical, hay 168-186-204-228-258-288 pts en la ag. Ahora continuar con el patrón según el diagrama A.2. Después de A.2, tejer 2 vtas de derecho y AL MISMO TIEMPO aum 0-6-0-0-6-0 pts repartidos en la última vta = 168-192-204-228-264-288 pts. Insertar 1 marcapuntos (MP) al inicio de la vta y otro después de 84-96-102-114-132-144 sts (= lados). Ahora continuar el patrón según el diagrama A.3. ¡RECUERDE MANTENER LA MISMA TENSIÓN DEL TEJIDO! AL MISMO TIEMPO cuando la labor mida 12 cm, aum 1 pt a cada lado de ambos MP - leer TIP PARA LOS AUMENTOS (= 4 pts aum). Repetir los aum cada 4-4-4-5-5-5 cm un total de 6 vcs a cada lado = 192-216-228-252-288-312 pts - ATENCIÓN: Trabajar los pts aum en pt jersey. Continuar trabajando hasta que la labor mida 35-36-38-38-40-40 cm. Trabajar la sig vta como sigue: Cerrar 5-5-5-6-6-6 pts para la sisa, trabajar 86-98-104-114-132-144 pts (= delantero), cerrar 10-10-10-12-12-12 pts para la sisa (es decir, 5-5-5-6-6-6 pts a cada lado del MP), trabajar 86-98-104-114-132-144 pts (= espalda) y cerrar los 5-5-5-6-6-6 pts restantes. Desjar la labor en espera y trabajar las mangas. MANGA: Se trabaja en redondo en ag circular. Mont 144-156-156-168-168-180 pts en ag circular tamaño 2.5 mm con Safran. Trabajar 2 pliegues en PT MUSGO - ver explicación arriba. Cambiar a ag circular tamaño 3 mm y trabajar el patrón según el diagrama A.1. Cuando se ha completado A.1 quedan 72-78-78-84-84-90 pts en la ag. Trabajar 2 pliegues. AL MISMO TIEMPO en la última vta cerrar los 10-10-10-12-12-12 pts del centro bajo la manga = 62-68-68-72-72-78 pts restantes en la ag. Dejar la labor en espera y tejer la otra manga. CANESÚ: Desl las mangas a la misma ag donde está el cuerpo en el punto donde se cerró para la sisa (sin trabajar los pts) = 296-332-344-372-408-444 pts. AL MISMO TIEMPO insertar 1 MP en el 1er y último pt de ambas mangas (= 4 MP). Comenzar en el centro de la espalda y continuar con el patrón como antes en el cuerpo, AL MISMO TIEMPO trabajar A.3 en las mangas (la flecha del diagrama debe coincidir con el centro de la manga. Comenzar en la misma fila del diagrama que el cuerpo). Trabajar de modo adicional A.4 en cada transición entre el cuerpo y las mangas (la flecha del diagrama debe coincidir justo con el pt con MP). uando se han trabajado 2 vtas sobre todos los pts comenzar a disminuir para el RAGLÁN - ver explicación arriba (= 8 pts dism). Repetir las dism cada 4ª vta un total de 4-5-5-7-7-8 vcs = 264-292-304-316-352-380 pts. Trabajar 2 pliegues sobre todos los pts y AL MISMO TIEMPO dism 4-12-4-6-12-10 pts repartidos en la 1ª vta = 260-280-300-310-340-370 pts. Trabajar 2 vtas de derecho. Ahora comenzar las dism para la forma del canesú y trabajar el patrón en redondo según el diagrama A.5 (=26-28-30-31-34-37 repeticiones en la vta – ATENCIÓN: Cambiar a ag corta cuando sea necesario). Cuando se ha trabajado A.5 una vez en vertical, trabajar A.6 en lugar de A.5. Cuando se ha completado A.6 una vez en vertical hay 156-168-180-186-204-222 pts en la ag. Ahora trabajar A.7 en lugar de A.6. Cuando se ha completado A.7 una vez en vertical trabajar una elevación en la parte posterior del cuello. Insertar 1 MP en el centro del delantero. Comenzar en el centro de la espalda y trabajar de derecho hasta que queden 14-14-16-16-18-20 pts antes del MP. Girar, trabajar de derecho la vta hasta que queden 14-14-16-16-18-20 pts antes del MP en el otro lado. Girar, trabajar de derecho hasta que queden 30-30-34-34-38-42 pts antes del MP. Girar, trabajar de derecho la vta hasta que queden 30-30-34-34-38-42 pts antes del MP en el otro lado. Girar, trabajar de derecho hasta que queden 46-46-52-52-58-64 pts antes del MP. Girar, trabajar de derecho la vta hasta que queden 46-46-52-52-58-64 pts antes del MP en el otro lado. Girar, trabajar de derecho hasta que queden 62-62-70-70-76-86 pts antes del MP. Girar, trabajar de derecho la vta hasta que queden 62-62-70-70-76-86 pts antes del MP en el otro lado. Girar la labor y trabajar de vta de derecho hasta el inicio de la vta. CENEFA DEL ESCOTE: Cambiar a ag circular tamaño 2.5 mm y trabajar el patrón en redondo sobre todos los pts según el diagrama A.2. AL MISMO TIEMPO en la 1ª vta dism 22-24-24-26-30-32 pts repartidos = 134-144-156-160-174-190 pts. Después de A.2, rematar flojo de derecho por el LD. El top mide aprox. 52-54-56-58-60-62 cm desde el hombro hacia abajo. TERMINACIÓN: Coser las aberturas bajo las mangas. |
||||||||||||||||||||||||||||
Explicaciones del diagrama |
||||||||||||||||||||||||||||
|
||||||||||||||||||||||||||||
 |
||||||||||||||||||||||||||||
 |
||||||||||||||||||||||||||||
 |
||||||||||||||||||||||||||||
¿Terminaste este patrón?Entonces, etiqueta tus fotos con #dropspattern #whiteromancetop o envíalas a la galería #dropsfan. ¿Necesitas ayuda con este patrón?Encontrarás 30 videos tutoriales, un espacio para comentarios/preguntas y más visitando la página del patrón en garnstudio.com © 1982-2026 DROPS Design A/S. Todos los derechos reservados. Este documento, incluyendo todas sus sub-secciones, está protegido por los derechos de autor (copyright). Lee más acerca de lo que puedes hacer con nuestros patrones en la parte de abajo de cada patrón de nuestro sitio. |
||||||||||||||||||||||||||||


Con más de 40 años en el diseño de modelos de punto y de ganchillo, DROPS Design ofrece una de las más vastas colecciones de patrones gratuitos en el internet - traducidos en 17 idiomas. Al día de hoy, contamos con 324 catálogos y 12290 patrones - de los cuales 11685 están traducidos en español.
Nosotros trabajamos con mucho esmero para brindarte lo mejor que las labores de punto y ganchillo tienen para ofrecer,inspiración y consejos, así como hilos de magnífica calidad a precios increíbles! Te gustaría usar nuestros patrones para otro fin además del uso personal? Puedes leer acerca de lo que estás permitida a hacer en el texto de Copyright en la parte de abajo de todos nuestros patrones. Felices labores!
Escribe un comentario sobre DROPS 159-12
¡Nos encantaría saber qué piensas acerca de este patrón!
Si quieres escribir una pregunta referente al patrón, por favor asegúrate de elegir la categoría correcta en el formulario debajo, para acelerar el proceso de respuesta. Los campos obligatorios están marcados con un *.