
Categorías populares
¿Buscas un hilo?


Comentarios / Preguntas (33)
![]() Maja escribió:
Maja escribió:
Hallo, ich arbeite den Cardigan in Größe S. Wenn ich über die 68 Maschen des Ärmel das Muster A1 arbeiten soll, bleiben 8 Maschen übrig. Was mache ich mit diesen? Schon einmal vielen Dank!
03.10.2015 - 15:03DROPS Design respondió:
Die Antwort finden Sie unten beim Eintrag vom 20.09.
04.10.2015 - 22:09
![]() Maja escribió:
Maja escribió:
Hallo, ich arbeite den Cardigan in Größe S. Wenn ich über die 68 Maschen des Ärmel das Muster A1 arbeiten soll, bleiben 8 Maschen übrig. Was mache ich mit diesen? Schon einmal vielen Dank!
03.10.2015 - 14:27DROPS Design respondió:
Antwort siehe unten! :-)
04.10.2015 - 22:13
![]() Maja escribió:
Maja escribió:
Hallo, ich arbeite den Cardigan in Größe S. Wenn ich über die 68 Maschen des Ärmel das Muster A1 arbeiten soll, bleiben 8 Maschen übrig. Was mache ich mit diesen? Schon einmal vielen Dank!
20.09.2015 - 13:36DROPS Design respondió:
Antwort siehe unten! :-)
20.09.2015 - 14:12
![]() Maja escribió:
Maja escribió:
Hallo, ich arbeite den Cardigan in Größe S. Wenn ich über die 68 Maschen des Ärmel das Muster A1 arbeiten soll, bleiben 8 Maschen übrig. Was mache ich mit diesen? Schon einmal vielen Dank!
20.09.2015 - 03:40DROPS Design respondió:
Diese M stricken Sie auch im Muster A.2 (nicht A.1), auch wenn es nicht aufgeht. Sie müssen das Muster von der oberen Ärmelmitte aus ausrechnen, so wie es in der Anleitung beschrieben ist, dann können Sie nach rechts und links zur unteren Ärmelmitte hin die M abzählen und ausrechnen, welche M Sie dann noch an der unteren Ärmelmitte stricken müssen. Es fällt nicht so auf, dass das Muster nicht aufgeht, da es ja unter dem Ärmel ist. Außerdem machen Sie dann ja auch Ärmelabnahmen, sodass an der unteren Ärmelmitte weitere Maschen verschwinden.
20.09.2015 - 12:56
![]() Maple escribió:
Maple escribió:
Hi, i am knitting drops 157-24. U say, when work WS rows have the yarn following in front of work, is that mean, purl on the wrong side when knit fair isle WS rows ????
04.09.2015 - 01:35DROPS Design respondió:
Dear Mrs Maple, that's right, you are working in stocking st, ie rows from WS are purled (= K 1 row, P 1 row following at the same time the diagram: 1 square = 1 st x 1 row). Happy knitting!
04.09.2015 - 09:53
![]() Maple escribió:
Maple escribió:
Hi,i'm knitting silver stag cardigan drops 157-24. I want to know, do sliver stag cardigan have purl stitches ??? Because drops fair isle video show purl stitches on wrong side row.. is this cardigan knit all ,right side row and wrong side row,all knit stitches ????
03.09.2015 - 22:38DROPS Design respondió:
Dear Mrs Maple, this jacket is worked in stocking st, back and forth on circular needle, ie you will K every row from RS and P every row from WS when working the body. Sleeves are then worked in the round with double pointed needles, ie you will then K every round. Happy knitting!
04.09.2015 - 09:22
![]() Maple escribió:
Maple escribió:
Hi i am knitting silver stag cardigan with circular needle.large size chart A.1.i try to knit row 6=(wrong side). But the floats is show on the right side... should i keep knitting row 6 even the floats is show in right side. Or i do wrong....please help...
03.09.2015 - 02:15DROPS Design respondió:
Dear Mrs Maple, When working WS rows have the yarn following in front of work, again make sure you have the right tension on the thread. Happy knitting!
03.09.2015 - 09:30
![]() Maple escribió:
Maple escribió:
Hi, i am knitting sliver stag cardigan drop 157-24. I don't know how to knit row 6 and i watch the fair isle video but doesn't help me because the video use straight needle to knit fair isle. But sliver stag cardigan use circular needle to knit fair isle...i don't know how to knit fair isle with circular needle and knit wrong side row...because don't seen right...
03.09.2015 - 01:56DROPS Design respondió:
Dear Mrs Maple, working fair isle with circular needle will be done the same way as with straight needles: at the end of each row you turn and work next row, ie you work alternately from RS and from WS, as with straigth needles. Happy knitting!
03.09.2015 - 09:29
![]() Maple escribió:
Maple escribió:
Hi,i am knitting sliver stag cardigan drops 157-24. I don't know how to knit row 6. I never working fair isle cardigan pattern.. after i done knitting row 5 =(right side). And i try to knit row 6=(wrong side ).but the yarn,the stitch..... long yarn...is show... i hope u understand me...
03.09.2015 - 01:37DROPS Design respondió:
Dear Mrs Maple, when working fair isle, you will have to make sure you are working not too tight or too loose. If you are not used to work fair isle, it can be a good idea to practise a bit making a swatch with another yarn before working on the jacket. Happy knitting!
03.09.2015 - 09:27
![]() Maple escribió:
Maple escribió:
Hi,i am knitting sliver stag cardigan drops 157-24. I'm knitting large size, chart A.1 and i am not sure how to knit row 6 because if i knit row 6= wrong size, the yarn is not on the wrong size,the yarn is show in right side..i hope you understand what i mean...please help....
03.09.2015 - 01:21DROPS Design respondió:
Dear Mrs Maple, you read diagram starting from the bottom corner on the right side: From RS: read from the right towards the left From WS: read from the left towards the right. This means you work row 6 as follows: 1 edge st in grey, *K3 in white, K1 in grey, K1 in white, K1 in grey, K3 in white, K1 in grey, K1 in white, K3 in grey* repeat from *-*, 1 edge st in grey. Happy knitting!
03.09.2015 - 09:23
|
||||||||||
Silver Stag Cardigan#silverstagcardigan |
||||||||||
|
|
||||||||||
Chaqueta de punto DROPS con canesú redondo y patrón de renos, tejida de arriba abajo en ”Karisma”. Talla: S - XXXL.
DROPS 157-24 |
||||||||||
|
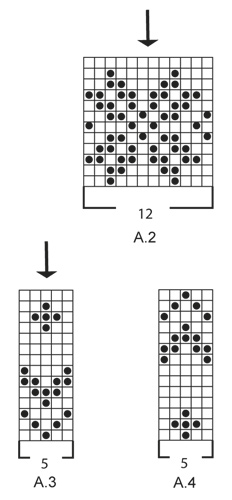
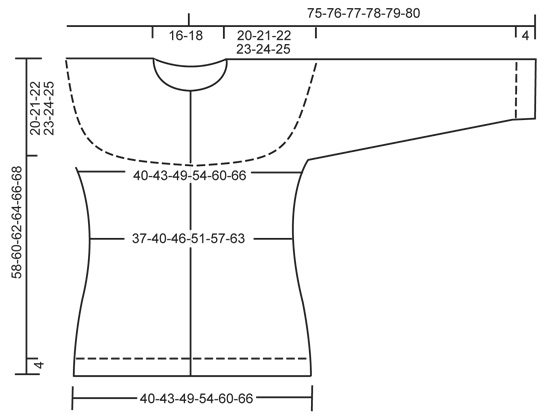
PUNTO MUSGO (de ida y vta en ag): Trabajar todas las filas de derecho. 1 pliegue = 2 filas de derecho. PATRÓN: Ver los diagramas A.1-A.4. Los diagramas muestran todas las filas del patrón visto por el LD. Trabajar todo el patrón en pt jersey. TIP PARA LAS DISMINUCIONES (se aplica a los lados y las mangas): Dism antes del marcapuntos (MP) y 1 d. como sigue: 2 pjd. Dism después del MP y 1 d. como sigue: Desl 1 pt como de derecho, 1 d., pasar el pt desl por encima. TIP PARA LOS AUMENTOS (se aplica a los lados): Trabajar todos los aum por el LD. Aum un total de 4 pts en la fila. Trabajar hasta que quede 1 pt antes del MP, 1 HEB, 2 pts en pt jersey, 1 HEB = 2 pts aum. En la sig fila trabajar las HEB de revés retorcido (es decir trabajar por detrás del pt en vez de por delante) para evitar que se formen agujeros. ---------------------------------------------------------------------------------------------------------------------------------------------- CHAQUETA: Se trabaja de ida y vta en ag circular, de arriba abajo. Trabajar las mangas en redondo con ag de doble punta. CANESÚ: Mont 90-98-106-122-130-138 pts con ag circular tamaño 4 mm con gris medio. Trabajar la 1ª fila como sigue (= LD): 1 pt orillo en PT MUSGO - ver explicaciones arriba - A.1 hasta que quede 1 pt., 1 pt orillo. RECUERDE MANTENER LA MISMA TENSIÓN DE LA MUESTRA! Cuando se ha trabajado A.1 una vez en vertical, hay 266-290-314-362-386-410 pts en la ag. Continuar con 2-5-8-4-7-10 filas en pt jersey (con 1 pt orillo a cada lado en pt musgo) con gris medio. Trabajar la sig fila por el LR como sigue: Trabajar los primeros 38-41-47-53-59-65 pts (incl 1 pt orillo en pt musgo) desl los sig 58-64-64-76-76-76 pts a un gancho aux (= manga), mont 10 pts nuevos bajo la manga, insertar un MP en el centro de estos 10 pts, trabajar los sig 74-80-92-104-116-128 pts, desl los sig 58-64-64-76-76-76 pts a un gancho aux (= manga), mont 10 pts nuevos bajo la manga, insertar un MP en el centro de estos 10 pts, trabajar los 38-41-47-53-59-65 pts restantes. CUERPO: Ahora hay 170-182-206-230-254-278 pts para el cuerpo. Trabajar como sigue: 1 pt orillo en pt musgo, A.2 (= 12 pts) hasta que quede 1 pt, 1 pt orillo en pt musgo. Continuar de la misma manera hasta que A.2 se haya trabajado 1 vez en vertical. Ahora trabajar la labor en pt jersey en gris medio. En la sig fila por el LD dism 1 pt a cada lado de cada MP en los lados - VER TIP PARA LAS DISMINUCIONES. Repetir las dism cada 2 cm 2 vcs más = 158-170-194-218-242-266 pts. Cuando la labor mida 12-13-14-15-16-17 cm desde el MP bajo la manga, aum 1 pt a cada lado de cada MP a ambos lados de la labor - ver TIP PARA LOS AUMENTOS. Repetir los aum cada 2 cm 2 vcs más = 170-182-206-230-254-278 pts. Cuando la labor mida 56-58-60-62-64-66 cm, cambiar a ag circular tamaño 3 mm y aum 22-26-26-30-30-34 pts repartidos = 192-208-232-260-284-312 pts. Continuar trabajando pt elástico por el LD como sigue: 1 pt orillo en pt musgo, *2 d., 2 r.*, repetir de * a * hasta que queden 3 pts, 2 d., 1 pt orillo en pt musgo. Cuando el elástico mida 4 cm, rematar con derecho sobre derecho y revés sobre revés. MANGAS: Desl los pts del gancho aux de vta a ag de doble punta tamaño 4 mm. Ahora hay 58-64-64-76-76-76 pts para la manga. Trabajar 1 fila en pt jersey. Ahora mont 10 pts nuevos bajo la manga = 68-74-74-86-86-86 pts. Insertar un MP en el centro de estos pts nuevos. Ahora trabajar la manga en redondo. Trabajar A.2. ATENCIÓN: Ajustar el patrón para que los 2 pts centrales del diagrama (ver la flecha) sean los 2 pts centrales de la manga. Cuando se ha trabajado A.2, continuar con A.3. ATENCIÓN: Ajustar el patrón para que el pt central del diagrama (ver la flecha) sea uno de los 2 pts centrales de la manga, AL MISMO TIEMPO en la 1ª vta de A.3 comenzar las dism bajo la manga - leer el TIP PARA LAS DISMINUCIONES. Repetir las dism cada 3-2½-2½-2½-2½-2½ cm 9-12-12-12-12-12 vcs más = 48-48-48-60-60-60 pts. Cuando la manga mida 38 cm, trabajar A.4. ATENCIÓN: Ajustar para que el pt central del diagrama (ver la flecha) sea uno de los 2 pts centrales de la manga. Cuando se ha trabajado A.4 una vez en vertical, cambiar a ag de doble punta tamaño 3 mm y aum 4-8-8-0-4-4 pts repartidos = 52-56-56-60-64-64 pts. Ahora trabajar 3 cm de pt elástico (= 2 d./2 r.). Rematar con derecho sobre derecho y revés sobre revés. CENEFA IZQUIERDA: Trabajar la cenefa de ida y vta en ag circular tamaño 3 mm. Recoger aprox 144-168 pts (divisible por 4) dentro de 1 pt orillo a lo largo del delantero izquierdo con gris medio. Trabajar pt elástico como sigue por el LR: 1 pt en pt musgo, *2 r., 2 d.*, repetir de * a *, finalizar con 2 r. y 1 pt en pt musgo. El elástico comienza y finaliza con 2 d. y 1 pt en pt musgo por el LD. Trabajar hasta que el elástico mida 3 cm. Rematar con derecho sobre derecho y revés sobre revés. CENEFA DERECHA: Trabajar como la cenefa izquierda pero después de 1 cm, cerrar para 7 ojales repartidos (cerrar para el ojal en las secciones de revés visto por el LD). 1 OJAL = trabajar 2 pjr y hacer 1 HEB (lazada) - el ojal superior debe estar a aprox 6-7 cm del borde superior (también debe quedar un ojal en el borde del escote) y el ojal inferior a aprox 5-6 cm del borde inferior. CENEFA DEL ESCOTE: Recoger 96-100-104-108-112-116 pts sobre las cenefas y la fila de mont en ag circular tamaño 3 mm con gris medio. Trabajar pt elástico como sigue: 1 pt orillo en pt musgo, *2 r., 2 d.*, repetir de * a * hasta que queden 3 pts, 2 r., 1 pt orillo en pt musgo. Cuando la cenefa mida 1 cm dism para 1 ojal en línea con los otros ojales en la cenefa derecha, trabajando 2 pjd y haciendo 1 HEB. Continuar en pt elástico hasta que mida 3 cm. Rematar con derecho sobre derecho y revés sobre revés. TERMINACIÓN Coser las aberturas bajo las mangas. Coser los botones en la cenefa izquierda. |
||||||||||
Explicaciones del diagrama |
||||||||||
|
||||||||||
 |
||||||||||
 |
||||||||||
 |
||||||||||
¿Terminaste este patrón?Entonces, etiqueta tus fotos con #dropspattern #silverstagcardigan o envíalas a la galería #dropsfan. ¿Necesitas ayuda con este patrón?Encontrarás 29 videos tutoriales, un espacio para comentarios/preguntas y más visitando la página del patrón en garnstudio.com © 1982-2026 DROPS Design A/S. Todos los derechos reservados. Este documento, incluyendo todas sus sub-secciones, está protegido por los derechos de autor (copyright). Lee más acerca de lo que puedes hacer con nuestros patrones en la parte de abajo de cada patrón de nuestro sitio. |
||||||||||


Con más de 40 años en el diseño de modelos de punto y de ganchillo, DROPS Design ofrece una de las más vastas colecciones de patrones gratuitos en el internet - traducidos en 17 idiomas. Al día de hoy, contamos con 324 catálogos y 12290 patrones - de los cuales 11675 están traducidos en español.
Nosotros trabajamos con mucho esmero para brindarte lo mejor que las labores de punto y ganchillo tienen para ofrecer,inspiración y consejos, así como hilos de magnífica calidad a precios increíbles! Te gustaría usar nuestros patrones para otro fin además del uso personal? Puedes leer acerca de lo que estás permitida a hacer en el texto de Copyright en la parte de abajo de todos nuestros patrones. Felices labores!
Escribe un comentario sobre DROPS 157-24
¡Nos encantaría saber qué piensas acerca de este patrón!
Si quieres escribir una pregunta referente al patrón, por favor asegúrate de elegir la categoría correcta en el formulario debajo, para acelerar el proceso de respuesta. Los campos obligatorios están marcados con un *.