
Categorías populares
¿Buscas un hilo?


Comentarios / Preguntas (127)
![]() Debbie escribió:
Debbie escribió:
Can you make a you tube video showing how this is made?
20.05.2015 - 01:53DROPS Design respondió:
Dear Debbie, you will find videos related to the sts used under tab "videos", you can work either following diagram or written pattern. Should you need any further assistance, you are welcome to ask your question here or to contact your DROPS store. Happy crocheting!
20.05.2015 - 10:02
![]() Judi Ames escribió:
Judi Ames escribió:
For Ruth, to put it more clearly, at end of first row, you turn, chain 3 (= first stitch) for turning chain...after the ch stitch do 2 more stitches, then stitch in ch-sp, ch 3 and continue...I was wondering why I had no turning chain and the rows were getting wider, too...does this help?
07.05.2015 - 22:35
![]() Lia escribió:
Lia escribió:
Ik ben met het voorpand bezig .Moet ik 3 stokjes in de 3 lossen tussen de tussen de stokjes in de hoek maken of in het eerst losse boogje? Keer de tweede toer 1st. in de eerst 3losse maar er zijn toch gen losse alleen 3 stokjes ? Moet je om een om aan het begin van de toer 3 stokjes haken of alleen maar boogjes?
30.04.2015 - 20:32
![]() Vivian escribió:
Vivian escribió:
Thx for the response about the sleeves! I woke up this morning and reread the instructions and understand them completely now!
27.04.2015 - 17:03
![]() Vivian escribió:
Vivian escribió:
I have the question about the increase every sixth round on the back panel. I think I understand what the instructions say…every 6th round you would have a DC ch3 DC all in the same ch sp on either side of the corners as you go round equaling 8 extra DC & ch3 per sixth round? BUT, I do not see that in the picture, which makes me question whether I understand clearly.
27.04.2015 - 17:01DROPS Design respondió:
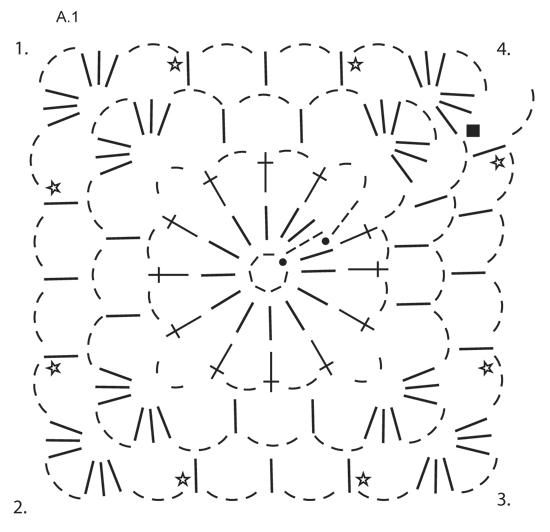
Dear Vivian, diagram shows only first 4 rounds, increase starts on round 5, then every 6th round where you will work 1 dc + 3ch +1dc +3 ch in same ch-space each side of each corner (= 2 dc more per side = 8 dc inc per inc round). Happy crocheting!
27.04.2015 - 17:14
![]() Vivian escribió:
Vivian escribió:
I am totally lost on the directions for the sleeves. Is there any possibility I could get a simplified explanation on dec the sleeves? I just don't understand the way it is written. Also, when I enlarge the picture of the back piece, I don't see where the inc are in the example? I don't think I did that part right :( , all I did was put in one extra DC, but I am plowing ahead anyhow. thx!
27.04.2015 - 07:06DROPS Design respondió:
Dear Vivian, mid under sleeve replace 1 dc+3 ch that way: work next dc in next ch-space but wait with last pull through (2 sts on hook, work next dc in next ch space and on last pull through, pull yarn through all sts on hook. For any individual assistance, remember you can get help from your DROPS store. Happy crocheting!
27.04.2015 - 11:42
![]() Ruth escribió:
Ruth escribió:
Nope, sorry, still don't understand what you do at the turn after the first row...any chance of a picture? To clarify - I finish the first row with 3ch, 3 tr in ch-loop in the corner, I turn and then....what??!!
26.04.2015 - 23:22DROPS Design respondió:
Dear Ruth, on 2nd row start with 3 ch (= 1st tr), 1 tr in each of the first 2 tr, then repeat *1 tr in ch-space, 3 ch* to the end of row and finish with 1 tr in the last ch-space, 1 tr in each of the last 3 tr. On 3rd row, turn and work 3 ch, 1 tr in each of the next 2 tr, *3 ch, 1 tr in next ch-space*, repeat to the end of row and finish with 1 tr in each of the last 3 tr. Repeat then row 2 and 3. Happy crocheting!
27.04.2015 - 14:19
![]() Ruth escribió:
Ruth escribió:
Nope, sorry, still don't understand what you do at the turn after the first row...any chance of a picture?
26.04.2015 - 23:10
![]() Ruth escribió:
Ruth escribió:
I am struggling to understand what happens at the corners when you turn on the frontpiece. A close up picture might help - the pattern makes no sense to me and I am so close! After severalf restarts I have done the main body and arms and it's looking good, but I can't figure out the turns. Help!.
24.04.2015 - 22:44DROPS Design respondió:
Dear Ruth, when you work only on front piece, crochet 3 tr in 1st ch-loop in the corner, then repeat *3 ch, 1 tr around ch-loop*, finish with 3ch, 3 tr in ch-loop in the corner. And continue then repeating row 2 and 3 - remember to replace 1st tr with 3 ch at the beg of row. Happy crocheting!
25.04.2015 - 10:19
![]() Lelel Mas escribió:
Lelel Mas escribió:
En el delantero, como se continua el patrón sin que salgan aumentos, si se trabaja un punto alto en cada arco aumenta igual que antes.
01.04.2015 - 09:34DROPS Design respondió:
Hola Lelel, gracias por escribir. Repasando el patrón he encontrado una corrección del delantero sin actualizar en español. Ahora está actualizado. Sentimos las molestias y esperamos que la corrección te ayude a realizar el delantero.
05.04.2015 - 12:12
|
||||||||||||||||||||||
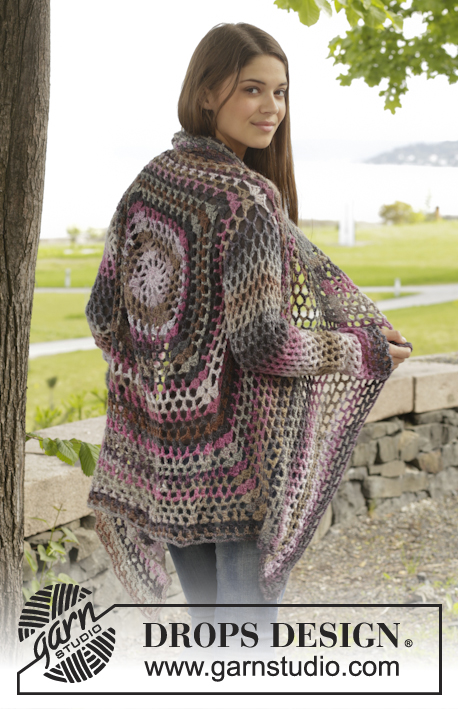
Around the World#aroundtheworldcardigan |
||||||||||||||||||||||
 |
 |
|||||||||||||||||||||
Chaqueta de ganchillo DROPS con patrón de calados en ”Big Delight”. Talla: S - XXXL
DROPS 156-42 |
||||||||||||||||||||||
|
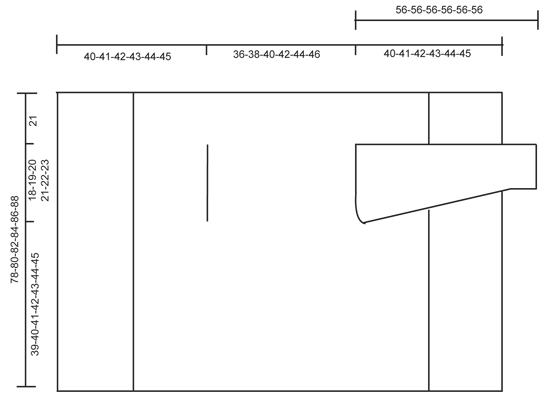
PATRÓN: Ver el diagrama A.1 TIP PARA LAS DISMINUCIONES (se aplica a las mangas): Para dism 1 repetición (= 1 p.a. + 3 p.de cad.) dejar sin trabajar p.de cad, pero trabajar 2 p.a. dentro de 1 p.a. como sigue: Trabajar 1 p.a. pero sin trabajar la última lazada (= 2 bucles en el ganchillo), ahora trabajar el sig p.a. pero en la última lazada pasar el hilo por todos los bucles en el ganchillo. ---------------------------------------------------------------------------------------------------------------------------------------------- CUERPO: Se trabaja en redondo desde el centro de la espalda. Trabajar 6 p.de cad. con ag de ganchillo tamaño 5 mm con Big Delight y formar un anillo con 1 p.e. en el primer p.de cad. Trabajar según el diagrama A.1, es decir trabajar como sigue: VUELTA 1: Trabajar 3 p.de cad., 13 p.a. dentro del anillo, finalizar con 1 p.e. en el 3er p.de cad. del inicio de la vta. VUELTA 2: 5 p.de cad., saltar 1 p.a. 1 p.a. en el sig p.a., *2 p.de cad., 1 p.a. en el sig p.a*, repetir de * a * la vta entera, finalizar con 2 p.de cad. = 12 p.a. + 2 p.de cad. VUELTA 3: Ahora trabajar el círculo en un cuadrado, es decir como sigue: Trabajar 3 p.a. + 3 p.de cad.+ 3 p.a. (= esquina) en el primer arco de p.de cad., 3 p.de cad., 1 p.a. en el sig arco, 3 p.de cad., 1 p.a. en el sig arco, 3 p.de cad., * 3 p.a. + 3 p.de cad.+ 3 p.a. (= esquina) en el sig arco, 3 p.de cad., 1 p.a. en el sig arco, 3 p.de cad., 1 p.a. en el sig arco, 3 p.de cad.*, repetir de * a * un total de 3 vcs , 1 p.a. en el sig arco (= quedan 2 p.de cad. de la vta anterior), 3 p.de cad. VUELTA 4: Trabajar 3 p.a. + 3 p.de cad.+ 3 p.a. (= esquina) en el primer arco de p.de cad., *3 p.de cad., 1 p.a. en el sig arco, 3 p.de cad., 1 p.a. en el sig arco, 3 p.de cad., 1 p.a. en el sig arco, 3 p.de cad., 3 p.a. + 3 p.de cad.+ 3 p.a. (= esquina) en el sig arco*, repetir de * a * un total de 3 vcs , 3 p.de cad., 1 p.a. en el sig arco, 3 p.de cad., 1 p.a. en el sig arco, 3 p.de cad., 1 p.a. en el sig arco, 3 p.de cad., 1 p.a. en el sig arco, 3 p.de cad. RECUERDE MANTENER LA MISMA TENSIÓN DE LA MUESTRA. Repetir la 4ª vta con aum, es decir trabajar 1 p.a. + 3 p.de cad. más entre cada esquina en cada vta (= 4 aum por vta), AL MISMO TIEMPO en cada 6ª vta aum 1 p.a.+ 3 p.de cad. extra a cada lado de cada esquina - ver la estrella en el diagrama (= 8 aum extra por vta). Continuar de la misma manera hasta que el cuadrado mida 36-38-40-42-44-46 cm x 36-38-40-42-44-46 cm. Ahora trabajar la sisa como sigue: Trabajar como antes hasta la primera esquina, trabajar 3 p.a. + 3 p.de cad.+ 3 p.a. en el arco de la esquina. Ahora trabajar p.de cad. hasta el centro del sig lado (es decir el centro entre la 1ª y 2ª esquina) como sigue: Trabajar 1 p.de cad. por cada p.de cad/p.a. saltado. Ahora trabajar el patrón como antes hasta el centro entre la 3ª y 4ª esquina. Ahora trabajar p.de cad. hasta inicio de la vta como sigue: Trabajar 1 p.de cad. por cada p.de cad/p.a. saltado. En la sig vta trabajar el patrón y aum como antes sobre todos los pts, incl los p.de cad. de las sisas. Continuar de la misma manera hasta que el cuadrado mida 78-80-82-84-86-88 cm x 78-80-82-84-86-88 cm (es decir 21 cm para todas las tallas desde la sisa). Asegurar el hilo. DELANTERO: Ahora trabajar de ida y vta entre la 1ª y la 2ª esquina. ATENCIÓN! Trabajar el delantero sin aumentos. Fila 1: trabajar en la 1ª esquina como sigue: 3 p.a. en el arco de la esquina, *3 p.de cad, 1 p.a. en el arco*, repetir de *a* y finalizar con 3 p.de cad y 3 p.a. en la esquina. Fila 2: girar y trabajar como sigue: 1 p.a. en cada uno de los primeros 3 p.a., *1 p.a. en el arco, 3 p.de cad*, repetir de *a* y finalizar con 1 p.a. en el último arco y 1 p.a. en cada uno de los 3 p.a. Fila 3: girar y trabajar como sigue: 1 p.a. en cada uno de los primeros 3 p.a., *3 p.de cad, 1 p.a. en el arco*, repetir de *a* y finalizar con 3 p.de cad y 1 p.a. en cada uno de los últimos 3 p.a. Continuar repitiendo las Filas 2 y 3. Trabajar de esta manera hasta haber trabajado 19-20-21-22-23-24 cm de ida y vta, asegurar el hilo. Repetir en el otro lado, ahora trabajar de ida y vta de la 3ª a la 4ª esquina. Finalmente trabajar una vta alrededor del cuadrado entero. trabajar el patrón como antes pero en los arcos de las esquinas trabajar 6 p.a. Asegurar el hilo. MANGA: Trabajar en redondo , de arriba abajo desde la sisa, comenzar desde el centro bajo la manga por el LD. VUELTA 1: Trabajar 6 p.de cad. (= 1 p.a. + 3 p.de cad.), * 1 p.a. en el sig arco, 3 p.de cad.*, repetir de * a * un total de 16-17-18-19-20-21 vcs, trabajar 1 p.de cad., finalizar con 1 p.e. en el 3er p. de cad. del inicio de la vta. VUELTA 2: Trabajar 5 p.de cad., * 1 p.a. en el sig arco, 3 p.de cad.*, repetir de * a * un total de 16-17-18-19-20-21 vcs, trabajar 1 p.de cad., finalizar con 1 p.e. en el 3er p. de cad. del inicio de la vta. Repetir las VUELTAS 1 y 2 - AL MISMO TIEMPO dism 1 p.a. + 3 p.de cad. al inicio de la 4ª-6ª-6ª-8ª-8ª-6ª vta trabajando 2 p.a. juntos - LEER TIP PARA LAS DISMINUCIONES - centro bajo la manga. Repetir las dism cada 6ª-6ª-6ª-4ª-4ª-4ª vta = 12-12-13-13-14-14 p.a. Repetir la vta sin dism hasta que la manga mida aprox 56 cm en todas las tallas. Asegurar el hilo. Trabajar otra manga. |
||||||||||||||||||||||
Explicaciones del diagrama |
||||||||||||||||||||||
|
||||||||||||||||||||||
 |
||||||||||||||||||||||
 |
||||||||||||||||||||||
¿Terminaste este patrón?Entonces, etiqueta tus fotos con #dropspattern #aroundtheworldcardigan o envíalas a la galería #dropsfan. ¿Necesitas ayuda con este patrón?Encontrarás 7 videos tutoriales, un espacio para comentarios/preguntas y más visitando la página del patrón en garnstudio.com © 1982-2026 DROPS Design A/S. Todos los derechos reservados. Este documento, incluyendo todas sus sub-secciones, está protegido por los derechos de autor (copyright). Lee más acerca de lo que puedes hacer con nuestros patrones en la parte de abajo de cada patrón de nuestro sitio. |
||||||||||||||||||||||


Con más de 40 años en el diseño de modelos de punto y de ganchillo, DROPS Design ofrece una de las más vastas colecciones de patrones gratuitos en el internet - traducidos en 17 idiomas. Al día de hoy, contamos con 324 catálogos y 12245 patrones - de los cuales 11625 están traducidos en español.
Nosotros trabajamos con mucho esmero para brindarte lo mejor que las labores de punto y ganchillo tienen para ofrecer,inspiración y consejos, así como hilos de magnífica calidad a precios increíbles! Te gustaría usar nuestros patrones para otro fin además del uso personal? Puedes leer acerca de lo que estás permitida a hacer en el texto de Copyright en la parte de abajo de todos nuestros patrones. Felices labores!
Escribe un comentario sobre DROPS 156-42
¡Nos encantaría saber qué piensas acerca de este patrón!
Si quieres escribir una pregunta referente al patrón, por favor asegúrate de elegir la categoría correcta en el formulario debajo, para acelerar el proceso de respuesta. Los campos obligatorios están marcados con un *.