
Categorías populares
¿Buscas un hilo?


Comentarios / Preguntas (63)
Rainbowis escribió:
Yes according to instruction received on 18.05.2015 and remaining 158 St. Regards.
28.07.2015 - 13:19DROPS Design respondió:
Dear Mrs Rainbowis, the 5th marker should be placed between 1st and 2nd makers (where you have 40 sts between these markers) and the 6th marker should be placed between the 3rd and 4th marker (where you have 40 sts between these) = these new markers are for the sides of jumper. Happy knitting!
29.07.2015 - 10:06Rainbowis escribió:
Hi, I finished the dec until I had 158 sts, however, when I count to add th 5th and 6th markers which is bet. 1st & 2nd - 3rd & 4th I found that the 40th sts is the same marker of the 2nd & 4th sts !!!?? They are not the middle as the pattern instructed. :$ Regards.
24.07.2015 - 12:10DROPS Design respondió:
Dear Mrs Rainbowis, did you dec 1 st before 1st and 3rd marker and 1 st after 2nd and 4th marker ?
27.07.2015 - 17:17Rainbowis escribió:
Repeat dec every 1-1-1½-2-3½-3½ cm 4-4-4-3-2-2 times. hi, the above means that I'll continue after the first Dec line or 2 in stockinett st the measure a 11/2 cm and then Dec, correct? Regards, Rainbowis
17.05.2015 - 13:52DROPS Design respondió:
Dear Mrs Rainbowis, work 1st dec, *then work 1½ cm in stocking st and work one more dec*, repeat from *-* a total of 4 times = 5 times in total, 10 sts dec and 158 sts remain. Happy knitting!
18.05.2015 - 09:54Rainbowis escribió:
Thanks for helping me.
11.05.2015 - 18:01Rainbowis escribió:
Dec 1 st before 1st and 3rd marker and 1 st after 2nd and 4th marker (NOTE! 1st marker is 1st marker on row from RS!) the above is puzzeling me can't get it? that means the one on the left needle is the 2nd as the 1st is on the right needle!!??
11.05.2015 - 15:30DROPS Design respondió:
Dear Mrs Rainbowis, the 1st marker is the first one you inserted, ie the first after the 23th st worked in stocking st, the 2nd is the one inserted after the 40th st ... Happy knitting!
11.05.2015 - 17:44Rainbowis escribió:
Hi, i need more clarification for my last question. 1st marker at 23rd st., 2nd marker at 40th st., 3rd marker at 48th st., 4th marker at 40th st. and 5th marker at 23rd st which will be at the beg from the right side. so I will make the decrease for the 1,2,3 & 4 but the last one (5) make nothing? Regards,
11.05.2015 - 11:15DROPS Design respondió:
Dear Mrs Rainbowis, you should have 4 markers (size L): 1st marker after 23th st in stocking st, 2nd marker after 40th st in stocking st, 3rd marker after 48th st in stocking st, 4th marker after 40th sts in stocking st, 23 sts in stocking st remain before beg of round. Happy knitting!
11.05.2015 - 13:13Rainbowis escribió:
Hi, in the body part the pattern said 4 markers while I work it counts 5 marker!? Does after the 48th sts no marker is replaced? ? Thanks.
09.05.2015 - 09:39DROPS Design respondió:
Dear Mrs Rainbowis, you may have a total of 5 markers, including the marker for beg of round, there will be no dec on this one, dec are done on the 4 marker placed 4 cm from new sts under sleeves. Happy knitting!
11.05.2015 - 10:04
![]() Caroline Brent escribió:
Caroline Brent escribió:
I've just finished this jumper, it's beautiful, and I love the shaping, the pattern was so easy to follow, thank you. Caroline
02.03.2015 - 21:49Rainbowis escribió:
I don't think that you get my last question. I finished that part until it says that I'll cont. Knitting till the marker and then starting using the diagram.. Do I miss something here?
20.02.2015 - 16:05DROPS Design respondió:
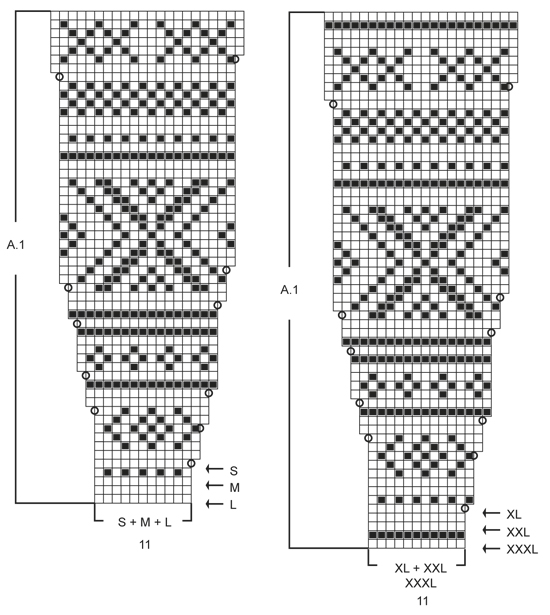
Dear Mrs Rainbowis, after you have worked the short rows for elevation, you continue now in the round and start diagram A.1: in size M, starting at the arrow and repeat the 11 sts in A.1 a total of 12 times around. Read more about diagrams here. Happy knitting!
20.02.2015 - 17:42Rainbowis escribió:
So I will start from bottom right side, let's say the diagram says k 11 the square are 11, then I'll turn the piece and k 11 the next row? Taking into consideration that I have 132 St on needles. Thanks,
20.02.2015 - 09:45DROPS Design respondió:
Dear Mrs Rainbowis, the elevation for back neck is worked in stocking st, not following the diagrams, work first the short rows with K11 from RS, P20 from WS etc.. until they are all done (= last row is P56 sts from WS), then start A.1 following diagram. Happy knitting!
20.02.2015 - 13:39
|
||||||||||
Elinor Dashwood#elinordashwoodsweater |
||||||||||
|
|
||||||||||
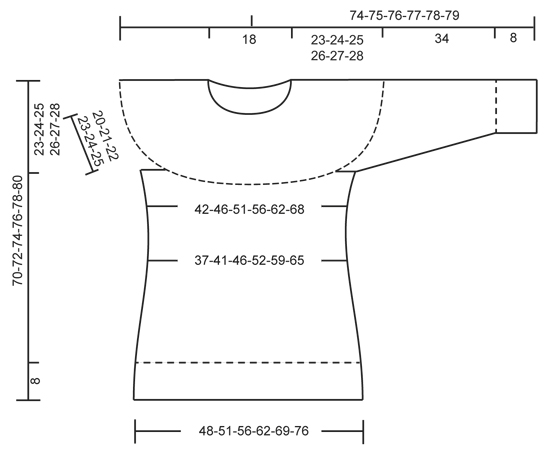
Pulóver de punto DROPS con pechera redonda y patrón texturado, tejido de arriba para abajo, en “Alaska”. Talla: S – XXXL.
DROPS 157-5 |
||||||||||
|
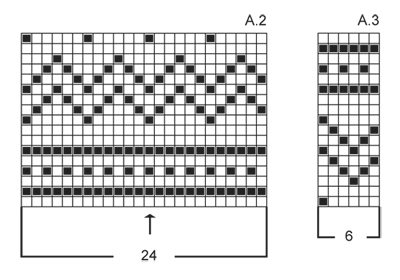
PT MUSGO (en redondo en ag circular): * 1 vta de derecho y 1 vta de revés *, repetir de *a*. 1 surco = 2 vtas. PATRÓN: Ver diagramas A.1 a A.3. Los diagramas muestran todas las hileras en el patrón vistas por el LD. TIP PARA AUMENTAR 1 (aplica a la pechera): Aum 1 pt haciendo 1 HEB (lazada). En la vta sig, tejer la HEB retorcida (es decir, tejer por atrás del pt en vez de por delante) para evitar que se formen agujeros. TIP PARA AUMENTAR 2: Tejer hasta que reste 1 pt antes del marcapuntos, 1 HEB, 2d (el marcapuntos está situado entre estos pts), 1 HEB. En la vta sig, tejer la HEB retorcida (es decir, tejer por atrás del pt en vez de por delante) para evitar que se formen agujeros. TIP PARA DISMINUIR (aplica a la cintura + la manga): Dism de la manera sig después del marcapuntos: Deslizar 1 pt de derecho, 1d, pasar el pt desl por encima. Dism de la manera sig 2 pts antes del marcapuntos: Tejer 2 pjd. ---------------------------------------------------- PULÓVER: Tejido en redondo, de arriba para abajo. PECHERA: Mon 69-76-80-84-87-91 pts en ag circular tamaño 4 mm con Alaska. Tejer 4 surcos en PT MUSGO – ver explicación arriba. Insertar un marcapuntos al inicio de la vta = centro de la espalda. Ahora cambiar a ag circular tamaño 5 mm. Tejer en pt jersey y, AL MISMO TIEMPO, aum 41-45-52-59-67-85 pts distribuidos equitativamente – LEER TIP PARA AUMENTAR 1! Ahora hay 110-121-132-143-154-176 pts en la vta. Después tejer una elevación de ida y vuelta en el escote, a partir del centro de la espalda, de la manera sig: 9-10-11-12-13-14 pts derechos, virar la pieza y tejer 18-20-22-24-26-28 pts reveses. Virar la pieza, tejer 27-29-31-33-35-37 pts derechos, virar la pieza y tejer 36-38-40-42-44-46 pts reveses. Virar la pieza y tejer 45-47-49-51-53-55 pts derechos, virar la pieza y tejer 54-56-58-60-62-64 pts reveses. Virar la pieza y tejer de derecho sobre todos los pts hasta el marcapuntos. En la vta sig, tejer y aum de acuerdo al diagrama A.1 – elegir el diagrama que corresponda a la talla que se está tejiendo. RECORDARSE DE MANTENER LA MISMA TENSIÓN DE TEJIDO DE LA MUESTRA! Después de haber tejido todo el diagrama A.1 1 vez verticalmente, hay 220-242-264-286-308-352 pts en la ag. En la vta sig, tejer la 1ª hilera de A.2 y, AL MISMO TIEMPO, aum 8-8-8-10-16-0 pts distribuidos equitativamente = 228-250-272-296-324-352 pts. Tejer la vta sig de la manera sig: la 2ª hilera de A.2 sobre los primeros 31-35-39-43-48-53 pts, deslizar los 51-55-57-61-65-69 pts sig a un gancho o seguro aux para la manga, mon 8 nuevos pts (= bajo la manga), continuar con A.2 sobre los 64-70-80-88-98-108 pts sig (= pieza del frente), deslizar los 51-55-57-61-65-69 pts sig a un gancho o seguro aux para la manga, mon 8 nuevos pts bajo la manga, A.2 sobre los 31-35-39-43-48-53 pts sig. Ahora hay 142-156-174-190-210-230 pts para el cuerpo. CUERPO: Continuar en pt jersey. Cuando la pieza mida 4 cm a partir de los nuevos pts bajo la manga, insertar 4 marcapuntos en la pieza de la manera sig: 17-20-23-25-28-31 pts en pt jersey, insertar un marcapuntos, 36-38-40-44-48-52 pts en pt jersey, insertar un marcapuntos, 36-40-48-52-58-64 pts en pt jersey, insertar un marcapuntos, 36-38-40-44-48-52 pts en pt jersey, insertar un marcapuntos, 17-20-23-25-28-31 pts en pt jersey. Ahora comenzar las dism – LEER TIP PARA DISMINUIR. Dism 1 pt antes del 1er y 3er marcapuntos y 1 pt después del 2º y 4º marcapuntos (NOTA! El 1er marcapuntos es el 1er marcapuntos en la hilera por el LD)! Repetir las dism a cada 1-1-1½-2-3½-3½ cm 4-4-4-3-2-2 veces en total = 126-140-158-178-202-222 pts. Ahora insertar un marcapuntos en el centro de los 36-38-40-42-48-52 pts en cada lado (es decir, entre el 1er y 2º marcapuntos y entre el 3er y 4º marcapuntos) = 5º y 6º marcapuntos. Cuando la pieza mida 14-15-16-17-18-19 cm a partir de los nuevos pts bajo la manga, comenzar los aum – recordarse del TIP PARA AUMENTAR 1! Aum antes del 1er y 3er marcapuntos y después del 2º y 4º marcapuntos. Repetir los aum a cada 3 cm 4 veces más y, AL MISMO TIEMPO, en el 2º, 3er y 4º aum, aum 1 pt en cada lado del 5º y 6º marcapuntos (= lados) – LEER TIP PARA AUMENTAR 2! Cuando todos los aum estén hechos, hay 158-172-190-210-234-254 pts en la ag. Cuando la pieza mida 31-32-33-34-35-36 cm a partir de los nuevos pts bajo la manga, aum 4-2-2-0-0-4 pts distribuidos equitativamente = 162-174-192-210-234-258 pts. Después tejer A.3 sobre todos los pts. Después de haber tejido A.3 verticalmente, aum 42-45-51-66-78-90 pts distribuidos equitativamente = 204-219-243-276-312-348 pts. Tejer 1 vta en pt jersey. Después cambiar a ag circular tamaño 4 mm y tejer el resorte de la manera sig: * 1d, 2r *, repetir de *a*. Continuar de esta manera hasta que el resorte mida 8 cm. Rem con derecho sobre derecho y revés sobre revés. MANGA: Tejida en redondo en ag de doble punta. Deslizar los 51-55-57-61-65-69 pts del gancho o seguro aux para las ag de doble punta tamaño 5 mm. Tejer la 2ª hilera de A.2, mon 8 nuevos pts bajo la manga al final de la hilera = 59-63-65-69-73-77 pts. Insertar un marcapuntos en el centro de los 8 nuevos pts (es decir, 4 pts en cada lado del marcapuntos). Después tejer en redondo. Continuar con el patrón de acuerdo al diagrama A.2 – NOTA: Ajustar el patrón de acuerdo con el centro, la flecha en el diagrama marca el pt central en la parte de arriba de la manga y, AL MISMO TIEMPO, cuando la pieza mida 4 cm a partir del marcapuntos, comenzar las dism – LEER TIP PARA DISMINUIR! Repetir las dism a cada 2-1½-1½-1½-1½-1 cm 8-10-11-10-12-14 veces más = 41-41-41-47-47-47 pts restantes. Cuando la pieza mida 34 cm en todas las tallas, aum 1 pt = 42-42-42-48-48-48 pts. Después tejer el patrón de acuerdo al diagrama A.3. Después de haber tejido A.3 1 vez verticalmente, aum 3 pts distribuidos equitativamente = 45-45-45-51-51-51 pts. Ahora cambiar a las ag de doble punta tamaño 4 mm y tejer el resorte (1d/2r). Rem con derecho sobre derecho y revés sobre revés cuando el resorte mida 8 cm. ENSAMBLAJE: Coser los agujeros bajo las mangas. |
||||||||||
Explicaciones del diagrama |
||||||||||
|
||||||||||
 |
||||||||||
 |
||||||||||
 |
||||||||||
¿Terminaste este patrón?Entonces, etiqueta tus fotos con #dropspattern #elinordashwoodsweater o envíalas a la galería #dropsfan. ¿Necesitas ayuda con este patrón?Encontrarás 25 videos tutoriales, un espacio para comentarios/preguntas y más visitando la página del patrón en garnstudio.com © 1982-2026 DROPS Design A/S. Todos los derechos reservados. Este documento, incluyendo todas sus sub-secciones, está protegido por los derechos de autor (copyright). Lee más acerca de lo que puedes hacer con nuestros patrones en la parte de abajo de cada patrón de nuestro sitio. |
||||||||||


Con más de 40 años en el diseño de modelos de punto y de ganchillo, DROPS Design ofrece una de las más vastas colecciones de patrones gratuitos en el internet - traducidos en 17 idiomas. Al día de hoy, contamos con 324 catálogos y 12290 patrones - de los cuales 11685 están traducidos en español.
Nosotros trabajamos con mucho esmero para brindarte lo mejor que las labores de punto y ganchillo tienen para ofrecer,inspiración y consejos, así como hilos de magnífica calidad a precios increíbles! Te gustaría usar nuestros patrones para otro fin además del uso personal? Puedes leer acerca de lo que estás permitida a hacer en el texto de Copyright en la parte de abajo de todos nuestros patrones. Felices labores!
Escribe un comentario sobre DROPS 157-5
¡Nos encantaría saber qué piensas acerca de este patrón!
Si quieres escribir una pregunta referente al patrón, por favor asegúrate de elegir la categoría correcta en el formulario debajo, para acelerar el proceso de respuesta. Los campos obligatorios están marcados con un *.