
Categorías populares
¿Buscas un hilo?


Comentarios / Preguntas (19)
![]() Petra Marquardt escribió:
Petra Marquardt escribió:
Wie hier öfters beschrieben muss in derMitte 8 Maschen gestrickt werden die aber nicht ins Diagramm gehören Die Diagramme werden innerhalb 7 Maschen gearbeitet die mittleren Maschen bleiben nach der Anleitung unangetastet das verstehen soviele hier nicht so kann man das Muster nicht arbeiten die mittleren 8 Maschen bleiben uneingeschränkt bestehen
13.04.2025 - 15:58DROPS Design respondió:
Liebe Frau Marquardt, ganz am Anfang, wenn mann die Diagramme strickt, sind es 8 M (in 2. Größe) die glatt rechts gestrickt werden, aber wenn man die Diagramme weiterschickt werden sich die Diagonalen in der Mitte "treffen", so daß alle Maschen mit rechten/linken Maschen gestrickt werden. Viel Spaß beim Stricken!
22.04.2025 - 08:40
![]() Anna escribió:
Anna escribió:
Hei haluaisin tehdä tähän raglanhihat, mitenköhän se olisi mahdollista? Hi I would like to change sleeves to raglan sleeves, how could I do it?
21.10.2020 - 00:13
![]() Allison escribió:
Allison escribió:
I al making size XXXL. The pattern says do A2 6 times then 4 stitches stockinette stitch, and A1 6 times. Eventually the points should meet, but the 4 stockinette stitches are still in the middle. Am I supposed to decrease those at some point while I am following the chart?
31.03.2019 - 06:18DROPS Design respondió:
Dear Allison, you don't have to decrease any stitches in the middle, when repeating the diagrams in height, these 4 sts will then be worked into the pattern creating the tip. Happy knitting!
01.04.2019 - 13:04
![]() Lela Zaranec escribió:
Lela Zaranec escribió:
I'm confused about the pattern too. I don't understand how the middle stitches disappear as you work the pattern vertically. Are you supposed to then work part of the diagram into the stockinette stitches on both sides? Also shouldn't the pattern go A1 then A2 so you get the point? I wish there was a picture of the back too.
19.11.2017 - 01:10DROPS Design respondió:
Dear Mrs Zaranec, working A.1 and A.2 as explained will create diagonals with K andn P sts meeting tog mid on piece. Happy knititng!
20.11.2017 - 09:23Vanda escribió:
Hallo, can this pattern work without any adjustments with 1 strand of Melody instead of 2 strands of Brushed Alpaka Silk? Thanks.
26.01.2016 - 14:20DROPS Design respondió:
Dear Vanda. Yes, that should be no problem, but don't forget to knit a sample anyway to check your gauge.
26.01.2016 - 14:24
![]() Lisa escribió:
Lisa escribió:
Hi, to be a bit more clear about my question, I don't understand how to make the pattern meet, when there are 8 stockinette stitches in the middle? What happens to those 8 stitches as I keep going vertically with the pattern? If I don't decrease those 8 stitches, there will be a break in the middle of the pattern that goes all the way up the whole sweater, unless I'm missing something?
24.12.2015 - 18:26DROPS Design respondió:
Dear Lisa, at the beg on A.2/A.1 you will have 8 stocking sts between both diagrams in the middle, but repeating diagrams vertically, the pattern will meet on mid back = you will get a tip of reverse stocking st in the middle. Happy knitting!
02.01.2016 - 13:39
![]() Lisa escribió:
Lisa escribió:
So am I supposed to figure out when to reverse the stockinette? There are no instructions that I can see that say to repeat the 8 stitches for a certain number of rows and then reverse the stockinette. Should I be following an exact pattern as written or am I supposed to figure it out myself?
24.12.2015 - 04:06DROPS Design respondió:
Dear Lisa, you work both diagrams A.2 and A.1 as explained and repeat displacement vertically until displacement meet at the middle of piece. Happy knitting!
02.01.2016 - 13:32
![]() Lisa escribió:
Lisa escribió:
Hi, I love this sweater but the pattern is not working for me. If I try to get the pattern to work for size "medium" there are 8 stockinette stitches between the pattern that create a thick stripe down the middle of the front and back. I can't figure out how to get the pattern right unless I make size "large" which has "0" stockinette stitches. Please let me know if I'm reading this wrong? I would love to get the pattern to work. Thanks! Lisa
20.12.2015 - 22:20DROPS Design respondió:
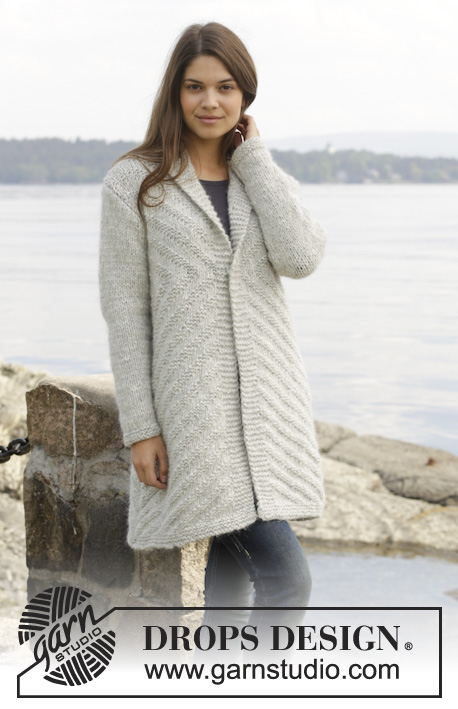
Dear Lisa, that's correct, working the diagrams upwards will then create the "tip" in reverse stocking sts (= in P st) as you can see in the photo on the model (size M is here shown). Happy knitting!
21.12.2015 - 11:21
![]() Lillan Öhrn escribió:
Lillan Öhrn escribió:
Tycker det låter väldigt konstigt i mängd av garn! Det kraftiga garnet i 50 gr. nystan Drops Cloud skall det vara 750gr. av i storlek XL i Drops Brushed Alpaca (tror det är 25g. nystan) skall det bara vara 450 gr. fast man skall sticka med 2 trådar. I mina öron verkar detta inte stämma alls det borde väl vara mycket mer i det garnet eller??? Kanske jag tänker fel... Mvh Lillan
27.10.2014 - 19:12DROPS Design respondió:
Jo Lillan, der er jo mange flere meter på 25gr i det tyndere garn. Se her hvordan man regner garnforbruget ud: I str XL skal du bruge følgende i Cloud: 750g = 15 nøgler x 80m = 1200 m Du deler 1200 med antal meter pr nøgle i Brushed Alpaca Silk 140 og får 8,5 nøgler det ganger du med 2 da du bruger dobbelt tråd = 17,14 nøgler á 25g = 428 gr (som vi da er nødt til af afrunde til 450 gr for at være sikker på at der er nok garn). Held og lykke!
28.10.2014 - 10:27
![]() Kari Bonnichsen escribió:
Kari Bonnichsen escribió:
Er den angivne mængde garn for bruched alpaka korrekt? Ser ulogisk ud at man skal bruge meget mere af det tykkere cloud når man tager i betragtning at man skal bruge 2 tråde af alpaka
27.10.2014 - 12:52DROPS Design respondió:
Hej Kari Jo det stemmer, husk at 50 g Cloud = 80 m og Brushed Alpaca Silk ligger i 25 g nøgler og indeholder 140 m. God fornøjelse!
28.10.2014 - 09:00
|
|||||||
By The Lake#bythelakesweater |
|||||||
|
|
|||||||
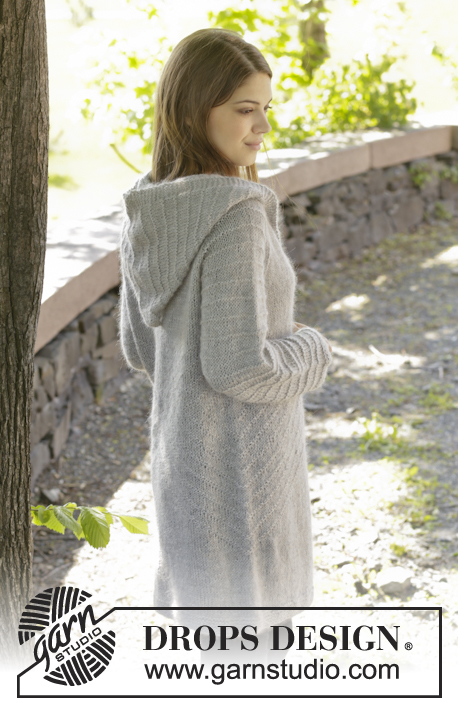
Pulóver de punto DROPS con patrón texturado en 1 hilo “Cloud” o 2 hilos “Brushed Alpaca Silk”. Talla: S – XXXL.
DROPS 157-7 |
|||||||
|
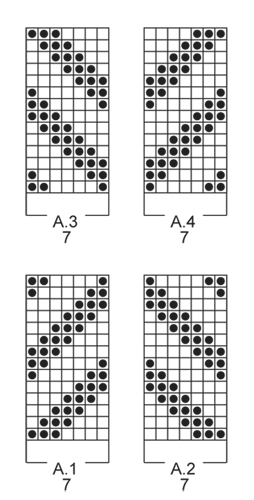
PT MUSGO (de ida y vuelta en la ag): Tejer todas las hileras de derecho. 1 surco = 2 hileras tejidas de derecho. TIP PARA DISMINUCIÓN: Todas las dism son hechas por el LD. Dism 1 pt al inicio de la hilera de la manera sig: 1 pt de orillo en pt musgo, deslizar el pt sig de derecho, 1d, pasar el pt desl por encima. Dism 1 pt al final de la hilera de la manera sig: Tejer hasta que resten 3 pts en la ag, tejer los 2 pts sig juntos de derecho, 1 pt de orillo en pt musgo. PATRÓN: Ver diagrama A.1-A.4, los diagramas muestran todas las hileras en el patrón vistas por el LD. TIP PARA AUMENTO: Aum 1 pt haciendo 1 HEB (lazada), en la hilera sig tejer la HEB retorcida (es decir, insertar la ag por atrás del pt en vez de por delante) para evitar que se formen agujeros. ---------------------------------------------------- ESPALDA: Tejida de ida y vuelta en la ag. Mon 62-66-72-76-86-90 pts (incluye 1 pt de orillo en cada lado) en ag circular tamaño 7 mm con 1 hilo Cloud o 2 hilos Brushed Alpaca Silk. Tejer 3 surcos en PT MUSGO – ver explicación arriba. Cambiar a ag circular tamaño 8 mm. Tejer de la manera sig, por el LD: 1 pt de orillo en pt musgo, A.2 (= 7 pts) 4-4-5-5-6-6 veces a lo ancho, pt jersey sobre los 4-8-0-4-0-4 pts sig, A.1 (= 7 pts) 4-4-5-5-6-6 veces a lo ancho, 1 pt de orillo en pt musgo. NOTA! Tejer los pts de orillo en los lados en pt musgo hasta el fin. RECORDARSE DE MANTENER LA MISMA TENSIÓN DE TEJIDO DE LA MUESTRA! Repetir la inclinación en A.1-A.2 verticalmente hasta que la inclinación coincida al centro de la espalda. Cuando la pieza mida 12 cm, dism 1 pt a 1 pt del pt de orillo en cada lado – LEER TIP PARA DISMINUCIÓN. Repetir las dism a cada 7-7½-7-8½-6½-9 cm 6-6-7-6-8-6 veces más = 48-52-56-62-68-76 pts. AL MISMO TIEMPO, cuando la pieza mida 50-51-52-53-54-55 cm, ajustar para después de 1 repetición o media repetición de A.1-A.2, tejer A.4 sobre A.2 y A.3 sobre A.1 hasta el fin. Cuando la pieza mida 61-63-65-67-69-71 cm, rem para las sisas al inicio de cada hilera, en cada lado, de la manera sig: Rem 3 pts 0-0-1-1-1-1 vez, 2 pts 1-1-1-1-2-3 veces, y 1 pt 2-3-1-3-3-4 veces = 40-42-44-46-48-50 pts. Cuando la pieza mida 78-81-84-87-90-93 cm, rem los 14-14-14-16-16-16 pts centrales para el escote y terminar cada hombro por separado. En la hilera sig a partir del escote, rem 1 pt = 12-13-14-14-15-16 pts restantes para el hombro. Rem flojamente todos los pts cuando la pieza mida 80-83-86-89-92-95 cm. FRENTE: Mon los pts y tejer como la pieza de la espalda. Cuando la pieza mida 72-75-76-79-80-83 cm, deslizar los 10-10-10-12-12-12 pts centrales a un gancho o seguro aux para el escote y terminar cada hombro por separado. Después, rem en cada hilera a partir del escote de la manera sig: 2 pts 1 vez y 1 pt 1 vez = 12-13-14-14-15-16 pts restantes para el hombro. Rem flojamente todos los pts cuando la pieza mida 80-83-86-89-92-95 cm. MANGA: Tejida de ida y vuelta en la ag. Mon 26-26-30-30-34-34 pts (incluye 1 pt de orillo en cada lado) en ag circular tamaño 7 mm con 1 hilo Cloud o 2 hilos Brushed Alpaca Silk. Tejer 3 surcos. Cambiar a ag circular tamaño 8 mm. Después tejer en pt jersey con 1 pt de orillo en pt musgo en cada lado. Cuando la pieza mida 9 cm, aum 1 pt – Leer TIP PARA AUMENTO – a 1 pt del pt de orillo en cada lado. Repetir los aum a cada 6½-4½-5-4½-5-4 cm 6-8-7-8-7-8 veces en total = 38-42-44-46-48-50 pts. Cuando la pieza mida 47-46-45-44-43-43 cm (medidas más cortas en las tallas más grandes debido a copete de manga más largo), rem para el copete de la manga al inicio de cada hilera en cada lado, de la manera sig: 3 pts 1 vez, 2 pts 1 vez y 1 pt 3-3-4-5-6-5 veces. Después rem 2 pts en cada lado hasta que la pieza mida aprox 56 cm, después rem 3 pts 1 vez en cada lado. Rem los pts restantes, la pieza mide aprox 57 cm. ENSAMBLAJE: Hacer la costura del hombro derecho. ORILLA DEL CUELLO: Tejida de ida y vuelta en la ag. Levantar 50 a 60 pts (incluye los pts en el gancho o seguro aux) en ag circular tamaño 7 mm con 1 hilo Cloud o 2 hilos Brushed Alpaca Silk. Tejer 2 surcos. Rem. ENSAMBLAJE: Hacer la costura del hombro izquierdo y de la orilla del cuello. Pegar las mangas en las hebras externas de los pts de orillo. Hacer la costura de las mangas y de los lados en una, a 1 pt del pt de orillo. |
|||||||
Explicaciones del diagrama |
|||||||
|
|||||||
 |
|||||||
 |
|||||||
¿Terminaste este patrón?Entonces, etiqueta tus fotos con #dropspattern #bythelakesweater o envíalas a la galería #dropsfan. ¿Necesitas ayuda con este patrón?Encontrarás 22 videos tutoriales, un espacio para comentarios/preguntas y más visitando la página del patrón en garnstudio.com © 1982-2026 DROPS Design A/S. Todos los derechos reservados. Este documento, incluyendo todas sus sub-secciones, está protegido por los derechos de autor (copyright). Lee más acerca de lo que puedes hacer con nuestros patrones en la parte de abajo de cada patrón de nuestro sitio. |
|||||||


Con más de 40 años en el diseño de modelos de punto y de ganchillo, DROPS Design ofrece una de las más vastas colecciones de patrones gratuitos en el internet - traducidos en 17 idiomas. Al día de hoy, contamos con 324 catálogos y 12290 patrones - de los cuales 11685 están traducidos en español.
Nosotros trabajamos con mucho esmero para brindarte lo mejor que las labores de punto y ganchillo tienen para ofrecer,inspiración y consejos, así como hilos de magnífica calidad a precios increíbles! Te gustaría usar nuestros patrones para otro fin además del uso personal? Puedes leer acerca de lo que estás permitida a hacer en el texto de Copyright en la parte de abajo de todos nuestros patrones. Felices labores!
Escribe un comentario sobre DROPS 157-7
¡Nos encantaría saber qué piensas acerca de este patrón!
Si quieres escribir una pregunta referente al patrón, por favor asegúrate de elegir la categoría correcta en el formulario debajo, para acelerar el proceso de respuesta. Los campos obligatorios están marcados con un *.