
Categorías populares
¿Buscas un hilo?


Comentarios / Preguntas (162)
![]() Barre escribió:
Barre escribió:
Je ne comprend pas comment faire pour retrouver 96 ms pour augmenter puis augmenter après pour en avoir 165 après vraiment drops ce n'est pas clair
06.09.2025 - 15:23DROPS Design respondió:
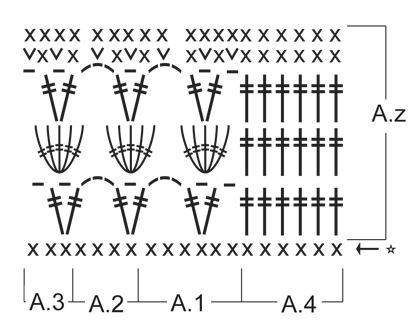
Bonjour Mme Barre, réalisez-vous la 2ème taille? Vous commencez alors par une chaînette de 166 mailles en l'air et, au 1er rang, vous allez sauter des mailles en l'air pour obtenir un total de 15 mailles serrées. Vous crochetez ensuite les diagrammes: A.4 = 6 m , A.1 = 6 m, A.2 = 24 x 4 m= 96 ms, A.3 = 3 ms, A.4 6 m soit = 6+6+96+3+6=117 mailles au 1er rang. Bon crochet!
08.09.2025 - 10:17
![]() Rebours escribió:
Rebours escribió:
Je ne comprend pas A1 A3 A4 vu qu'il ne suivent pas les explications pas très claires merci
23.08.2025 - 10:34DROPS Design respondió:
Bonjour Mme Rebours, A.4 correspond aux mailles de bordure des devants, le point fantaisie commence par A.1, juste après les mailles de bordure devant, on répète ensuite le diagramme A.2 puis on termine par le diagramme A.3 et la bordure devant comme indiqué dans A.4. Sur l'envers, lisez les diagrammes de gauche à droite ainsi: A.4, A.4, répétez A.2 et terminez par A.1 et A.4. Retrouvez ici comment lire un diagramme. Bon crochet!
25.08.2025 - 09:24
![]() Carol escribió:
Carol escribió:
I keep getting stuck making the yoke on the 2nd row. It says I should have 125 stitches to work with from the 1st row. When I complete the stitches I should have a total of 27 “v” sets. That includes the finishing “v” before the band. However, I have 4 stitches left over that would make a total of 28 “V”s. Why can’t I figure this out. Please help
13.07.2025 - 23:16DROPS Design respondió:
Dear Carol, you work: A.4 (= band), A.1 (= 1 V), A.2 over the next 104 tr (= 26 V), finish with A.3 (= 1 V) and A.4 (= band). That's 28 "V"s, 26 from A.2 and 1 from each of A.1 and A.3. Happy crochetting!
14.07.2025 - 00:23
![]() Dominique escribió:
Dominique escribió:
Ik ben tot aan de rij 5 met vasten gekomen waar de meerderingen moeten ingevoerd worden. Volgens het diagram hoort er maar 1 vaste in een lossenboog van 3 lossen te komen. Dit klopt niet. Ook als je dit diagram aanhoudt zonder meerderingen komt dit toch niet goed? Bij mij begint dit helemaal te rimpelen. Ik heb het uitgehaald en ik geef het op.
25.06.2025 - 23:26
![]() Mary escribió:
Mary escribió:
The answer to my question did not actually address my concerns. I don't think the responder actually read to the end. I started again. The picture gives the impression of a straight up and down shape, but it is actually a circle which gets bigger as you go on. I think the model must have had a clothes peg or something to hide the excess at the back! It is very much like crocheting a huge matinee jacket. I also did 3 SC rows between the lace rows to keep the fan clusters right facing.
03.02.2025 - 05:25
![]() Mary escribió:
Mary escribió:
Has anyone actually managed to complete this garment? I have seen the ruffled cardigan in the drops fan gallery but it is so different that It can't actually be the same pattern. My issue is not the armholes but the stitch count. I am making the 4th size so before dividing for the armholes I had 281 stitches. After doing the round with the 8ch to create the armholes which is ignored for the next (body) round, I would expect to be working 177 STS but I still have over 200 left.
01.02.2025 - 07:52DROPS Design respondió:
Dear Mary, the number of stitches should be correct: A.4 (=6 sts), A.1 (= 6 sts), 36sts of A.2, 8ch, skip 52 sts, 84sts of A.2, 8ch, skip 52 sts, 36 sts of A.2, A.3 (= 3 sts), A,4 (= 6 sts). If you add up all the numbers including the sleeves (but excluding the new chain stitches) = 281. Removing the 52+52 sleeve stitches and adding the 16 chain stitches you should have: 193 sts. Then you skip the 16 chain stitches as well: 177 stitches. Happy crochetting!
02.02.2025 - 23:32
![]() Karin escribió:
Karin escribió:
The armhole is just big enough if I crochet the 2 x 8 chains with a 9mm hook, but the next row says skip the 8's, which then makes the armhole much too small again, and would leave under arm holes in finished top. The pattern links to a video showing how to crochet a yoke top, and shows the chains as part of the body, but the pattern says not to do this. And how would you crochet 2nd row of A.z from simple chain stitches anyway? I am tempted to give up!
12.03.2024 - 00:31DROPS Design respondió:
Dear Karin, these 8 chain stitches under the sleeve are worked to help enlarge the armhole slightly, so that it won't be too small. You will work on the 8 chain stitches when working the sleeves. Once you join the sleeve to the body, the remaining hole won't be that big. Happy crochetting!
17.03.2024 - 19:01
![]() Petra Reider escribió:
Petra Reider escribió:
Hallo liebes Team, Wie "überspringe: ich Maschen? Ist es richtig, dass ich 56 Maschen "überspringen" soll? Ich bin verwirrt. LG Petra
07.03.2024 - 18:33DROPS Design respondió:
Liebe Frau Reider, um eine Masche zu überspringen wird diese Masche einfach nicht gearbeitet. Ganz am Anfang werden mehr Luftmaschen gehäkelt, als man Maschen braucht, denn die Luftmaschenkette ist oft fester als die nächsten Reihe danach, deshalb beginnt man hier mit mehr Luftmaschen als man feste Maschen braucht. Viel Spaß beim häkeln!
08.03.2024 - 08:18
![]() Karin escribió:
Karin escribió:
I've crocheted the yoke and row with 2 sets of 8 chains in it. Measuring the piece it's 22 across neck, 14 for shoulder/yoke depth, and 44 body width. However, sleeve depth is 14, not 18, and armhole is way too tight. How can this happen if everything else measures correctly? How best to fix this, please - very loose chaining for the 8, or chain 12 and add extra A2's to body, or skip 44 or 48 for sleeve instead of 40? Or something else? Thanks in advance
06.03.2024 - 22:34DROPS Design respondió:
Dear Karin, if your tension is correct you might just have to crochet these 8 chains loosely to avoid losing tension and let you keep the correct finished measurements. Happy crocheting!
07.03.2024 - 08:11
![]() Karin escribió:
Karin escribió:
Thanks. Sorry, another query, I'm new to crocheting garments. I've chained 156 loose chains for size small, and done the double crochet row, skipping every 4th chain as instructed. If tension is 14 stitches to 10cm, should the resulting 117 stitches measure 84cm? This seems big for the neckline, and mine is even bigger. Before I undo, and just do normal (rather than loose) chains, it would help to know what length I'm aiming for, please.
17.02.2024 - 15:09DROPS Design respondió:
Dear Karin, the gauge is 14 dtr, that is, double treble crochets. These are worked very differently from double crochets, so you can't apply the gauge of the pattern to the neckline. You can see the necessary length for the neck in the size chart: approx. 44cm (22 cm is half the neck in the size chart). Your gauge when working the neckline should be very different from the 14 stitches to 10cm of the dtr; the 117 stitches should be approx. 44cm. Happy crochetting!
18.02.2024 - 22:41
|
|||||||||||||||||||
Nevertheless#neverthelesscardigan |
|||||||||||||||||||
|
|
|||||||||||||||||||
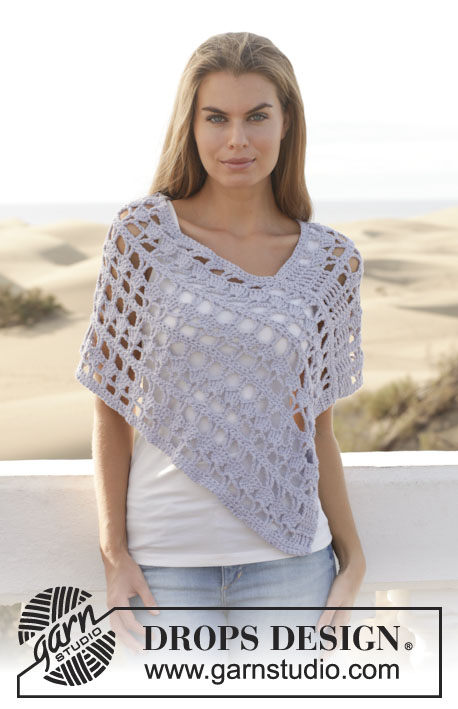
Chaqueta DROPS a ganchillo, en “Paris”. Talla: S – XXXL.
DROPS 153-10 |
|||||||||||||||||||
|
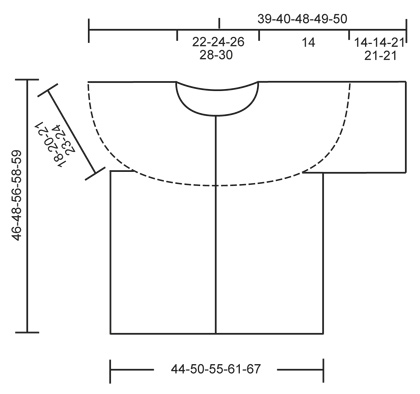
PATRÓN: Ver diagramas A.1 a A.4. INFORMACIÓN PARA LA ELABORACIÓN DEL TRABAJO: Sustituir el primer p.b. en cada hilera de p.b. con 1 cad. Sustituir el primer p.a.d. en cada hilera de p.a.d. con 4 cad. TIP PARA AUMENTO: Aum haciendo 2 p.b. en 1 p.b. ------------------------------------------------------ CHAQUETA: Trabajada de arriba para abajo, de ida y vuelta a partir del centro del frente. PECHERA: Mon 156-166-177-188-198 cad flojas (incl 1 cad para virar) en ag de ganchillo tamaño 5 mm con Paris. Hacer la 1ª hilera de la manera sig: Hacer 1 p.b. en la 2ª cad a partir de la ag, * 1 p.b. en cada una de las 3 cad sig, saltar 1 cad *, repetir de *a* y terminar con 1 p.b. en cada una de las últimas 2-4-3-2-4 cad = 117-125-133-141-149 p.b. (= la primera hilera del diagrama) – LEER INFORMACIÓN PARA LA ELABORACIÓN DEL TRABAJO. Continuar trabajando de la manera sig: A.4 (= borde), A.1, A.2 sobre los 96-104-112-120-128 p.b. sig (= 24-26-28-30-32 veces a lo ancho), terminar con A.3 y A.4 (= borde). Trabajar el diagrama A.z 1 vez verticalmente y, AL MISMO TIEMPO, en las últimas 2 hileras, aum 24-28-32-36-40 pts distribuidos equitativamente en cada una de las hileras (= 48-56-64-72-80 pts aum en total) – LEER TIP PARA AUMENTO arriba. NOTA: No aum sobre A.4 = 165-181-197-213-229 pts. Después trabajar el diagrama A.z 1 vez verticalmente (A.2 ahora es trabajado 36-40-44-48-52 veces a lo ancho) y, AL MISMO TIEMPO, en las últimas 2 hileras, aum 22-26-30-34-38 pts distribuidos equitativamente en cada una de las hileras (= 44-52-60-68-76 pts aum en total). NOTA: No aum sobre A.4 = 209-233-257-281-305 pts. CUERPO: AHORA MEDIR LA PIEZA A PARTIR DE AQUÍ! Continuar trabajando de la manera sig: A.4, A.1, A.2 sobre los 24-28-32-36-40 p.b. sig (= 6-7-8-9-10 veces a lo ancho) (pieza del frente), 8 cad (bajo la manga), saltar 40-44-48-52-56 p.b. de la hilera anterior (sisa, los pts serán usados para la manga más adelante), A.2 sobre los 60-68-76-84-92 p.b. sig (pieza de la espalda), 8 cad (bajo la manga), saltar 40-44-48-52-56 p.b. de la hilera anterior (sisa, los pts serán usados para la manga más adelante), A.2 sobre los 24-28-32-36-40 p.b. sig (pieza del frente) y terminar con A.3 y A.4. Continuar trabajando de la manera sig: Trabajar A.4, A.1, A.2 sobe los 24-28-32-36-40 p.b. sig (= 6-7-8-9-10 veces a lo ancho) (pieza del frente), saltar 8 cad (bajo la manga), A.2 sobre los 60-68-76-84-92 p.b. sig (pieza de la espalda), saltar 8 cad (bajo la manga), A.2 sobre los 24-28-32-36-40 p.b. sig (pieza del frente) y terminar con A.3 y A.4. Repetir A.z hasta que la pieza mida aprox 28-28-35-35-35 cm, terminar después de una repetición completa de A.z. Cortar y asegurar el hilo. La pieza mide aprox 46-48-56-58-59 cm a partir del hombro. MANGA: Trabajada en redondo. AHORA MEDIR LA PIEZA A PARTIR DE AQUÍ! Trabajada de arriba para abajo. Comenzar trabajando al centro bajo la manga de la manera sig: Hacer 2 p.b. en la primera cad (de las 8 cad), 1 p.b. en cada una de las 7 cad sig y 1 p.b. en cada uno de los 40-44-48-52-56 p.b. de la pechera = 49-53-57-61-65 p.b. Continuar trabajando de la manera sig: 4 cad, A.1, A.2 sobre los 40-44-48-52-56 pts sig (= 10-11-12-13-14 veces a lo ancho), terminar con A.3 y 1 p.bjs en la cuarta cad. Continuar de esta manera hasta que la pieza mida aprox 14-14-21-21-21 cm, terminar después de una repetición completa de A.z. Cortar y asegurar el hilo. ENSAMBLAJE: Hacer una orilla de p.b. alrededor del escote para obtener un bonito acabado de la manera sig: Hacer * 1 p.b. en cada una de las 3 cad sig, saltar 1 cad *, repetir de *a* y terminar con 1 p.b. en cada una de las últimas 4-6-5-4-6 cad = 118-126-134-142-150 p.b. Coser los botones en el borde izquierdo, separados aprox 7 cm uno del otro. |
|||||||||||||||||||
Explicaciones del diagrama |
|||||||||||||||||||
|
|||||||||||||||||||
 |
|||||||||||||||||||
 |
|||||||||||||||||||
¿Terminaste este patrón?Entonces, etiqueta tus fotos con #dropspattern #neverthelesscardigan o envíalas a la galería #dropsfan. ¿Necesitas ayuda con este patrón?Encontrarás 6 videos tutoriales, un espacio para comentarios/preguntas y más visitando la página del patrón en garnstudio.com © 1982-2026 DROPS Design A/S. Todos los derechos reservados. Este documento, incluyendo todas sus sub-secciones, está protegido por los derechos de autor (copyright). Lee más acerca de lo que puedes hacer con nuestros patrones en la parte de abajo de cada patrón de nuestro sitio. |
|||||||||||||||||||


Con más de 40 años en el diseño de modelos de punto y de ganchillo, DROPS Design ofrece una de las más vastas colecciones de patrones gratuitos en el internet - traducidos en 17 idiomas. Al día de hoy, contamos con 324 catálogos y 12290 patrones - de los cuales 11675 están traducidos en español.
Nosotros trabajamos con mucho esmero para brindarte lo mejor que las labores de punto y ganchillo tienen para ofrecer,inspiración y consejos, así como hilos de magnífica calidad a precios increíbles! Te gustaría usar nuestros patrones para otro fin además del uso personal? Puedes leer acerca de lo que estás permitida a hacer en el texto de Copyright en la parte de abajo de todos nuestros patrones. Felices labores!
Escribe un comentario sobre DROPS 153-10
¡Nos encantaría saber qué piensas acerca de este patrón!
Si quieres escribir una pregunta referente al patrón, por favor asegúrate de elegir la categoría correcta en el formulario debajo, para acelerar el proceso de respuesta. Los campos obligatorios están marcados con un *.