
Categorías populares
¿Buscas un hilo?


Comentarios / Preguntas (162)
![]() Yvonne Duckstein escribió:
Yvonne Duckstein escribió:
Hallo, das Häkeln des Reglan bedeutet nur das oberste Teil über der Brust? Man häkelt das Musterbild nur 1x ?! Und dann kommen in den letzten beiden Reihen die Zunahmen? Habe ich das so richtig verstanden? Danke und Beste Grüße Yvonne Duckstein
30.03.2026 - 14:32DROPS Design respondió:
Liebe Frau Duckstein, das Diagram A.z wird insgesamt 2 Mal in der Höhe gehäkelt. Die Zunahmen werden bei den 2 letzten Reihen vom 1. Rapport in der Höhe gehäkelt, dann bei den 2 letzten Reihen vom 2. Rapport in der Höhe (4 Reihen mit Zunahmen). Viel Spaß beim Häkeln!
07.04.2026 - 14:06
![]() Rebours escribió:
Rebours escribió:
Encolure beaucoup trop importante comment la diminuer Merci si vous avez une obtion0
19.12.2025 - 17:50
![]() Barre escribió:
Barre escribió:
Je me retrouve avec 12 A2
15.12.2025 - 17:50DROPS Design respondió:
Bonjour Mme Barre, vérifiez bien votre nombre de mailles et le décompte donné hier (on commence par A.1, on répète 10 fois A.2 et on termine par A.3, on aura ainsi 12 groupes de double-brides au total pour la manche. Bon crochet!
16.12.2025 - 08:57
![]() Barre escribió:
Barre escribió:
Sur les ms ont continu toujours en ms si non on a plus de 10 A1 MERCI
15.12.2025 - 17:27DROPS Design respondió:
Bonjour Mme Barre, en taille S/M vous avez sauté 40 m de l'empiècement pour la manche, vous allez crocheter ces 40 m dans le point fantaisie A.1-A.2-A.3 exactement comme avant + dans les 9 mailles crochetées sous la manche; si vous avez davantage de mailles, vous pouvez probablement ajuster en fonction de votre nombre; attention à ce que vous ayez suffisamment de mailles pour crocheter le point fantaisie. Bon crochet!
16.12.2025 - 08:56
![]() Barre escribió:
Barre escribió:
Je suis arrivée à la manche mais j'ai un problème j'ai mais 49 ms mais pourquoi après vous dites de continuer sur les 40 mailles sur les 9 mailles on fait quoi Merci
14.12.2025 - 19:40DROPS Design respondió:
Bonjour Mme Barre, on crochète le tout 1er rang des manches en mailles serrées: 1 ms dans la 1ère des 8 ml et 1 ms dans les 40 ms de l'empiècement = 49 ms. Crochetez ensuite: A.1 (= 6 m), répétez 10 fois A.2 (= 8 m x 10 = 40) et terminez par A.3 (= 3 m) = 6+40+3=49 m. Commencez les tours par 4 ml pour remplacer 1 double-bride / 1 ml pour remplacer 1 ms et terminez les tours par 1 mc dans la 4ème/la 1ère ml du début du tour. Bon crochet!
15.12.2025 - 15:17
![]() Barre escribió:
Barre escribió:
À la fin du 1er rang du dos quand on a crocheter les 60 mailles que fait on Merci
02.12.2025 - 18:59DROPS Design respondió:
Bonjour Mme Barre, lorsque vous divisez l'ouvrage, vous sautez les mailles des manches que vous remplacez par 8 mailles en l'air, et, au 2ème rang, vous crochetez les diagrammes comme avant en sautant les 8 mailles en l'air des emmanchures. Crochetez ainsi toutes les mailles comme avant: on va avoir ainsi, A.4, A.1 puis A.2 pour la fin du devant, tout le long du dos, au début de l'autre devant et on termine par A.4 et A.4 (vu sur l'endroit). Bon crochet!
03.12.2025 - 08:15
![]() Rebours escribió:
Rebours escribió:
Lorsque l'on a terminé le 1er A2il faut bien piquer dans 1maille il y a quelque chose qui m'échappe à ce moment la
12.11.2025 - 15:21DROPS Design respondió:
Bonjour Mem Rebours, à la fin du dernier A.2 (sur les 24 mailles), vous terminez A.2 par 3 ml, vous crochetez les 8 ml et vous sautez les mailles de la manche, puis vous reprenez A.2 dans le motif suivant (1 ml, vous sautez 1 ms, les double-brides, etc...). Quand vous crochèterez le rang suivant, crochetez les 5 double-brides dans l'arceau d'1 ml comme avant et tout le rang (donc rien dans les 8 mailles en l'air de chaque côté sous les manches. Bon crochet!
12.11.2025 - 16:52
![]() Rebours escribió:
Rebours escribió:
Lorsqu'on arrive à la 24 ème maille du devant l'on fait une maille serrée ou une double bride Merci
10.11.2025 - 11:59DROPS Design respondió:
Bonjour Mme Rebours, terminez le dernier A.2 en largeur par 3 mailles en l'air, sautez les 2 ms suivantes, puis crochetez 8 mailles en l'air, sautez les mailles indiquées pour la manche et commencez le A.2 du dos dans la maille suivante; au tour suivant, rappelez-vous que les 8 mailles en l'air ne seront pas crochetées. Bon crochet!
11.11.2025 - 15:59
![]() Barre escribió:
Barre escribió:
Excusez moi mais je ne comprend pas comment faire avec les 8 mailles en l'air
04.11.2025 - 08:31DROPS Design respondió:
Bonjour Mme Barre, lorsque vous crochetez le rang de division manches/dos et devants, vous les crochetez à la place des manches, et au rang suivant, vous sautez ces 8 mailles en l'air, vous ne les crochetez pas pour le bas du gilet, vous les crochèterez seulement quand vous ferez les manches. Bon crochet!
04.11.2025 - 17:12
![]() Barre escribió:
Barre escribió:
Les 8 mailles en l'air ne font pas 40 mailles
01.11.2025 - 19:35DROPS Design respondió:
Bonjour Mme Barre, les 8 mailles en l'air sont faites quand on saute les 40 mailles des manches, elles seront crochetées ensuite lorsque l'on termine les manches. Bon crochet!
03.11.2025 - 07:38
|
|||||||||||||||||||
Nevertheless#neverthelesscardigan |
|||||||||||||||||||
|
|
|||||||||||||||||||
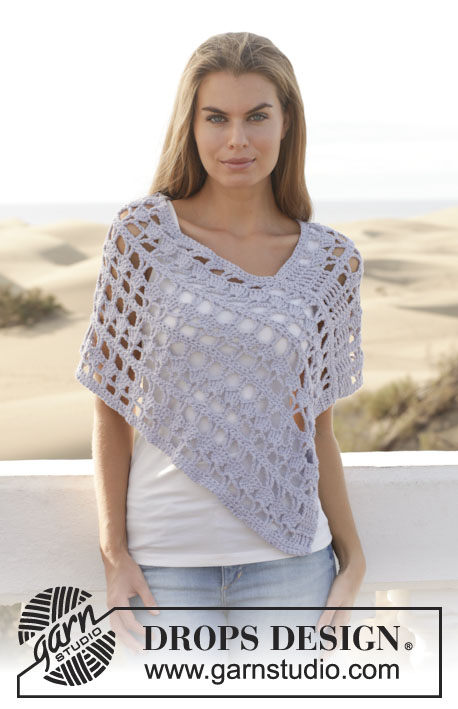
Chaqueta DROPS a ganchillo, en “Paris”. Talla: S – XXXL.
DROPS 153-10 |
|||||||||||||||||||
|
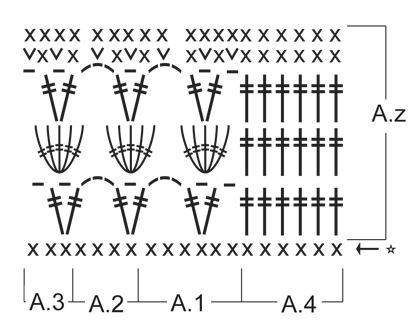
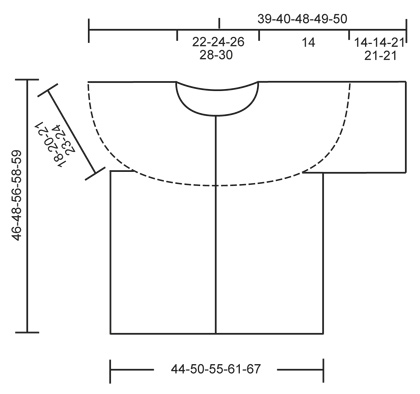
PATRÓN: Ver diagramas A.1 a A.4. INFORMACIÓN PARA LA ELABORACIÓN DEL TRABAJO: Sustituir el primer p.b. en cada hilera de p.b. con 1 cad. Sustituir el primer p.a.d. en cada hilera de p.a.d. con 4 cad. TIP PARA AUMENTO: Aum haciendo 2 p.b. en 1 p.b. ------------------------------------------------------ CHAQUETA: Trabajada de arriba para abajo, de ida y vuelta a partir del centro del frente. PECHERA: Mon 156-166-177-188-198 cad flojas (incl 1 cad para virar) en ag de ganchillo tamaño 5 mm con Paris. Hacer la 1ª hilera de la manera sig: Hacer 1 p.b. en la 2ª cad a partir de la ag, * 1 p.b. en cada una de las 3 cad sig, saltar 1 cad *, repetir de *a* y terminar con 1 p.b. en cada una de las últimas 2-4-3-2-4 cad = 117-125-133-141-149 p.b. (= la primera hilera del diagrama) – LEER INFORMACIÓN PARA LA ELABORACIÓN DEL TRABAJO. Continuar trabajando de la manera sig: A.4 (= borde), A.1, A.2 sobre los 96-104-112-120-128 p.b. sig (= 24-26-28-30-32 veces a lo ancho), terminar con A.3 y A.4 (= borde). Trabajar el diagrama A.z 1 vez verticalmente y, AL MISMO TIEMPO, en las últimas 2 hileras, aum 24-28-32-36-40 pts distribuidos equitativamente en cada una de las hileras (= 48-56-64-72-80 pts aum en total) – LEER TIP PARA AUMENTO arriba. NOTA: No aum sobre A.4 = 165-181-197-213-229 pts. Después trabajar el diagrama A.z 1 vez verticalmente (A.2 ahora es trabajado 36-40-44-48-52 veces a lo ancho) y, AL MISMO TIEMPO, en las últimas 2 hileras, aum 22-26-30-34-38 pts distribuidos equitativamente en cada una de las hileras (= 44-52-60-68-76 pts aum en total). NOTA: No aum sobre A.4 = 209-233-257-281-305 pts. CUERPO: AHORA MEDIR LA PIEZA A PARTIR DE AQUÍ! Continuar trabajando de la manera sig: A.4, A.1, A.2 sobre los 24-28-32-36-40 p.b. sig (= 6-7-8-9-10 veces a lo ancho) (pieza del frente), 8 cad (bajo la manga), saltar 40-44-48-52-56 p.b. de la hilera anterior (sisa, los pts serán usados para la manga más adelante), A.2 sobre los 60-68-76-84-92 p.b. sig (pieza de la espalda), 8 cad (bajo la manga), saltar 40-44-48-52-56 p.b. de la hilera anterior (sisa, los pts serán usados para la manga más adelante), A.2 sobre los 24-28-32-36-40 p.b. sig (pieza del frente) y terminar con A.3 y A.4. Continuar trabajando de la manera sig: Trabajar A.4, A.1, A.2 sobe los 24-28-32-36-40 p.b. sig (= 6-7-8-9-10 veces a lo ancho) (pieza del frente), saltar 8 cad (bajo la manga), A.2 sobre los 60-68-76-84-92 p.b. sig (pieza de la espalda), saltar 8 cad (bajo la manga), A.2 sobre los 24-28-32-36-40 p.b. sig (pieza del frente) y terminar con A.3 y A.4. Repetir A.z hasta que la pieza mida aprox 28-28-35-35-35 cm, terminar después de una repetición completa de A.z. Cortar y asegurar el hilo. La pieza mide aprox 46-48-56-58-59 cm a partir del hombro. MANGA: Trabajada en redondo. AHORA MEDIR LA PIEZA A PARTIR DE AQUÍ! Trabajada de arriba para abajo. Comenzar trabajando al centro bajo la manga de la manera sig: Hacer 2 p.b. en la primera cad (de las 8 cad), 1 p.b. en cada una de las 7 cad sig y 1 p.b. en cada uno de los 40-44-48-52-56 p.b. de la pechera = 49-53-57-61-65 p.b. Continuar trabajando de la manera sig: 4 cad, A.1, A.2 sobre los 40-44-48-52-56 pts sig (= 10-11-12-13-14 veces a lo ancho), terminar con A.3 y 1 p.bjs en la cuarta cad. Continuar de esta manera hasta que la pieza mida aprox 14-14-21-21-21 cm, terminar después de una repetición completa de A.z. Cortar y asegurar el hilo. ENSAMBLAJE: Hacer una orilla de p.b. alrededor del escote para obtener un bonito acabado de la manera sig: Hacer * 1 p.b. en cada una de las 3 cad sig, saltar 1 cad *, repetir de *a* y terminar con 1 p.b. en cada una de las últimas 4-6-5-4-6 cad = 118-126-134-142-150 p.b. Coser los botones en el borde izquierdo, separados aprox 7 cm uno del otro. |
|||||||||||||||||||
Explicaciones del diagrama |
|||||||||||||||||||
|
|||||||||||||||||||
 |
|||||||||||||||||||
 |
|||||||||||||||||||
¿Terminaste este patrón?Entonces, etiqueta tus fotos con #dropspattern #neverthelesscardigan o envíalas a la galería #dropsfan. ¿Necesitas ayuda con este patrón?Encontrarás 6 videos tutoriales, un espacio para comentarios/preguntas y más visitando la página del patrón en garnstudio.com © 1982-2026 DROPS Design A/S. Todos los derechos reservados. Este documento, incluyendo todas sus sub-secciones, está protegido por los derechos de autor (copyright). Lee más acerca de lo que puedes hacer con nuestros patrones en la parte de abajo de cada patrón de nuestro sitio. |
|||||||||||||||||||


Con más de 40 años en el diseño de modelos de punto y de ganchillo, DROPS Design ofrece una de las más vastas colecciones de patrones gratuitos en el internet - traducidos en 17 idiomas. Al día de hoy, contamos con 324 catálogos y 12290 patrones - de los cuales 11674 están traducidos en español.
Nosotros trabajamos con mucho esmero para brindarte lo mejor que las labores de punto y ganchillo tienen para ofrecer,inspiración y consejos, así como hilos de magnífica calidad a precios increíbles! Te gustaría usar nuestros patrones para otro fin además del uso personal? Puedes leer acerca de lo que estás permitida a hacer en el texto de Copyright en la parte de abajo de todos nuestros patrones. Felices labores!
Escribe un comentario sobre DROPS 153-10
¡Nos encantaría saber qué piensas acerca de este patrón!
Si quieres escribir una pregunta referente al patrón, por favor asegúrate de elegir la categoría correcta en el formulario debajo, para acelerar el proceso de respuesta. Los campos obligatorios están marcados con un *.