
Categorías populares
¿Buscas un hilo?


Comentarios / Preguntas (92)
![]() Jill escribió:
Jill escribió:
The pattern states to do 220 chains. Turn and start doing 3 sc's / skip 1 ch... Do I do a chain stitch between the 3 sc's? Or do I just skip a chain which would decrease total stitches in the row to 165 stitches? Thanks so much.
29.03.2014 - 23:16DROPS Design respondió:
Dear Jill, you will just skip 1 ch as stated, ie, you have more sts on foundation ch than on 1st row so that edge will not be too tight and dec to 165 sts (3rd size). Happy crocheting!
31.03.2014 - 09:15
![]() Mireille escribió:
Mireille escribió:
Ik snap A1- A3 niet in mijn ogen is dit gewoon allemaal vaste over de hele toer. Na A1-A2 120 vaste= 30 x de breedte begrijp ik ook niet s van. Wie kan mij dit uitleggen? Alvast bedankt.
14.03.2014 - 14:34DROPS Design respondió:
Hoi Mireille. Eerste rij van de teltekeningen A.1, A.2 en A.3 zijn inderdaad gewoon vasten (staat ook in het patroon: 1 v in elke v). Je haakt A.2 over de volgende 120 v = dit betekent dat je het patroon A.2 30 keer hebt herhaald in de breedte. Veel haakplezier.
14.03.2014 - 16:03
![]() Marianne Edlund escribió:
Marianne Edlund escribió:
Hej, jag får inte ihop mönstret! Vad menas med 30 ggr på bredden. Tacksam för förklaring. Hälsning
10.03.2014 - 14:50DROPS Design respondió:
Hei Marianne. Det betyder at du har gentaget mönster A.2 30 ganger i bredden (over de 120 fm).
11.03.2014 - 16:55
![]() Robin Blackburn escribió:
Robin Blackburn escribió:
Hi, I love this beautiful poncho (Atardecer design) and am anxious to crochet this! However, I was wondering if the chart/diagram instructions were available as written instructions as I have great difficulty in reading diagrams. I would be willing to purchase the written pattern. Please let me know and thank you for your help! Robin
08.03.2014 - 23:13DROPS Design respondió:
Dear Mrs Blackburn, each stitch is figured in diagram with 1 symbol. Follow each row step by step as it is in diagram. For any further assistance, please contact the store where you bought your yarn or any crochet forum. Happy crocheting!
10.03.2014 - 08:48
![]() Nita Sands escribió:
Nita Sands escribió:
Question- Is A.3 the last 9 stitches and A.1 and A.2 = 16 stitches?
08.03.2014 - 06:50DROPS Design respondió:
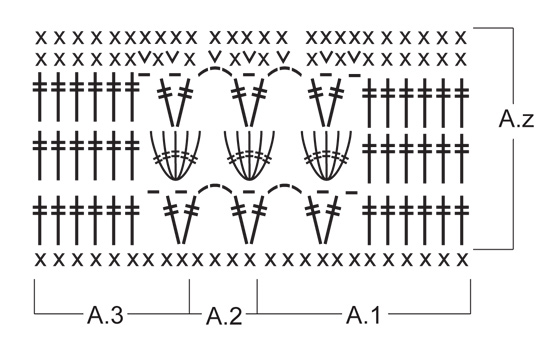
Dear Mrs Sands, A.1 is worked over the first 12 sts (seen from RS), A.2 is repeated over the next 4 sts, and A.3 is worked over the last 9 sts. Happy crocheting!
08.03.2014 - 10:31
![]() Nita Sands escribió:
Nita Sands escribió:
I would really like to make this. Is it possible to get written instructions? I don't understand diagrams that overlap. if not thank you anyway. All your things are so very very pretty.
08.03.2014 - 06:35
![]() Barbara Evans escribió:
Barbara Evans escribió:
Although I have only just started a sample of the pattern, I am fairly sure that the dividing marker on the chart between A2 & A3 is wrongly placed therefore A3 should only consist of six dc?
02.03.2014 - 21:24DROPS Design respondió:
Dear Mrs Evans, A.2 shows how to work over the middle sts, A.3 show how to finish the "V" sts before the 6 end sts. On 1st row in A.Z, repeat A.2 (= 4 sts) until 9 sts remain, then work A.3 over these last 9 sts. Happy crocheting!
03.03.2014 - 10:00
![]() Kerstin escribió:
Kerstin escribió:
Leider stimmt die Maschenprobe überhaupt nicht. Bei Doppelstäbchen komme ich auf höchstens 6R bei 10cm. Ändere ich die Nadelstärke, stimmt es bei der Anzahl der Stäbchen nicht mehr:-( mit einfachen Stäbchen würde es in etwa hinkommen...
26.02.2014 - 16:45DROPS Design respondió:
Liebe Kerstin, Sie haben Recht, wir haben dies zum Überprüfen an die Design-Abteilung zurückgegeben. Wichtig sind hier aber die D-Stb in der Breite und diese Angabe ist korrekt, die Masse in der Höhe sind in der Anleitung in cm angegeben, daran können Sie sich halten und gerne in der Zwischenzeit schon häkeln.
27.02.2014 - 09:05
![]() Rian Dirksen escribió:
Rian Dirksen escribió:
Houdt A2 echt op boven het 16e kruisje vanaf rechts en begin je dan weer met het 1e kruisje van rechts? Lijkt me niet erg logisch maar zo lijkt het op het telpatroon gezien het vericale streepje. En dan eindig je met 3 l. en begin je weer met de 6 dubbelstokje?
20.02.2014 - 01:12DROPS Design respondió:
Hoi Rian. Ja, dat klopt. Je herhaalt A.2 en dat betekent dat je wel eindigt met 3 l en dan weer begint met 1 dstk, 1 l, 1 dstk. Bij het overgaan naar A.3 past het ook bij elkaar. Veel haakplezier verder.
21.02.2014 - 10:44
![]() Dawn Curran escribió:
Dawn Curran escribió:
I just want to check what the correct tension is on this project. It says 14dtrx9rows with 5mm hook but even at 4mm I'm no where close yet normally my tension squares are correct. What have other people found?
19.02.2014 - 15:28DROPS Design respondió:
Dear Mrs Curran, most important is to get the 14 dtr = 10 cm, some crochet looser, some other tighter, so crochet hook size is just for your information, but has to be adapted to every tension. So that if you get correct tension with crochet hook size 4mm, just go ahead. Happy crocheting!
19.02.2014 - 16:34
|
||||||||||||||||
Atardecer#atardecer |
||||||||||||||||
|
|
||||||||||||||||
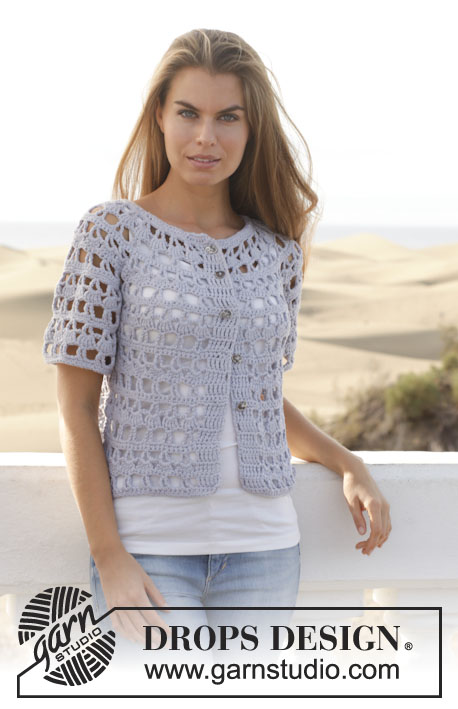
Poncho DROPS a ganchillo, en “Paris”. Talla: S – XXXL.
DROPS 153-11 |
||||||||||||||||
|
PATRÓN: Ver diagramas A.1 a A.3. INFORMACIÓN PARA LA ELABORACIÓN DEL TRABAJO: Sustituir el primer p.b. en cada hilera de p.b. con 1 cad. Sustituir el primer p.a.d. en cada hilera de p.a.d. con 4 cad. ------------------------------------------------------ PONCHO: Trabajado de ida y vuelta. Mon 188-199-220-231 cad flojas (incl 1 cad para virar) en ag de ganchillo tamaño 5 mm con Paris. Hacer 1 p.b. en la 2ª cad a partir de la ag, 1 p.b. en cada una de las 2 cad sig, saltar 1 cad, * hacer 1 p.b. en cada una de las 3 cad sig, saltar 1 cad *, repetir de *a* y terminar con 1 p.b. en cada una de las últimas 3-2-3-2 cad = 141-149-165-173 p.b. Hacer 1 p.b. en cada p.b. (= 1ª hilera de los diagramas A.1-A.3) – LEER INFORMACIÓN PARA LA ELABORACIÓN DEL TRABAJO! Continuar trabajando de la manera sig: A.1, A.2 sobre los 120-128-144-152 p.b. sig (= 30-32-36-38 veces a lo ancho), terminar con A.3. Repetir A.z en dirección hacia arriba hasta que la pieza mida aprox 30-30-38-38 cm, terminar después de una repetición completa de A.z. Cortar y asegurar el hilo. ENSAMBLAJE: Coser uno de los lados cortos, orilla con orilla, con el extremo de uno de los lados largos para evitar que se forme una costura abultada (el lado largo opuesto ahora forma una punta al centro del frente). |
||||||||||||||||
Explicaciones del diagrama |
||||||||||||||||
|
||||||||||||||||
 |
||||||||||||||||
¿Terminaste este patrón?Entonces, etiqueta tus fotos con #dropspattern #atardecer o envíalas a la galería #dropsfan. ¿Necesitas ayuda con este patrón?Encontrarás 6 videos tutoriales, un espacio para comentarios/preguntas y más visitando la página del patrón en garnstudio.com © 1982-2026 DROPS Design A/S. Todos los derechos reservados. Este documento, incluyendo todas sus sub-secciones, está protegido por los derechos de autor (copyright). Lee más acerca de lo que puedes hacer con nuestros patrones en la parte de abajo de cada patrón de nuestro sitio. |
||||||||||||||||


Con más de 40 años en el diseño de modelos de punto y de ganchillo, DROPS Design ofrece una de las más vastas colecciones de patrones gratuitos en el internet - traducidos en 17 idiomas. Al día de hoy, contamos con 324 catálogos y 12290 patrones - de los cuales 11675 están traducidos en español.
Nosotros trabajamos con mucho esmero para brindarte lo mejor que las labores de punto y ganchillo tienen para ofrecer,inspiración y consejos, así como hilos de magnífica calidad a precios increíbles! Te gustaría usar nuestros patrones para otro fin además del uso personal? Puedes leer acerca de lo que estás permitida a hacer en el texto de Copyright en la parte de abajo de todos nuestros patrones. Felices labores!
Escribe un comentario sobre DROPS 153-11
¡Nos encantaría saber qué piensas acerca de este patrón!
Si quieres escribir una pregunta referente al patrón, por favor asegúrate de elegir la categoría correcta en el formulario debajo, para acelerar el proceso de respuesta. Los campos obligatorios están marcados con un *.