
Categorías populares
¿Buscas un hilo?


Comentarios / Preguntas (11)
![]() DUVAL MT escribió:
DUVAL MT escribió:
Je ne comprends pas le sens des symboles utilisés dans les diagrammes, pouvez-vous m'aider svp ? Merci
26.09.2025 - 10:15DROPS Design respondió:
Bonjour Mme Duval, vous trouverez la légende des symboles juste au-dessus des diagrammes; pour M.1 et M.3 suivez bien les instructions des mailles en fonction du rang sur l'endroit ou sur l'envers. Les rangs sur l'envers dans M.2 se tricotent tous en mailles envers. Bon tricot!
26.09.2025 - 16:54
![]() Anja escribió:
Anja escribió:
Bei der Erklärung für die Krausrippe stimmt etwas nicht. Müsste es nicht heißen: 2 Reihen kraus rechts, also Hin- und Rückreihe rechts stricken. Was soll das mit den Nadeln bedeuten?
22.03.2025 - 18:06DROPS Design respondió:
Liebe Anja, ja stimmt, mit "Nadel" ist hier "Reihen" gemeint. Viel Spaß beim Stricken!
24.03.2025 - 10:09
![]() Patty Walk escribió:
Patty Walk escribió:
Could you please further explain the back section directions that read" Knit pattern 2 two times then knit pattern 3 once change back to larger needles and knit stockinette st to finished measurements." Is this all one row ? So part of the row has pattern and the rest is stockinette? The picture of the sweater doesn't look like that.
21.07.2024 - 14:17DROPS Design respondió:
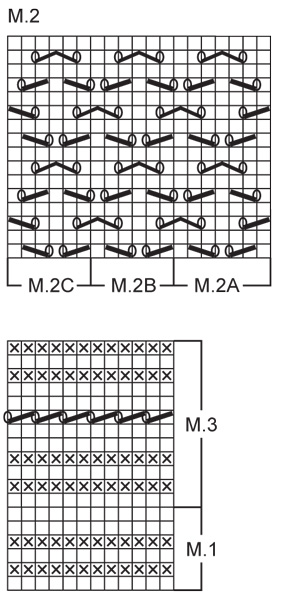
Dear Patty, previously you had: K 1 (edge st), Pattern 2A (7 sts), Pattern 2B over 72-78-90-96 sts, Pattern 2C (6 sts), K 1 (edge st). So continue working Pattern 2 upwards, with the second row of 2A, 2B and 2C, e.t.c. Work all Pattern 2 rows twice (so 16x2 = 32 rows in Pattern 2). Then work Pattern 3 over the Pattern 2 stitches (don't forget the edge stitch on each side). Work all 12 rows of Pattern 3. Now change to larger needles and continue working the rest of the garment in stocking stitch. To better understand our charts you can read the following lesson: https://www.garnstudio.com/lesson.php?id=68&cid=19. Happy knitting!
22.07.2024 - 01:59
![]() Ann Woodward escribió:
Ann Woodward escribió:
I am knitting the back: The pattern says Knit Pattern 2, two times. The directions say to bind off a designated number of stitches for the armhole at each side, every other row when the piece measures 34 cm.. I have reached 34 cm, but am still knitting Pattern 2 on the Diagram. How do I adjust and right side rows so that the Pattern 2 stays intact, if I am decreasing at each side? The pattern only called for one edge stitch. Your help would be greatly appreciated. Thank you.l
08.02.2023 - 08:50DROPS Design respondió:
Dear Mrs Woodward, if you have to decrease the stitches in diagram M.2A and M.2 C make sure to always have the correct number of stitches, ie for the lace pattern you should always have 1 stitch decreased for 1 yarn over, if you cannot work the decrease, then don't do the yarn over, if you cannot do the yarn over, then don't decrease, just work these stitches in stocking stitch, then continue lace pattern as before. Happy knitting!
08.02.2023 - 09:23
![]() Inger Johansson escribió:
Inger Johansson escribió:
Varför ska ska jag inte avmaska lika många maskor för ärmhålet på framstycket som på bakstycket?
07.10.2018 - 20:32DROPS Design respondió:
Hei Inger. Det felles litt ulikt i 2 av størrelsene for at masketallet skal gå opp - slik at det er like mange masker på forstykke og bakstykke når du feller av og monterer. God fornøyelse.
19.10.2018 - 10:26
![]() Evelinee escribió:
Evelinee escribió:
Leider bin ich als erfahrene Strickerin an der Musterschrift für dies Lochmuster gescheitert. Schon ab der 3. Reihe stellte sich heraus, dass es nicht aufgeht. Ich habe dann im Internet ein ähnliches Muster gefunden und dies verwendet und so ist die Jacke nun sehr schön geworden. Das Garn hat ein schönes Maschenbild, aber meine gewählte Farbe Korall ist greller als ich erwartet habe.
19.05.2016 - 18:53DROPS Design escribió:
We have updated the diagrams so that they are now larger. Happy knitting!
15.04.2015 - 10:29
![]() Dana escribió:
Dana escribió:
Ok so this is my second message. I have now realised why chuncks of the pattern are missing. They are in the tiny graphs at the bottom of the page, but why are they? How do we know which parts are pattern 1,2,or 3 and what do the other m's and numbers mean? Which are the back,sleeves and fronts?
13.04.2015 - 20:59DROPS Design respondió:
Dear Dana, "Pattern 1, 2, 3" in written pattern refer to the diagrams M.1, M.2 and M.3 - in M.2 start with M.2A over the first 7 sts, repeat the 6 sts in M2B and finish with the 6 sts in M2C. Happy knitting!
14.04.2015 - 10:28
![]() Dana escribió:
Dana escribió:
I would love to knit this but the way it has been written is hard to understand. Its as though whoever wrote it was talking to themselves rather than using the correct terms for a knitting pattern. I cant explain which parts do not make sense because every time I try to send this message I'm told its to long. Can you change it so that it is like UK patterns please?
13.04.2015 - 20:36
![]() DROPS Design escribió:
DROPS Design escribió:
The translations for the Diagrams for all Garnstudio patterns are included within the text of the Pattern itself. If you look you will find lines starting with an = sign. These are the translations, and they are given in the same vertical order as the chart symbols within the diagram.
06.03.2008 - 22:42
|
|||||||||||||||||||
English Miss |
|||||||||||||||||||
 |
 |
||||||||||||||||||
Cárdigan DROPS en “Muskat”.
DROPS 74-3 |
|||||||||||||||||||
|
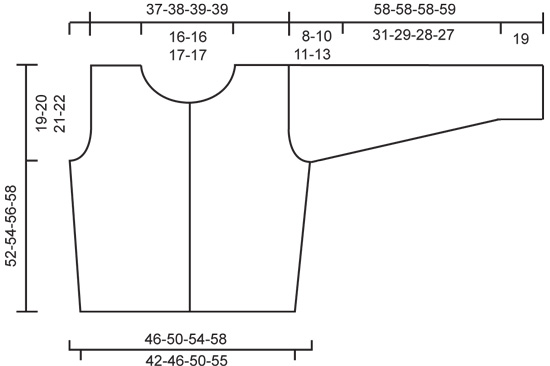
Muestra: 19 pts x 25 hileras = 10 x 10 cm con las ag tamaño 5 mm en pt jersey. Para obtener la misma muestra para M.2 y M.3, posiblemente necesites tejer con las ag tamaño 4.5 mm. Patrón: Ver diagramas. Los diagramas muestran los patrones vistos por el lado derecho. Pt musgo (de ida y vuelta): Tejer todas las hileras de derecho. Espalda: Montar 81-89-97-107 pts en ag tamaño 4.5 mm. Tejer 4 hileras en pt musgo, cambiar a ag tamaño 5 mm y a pt jersey. Cuando la pieza mida 8-8-9-10 cm, aumentar 1 pt de cada lado a cada 5-6-6-7 cm un total de 4-4-4-3 veces = 89-97-105-113 pts. Cuando la pieza mida 26-27-28-29 cm, tejer M.1 (= 6 hileras) – disminuyendo 2-4-0-2 pts distribuidos equitativamente en la última hilera = 87-93-105-111 pts. Cambiar a ag tamaño 4.5 mm y tejer la hilera siguiente de la manera siguiente: 1 d (pt de orillo), M.2A (= 7 pts), M.2B sobre 72-78-90-96 pts, M.2C (= 6 pts), 1 d (pt de orillo). Leer toda la sección siguiente antes de continuar: Tejer M.2 2 veces, después tejer M.3 1 vez, cambiar nuevamente a ag tamaño 5 mm y tejer en pt jersey hasta finalizar las medidas. Al mismo tiempo, cuando la pieza mida 33-34-35-36 cm, rematar para la sisa de cada lado de la pieza a cada 2 hileras: 4 pts 0-0-1-1 veces, 3 pts 1-1-1-1 vez, 2 pts 1-2-2-4 veces y 1 pt 3-3-4-3 veces = 71-73-75-75 pts – rematar en pt jersey en vez de seguir M.3. Cuando la pieza mida 50-52-54-56 cm, rematar los 29-29-31-31 pts centrales para el escote. En la hilera siguiente, disminuir 1 pt en cada orilla del escote = 20-21-21-21 pts restantes en cada hombro. Rematar cuando la pieza mida 52-54-56-58 cm. Frente izquierdo: Montar 45-50-53-58 pts en ag tamaño 4.5 mm. Tejer 4 hileras en pt musgo. Cambiar a ag tamaño 5 mm y a pt jersey, pero mantener los 4 pts de orillo al centro del frente en pt musgo todo el tiempo. Cuando la pieza mida 8-8-10-10 cm, aumentar 1 pt en el lado a cada 5-6-6-7 cm un total de 4-4-4-3 veces = 49-54-57-61 pts. Cuando la pieza mida 26-27-28-29 cm, tejer M.1 (= 6 hileras), disminuyendo 1-0-3-1 pts distribuidos equitativamente en la última hilera = 48-54-54-60 pts. Cambiar a ag tamaño 4.5 mm y tejer la hilera siguiente de la manera siguiente: 1 d (pt de orillo), M.2A (= 7 pts), M.2B sobre 30-36-36-42 pts, M.2C (= 6 pts), 4 d (pts de orillo en pt musgo). Leer toda la sección siguiente antes de continuar: Tejer M.2 2 veces, después tejer M.3 1 vez, cambiar nuevamente a ag tamaño 5 mm y tejer en pt jersey hasta finalizar las medidas. Al mismo tiempo, cuando la pieza mida 33-34-35-36 cm, rematar para la sisa en el lado a cada 2 hileras: 4 pts 0-1-1-1 vez, 3 pts 1-0-0-1 vez, 2 pts 1-3-2-4 veces y 1 pt 3-3-4-3 veces = 40-41-42-42 pts – rematar en pt jersey en vez de seguir M.3. Cuando la pieza mida 42-44-45-47 cm, rematar 10-10-11-11 pts en la orilla del centro del frente para el escote. Después, rematar en la orilla del escote a cada 2 hileras: 3 pts 1 vez, 2 pts 1 vez y 1 pt 5 veces = 20-21-21-21 pts restantes en cada hombro. Rematar cuando la pieza mida 52-54-56-58 cm. Frente derecho: Montar y tejer como se hizo para el frente izquierdo, pero en sentido inverso. Al mismo tiempo, hacer los ojales en los 4 pts de orillo en pt musgo (1 ojal = rematar el 3er pt a partir de la orilla y montar 1 nuevo pt en la hilera siguiente). El último ojal es hecho cuando ya solo faltan 2 hileras de pt musgo antes del escote. Hacer los ojales cuando la pieza mida: Talla S: 2, 10, 18, 26, 34 cm Talla M: 2, 11, 19, 28, 36 cm Talla L: 2, 11, 20, 29, 37 cm Talla XL: 2, 11, 20, 29, 38 cm Manga: Montar 39-45-45-51 pts en ag tamaño 4.5 mm. Tejer 4 hileras en pt musgo (hilera 1 = lado derecho), 2 hileras en pt jersey y, después, M.3 1 vez. Después de M.3, tejer la hilera siguiente de la manera siguiente: 1 d (pt de orillo), M.2A (= 7 pts), M.2B sobre 24-30-30-36 pts, M.2C (= 6 pts), 1 d (pt de orillo). Tejer M.2 2 veces, después cambiar a ag tamaño 5 mm, tejer M.1, después tejer en pt jersey hasta finalizar las medidas. Al mismo tiempo, cuando la pieza mida 19 cm, aumentar 1 pt de cada lado: Tallas S y M: alternativamente a cada 5ª y 6ª hilera.’ Tallas L y XL: alternativamente a cada 4ª y 5ª hilera un total de 14-13-15-14 veces = 67-71-75-79 pts. Cuando la manga mida 50-48-47-46 cm, rematar para el copete de la manga de cada lado de la pieza a cada 2 hileras: 4 pts 1 vez, 3 pts 1 vez, 2 pts 2-2-2-1 vez, 1 pt 2-6-7-10 veces, después rematar 2 pts de cada lado hasta que la pieza mida 57-57-57-58 cm y, después, rematar 3 pts 1 vez. La pieza mide aprox 58-58-58-59 cm. Rematar los pts restantes. Ensamblaje: Hacer la costura de los hombros. Borde del escote: Levantar aprox 80-90 pts alrededor del escote (incl. sobre los bordes delanteros) en ag tamaño 4.5 mm. Tejer 4 hileras en pt musgo (hacer el último ojal encima de los otros ojales en la 2ª hilera de pt musgo), rematar. Montar las mangas. Hacer la costura de las mangas y de los lados usando los pts de orillo como un margen de costura. Coser los botones. |
|||||||||||||||||||
Explicaciones del diagrama |
|||||||||||||||||||
|
|||||||||||||||||||
 |
|||||||||||||||||||
 |
|||||||||||||||||||
¿Terminaste este patrón?Entonces, etiqueta tus fotos con #dropspattern o envíalas a la galería #dropsfan. ¿Necesitas ayuda con este patrón?Encontrarás 22 videos tutoriales, un espacio para comentarios/preguntas y más visitando la página del patrón en garnstudio.com © 1982-2026 DROPS Design A/S. Todos los derechos reservados. Este documento, incluyendo todas sus sub-secciones, está protegido por los derechos de autor (copyright). Lee más acerca de lo que puedes hacer con nuestros patrones en la parte de abajo de cada patrón de nuestro sitio. |
|||||||||||||||||||


Con más de 40 años en el diseño de modelos de punto y de ganchillo, DROPS Design ofrece una de las más vastas colecciones de patrones gratuitos en el internet - traducidos en 17 idiomas. Al día de hoy, contamos con 324 catálogos y 12290 patrones - de los cuales 11673 están traducidos en español.
Nosotros trabajamos con mucho esmero para brindarte lo mejor que las labores de punto y ganchillo tienen para ofrecer,inspiración y consejos, así como hilos de magnífica calidad a precios increíbles! Te gustaría usar nuestros patrones para otro fin además del uso personal? Puedes leer acerca de lo que estás permitida a hacer en el texto de Copyright en la parte de abajo de todos nuestros patrones. Felices labores!
Escribe un comentario sobre DROPS 74-3
¡Nos encantaría saber qué piensas acerca de este patrón!
Si quieres escribir una pregunta referente al patrón, por favor asegúrate de elegir la categoría correcta en el formulario debajo, para acelerar el proceso de respuesta. Los campos obligatorios están marcados con un *.