
Categorías populares
¿Buscas un hilo?


Comentarios / Preguntas (101)
Renée escribió:
Please confirm this is correct for insert needle in st below section: On 9th (19th) row before working st on LH needle, insert RH needle from RS into st 3/6 rows down & pull through a loop of working yarn to required length from WS to RS. This loop will lie on RS stretching up to RH needle. K1. Then stick RH needle from RS through same stitch as you stuck it through previously & pull through another loop of yarn from WS to RS to required length. Is this what you mean?
29.11.2014 - 15:06Renée escribió:
The instructions for insert needle down in st 6/3 rows below. It states; yarn should be pulled from WS to a length of 2/1.5cms. However, it was explained lwr down in this chain: you get the yarn from the WS and pull the stitch from the RS (see post from 08.10.2014 kl. 17:06). But the pattern doesn't state that you pull from the RS. Also the pictures supplied look like the whole process is done from RS. I'm confused by the instructions provided. Please clarify in detail what is required here.
29.11.2014 - 11:41RHS escribió:
You missed the first part of my question in my previous post, here it is again below: I start the decreases when the entire piece measures 10cms: i.e. 10cms including the P2/K2 ribbing?
28.11.2014 - 11:59DROPS Design respondió:
Dear Mrs RHS and sorry for having missed this part of your question, you are correct, decreases start when piece measures 10 cm from the beg, ie including P2/K2 ribbing. Happy knitting!
28.11.2014 - 13:41RHS escribió:
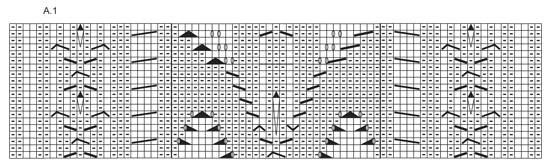
About the YOs in A1. It's not stated in the pattern, but I assume from looking at the finished garment that the YOs are used to create holes in the work and are not used as increases. Therefore, when I come to work the YOs on the following round, I just need to knit or purl them (depending on what the pattern states) as if they were normal stitches And NOT knit or purl into the back of the loop? Is this correct?
23.11.2014 - 13:43DROPS Design respondió:
Dear Mrs RHS, you are correct, the yos made in pattern are creating holes, just work them regular P or K as in pattern but not into back of the loop. Happy knitting!
24.11.2014 - 11:16RHS escribió:
Re: previous query regarding the decrease of 3 sts in A1. Just to be clear, I mean perform 3 separate instances of knit 2 tog or purl 2 together. And not knit or purl 3 stitches together.
12.11.2014 - 12:24DROPS Design respondió:
Yes that's correct, it may look better to rather K/P 2 tog than 3 tog. Happy knitting!
12.11.2014 - 14:31RHS escribió:
Pattern states: A1 over first 82 sts, at same time dec 3 sts =79sts. Just to clarify, over the course of diagram A1, I have to knit or purl 3 sts together?
12.11.2014 - 12:20DROPS Design respondió:
Dear Mrs RHS, you work the next 82 sts following A.1 and at the same time K/P 2 sts tog evenly a total of 3 times to match the 79 sts in diagram. Happy knitting!
12.11.2014 - 14:12RHS escribió:
The symbols for:slip 1 st on cable needle behind & in front of piece are a bit confusing as the arrows point in the wrong direction to behind & in front. I knitted the Drops cabled wrist warmers and in that pattern the symbols (arrows) for cable behind and cable front pointed in the opposite direction to the symbols in this pattern. Are the symbols incorrect?
11.11.2014 - 15:20DROPS Design respondió:
Dear Mrs RHS, symbols are correct: for 4th symbol (= / over 2 squares), slip 1 st behind piece and for 5th symbol (= \ over 2 squares), slip 1 st in front of piece. There may be some changes from a pattern to another, make sure you are working as stated under diagram text. Happy knitting!
11.11.2014 - 17:45
![]() Maria Stella Magrì escribió:
Maria Stella Magrì escribió:
Per questo modello, come scegliere la taglia, ho visto che per altri modelli già la M corrisponde ad una 48 italiana
10.11.2014 - 14:33DROPS Design respondió:
Buongiorno Maria Stella. La taglia 48 dovrebbe corrispondere ad una XL. Se ha già un capo analogo di cui è soddisfatta delle misure, confronti le misure del suo capo con quelle riportate nel grafico alla fine del modello, per scegliere la taglia corretta. Buon lavoro!
10.11.2014 - 16:28
![]() Fanny escribió:
Fanny escribió:
Det minskas inte i diagrammet: se den lilla ringen som kompenserar.
01.10.2014 - 08:51
![]() Ulrica Törning escribió:
Ulrica Törning escribió:
På första mönstervarvet står det att det ska minskas 3 maskor jämt fördelat. Från 82 till 79 maskor. Samtidigt är det inritat två minskningar i diagrammet. Då blr det ju 77 maskor??? Eller är de två inräknade i de tre ni nämner först?
01.10.2014 - 07:48
|
||||||||||||||||||||||||||||||||||||||||||||||||||||
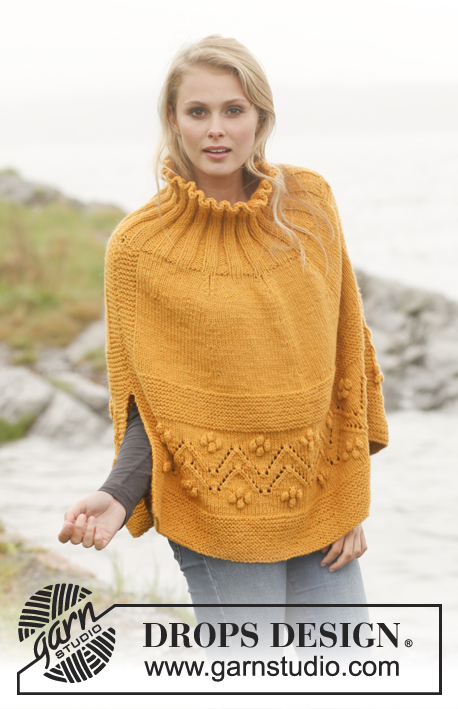
Frozen Ivy#frozenivyponcho |
||||||||||||||||||||||||||||||||||||||||||||||||||||
|
|
||||||||||||||||||||||||||||||||||||||||||||||||||||
Poncho de punto DROPS con torsadas y patrón de hojas, en “Karisma”. Talla: S – XXXL.
DROPS 151-2 |
||||||||||||||||||||||||||||||||||||||||||||||||||||
|
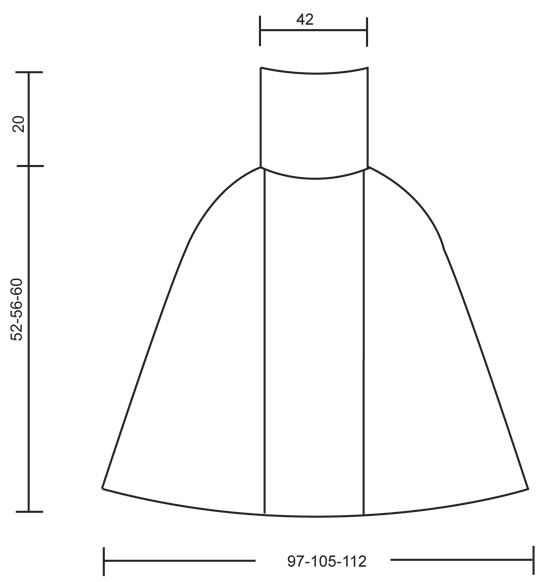
PATRÓN: Ver diagrama A.1. TIP PARA DISMINUCIÓN: Empezar 6 pts antes del marcapuntos y tejer de la manera sig: Tejer 2 pjd, 1d, 2r, 2d (el marcapuntos está situado en el centro de estos 2 pts), 2r, 1d, deslizar 1 pt de derecho, 1d, pasar el pt desl por encima. ------------------------------------------------------ PONCHO: Mon 408-440-472 pts en ag circular tamaño 3.5 mm con Karisma. Tejer en resorte = 2r/2d por 8 cm. Cambiar a ag circular tamaño 4 mm. Después tejer de la manera sig: A.1 sobre los primeros 82 pts y, AL MISMO TIEMPO, dism 3 pts distribuidos equitativamente sobre estos pts (= 79 pts), * pt jersey sobre los 26-30-34 pts sig, continuar con 2r, 2d, 2r sobre los 6 pts sig (estos pts están directamente sobre 2r, 2d, 2r del resorte) *, repetir de *a* 2 veces más, pt jersey sobre los 26-30-34 pts sig, A.1 sobre los 82 pts sig y, AL MISMO TIEMPO, dism 3 pts distribuidos equitativamente sobre estos pts (= 79 pts), * pt jersey sobre los 26-30-34 pts sig, continuar con 2r, 2d, 2r sobre los 6 pts sig (estos pts están directamente sobre 2r, 2d, 2r del resorte) *, repetir de *a* 2 veces más, pt jersey sobre los 26-30-34 pts sig = 402-434-466 pts. Insertar 4 marcapuntos en la pieza de la manera sig: Insertar el primer marcapuntos después de 108-112-116 pts (entre 2 pts derechos en el primer resorte), el segundo marcapuntos después de 172-184-196 pts (entre 2 pts derechos en el tercer resorte), el tercer marcapuntos después de 309-329-349 pts (entre 2 pts derechos en el cuarto resorte), y el cuarto marcapuntos después de 373-401-429 pts (entre 2 pts derechos en el sexto resorte). Continuar este patrón y, AL MISMO TIEMPO, cuando la pieza mida 10 cm, dism 1 pt en cada lado de los marcapuntos – LEER TIP PARA DISMINUCIÓN. Repetir las dism a cada 2 cm 19-19-19 veces, después a cada 5-9-13 veces (24-28-32 dism en total) = 210 pts restantes en la ag en todas las tallas. La pieza mide aprox 52-56-60 cm. Cambiar a ag circular tamaño 3.5 mm. Tejer 1 vta de derecho y, AL MISMO TIEMPO, dism 42 pts distribuidos equitativamente = 168 pts. Tejer 1 vta de revés. Tejer en resorte = 2d/2r por 20 cm. Rem los pts con derecho sobre derecho y revés sobre revés. |
||||||||||||||||||||||||||||||||||||||||||||||||||||
Explicaciones del diagrama |
||||||||||||||||||||||||||||||||||||||||||||||||||||
|
||||||||||||||||||||||||||||||||||||||||||||||||||||
 |
||||||||||||||||||||||||||||||||||||||||||||||||||||
 |
||||||||||||||||||||||||||||||||||||||||||||||||||||
¿Terminaste este patrón?Entonces, etiqueta tus fotos con #dropspattern #frozenivyponcho o envíalas a la galería #dropsfan. ¿Necesitas ayuda con este patrón?Encontrarás 15 videos tutoriales, un espacio para comentarios/preguntas y más visitando la página del patrón en garnstudio.com © 1982-2026 DROPS Design A/S. Todos los derechos reservados. Este documento, incluyendo todas sus sub-secciones, está protegido por los derechos de autor (copyright). Lee más acerca de lo que puedes hacer con nuestros patrones en la parte de abajo de cada patrón de nuestro sitio. |
||||||||||||||||||||||||||||||||||||||||||||||||||||


Con más de 40 años en el diseño de modelos de punto y de ganchillo, DROPS Design ofrece una de las más vastas colecciones de patrones gratuitos en el internet - traducidos en 17 idiomas. Al día de hoy, contamos con 324 catálogos y 12290 patrones - de los cuales 11685 están traducidos en español.
Nosotros trabajamos con mucho esmero para brindarte lo mejor que las labores de punto y ganchillo tienen para ofrecer,inspiración y consejos, así como hilos de magnífica calidad a precios increíbles! Te gustaría usar nuestros patrones para otro fin además del uso personal? Puedes leer acerca de lo que estás permitida a hacer en el texto de Copyright en la parte de abajo de todos nuestros patrones. Felices labores!
Escribe un comentario sobre DROPS 151-2
¡Nos encantaría saber qué piensas acerca de este patrón!
Si quieres escribir una pregunta referente al patrón, por favor asegúrate de elegir la categoría correcta en el formulario debajo, para acelerar el proceso de respuesta. Los campos obligatorios están marcados con un *.